Integrating Siri with Notion to send Voice Notes to Notion directly from your phone unlocks a new superpower for your workspace. Notion is an awesome tool for knowledge management, but using it on mobile isn’t the most pleasant experience so far. It’s a bit slow to load and while the app has improved a lot, it still doesn’t feel frictionless. How cool would it be if instead of going through that, you could simply ask Siri to add a Note to Notion for you? Well, with this method, you can! In this article, I’ll show you step-by-step how you can create a custom Siri Shortcut to quickly add Voice Notes to Notion.
Read on for the full tutorial or jump to the bottom of this article to download the free done-for-you Notion template.
The Basic Automation to send Voice Notes to Notion
Step 1: Create Your Notion Backend
Open your Notion workspace and create a simple table with the following properties:
- Name – the main property of your database
- Note – a text property to store the actual voice note
If you already have a database to store your notes, feel free to use that one instead. Just make sure that you have a text property to store the actual note.
Step 2: Unlock Access to the Notion API
To access your Notion workspace via Apple Shortcuts, you need to unlock your Notion API. Luckily, this is pretty easy to do.
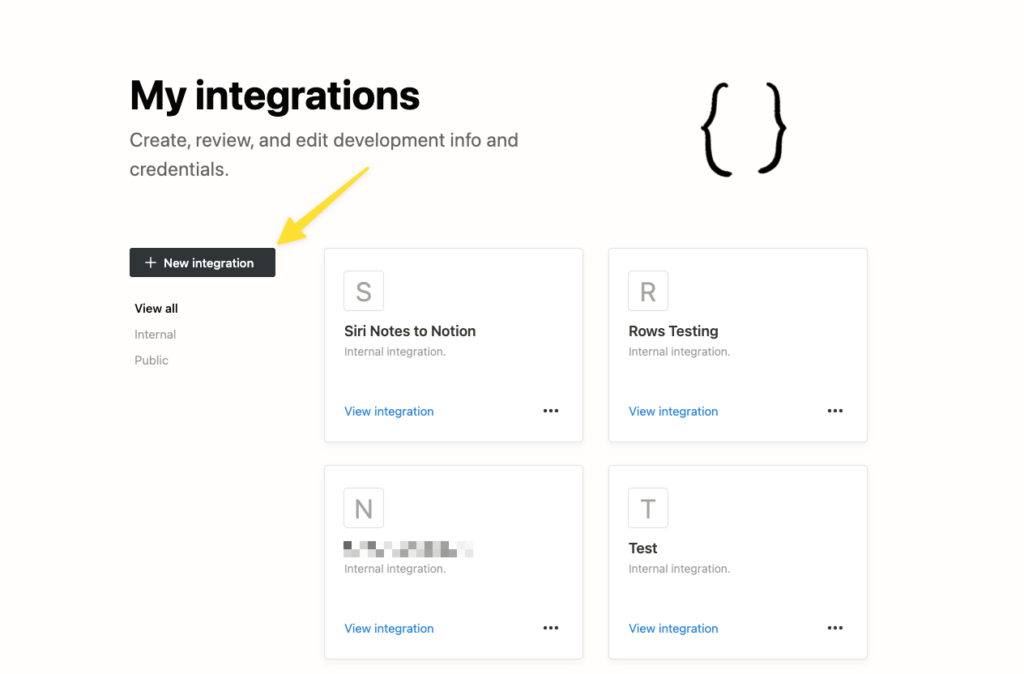
Simply head over to https://www.notion.so/my-integrations/ and click on the big New Integration button.
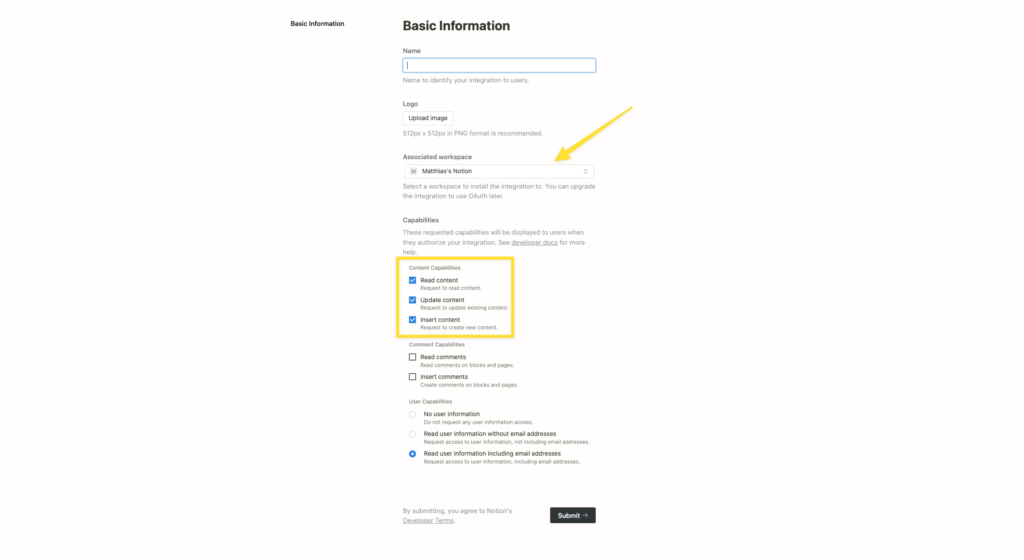
Then, fill out the details of your integration. The only thing that really matters is choosing the right workspace (i.e. the Notion account for which you want to set up Voice Notes to Notion) and confirming the access rights.
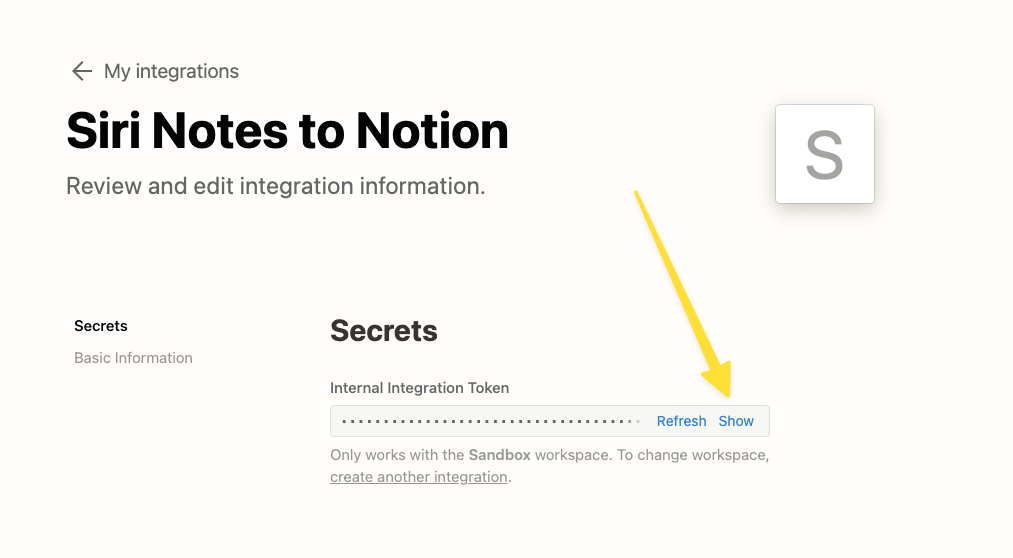
Once you click on Submit, you’ll see a hidden Secrets field at the top. Click on Show to reveal your API key and then copy it. This key enables any integration to access your Notion workspace, so make sure to not share it publicly.
Learning to access the Notion API will unlock tons of cool use cases besides this Voice Notes to Notion Shortcut. Here are just a few examples:
- Never take meeting notes again thanks to AI powered Meeting Notes in Notion
- Get Email Summaries plus extract all tasks to Notion Database
- Turn Your Notion into an AI Image Generator
Step 3: Create Shortcut and Add Your Voice Note
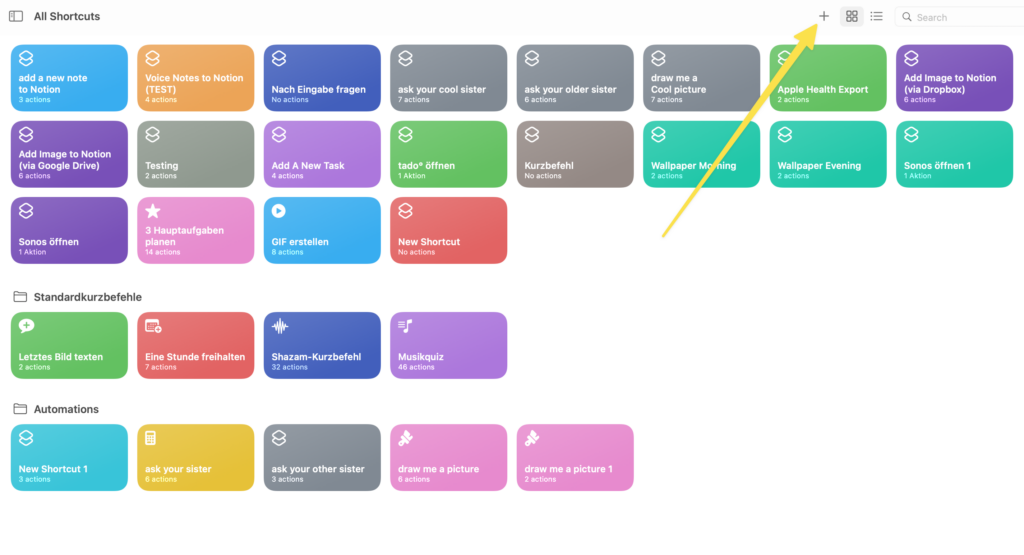
Now for the fun part: building the shortcut that will add your Voice Notes to Notion. Open the Shortcut App and click on the plus icon in the top right corner to create a new shortcut.
Tip: it’s easiest to build a shortcut on your mac. If you don’t have a mac, you can follow the same steps on your iPhone or iPad, but it will be a little bit clunkier.
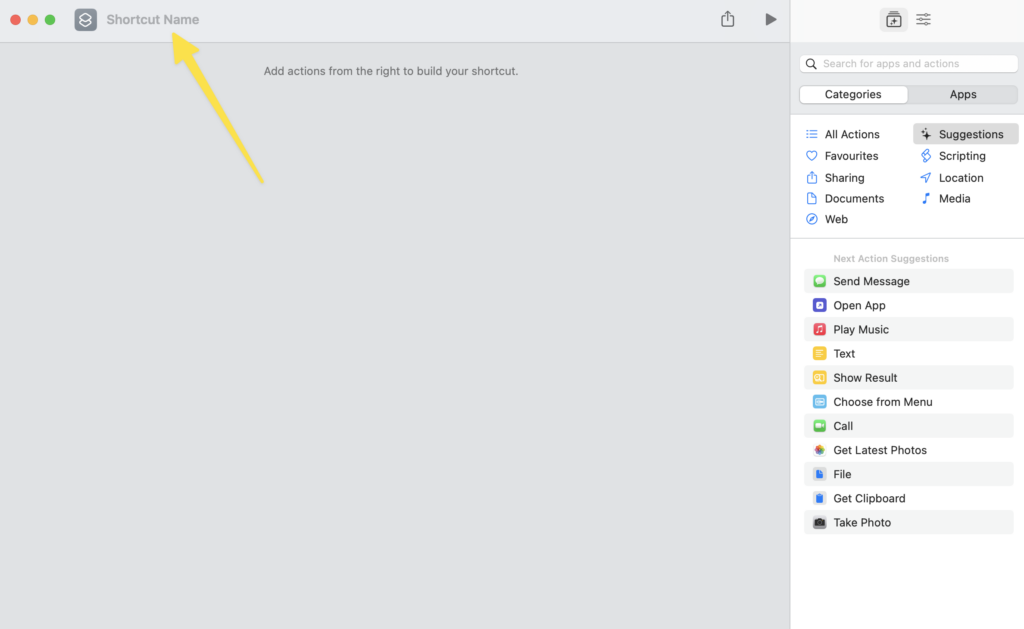
Start by naming your shortcut in the top left corner. This name isn’t just for organisational purposes – it’s the actual trigger for Siri. If you say “Hey Siri” followed by whatever shortcut name you gave, it will start the automation.
A good name would be “add a voice note to Notion”, so that you can use the full command “Hey Siri, add a voice note to Notion” to trigger this process.
Tip: You don’t need to start the shortcut with Siri, but it’s pretty cool. Towards the end of the automation, I’ll show you how to add the shortcut like an app to your homescreen.
Time to build the actual shortcut. First off, you need to collect the information about your note. In our example, that’s the name of the note and the actual note itself.
You can add more properties to your database and collect more fields in the shortcut, but for this simple example, let’s start with two. Check out the section about adding additional properties to your Voice Notes to Notion to learn how to expand on this.
To do so, click into the search field on the right side and search for Ask for input.
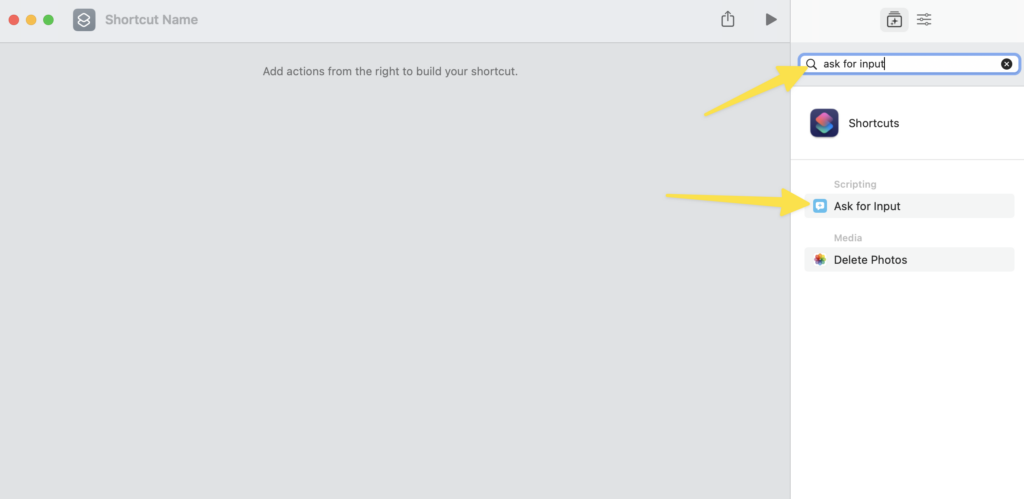
Then, drag the Ask for input option into your main area.
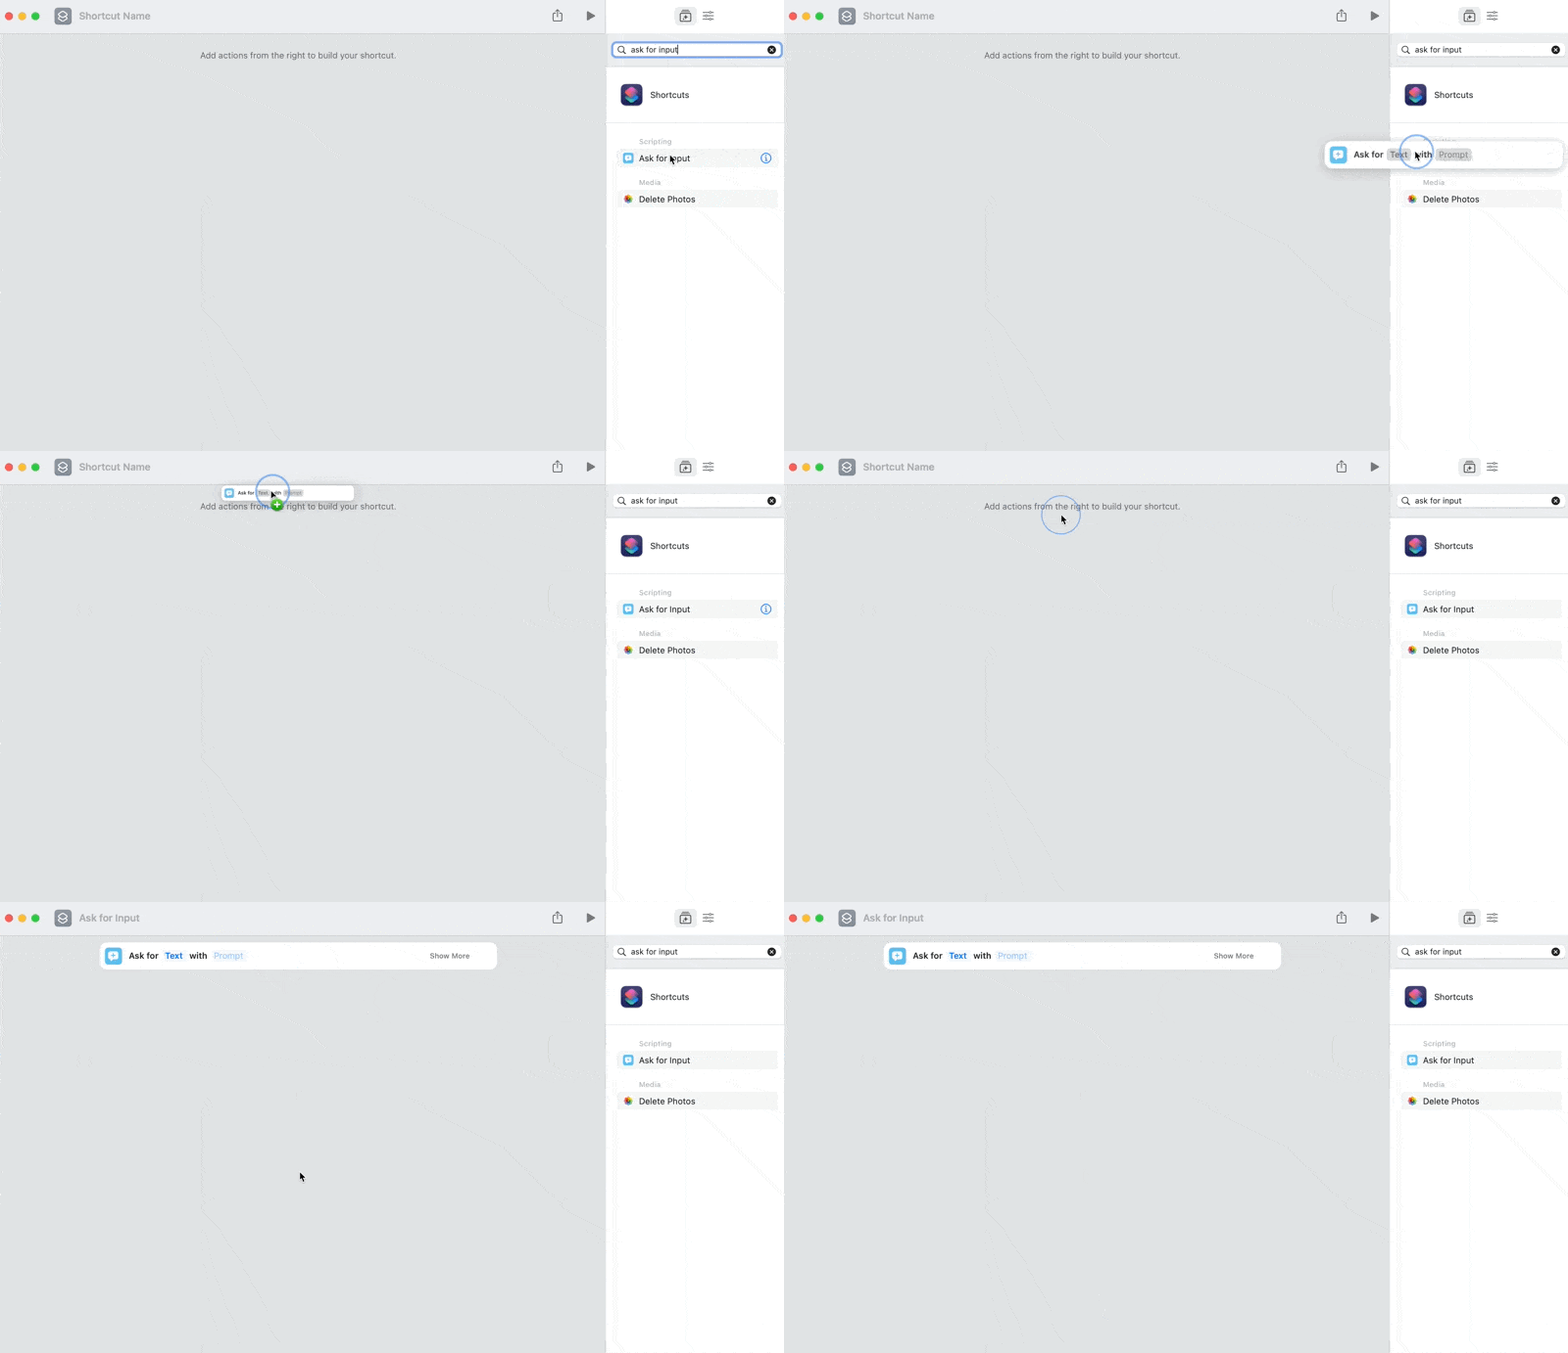
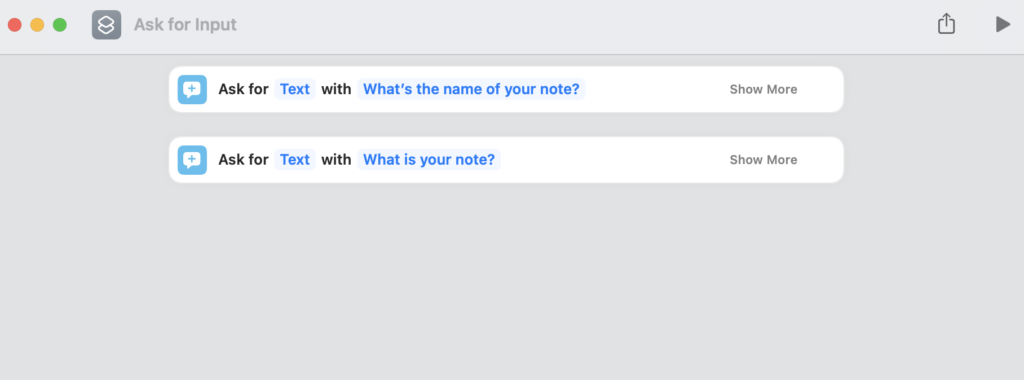
To specify what exactly Siri is going to ask, click into the prompt field and write out a question that corresponds to the input. In this case, you’re asking for the name of the note, so something like “What’s the name of your note?” makes sense.
Then, repeat the steps to add a second Ask for input field below. This will record the actual note, so give it a name like “What is your note?”.
Step 4: Send your Voice Notes to Notion
Now that you’ve collected your inputs, it’s time to send your voice notes to Notion. Unfortunately, Apple Shortcuts don’t have a direct integration with Notion yet, but we can use a generic API request to send our data.
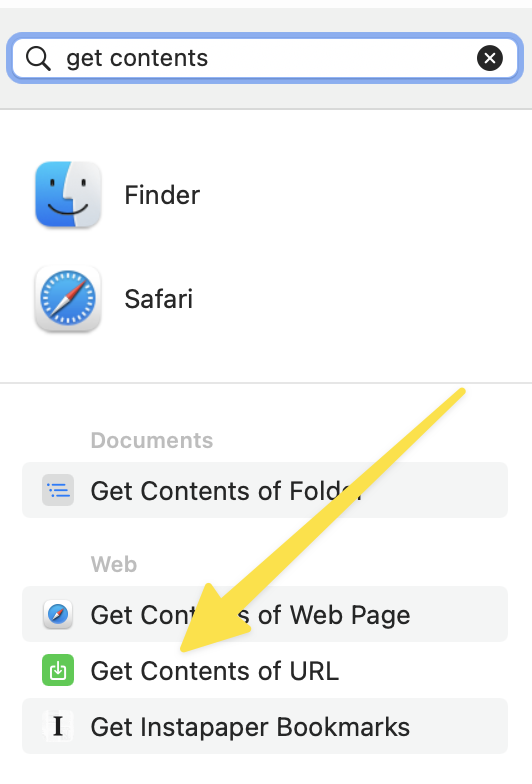
To do so, search for get contents from URL and drag the module below the previous two steps into your building area.
By default, it will fill Provided Input as the URL, which is obviously wrong – that’s our note, not the URL to send the request to. Click into the field and remove the variable.
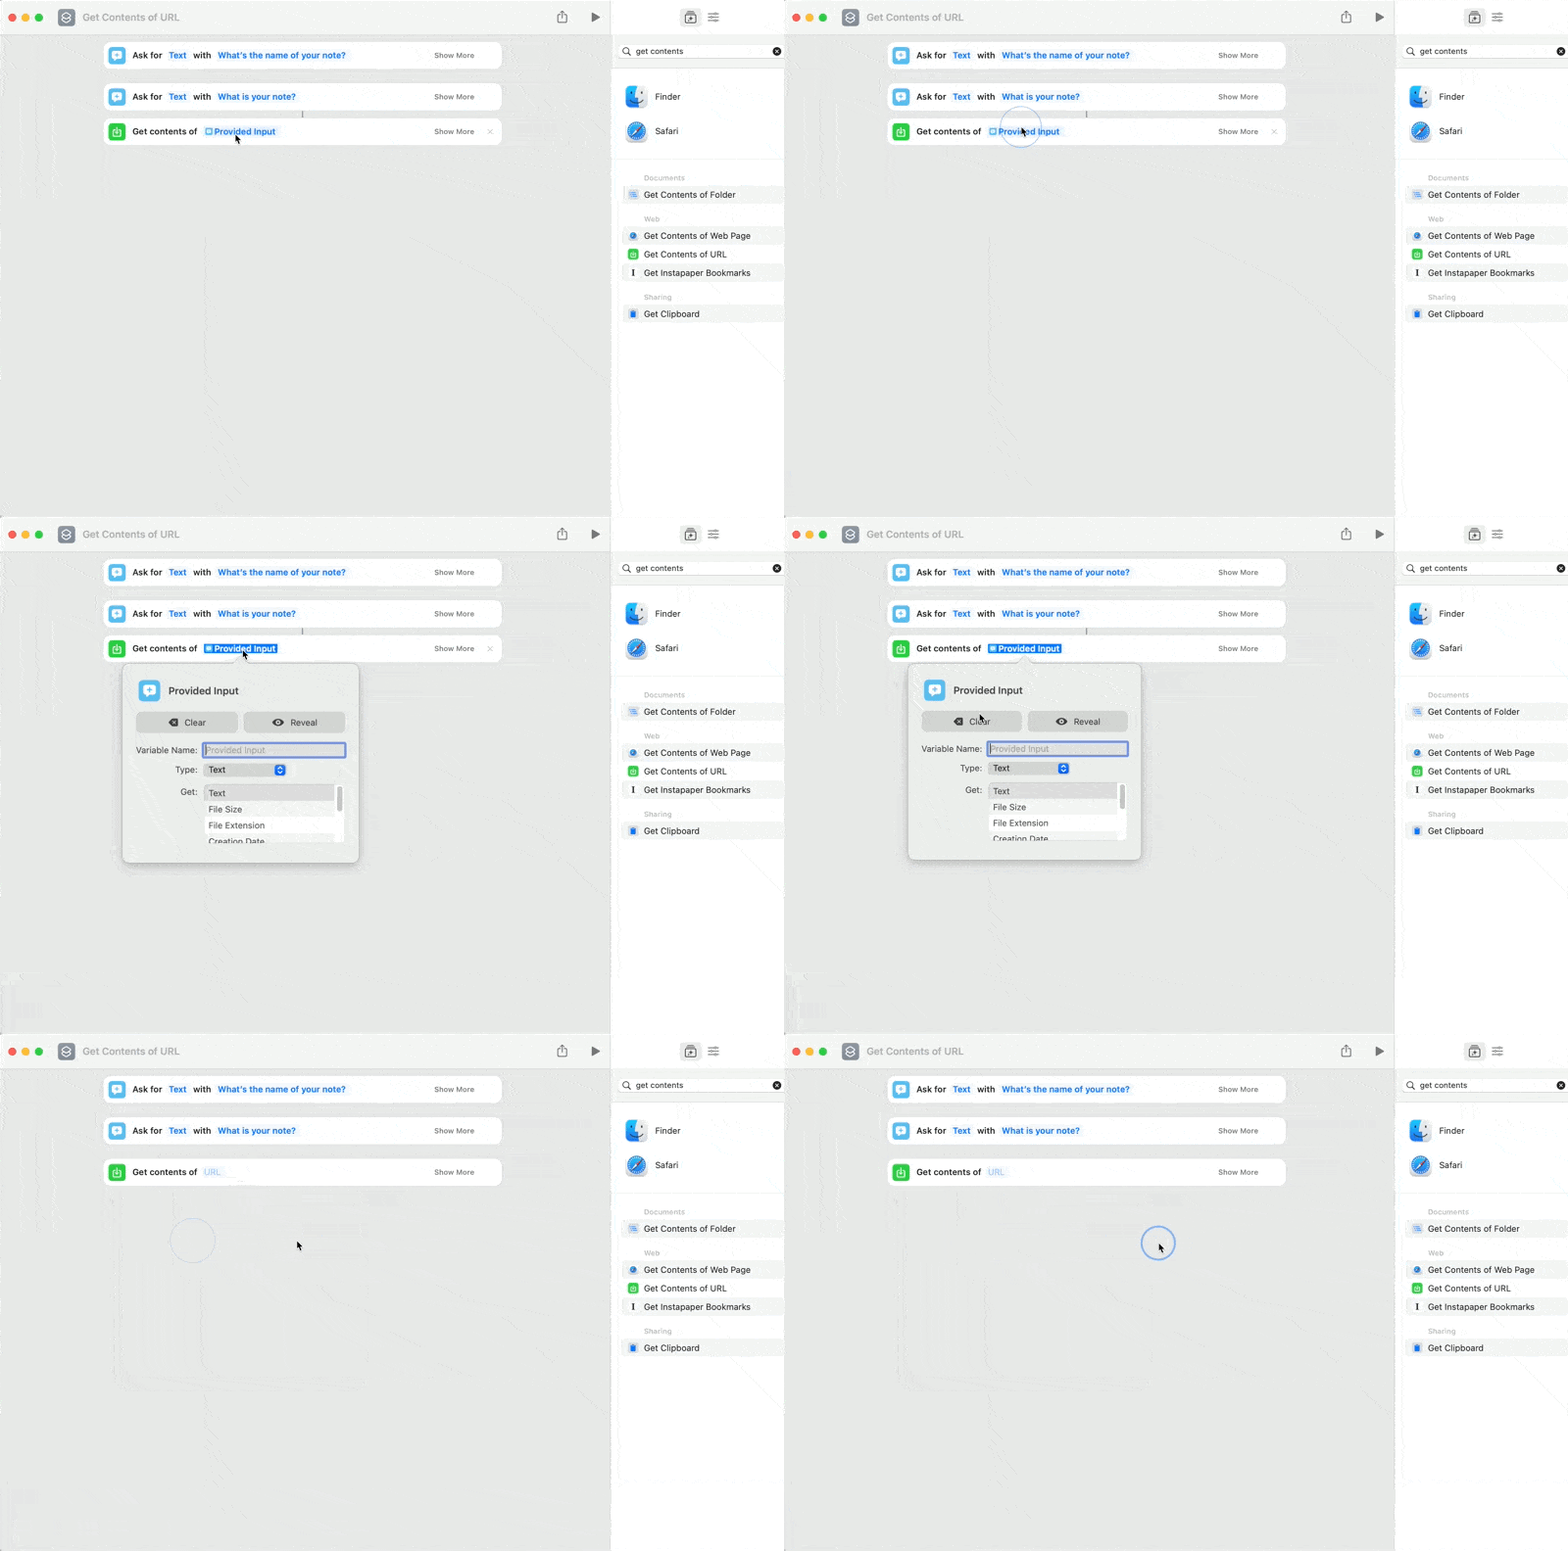
Then, paste in the following url:
https://api.notion.com/v1/pages
Now click on the light grey Show More button on the right side of the module to expand the options. Time to set up the API call!
First off, change the Method from Get to Post. Then, click on the toggle next to Headers to expand the options.
The Headers of your API call sort of set the tone. In here, you authorise yourself to Notion (”I am allowed to access your API”) and tell them everything they need to handle your request.
To get started, click on the + icon below the Headers options to add your first header.
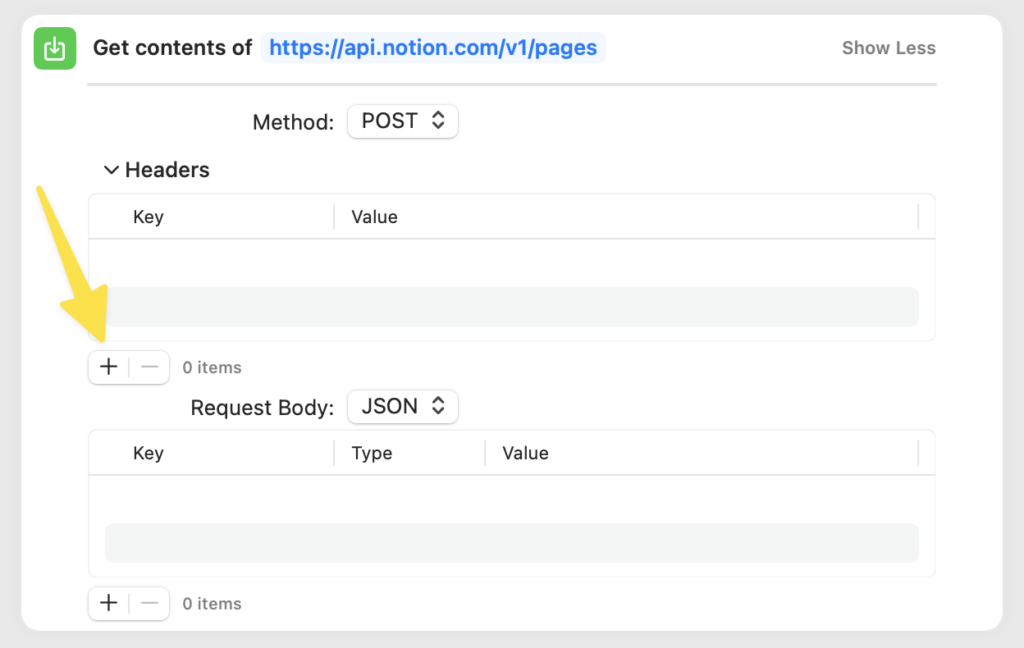
Each header consists of a key and a value. For this API call, you’ll need to provide two such “Key-Value-Pairs”.
In the first header, type Authorization into the Key field. In the Value field, type Bearer (with a capital B), then a space and then paste your Notion API key (the one you got in Step 2 of this tutorial).
Then, add a second Header. Here, the key should be Notion-Version (again, both words capitalised) and the value should be 2022-06-28.
- Key: Authorization I Value: Bearer YOUR-API-KEY
- Key: Notion-Version I Value: 2022-06-28
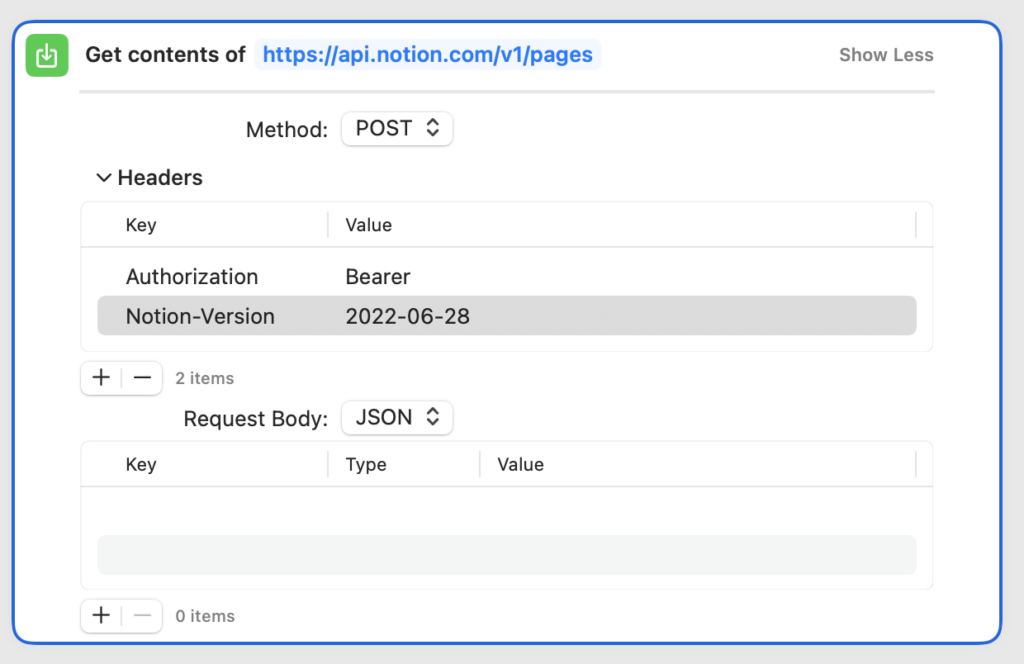
That’s it for the headers, time to move on to the actual part of your request: the request body.
Here, you’ll follow a similar process, just that this time, there’s also a third field: the type field.
The setup for this section can feel a bit complicated due to the way Notion has structured their API, but don’t worry. I’ll explain everything step-by-step and if it’s too much, you can always download the free Notion template below to get your voice notes into Notion.
Click on the + icon below the request body to add your first entry. The key should be parent (this time not capitalised) and the type Dictionary. Then, open the toggle before clicking the + icon again. This should create a nested item. Close the parent toggle again to double-check that you indeed created a nested item.
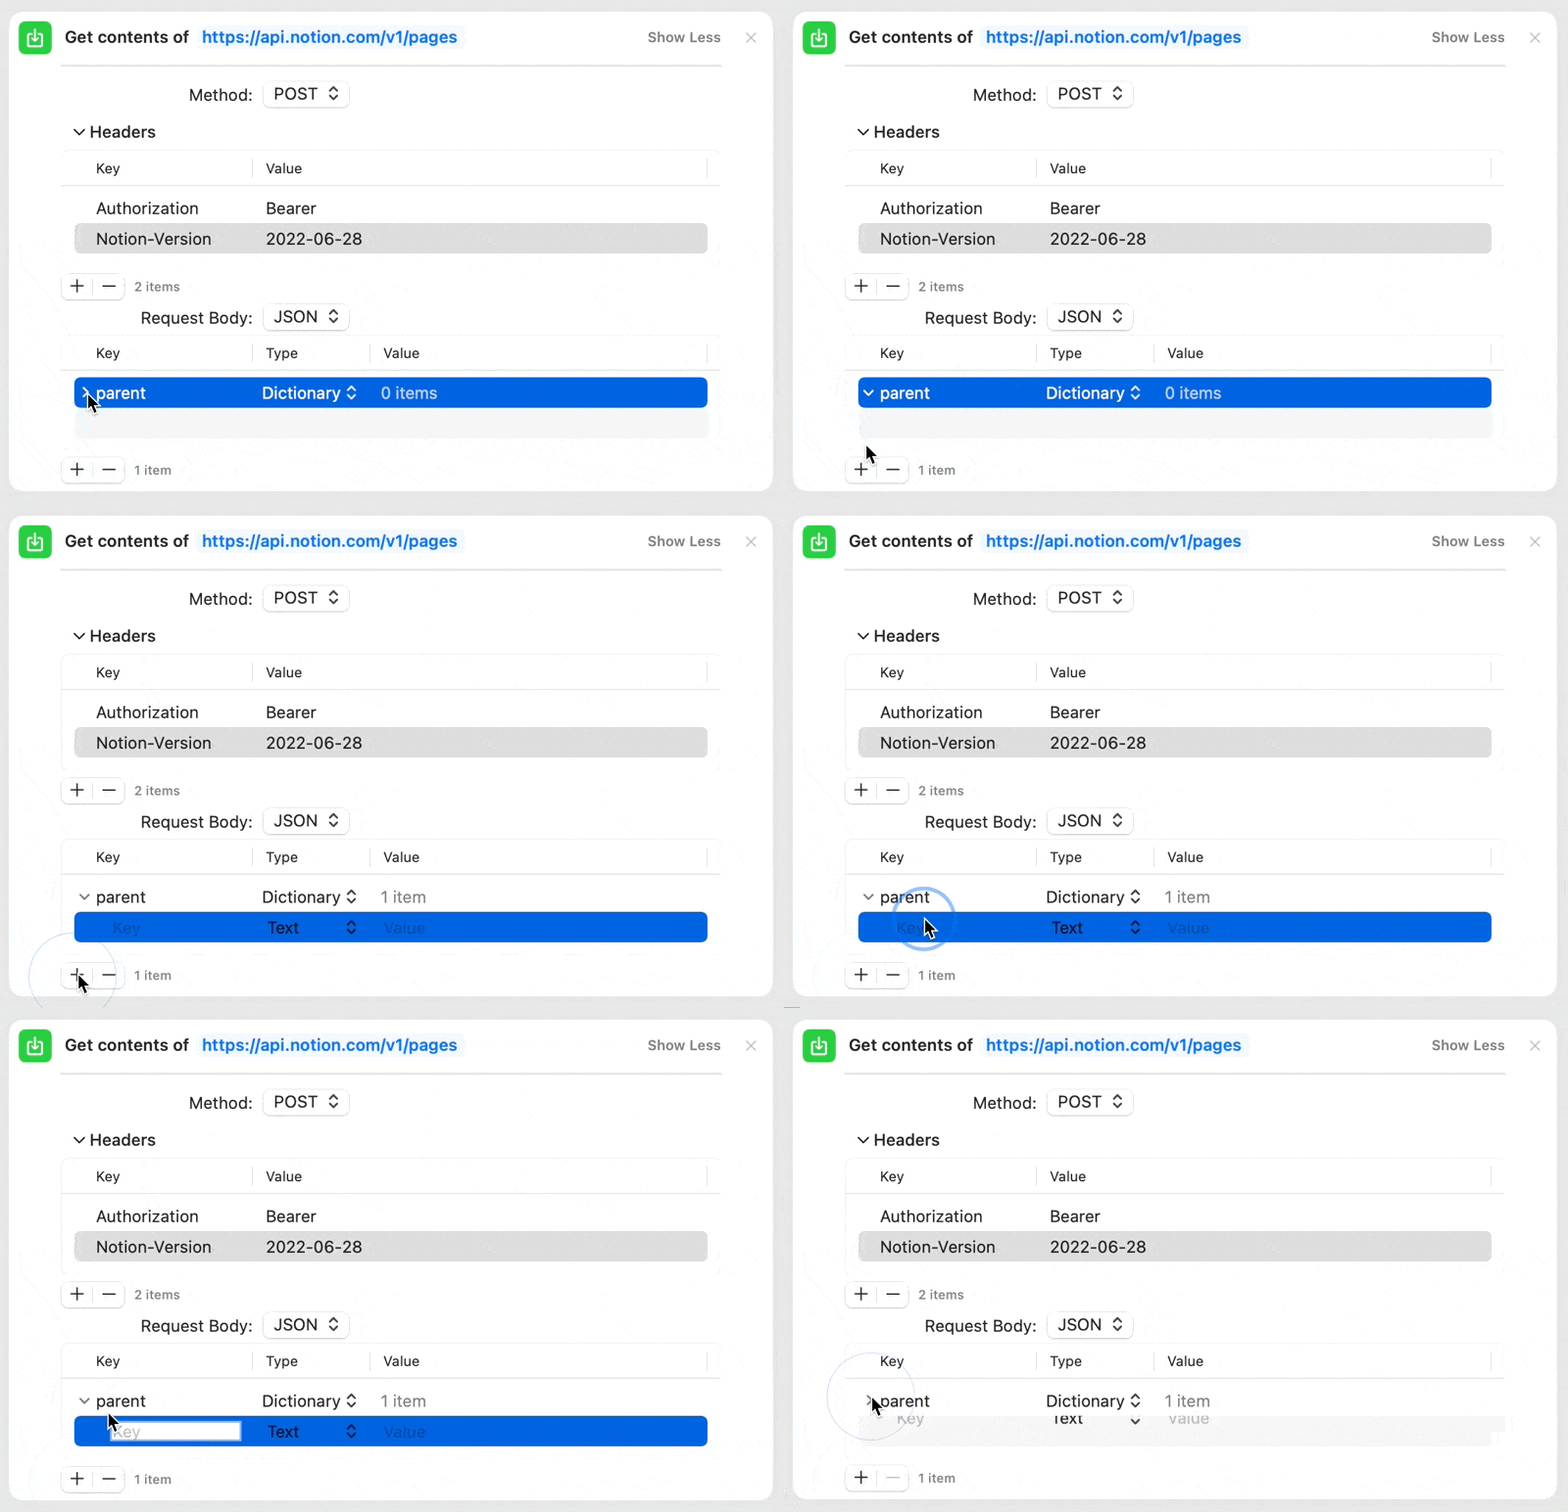
In this nested entry, add database_id as the key, text as the value and then the id of the Notion database created in Step 1 as the value.
To find your Database ID, open the database as a full page and copy the link to it by pressing cmd + L on mac or cntrl+ L on windows. Then, paste it into your browser and highlight the part after your workspace name until the ? symbol (excluding both the / after your workspace name and the ?).

Now onto the more complicated part. If you get stuck here, don’t worry. You can always download the free Notion template at the bottom of this page to get the setup done-for-you.
- Create another main level entry (so not nested below parent) and name it properties. It should be a dictionary.
- Inside, create a nested property Name (matching exactly the spelling of your main property in the Notion database) with the type dictionary.
- Insite Name, nest an entry called title (not capitalised) with the type array
- Inside title, nest another entry. You cannot name this one (it should simply read “Item 1”). Turn it into a dictionary.
- Inside Item 1, nest another entry called text. It’s a dictionary as well
- And finally, inside text, nest an item called content. This one should be the text type and it’s the last one!
Click into the value field of the content item and right-click to select Insert Variable. Then, select the input from the first text prompt.
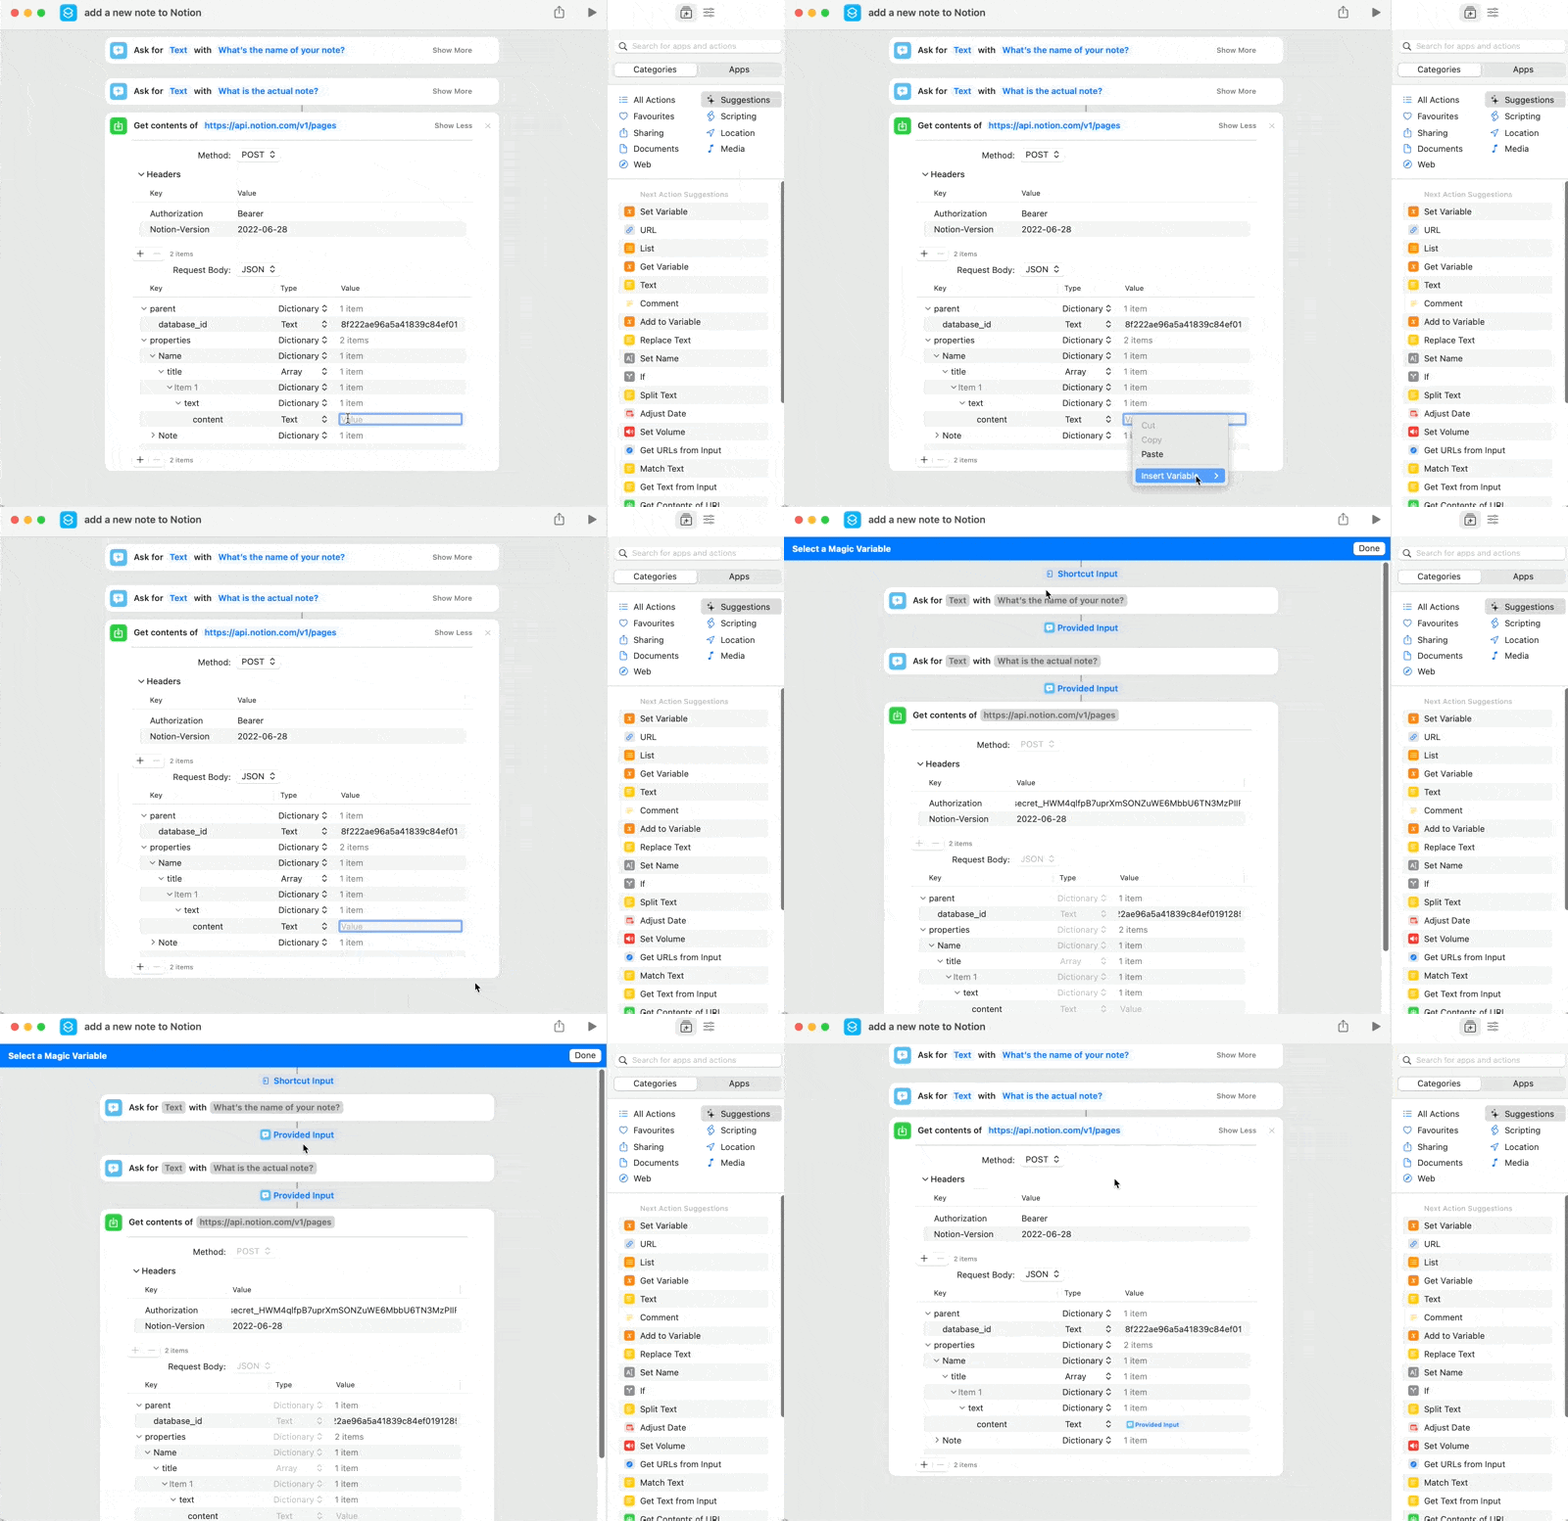
Now it’s time to repeat the same steps for the actual note property.
It’s important to know that not all properties in your Notion Database require this sort of nested setup. I’ll provide some more examples in the next section, but for now, just remember that this crazy nested setup is required for the main title property and for all text properties.
- Inside properties, create a nested property Note (matching exactly the spelling of your Note property in the Notion database) with the type dictionary.
- Insite Note, nest an entry called rich_text (not capitalised) with the type array
- Inside rich-text, nest another entry. You cannot name this one (it should simply read “Item 1”). Turn it into a dictionary.
- Inside Item 1, nest another entry called text. It’s a dictionary as well
- And finally, inside text, nest an item called content. Right-click into the value field and map it to the variable from the second text prompt.
All in all, this is how everything should look like:
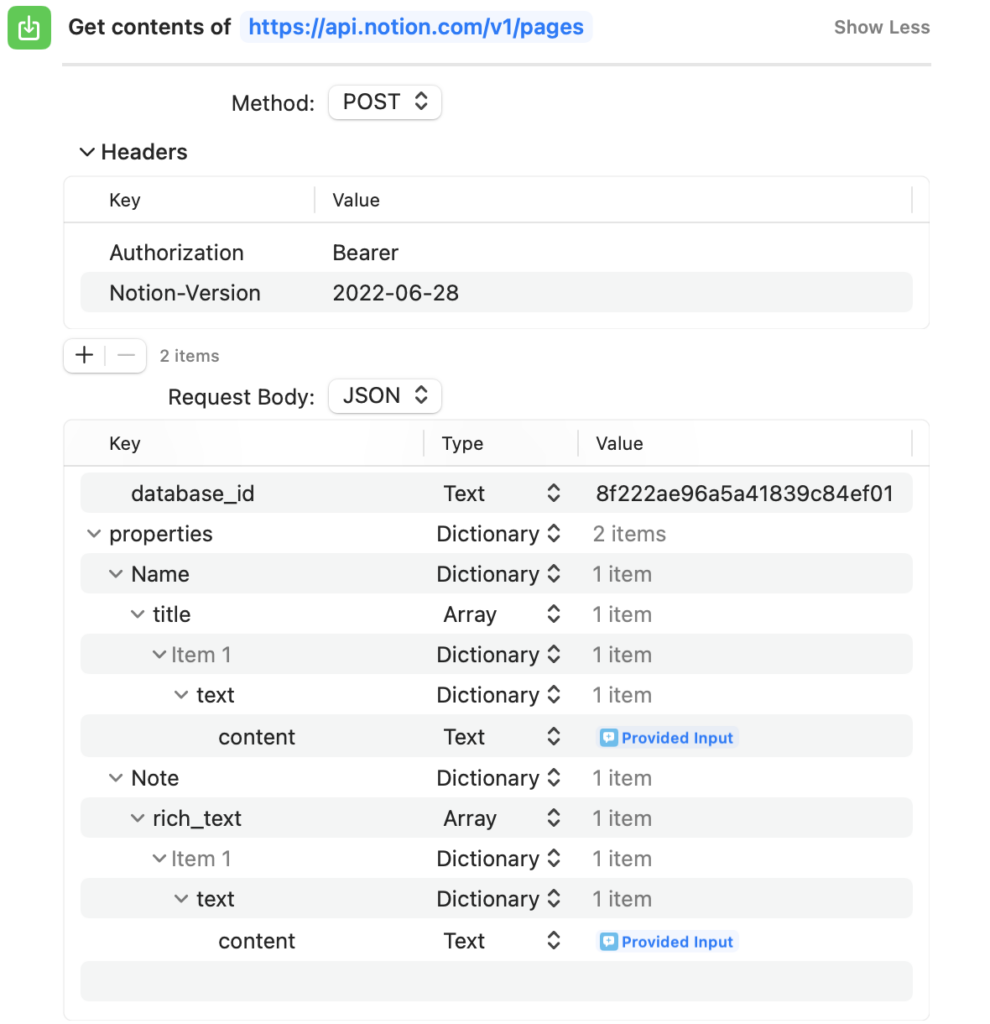
Congratulations, you’re done!
You just created a shortcut to send voice Notes to Notion via Siri. Quick Capture has never been easier.
And if you truly want to supercharge your Siri, why not replace her with OpenAI? Or do you want to solve one of Notion’s biggest remaining problems yourself?
Add Additional Properties to your Voice Notes to Notion
How to add date property via Voice Notes to Notion
In order to send a date to your Notion Database, use the following setup in the Get contents from URL request body.
- Inside properties, create a nested property matching exactly the spelling of your date property in the Notion database with the type dictionary.
- Inside this property, create a nested property called date (not capitalised) with the type dictionary
- Inside date, create a text property called start and choose your date input
Tip: the date should be in a specific format called ISO 8601. You can use the Format Date Module in Shortcuts to turn any date input into this format.
How to add number property via Voice Notes to Notion
Number properties are super easy to send via voice notes to Notion.
- Inside properties, create a nested property matching exactly the spelling of your Number property in the Notion database) with the type dictionary.
- Inside this property, create a number property called number (not capitalised) and choose your number input.
How to add select property via Voice Notes to Notion
To add a select or multi-select property via voice notes to Notion, use the following setup:
- Inside properties, create a nested property matching exactly the spelling of your select property in the Notion database with the type dictionary.
- Nested inside, add a dictionary property with the name select
- Inside select, create a text property called text and choose your select input.
Get Your Free Notion Template
You can download this Notion Template plus another 21+ other free templates here:


