Granular database permissions and the ability to share only part of a Notion database. This is one of Notion’s most anticipated features for Notion power users. But up until now, you were out of luck. The only two options are either to give someone access to the whole database (not great) or share individual pages through a lot of manual work (not scalable at all). If you’re using Notion for business, this lack of granular permissions is a huge problem. You want to plan a client dashboard and share only the client relevant information? Not possible. Or you have a bigger number of employees and only want to give them access to data that is relevant? Again not possible. That is, until you find out about the workaround that I’m going to share with you in this article. With this method, you’ll be finally able to partially share a Notion database and give people access only to the specific database views they require – while retaining full control over everything. This method is easy to implement, scalable and can be customised to accommodate for any specific requirements.
Continue reading for a step-by-step guide on how to implement granular database permissions in Notion or scroll to the bottom for a template with a sample setup that showcases how you can share only parts of a Notion database.
Need a custom solution for your business? Send me an email and let’s have a call to see how I can best help you achieve your goals.
What are Granular Database Permissions in Notion?
Granular Database Permissions (or sharing only a part of a Notion database) means that you have full control over who can see which entries in your Notion database.
Ideally, you should be able to share complete entries (the rows in your Notion database) based on specific criteria or choose to only display certain properties (the columns in your Notion database).
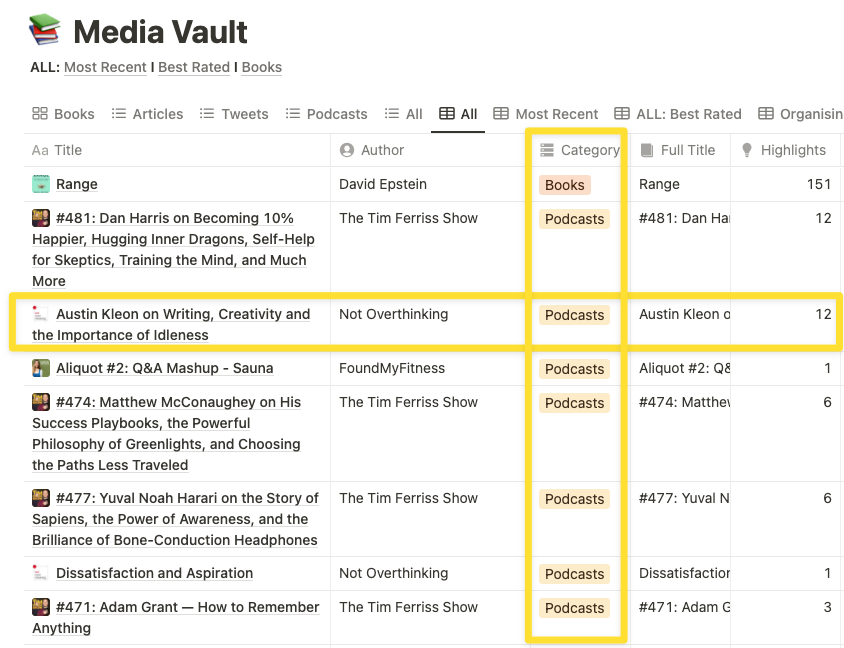
That way, you can slice and dice the data in your Notion databases according to your target audience.
Example: You run your consulting business in Notion. To optimise your workflows, you follow the Notion Workspace Setup that I recommend for 85% of users and keep all your tasks in one master database. Ideally, you’d like to have client dashboards that automatically display all tasks relevant to a certain client. Of course, they shouldn’t be able to see all your tasks – just the ones that apply to them.
Is it possible to partially share a Notion database?
Right now, Notion doesn’t offer a built-in solution to share only parts of a database. However, with this simple workaround, you can choose exactly which database items you want to share with whom.
So, how does it work? To understand that, we first need to quickly cover the status quo.
Why it’s so hard to only share a part of a Notion database
Once you created a database in Notion, you can apply filters and sorts to only display a part of the information. You can also utilise linked database views across your workspace to pull in data from other sources. If you’re not familiar with these basics, check out my complete Notion Tutorial.
Ideally, when using a linked database view, you could just give someone access to the page and all they should be able to see is the specific information based on the filters and sorts that you applied.
However, that’s not how Notion works. If you don’t share the original database with your guest, they won’t be able to see anything. Where you see a linked database view, they will simply see an empty page.
And as soon as you give them access to the original database, you expose all information to your guest.
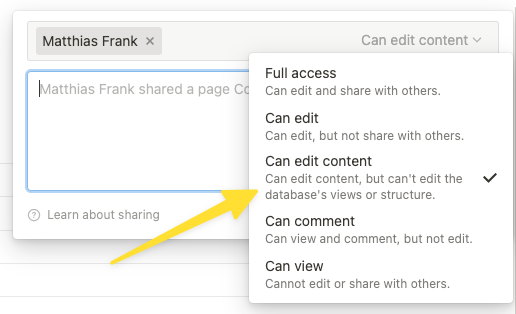
Warning: This is true even if you utilise Notion’s newer sharing permission of can edit content. At first glance, this seems like a possible workaround. Just hide all the sensitive information and then block your guest from changing the filters. However, they will still be able to export the complete database content regardless of your applied filters, which means you don’t have 100% data security.
How this workaround allows for partial sharing of a Notion database
What do you do when Notion natively doesn’t support a feature yet? You utilise Notion’s API to build a simple yet powerful automation to significantly increase Notion’s capabilities.
The automation will go over all entries in your Master Database and then sync entries based on the criteria that you choose to the corresponding “public” database.
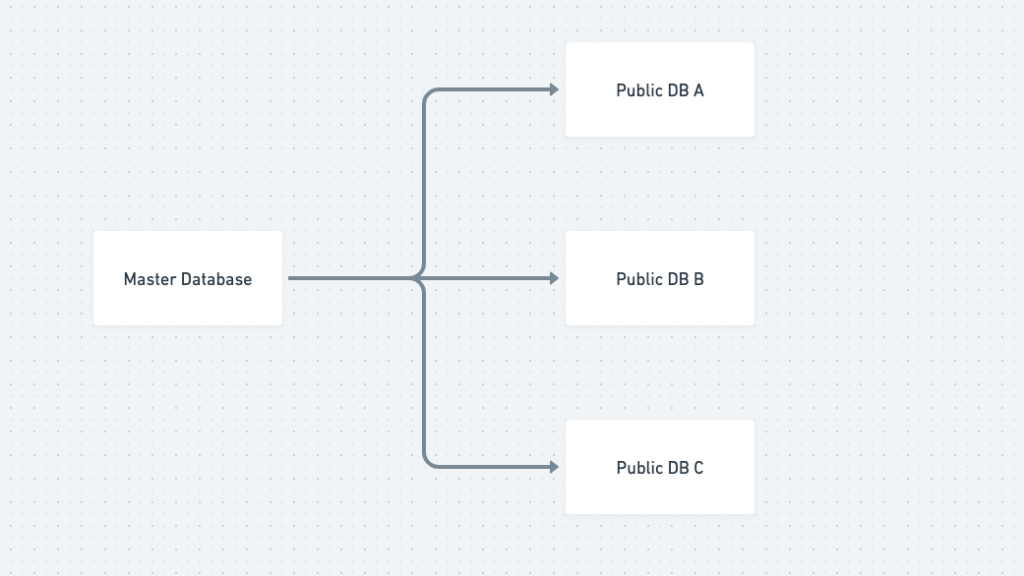
That way, you can organise data in one big database, share the relevant data with specific people and retain full control over everything that’s going on.
And because your Master Database and the Public Database are two completely separated entities (and not just a linked database view), there’s no way that someone can get access to sensitive information.
Last but not least, you’ll be able to update and remove entries in the Public Databases easily and you can even allow for your guests to be able to edit entries and sync their changes back into the Master Database. True Two-Way Sync.
So let’s dive in and learn how to share only part of a Notion Database.
How to share only a part of a Notion database
First, you’ll learn how to add One-Way Sync functionality to your Notion Database. If you don’t need the person on the other side to modify entries, then you can stop here. But if you want them to be able to make changes and have it reflect in your Master Database, continue with the second part of the automation.
This tutorial uses a simple example for sharing a part of a Notion database with one Master Database and one public Database, but once you understand the principles, you can expand this to whatever use case you have.
Notion Share Part of Database: One-Way Sync
Start by building the foundation for one-way sync. One Way sync means that you can share only part of a Notion Database in one direction, say from your master database to a public view. Guests who look at the public view won’t be able to make changes that reflect back in your database (that’s two-way sync and you’ll learn how to do that in the second part of this tutorial).
Step 1: Build the Notion Backend for One-Way Sync
To share parts of a Notion database, you first need to create the underlying structure. If you already have a database that you want to share, you can use that and simply add the required properties.
Otherwise, create a new Notion database that will act as your private database with the following properties:
- Name – the main property
- Sample Description – a placeholder text property for information to pass along to the public database (replace this with the properties that you ultimately need)
- ID – a formula property that pulls in the ID for the database entry
- Corresponding ID – a text property that will store the IDs of entries in the public database
- Sync? – a checkbox property to indicate whether or not the entry should be pushed to public
Use this formula to get the ID of the database entry:
id()
Instead of the checkbox property, you can also add different criteria for syncing, like a select or relation property.
Then, create a second database. This one will act as the public database in this example and should have the following properties:
- Name – the main property
- Sample Description – a placeholder text property for information to store in the public database (replace this with the properties that you ultimately need)
- ID – a formula property that pulls in the ID for the database entry
- Corresponding ID – a text property that will store the IDs of entries in the public database
That’s all you need in Notion to learn how to partially share your Notion Databases.
Before proceeding to the next steps, make sure that the backend has some sample data in the private database.
Step 2: Start building the Automation
Next, it’s time to build the automation that will connect your private Master Database with the public databases to partially share your Notion Database.
If you don’t have a Make account yet, you can create one here. The free plan is sufficient for this automation.
Log into your account and click on the create a new scenario button.
Then, click on the big purple plus button in the middle of your screen to add your first module. Search for Notion and opt for Watch database items.
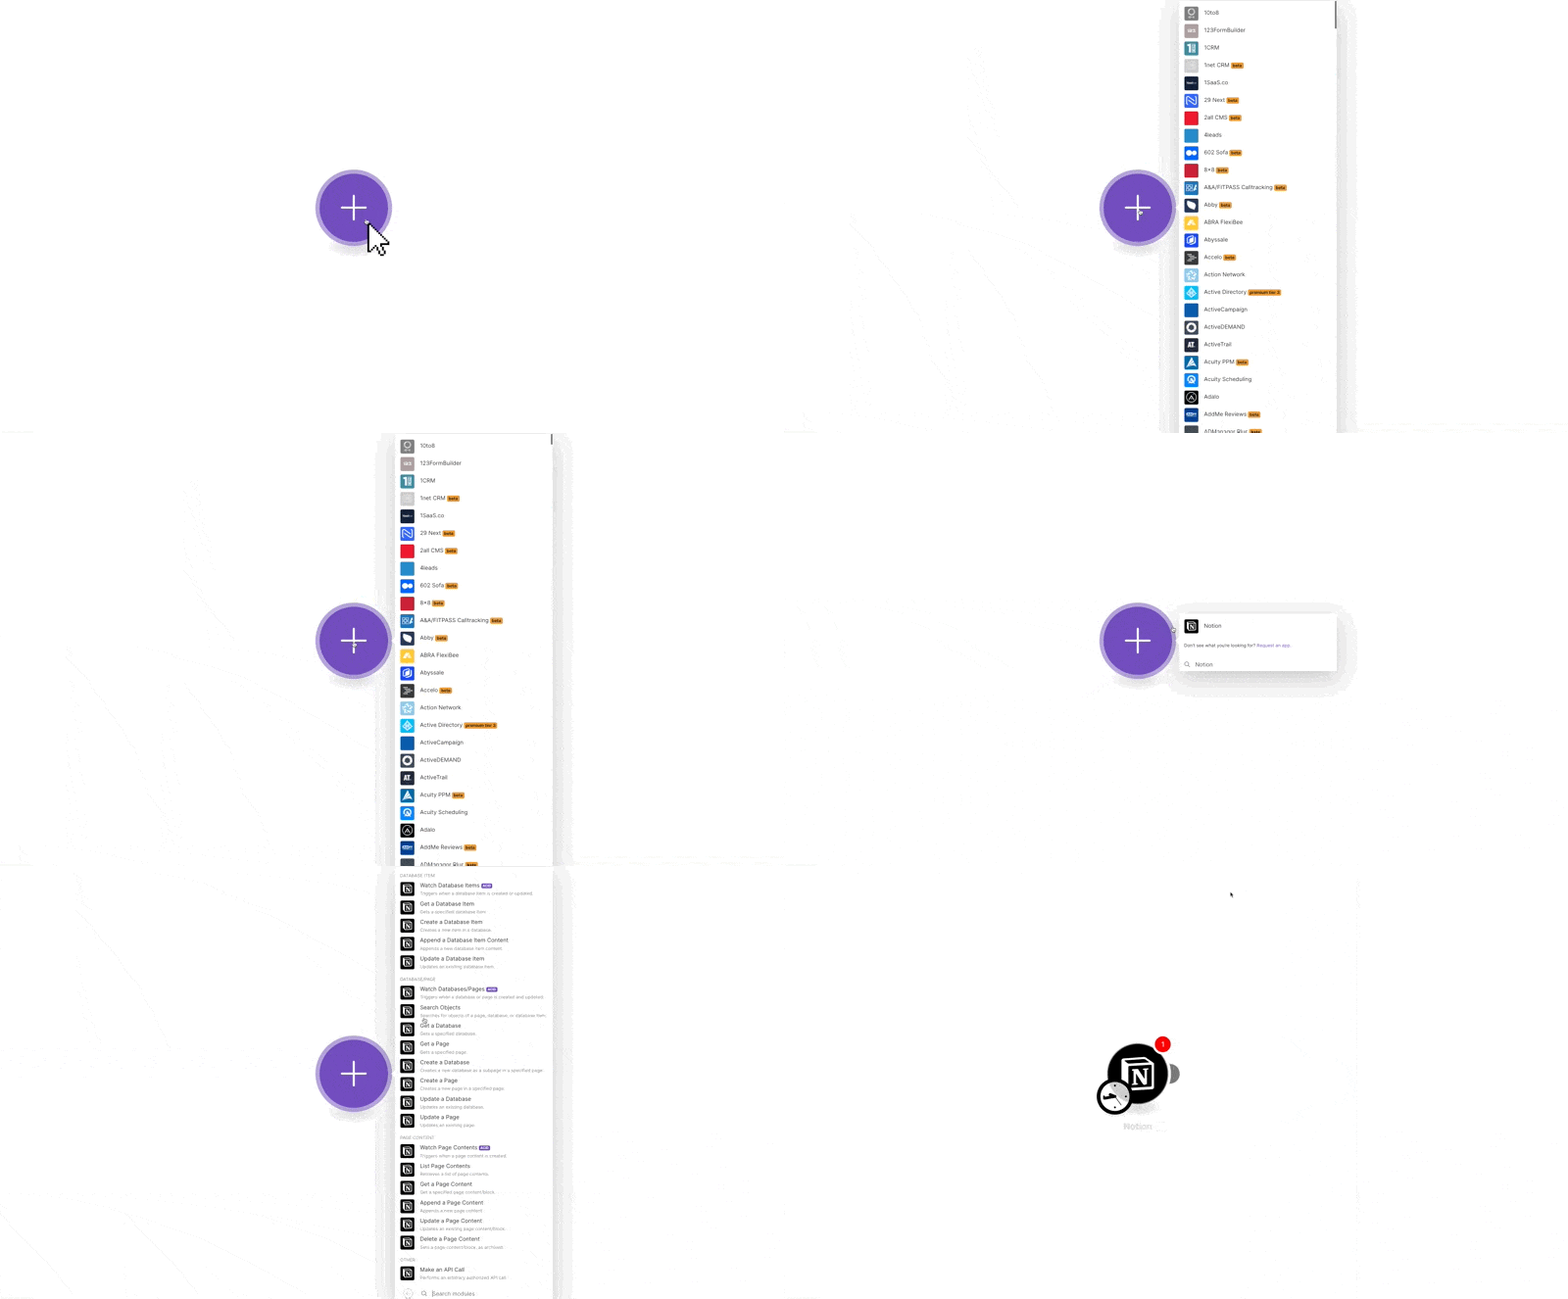
If it’s your first time connecting Make to Notion, click on Add and go through the steps to authorise yourself. Make sure you use the Public integration. Don’t worry: this doesn’t mean that any of your data will be public, it’s simply the difference between an official connector to other tools like Make and one that you’ve built yourself.
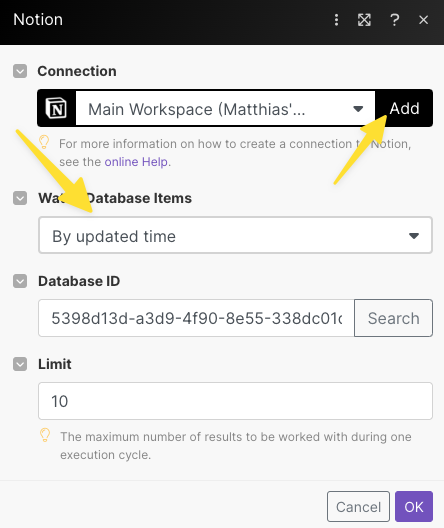
Next, switch to By updated time. That way, the automation will pull in all changes in your database and not just completely new entries.
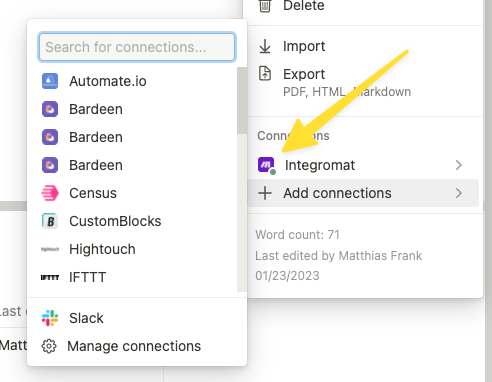
For the next step, make sure that the page on which you have your private and public databases (the backend from Step 1) is shared with Make.
You can double-check by clicking on the three dots in the top right corner of your page and then looking towards the bottom for Integrations. If Make doesn’t show already with a green dot, hover over Add connections and look for it.
(Note that the screenshot below shows Integromat instead of Make – that’s the old name. If you just started using Make, yours should be called, well, Make)
Last but not least, set the limit for your automation. The limit controls the maximum number of database items that are processed each time the automation runs. Make sure it’s high enough to capture all your potential changes. For testing purposes, you can also leave it at 1 or 2, but don’t forget to change it later.
Example: You use this method to share only a specific view of your Notion Task database with clients. You usually have up to 20 active tasks at any given time. Set the limit to 25-30 to make sure that you capture all changes even if all tasks are changed.
If the limit is too low though, don’t worry. The automation will capture the remaining changes on the next run, it will just be a bit delayed.
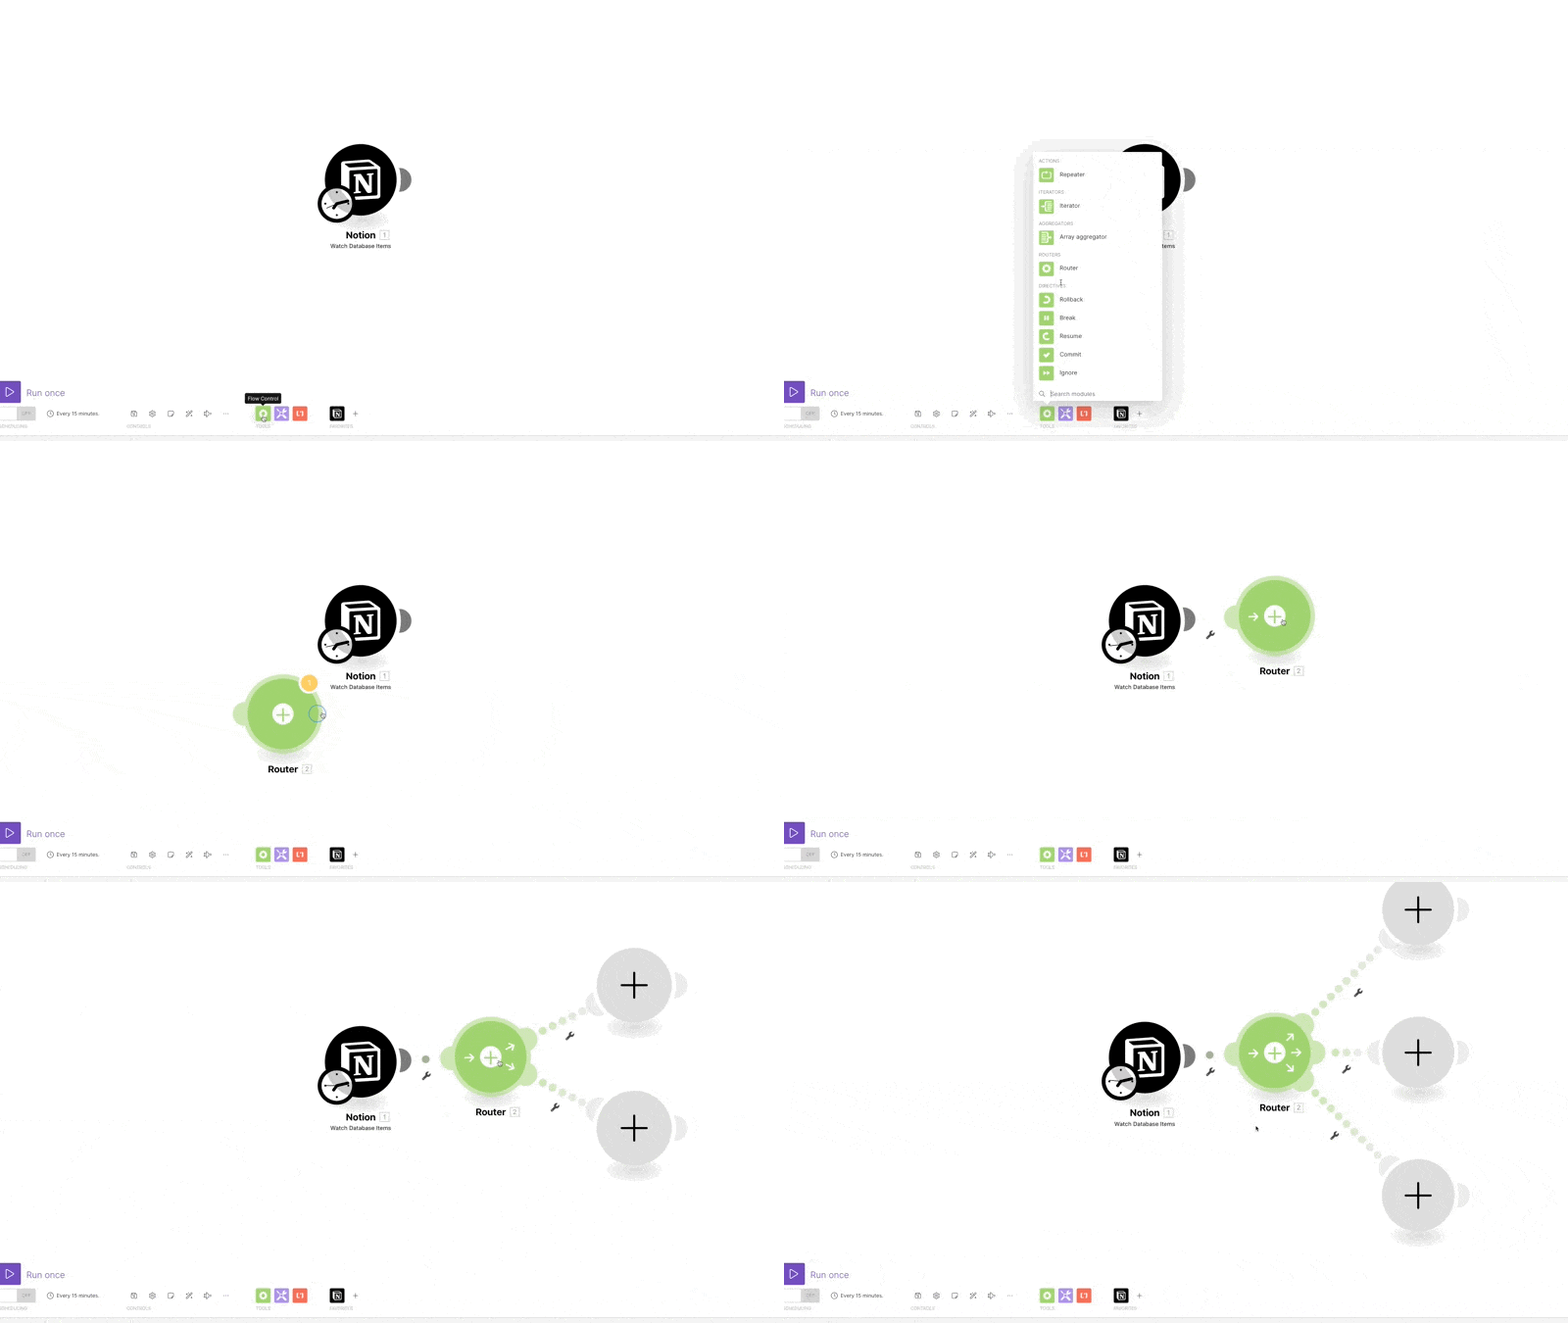
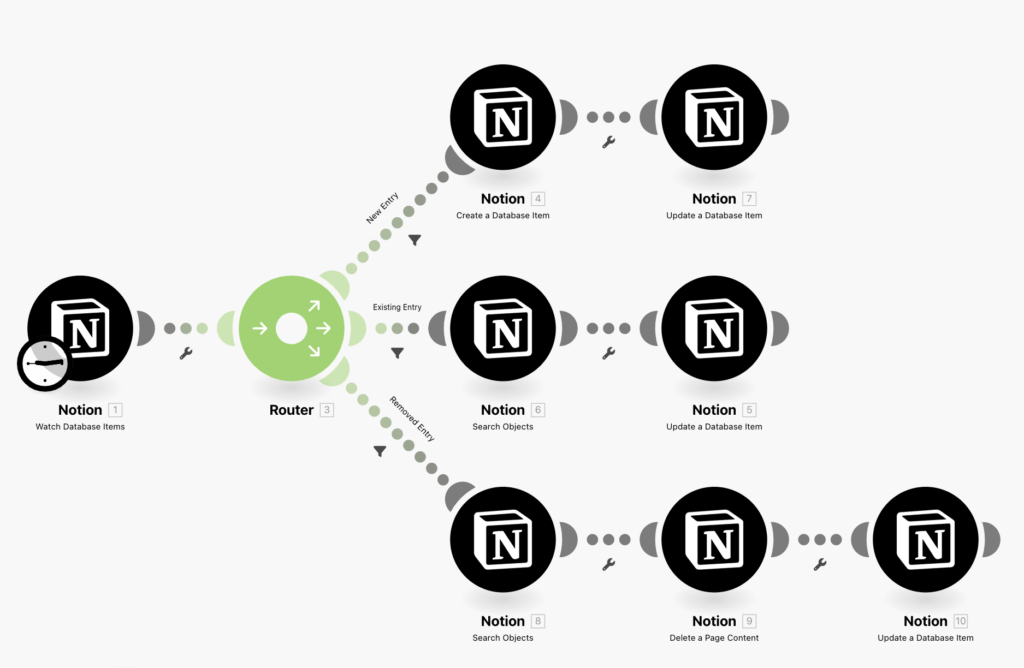
Finish the initial setup by adding a Router Module to the automation and clicking it once more to produce a total of three separate paths.
Step 3: How to share specific entries from Notion Database
It’s time to set up the first aspect necessary for sharing parts of a Notion Database: pushing specific entries from your private database to the public database.
Click on the dotted line between the router and the top most route to set up a filter. This path should only be taken if the corresponding Notion entry has a checked box in the Publish property (or the equivalent of your system) and if it doesn’t have a Corresponding ID yet
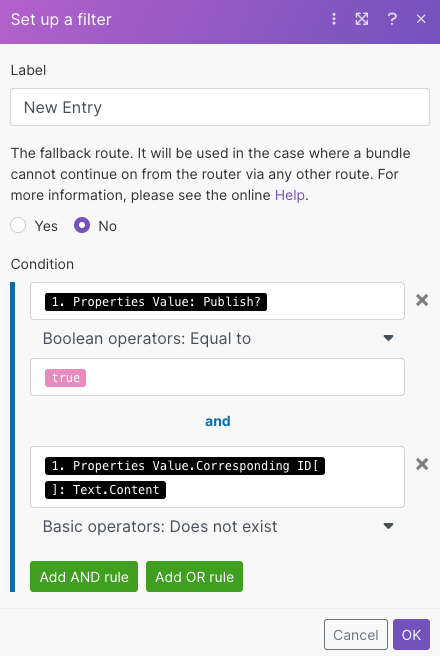
Together, these two conditions ensure that only
- entries that you want to share
- but have not been shared yet
take this path.
Then, add a Notion Module and opt for Create database item. Pick the public database and map the fields from the private to the public database.
Make sure that you insert the ID of the entry in the private database into the Corresponding ID field in the public database.
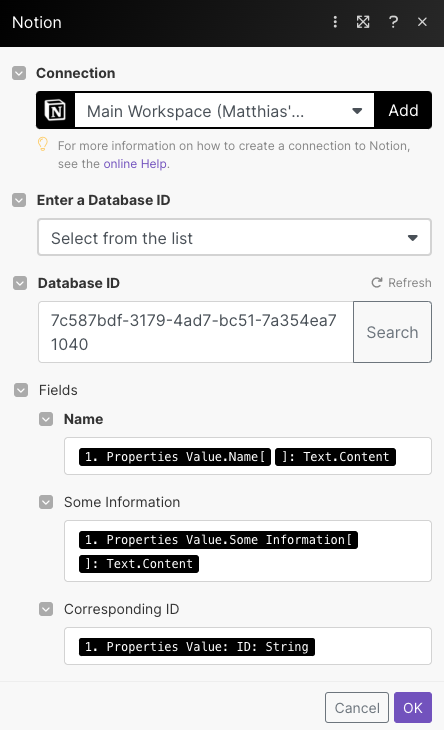
Tip: This granular mapping allows you to choose exactly which properties you want to share and which should stay private
Last but not least, add another Notion Module, this time opting for Update database item. Select the private database and map to the entry that was just synced.
Update the Corresponding ID field here to reflect the ID of the newly created entry in the public database.
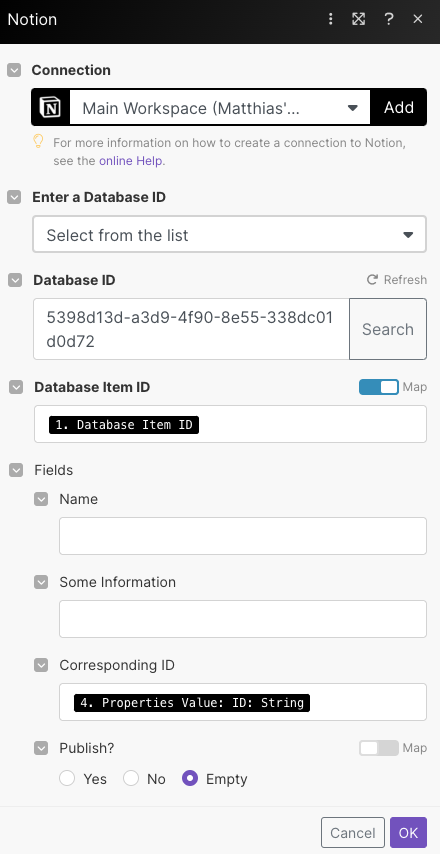
And that’s it! You’ve unlocked the first step towards sharing a part of a Notion database. You can now push selected entries and specific properties into a public database without the risk of exposing your sensitive data.
Step 4: How to enable edits on specific entries in Notion Database
Let’s make sure that any edits in your private database also reflect in the public database.
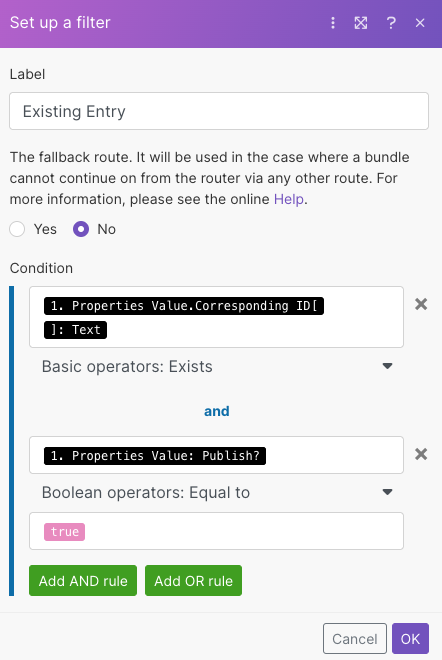
To do so, select the dotted line between the router and the second path to set up your next filter. This time, you want to pick all elements that have an entry in the Corresponding ID field and are set to share.
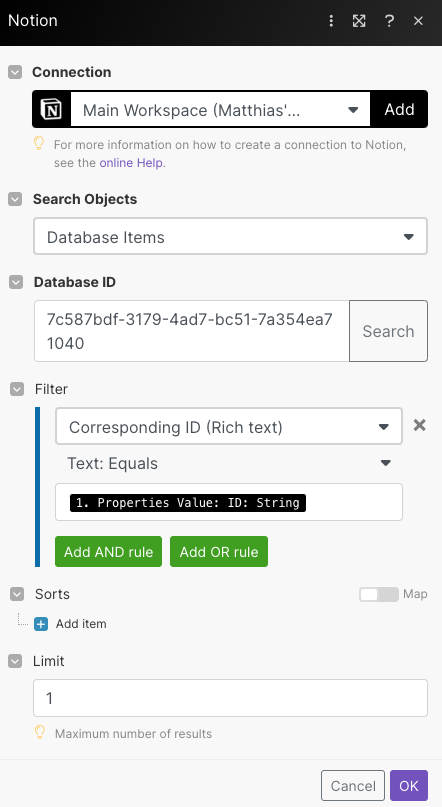
Add a Notion Module to the path and choose the Search Objects option. Select your public database and search for the entry that contains the ID of the private database entry in the Corresponding ID field.
All that’s left to do know is to add another Notion Module, this time the Update database item. Map the information from the private fields to the public fields.
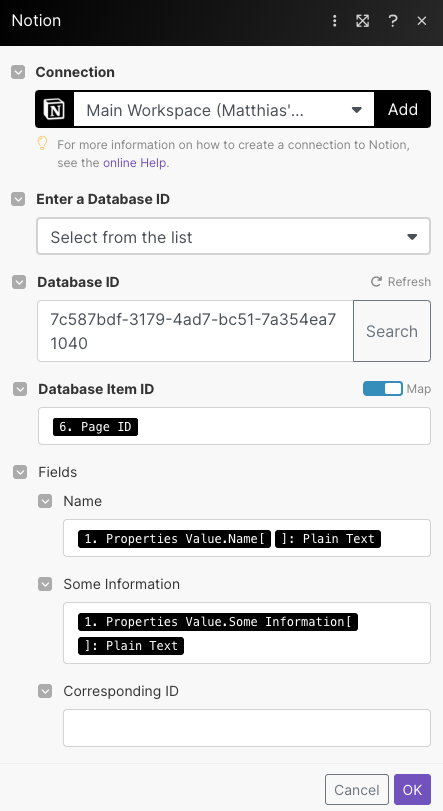
And you’ve unlocked the second step towards partially sharing a Notion Database. Whenever you make a change to an already synced entry in the private database, this path will automatically update the corresponding entry in the public database.
Step 5: How to remove specific entries after sharing them
Last but not least, you want to make sure that you can remove entries that should no longer be part of your shared Notion database.
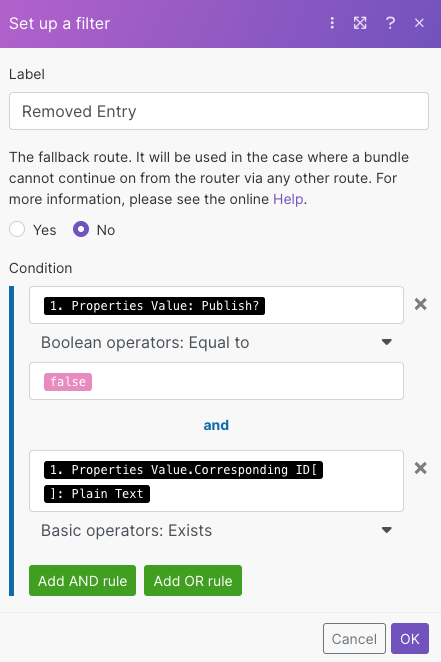
Click on the dotted line between the router and the last path. This filter should catch any entry, where Publish has been set to false (i.e. the checkbox is unchecked) even though a Corresponding ID exists.
Like in the previous step, add a Notion Module to Search Objects. Look for anything where the ID in one element matches the Corresponding ID in the other element.
Tip: There are two ways to do that. Either start with the Corresponding ID in the public database and look for the matching ID in the private DB. Or look up the ID in the public one and match it to the Corresponding ID in the public one. Automations are fun, aren’t they?
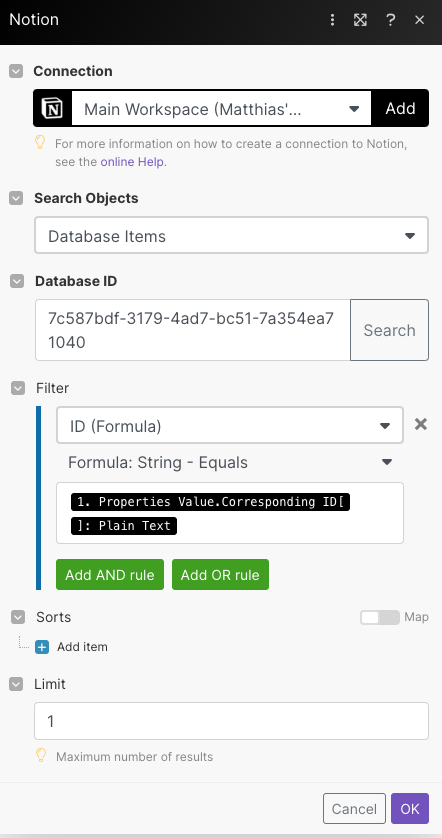
Add another Notion Module. It’s slightly confusing, but Delete a page content is actually the right module, even though you’re deleting the whole database entry, not just content within a page.
That’s because in Notion, everything is a block. Pages, databases, database entries just like headings, paragraphs or toggles. If you want to learn more about how Notion works, check out my complete Notion Tutorial.
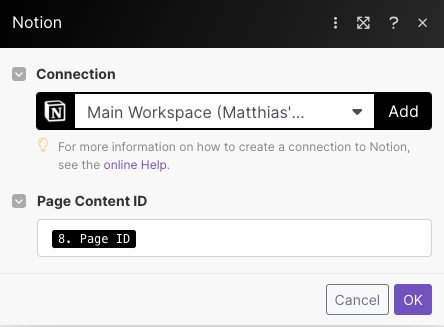
Nearly done. For this path, you actually need a third Notion Module, this time Update a database item.
Select your private database, map to the initial database entry and make sure you remove the Corresponding ID by replacing it with emptystring. You can find the emptystring option by clicking on the section with the string formulas.
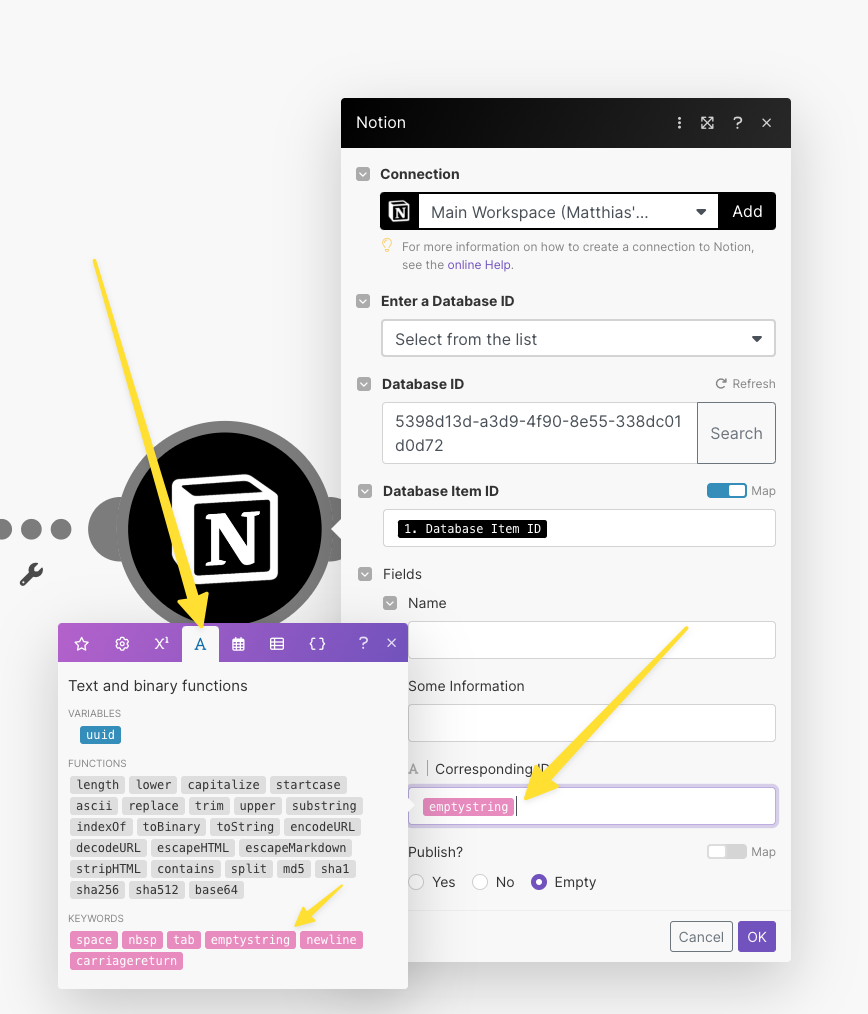
That way, your private database is reset correctly and doesn’t show a corresponding entry even though we just removed it from the public database.
Congratulations! You just finished setting up One-Way Sync for your Notion Databases. Now you’re able to share only parts of a Notion database without giving access to the complete database.
Partially Share a Notion Database: Two-Way Sync
Partially sharing a Notion database wouldn’t be complete unless your counterpart is also able to modify entries. That’s where Two-Way Sync comes in. Read on to learn how to modify the initial setup to also see changes that occur in the public database in the private database.
Step 1: Update the Notion Backend for Two-Way Sync
Start by making a few adjustments to your Notion backend.
Tip: These changes are necessary to avoid creating an infinite loop, where you change something in one database and the automations start syncing this one change back and forth in infinity, because they always find an updated record (even though that update comes from the automation itself, not you).
In your Public Database, add two new properties:
- Last edited by – the system generated Last Edited By property
- User Update? – a formula property
Use this formula to check whether the last change was made by a user or by the automation:
prop(“Last edited by”).name()!=”Make”
This will return a checked checkbox unless Make (aka the automation software) made the last change. Careful: if you’re using a different automation tool or if your integration is still called Integromat (the previous name of Make), adapt the formula accordingly.
Then, repeat the same process in your Private Database.
The video tutorial is insofar outdated and still shows the old formula (prop(“Last edited by”)!=”Make”. This no longer works since Notion reworked Formulas and introduced new user objects.
Step 2: Start building the Automation
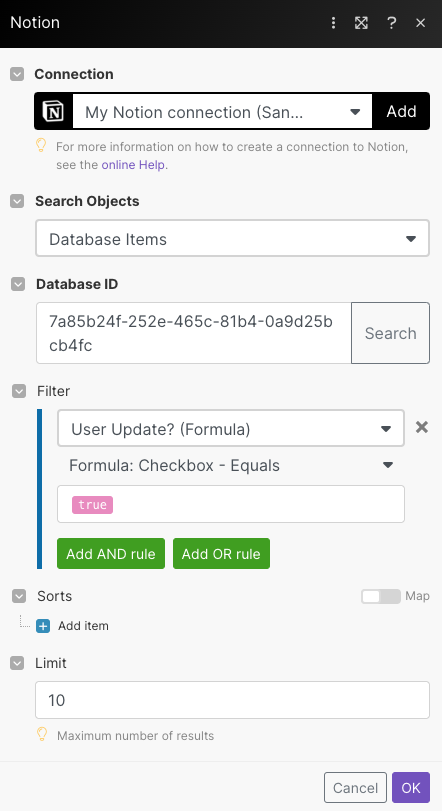
Go back to make and create a second automation. Add a Notion Module as the first module to the automation. Opt for Search Objects.
Set it up to look through the public database and pick all elements that were last edited by a user.
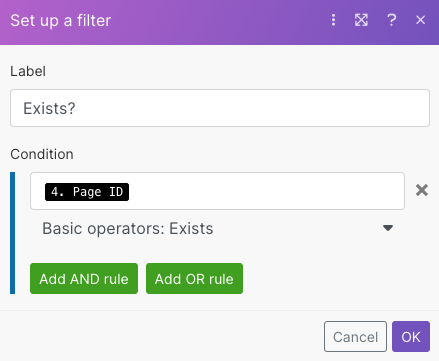
Next, add a router and enable to paths. Click on the dotted line before the first module and the router and set up a filter to make sure that the automation only continues, if it actually found an entry in the public database that matches the criteria.
Step 3: How to enable edits on public Notion Database Entries
Start by enabling edits in the public database, i.e. someone can modify an already existing entry and the change will reflect in the private database.
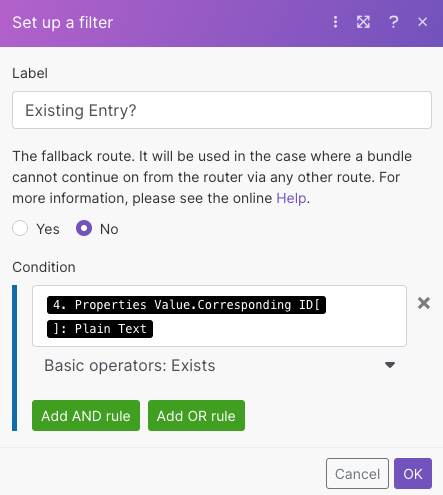
To do so, click on the dotted line between the router and the upper path and set the filter to only let items through that have a Corresponding ID.
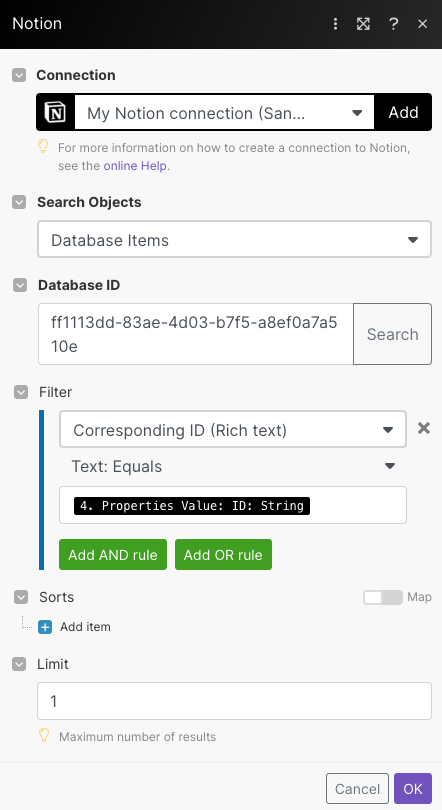
Then, add a Notion Module to the path, opting again for Search Objects. Set it up to look through the private database to find the record matching the Corresponding ID in the public database.
Then, add a Notion Module to Update a database item. Map the changes from the public database to the corresponding entry in the private database.
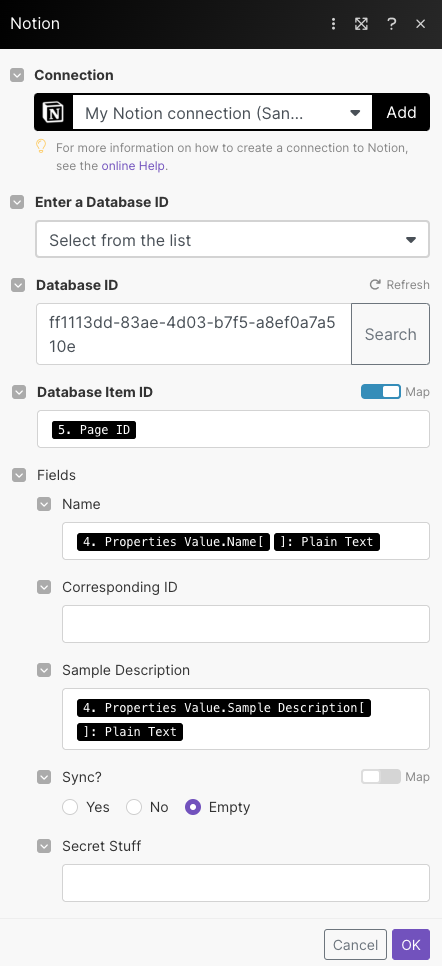
Nearly done. All that’s left is to make a tiny update to the entry in the public database. This will change the Last edited by field back to the automation so the entry won’t enter the automation again until a new change has been made.
You can achieve this through another Update a database Notion Module. My favourite way to do this is to simply add a space at the end of the description field. Just click into the field, pull in the description that it should have and then hit the space key once.
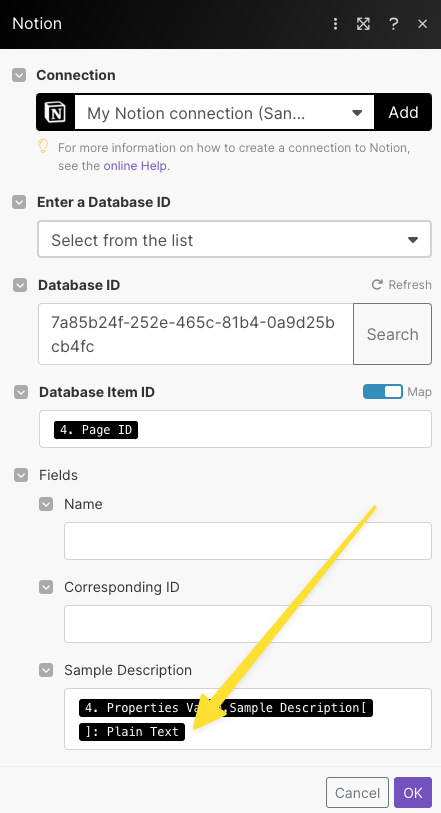
Step 4: How to sync new entries to the private database
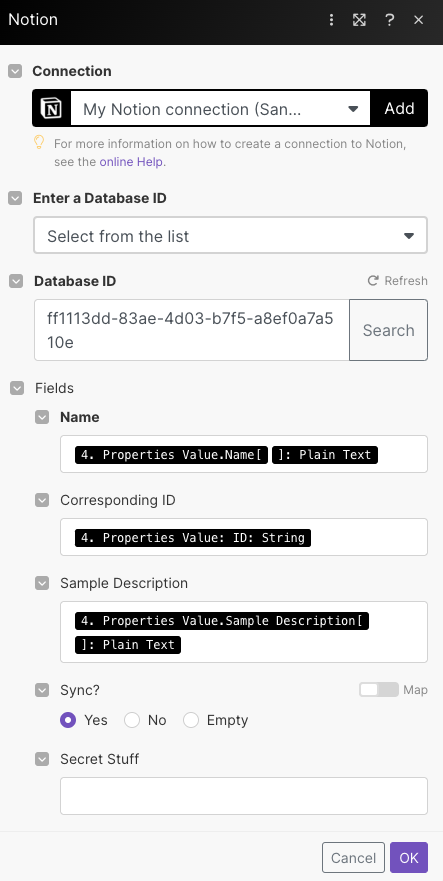
Now onto the lower path. If someone created a new entry in the public database, then it won’t have a corresponding item in the private database to modify. So in this case, we need to change things up.
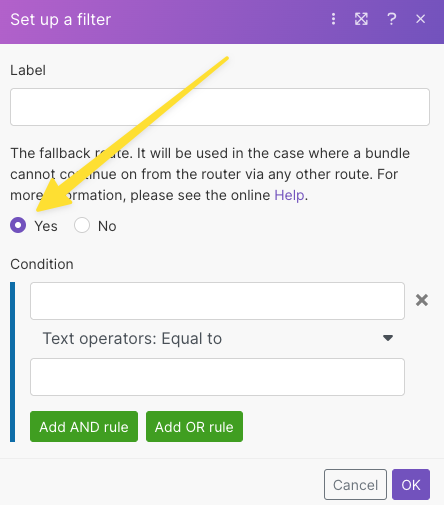
Click on the dotted line between the router and the lower path and make sure you check The fallback route. That means that this path will be taken if the other one isn’t a match.
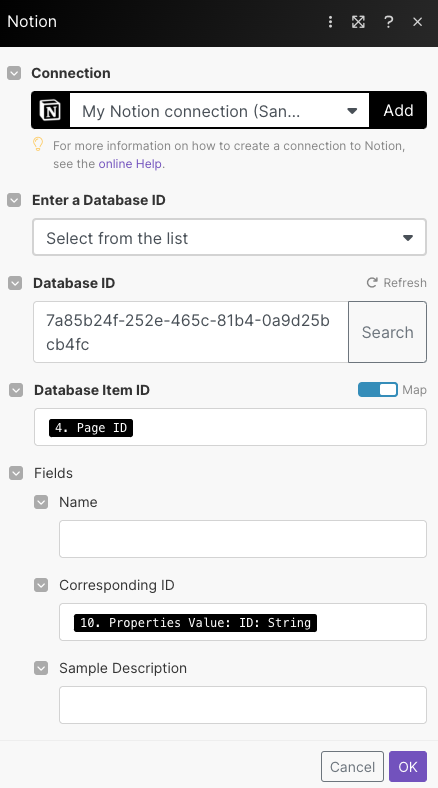
Now add a Notion Module, this time Create a database item. Set it up to create a new item in your private database based on the information that was added to the public database.
Last but not least, make sure to use another Update a database item Notion Module to store the ID of this newly created item in the Corresponding ID field of your public database.
Step 5: How to avoid accidental overwrites
Only one thing is missing now for you to be able to share a locked view of a Notion Database: preventing accidental overwrites.
There are two parts to this equation. First, you want to make sure that your initial automation (the one that you built in the previous chapter) also only runs if the last change was made by a human, not the automation.
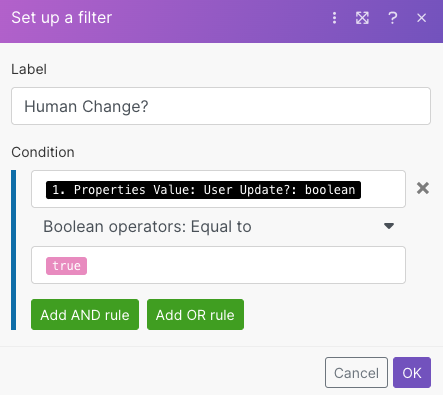
To do so, open your first scenario and add a filter between the first Notion Module and the router.
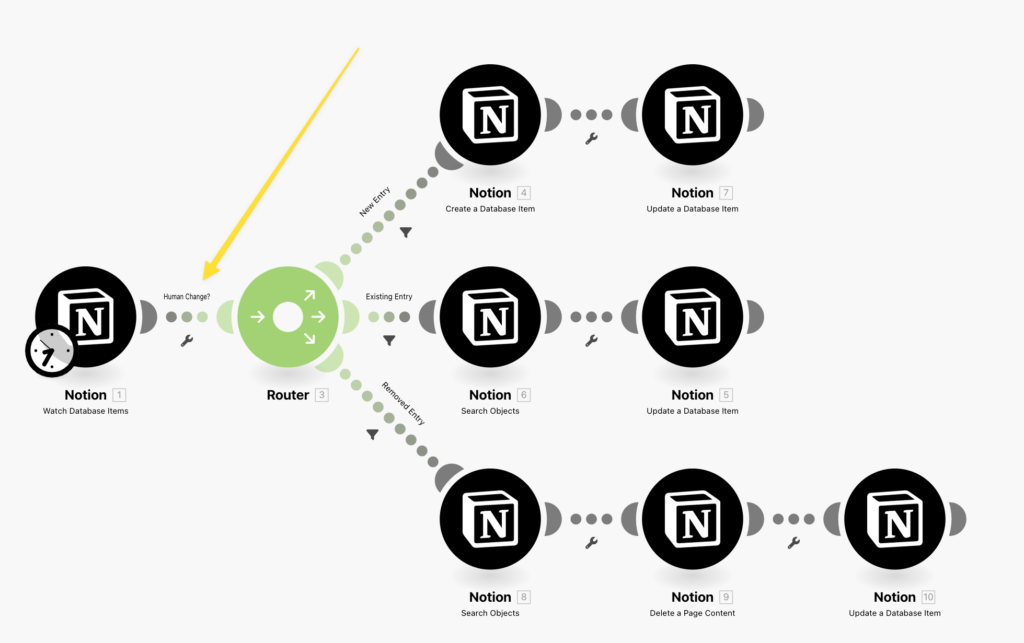
Use the newly created User Update? property to exclude changes that were done by the automation to avoid a permanent loop.
To finish your workaround to partially share a Notion Database, schedule both automations.
You want to make sure that the higher priority data source is run first. That way, if there’s a conflict between the private and the public database, the private one will take priority.
Congratulations! You’ve solved one of Notion’s biggest remaining problems and unlocked a new superpower for your workspace. Sharing a locked view of your Notion Database is finally a possibility.
How to share different parts of Notion Database with various people
While the above example only illustrates a simple setup where you share a part of your Notion Database with one other “access level”, you can easily adapt it for more complex use cases.
The exact implementation will depend on your workflow and needs, but here are a few starting points:
- Create cascading access levels in your company based on the sensitivity of the information shared (think different classified levels)
- Create a role based access system for information that should be available based on the group an employee belongs to
- Share data based on a relational property if you’re working with several clients and need to sort data for them
- Build a time-based unlock system that pushed information not based on a private / public dualism, but on a specified delay (maybe to first share content with your paid subscribers before making it available for free)
If you’re looking for more ways to supercharge your Notion Workspace, check out these tutorials:
- Never take meeting notes again with AI Meeting Notes for Notion
- Get Your Emails and AI Generated Summaries in Notion
- Learn why most people do project management in Notion wrong
Oh and have you ever wondered how much better Siri could be if only she had the same capabilities as ChatGPT?
Get the free Notion Template for Sharing a Locked Database View
If you don’t want to go through the trouble of building this yourself, you can download the free Notion template below and immediately start sharing parts of your Notion Database.


