Looking for a way to get emails into Notion? In this article, you’ll learn how to do just that and a lot more. Extract tasks from emails and add them to your Notion Project Manager? Download and reference attachments? Or even connect emails to the contacts in your CRM?
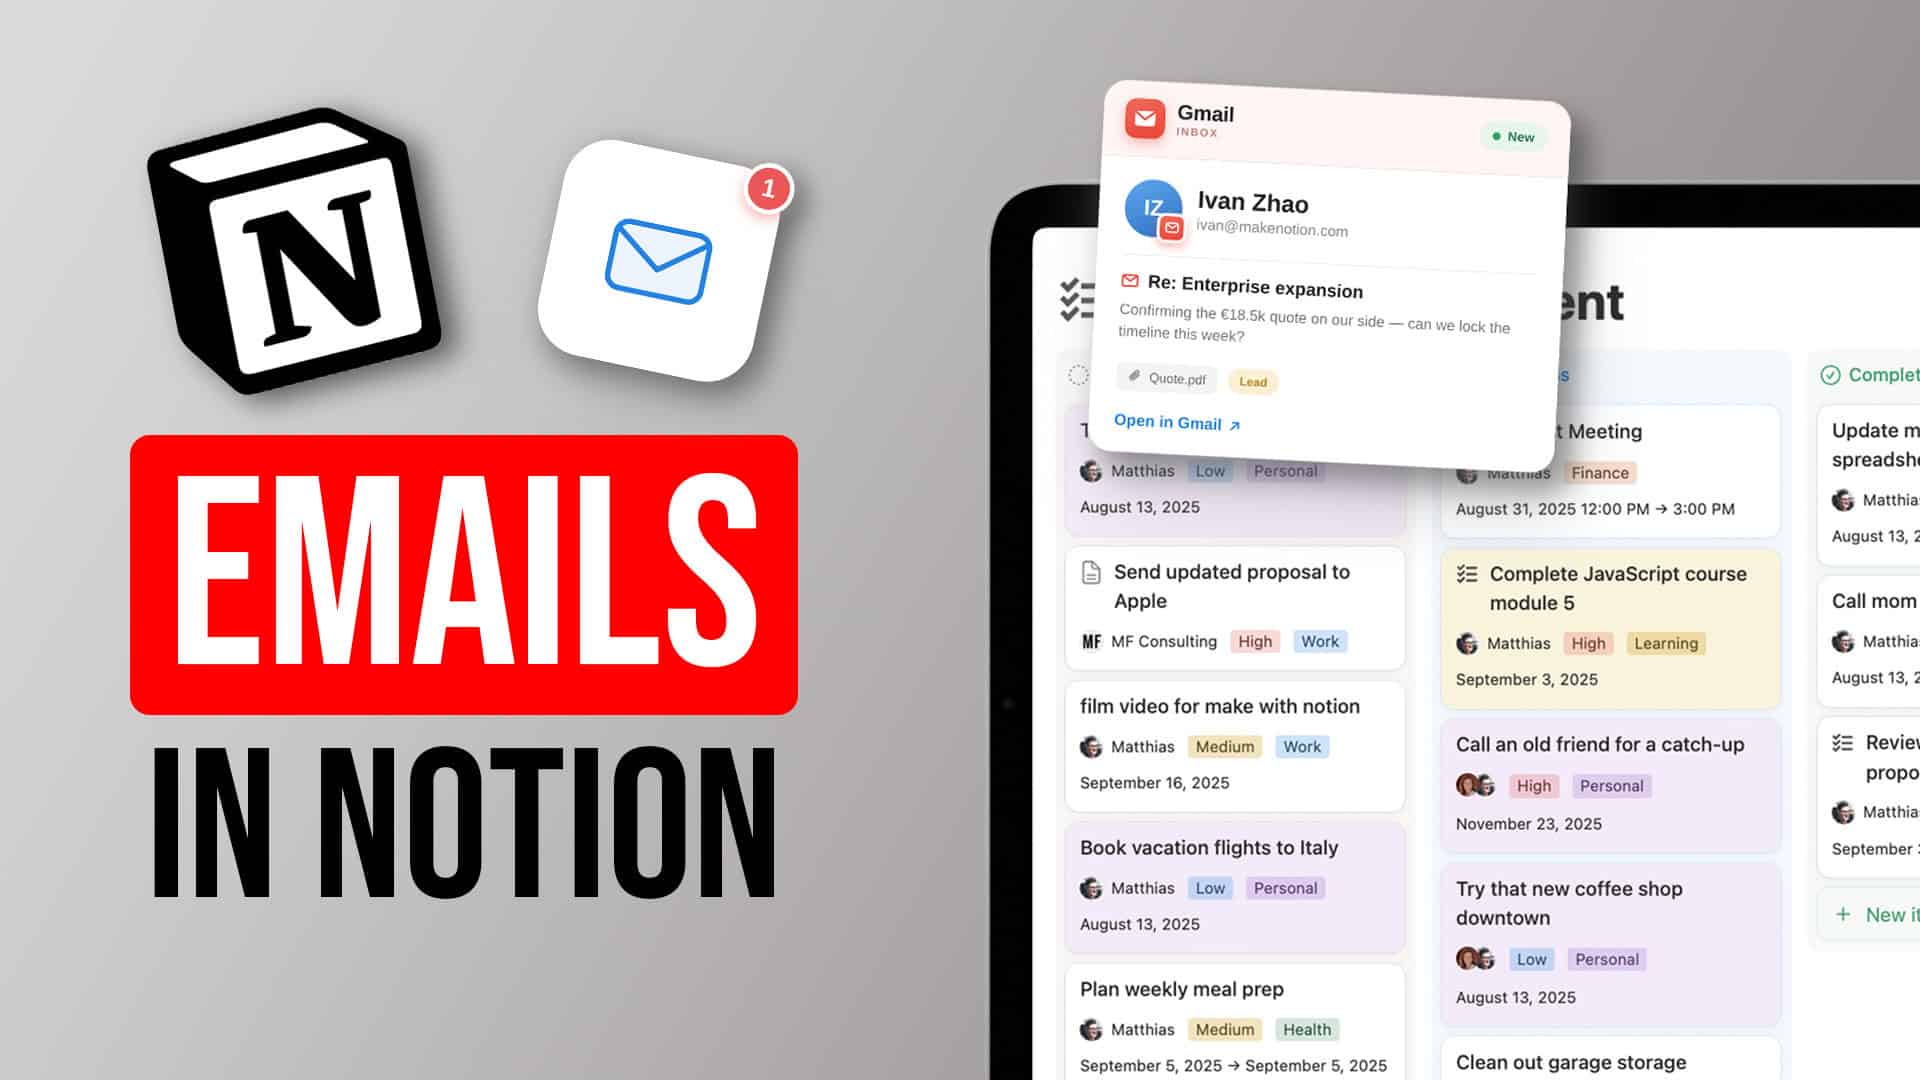
In January 2026, Notion finally added the first native option to push emails from Notion Mail directly to Notion. You can now use either an email action to sync an individual email or set up a sync for a specific view in Notion Mail.
📢 Update: Notion is sunsetting the Notion Mail inbox app, so the native sync described here may change. Here’s what that means and what I’d use instead: Notion Mail is shutting down. The Relay and Make methods below don’t rely on Notion Mail and keep working regardless — they’re the safer bet if you want something durable.
However, this only syncs over the email content and doesn’t extract attachments or structured data.
If you want to use Emails for advanced workflows in Notion, you might still want to check out these three advanced methods.

What Method should you choose to sync emails to Notion?
| Method | Best For | Structured Data | Attachments | Task Extraction | Works With |
|---|---|---|---|---|---|
| Native Notion Mail | Quick reference, manual review | ❌ | ❌ | ❌ | Gmail only |
| Relay | Automated workflows with properties | ✅ | ✅ (via Google Drive) | ✅ (with AI) | Gmail, Outlook |
| Make | Full customisation, complex logic | ✅ | ✅ (via Google Drive) | ✅ (with AI) | Gmail, Outlook, others |
If you are just looking for a quick way to get the content of your emails to Notion so that you can then further process them either manually or using Notion AI, pick the newly released native Notion Mail sync.
For more robust options and for additional email providers, choose one of the advanced workflows via relay or make.
Send Emails to Notion With Relay (Best for Structured Data)
This is my recommended method to get emails into Notion – you can follow along this step-by-step guide or download the template here to get things up and running quickly.
Step 1: Set Up an Email Tracker Database
First, you’ll need to create a database in Notion to keep track of your emails. A simple setup could include these properties:
- Subject Line
- Sender Name
- Email Address
- Date Received
- Status (This can be handy for project management!)

The tool you will be using for this integration is a free automation tool called Relay.
You’ll need to sign up for a Relay account first. Sign up here.
Step 2: Create a New Workflow
The first step in Relay is setting up a trigger. For a basic setup, this will be whenever you receive a new email in your Gmail (or another supported email provider like Outlook).
You’ll connect your email account to Relay at this point.

Step 3: Add an Action Step in Relay to Connect to Notion
You can do this by sharing the database with the Relay integration in your Notion page’s Connections settings.
You’ll need to give Relay access to the specific Notion database you created for email tracking (Email Tracker, Attachments, Tasks from Mails and CRM in my case).
Step 4: Map Data From Your Mails to Notion
Finally, you’ll map the data from your email to the right properties in your Notion database.
For example, the email subject will go into the Subject property, the sender’s name into the Sender property, and the email body can become the page content in Notion.

How to Customise Your Email to Notion Setup
Once you implemented the basic flow to send emails to Notion, it’s time to take your setup to the next level. Here’s how you can
- send only specific emails to Notion using labels
- save email attachments in Notion
- extract tasks from emails and add them to Notion
- and even connect emails to contacts in your CRM
How to Send Only Specific Emails to Notion
Want more control over which emails end up in Notion? You can use Mail labels to filter them.
Instead of a general “new email” trigger, you’ll set up a scheduled trigger in Relay to run regularly (for example, daily).
This scheduled workflow will then search your Gmail for emails with a specific label (like “Action required”). You can apply this label manually or even automatically using AI (more on that later!).
Relay will go through all the emails with that label within a timeframe you set (like the previous day). For each email, it will add a new page to your Notion email tracker database, just like in the basic setup.

Tip: By using labels, you can decide exactly what information gets into your Notion workspace, keeping it tidy and focused on what matters most to you.
How to Save Email Attachments in Notion
Currently, the technology doesn’t allow Relay to directly upload files to Notion. But don’t worry, there’s a clever workaround using cloud storage like Google Drive.

You’ll need to create a separate “Attachments” database in Notion with these properties:
- File Name
- URL
- A Relation back to your email tracker database.
In your Relay workflow, after the step where the email page is added to Notion, you’ll add a Google Drive “upload file” action. This will go through any attachments in the email and upload them to a folder you choose in your Google Drive.
After the upload, another action in Relay will add a new page to your Notion “Attachments” database. This page will include the file name and a direct link (URL) to the file in Google Drive. It will also be connected back to the original email in your email tracker database using the Relation property.

How to Integrate Emails With Your Notion CRM
If you use a Notion CRM, you can connect your email tracking to it!

You’ll need a CRM database with contact information (including email addresses) and a Relation property that links it to your email tracker database.
As the final step in your Relay workflow, you’ll add a Notion “lookup page” action.
This will search your CRM database for a contact whose email address matches the sender’s email address from the email you received.

Then, you can add some smart logic:
- If a contact is found, you can update their record to link the new email.
- If no contact is found, you can create a new contact in your CRM, automatically filling in their name and email address from the email.

Tip: For those new contacts, you could even use AI to automatically find more information about them from public sources like LinkedIn!
How to Add Emails to Notion (Using Make)
This method predates the native Notion Mail integration and is best suited for users who want granular control over their automation or who use email providers other than Gmail.
If you don’t want to build the automation with Relay and instead want to use Make as your automation tool of choice, you can certainly do so.
Before I found Relay, this was my go-to method but I have since replaced it with the updated method from above.
Still, here’s everything you need to do in case you prefer this approach.
For this example, I created a basic database in Notion to store my emails with the following properties:
- Subject
- Sender

Step 1: Create Your Make Account
Start by creating an account at Make.com (the automation platform that we’re using here). The free plan is amazing and more than enough for what we’re about to build.
Step 2: Add a New Scenario
Once logged in, click on the Create a new scenario button to start building your first automation.
Step 3: Add a Mailhook as Your First Module
Inside the scenario builder, click on the big purple plus button and type Webhook into the search field. Pick the Webhooks option and then opt for Custom Mailhook under Triggers.

Click on the module you just added and add your mailhook by clicking on Add and giving your mailhook a name. After that, a long email appears below the box that you can copy by clicking the grey Copy address to clipboard button.

Now you’re already half-way done. Any email that gets forwarded to this address will enter the automation.
Step 4: Add a Notion Module to Your Automation
Now click on the half-circle next to your first module to add a second module. Search for Notion in the menu and opt for the Create a database item option.

Step 5: Map the Relevant Information to Add Emails to Notion
If you never used Make and Notion together, click on Add under *********connection and authorise Make to access your Notion workspace by following the instructions.
Make sure to give Make access to the Notion page that contains the database where you want to store your emails.
Then, click on Search, type in the name of your Notion database and pick it from the options.

All that’s left is to map the information from your email to your database properties.
To do so, click into one of the fields. Each field corresponds to one of your database properties. Pick the information from the appearing sidebar that you want to add from the email.
Step 6: Set Up Automatic Rules for Emails to Forward (Optional)
Your automation is ready. You can now add emails to Notion. All that’s left is to decide which emails should be added to Notion.
Here, you have two options:
- Add the mailhook address from Step 3 to your address book and manually forward emails to this address whenever you want to capture something in Notion
- Set up forwarding rules to automatically capture certain emails (or all of them)
Doing so is pretty straightforward, but the specific steps will depend on your email provider of choice. Here’s how to set up automatic forwarding rules for gMail:
First, open your Make scenario that you just built and copy the mailhook address. Then, right click on the webhook module and click on run this module only.

Then, log into your account and navigate to settings. In Settings, head over to Forwarding and POP/IMAP and click on Add a forwarding address.

In the popup, enter the mailhook address from your scenario. Confirm that you want to forward to this email address.

Google will tell you that they sent a test email for you to verify ownership of this email. To do so, head on over to your Make scenario. It should have received some information in the webhook as indicated by the little bubble with a 1 above the webhook module.
Click on it to expand the details. Under Output, expand the Text option. You’ll see the content of the email that Google sent. Look for the confirmation code and copy it.

Navigate back to your Google account and paste the confirmation code. You can now use a filter to automatically forward emails to your mailhook.

To do so, click on the filter icon next to the search bar.

Next, set up your condition, like searching for specific key words. Instead of clicking on search, click on Create Filter.

Check the Forward it option and select the mailhook address you just created from the drop down.

And that’s it! Gmail will now automatically forward all emails that match your criteria to your scenario and the scenario will add them to Notion.
Just don’t forget to turn on your Make Scenario by clicking on the Scheduling button at the bottom of the scenario. Emails to Notion, on autopilot? Check!

Pro Tip: If you want more granular control than Google Filters have to offer, you can also use another automation to forward emails to Notion. This could be something like “Starred an email” or any of the other available triggers.
Alternatively, if you don’t want to build an email-forwarding tool yourself, you can look for dedicated third-party email-to-Notion tools like TaskRobin.
Extract Tasks From Emails to Notion (Using the Power of AI)
Now, simply getting your emails into Notion is nice, but still leaves a lot to desire. Emails often contain several pieces of information and various tasks. So if you use a Task Manager in Notion, you need to somehow turn that email into individual tasks.
You can either do that manually, going through each imported email and write extract all tasks. Or you can use your personal AI assistant to do this for you.
And don’t worry. Thanks to various open source AI tools, it’s actually surprisingly easy to build such a powerful automation.
Our Recommended Way in Relay

Relay lets you add an AI step to your workflow. You can use Relay’s own AI credits or connect your own API keys (like OpenAI).
You’ll use a “Prompt AI model” action. You can choose a suitable model (like GPT-3.5 Turbo). Then, you’ll write a prompt telling the AI to find and extract actionable tasks from the email body and subject.
You can tell the AI how you want the output to be structured, for example, including task descriptions, due dates, and priority levels. Relay does a good job helping you with setting up the expected output format.

After the AI does its magic, an iterator will go through each task it found. For each task, a new page will be added to your Notion task database, filling in the relevant properties (Task Name, Due Date, Priority) with the AI’s output and linking it back to the original email.

Our Recommended Way in Make
For this example, you can use a simple Notion backend with only two databases.
Your email database will save the email itself and should contain the following properties:
- Subject
- Summary
- Sender
- Relation to the second database
Your tasks database should contain the following properties:
- Task
- Relation to the first database.
You can of course use a more complicated setup and integrate this directly with your existing task or Project Manager. If you download the free emails to Notion template at the bottom of this post, you’ll get a working backend as well.
Ready? Let’s dive in.
Step 1: Create a new scenario
Create a new scenario in Make and add a mailhook module as explained in Step 3 of the easy Email to Notion tutorial above.
Right-click the module and run this module only. Forward an email to the mailhook to ensure it works properly.
Step 2: Get Your OpenAI API Key
This automation leverages OpenAI’s language models via their API. Anyone can sign up for an account, and processing your emails will only cost you a few cents.
Head on over to OpenAI and create your account. Then, click on Setting in the top right corner and on API Keys on the sidebar.

Create a new secret key and make sure to copy it to a secure location. You’re going to need the key in a second and you won’t be able to view it again after closing the window. If you lose your key, simply generate a new one.
Step 3: Clean Up the Email Data
Before we can ask OpenAI to summarise our email, we first have to clean up the data. To do so, add a Text Parser module and opt for the Replace function.
Remove all linebreaks from your email by searching for the pattern “n”. Replace them with a space or an empty string. Make sure to set the module to Global Match Yes to remove all linebreaks and not just the first one.

Step 4: Extract the Sender of the Email
If you want to identify the person sending you the email, add another text parser module with the Match Pattern option.
Use From:.*<(.*)> as your pattern to extract the sender email of the forwarded email. Set Global Match to No to avoid matching any other emails by accident.

Step 5: Let Open AI Summarise Your Email
Now it’s time to send our cleaned up email to OpenAi.
Make also offers a pre-built OpenAI module (more on that below), but we’re going to use the HTTP module with the Make a request option to build our own custom API call — it gives you full control over the request.
Set the module up as follows:
- URL: https://api.openai.com/v1/chat/completions
- Method: POST
- Header
- Name: authorization
- Value: Bearer YOUR OPENAI API KEY
It is crucial that your authorization header looks as shown in the image (but of course with your own API key instead of this test value). Make sure to leave a space between the word Bearer and your token.

You don’t need to set any parameters in the Query String.
The second half of the module should look like this:
- Body type: Raw
- Content type: JSON (application/json)
- Request content: see below
- Parse response: Yes

In request content, you add the actual information for OpenAI to process your request.
If you’re not familiar with writing API requests, I recommend that you simply copy the following text. To write your own variation, please reference the OpenAI API documentation.
{ “model”: “gpt-4o-mini”, “messages”: [{ “role”: “user”, “content”: “You are an expert assistant. Summarize the following email forwarded to you by doing the following: ignore the forwarding header, summarize the email, provide a list of comma separated action items after the title ACTION ITEMS. Email: {{2.text}} SUMMARY:” }], “temperature”: 0.5, “max_tokens”: 200 }
The above requests sets four parameters:
- model: sets the model to use. “gpt-4o-mini” is a fast, inexpensive option that works well here. If a newer model is released, simply swap out the name and you’re good to go
- prompt: this is the actual request for the AI. Feel free to modify the prompt text to get different types of responses. In order for the rest of the automation to work, you should always ask for a comma separated list of action items. Replace {{2.text}} with the mapped data from your cleaned up email of Step 3 as shown in the image above.
- temperature: sets the “creativity” that OpenAI will use when interpreting your prompt. It’s a value between 0 and 1 with 1 being the most literal and strict interpretation of the prompt.
- max-tokens: sets how many tokens OpenAI will use to process your request. 100 tokens roughly equal 75 words. If you want to process longer emails, you should increase this value. Pricing depends on the model, but with current models, summarising an email costs a fraction of a cent — see OpenAI’s pricing page for details.
Before moving on building your emails to Notion automation, make sure to test your build and get a sample response from OpenAI. To do so, click on Run once in the bottom left corner of the scenario screen and forward an email to your mailhook.
The http module should return a status with a 200er number and your answer under Data – Choices – Text.
Trouble Shooting
If OpenAI returns an error message, check the response to see where the issue is. If it states that your json body is formatted wrong, make sure that you have set all quotation marks and commas as shown in the image above. Everything should be wrapped by curly brackets.
If everything is set up correctly and it still returns an error, it might be because your email contains additional quotation marks. To make sure that this doesn’t lead to an error, replace all double brackets ( ” ) with single brackets ( ‘ ) inside the email.
You can do so by wrapping the text inside the http module with a replace function as shown in the image below.

Using The Official Make OpenAI Module
Make also offers an official OpenAI module. You can swap out the http module in this automation for the official module. Opt for its chat-completion action and set up the parameters as described above.

Step 6: Extract the Tasks from your Email
It’s time to get the individual tasks from the email. Add a text parser module to your automation and opt for Replace.
Set it up to match the pattern
^.*:
As the new value, set an emptystring. This will isolate the comma separated list of tasks. Make sure to turn on Global match. The input is the response that you get from OpenAI.

Step 7: File the Email in Notion
Now add the Notion Module Create a Database item and add the email to your email database. Map the subject line to the name field and the sender that you isolated in Step 4 to the sender field.
Add the response from OpenAI as the summary.
If you want to clean up the subject line a bit, you can set a small replace function as shown in the image below.

Congratulations, you can now add emails to Notion with an executive summary provided by your AI asistent.
Step 8: Create the Individual Tasks in Notion
Now onto the last step, adding the individual tasks to Notion.
To do so, we first need to turn our list of comma separated tasks into an array. Simply add an Iterator (which can be found under the flow control options) and set up a split function
{{split(4.text; “,”)}}
This will take your string of action items and turn it into an array. Afterwards, the iterator makes sure that each element of the array is processed separately.

Finish your automation by adding another Notion module Create a Database item. This time, pick your tasks database and add the result of the iterator as the task name and the previously created email entry from Step 7 as your relation.

And that’s it!
You just built your personal AI powered email assistant for Notion. You can now easily sync email to Notion, get a summary of the content and even extract tasks from email using AI.
Looking for more ways to leverage AI for Notion? Check out this AI Image Generator!
Get the Free Email to Notion Template
Don’t want to build this yourself? Simply download the Emails to Notion Template and get the automation blueprint and Notion backend, built-for-you.