Never take any meeting notes, ever again thanks to OpenAI Meeting Summaries. Sounds too good to be true? Well, we all know that effective meetings are crucial for success. And somehow, you need to keep up with all the information and tasks flying around. So you take lengthy notes (which means you can’t fully participate in the conversation) and spend even more time reviewing them afterwards. But thanks to OpenAI, this is a problem of the past. Combine OpenAI with Otter.AI and Notion and you get an incredibly powerful tool that can help you save tons of time and effort by automatically generating concise summaries of your meeting transcripts.
Using OpenAI to summarise your meeting notes has numerous benefits. First, you can be fully present during the meeting. Second, you can quickly review and understand the key points of a meeting afterwards, eliminating the need to sift through lengthy transcripts. Last but not least, all action items will be automatically added to your task manager of choice.
In this blog post, you’ll learn how to use OpenAI in combination with Otter.ai, Make and Notion to automatically summarise your meeting transcripts. Read on for the step-by-step instructions or scroll to the bottom to download the free AI Meeting Notes for Notion Template.
Step 1: Create your accounts
Before it’s time to automatically transcribe and summarise your meetings, you need to set up your various accounts. And don’t worry about cost: all tools offer extensive free plans.
- Sign up for your Otter.ai account (the tool creating your meeting transcripts)
- Sign up for Make (the automation tool that combines everything)
- Sign up for Notion (the workspace tool to save your meeting notes & tasks in)
- Sign up for OpenAI (the AI tool that will summarise your meeting transcript)
Looking to learn more about Notion? Here’s a complete free Notion course.
Looking for more OpenAI Tutorials?
Step 2: Prepare your meeting transcript
Next, it’s time to create your meeting transcript. There are a lot of tools to choose from and you can use any that allows you to export a text file of your transcript. In this example, we’re using otter.ai.
Otter.ai has a generous free plan that allows for up to 300 transcribed minutes per month. The only two drawbacks are that you can’t transcribe recordings afterwards and that you cannot automatically export them. Overall a great choice to create your first OpenAI Meeting Summaries.
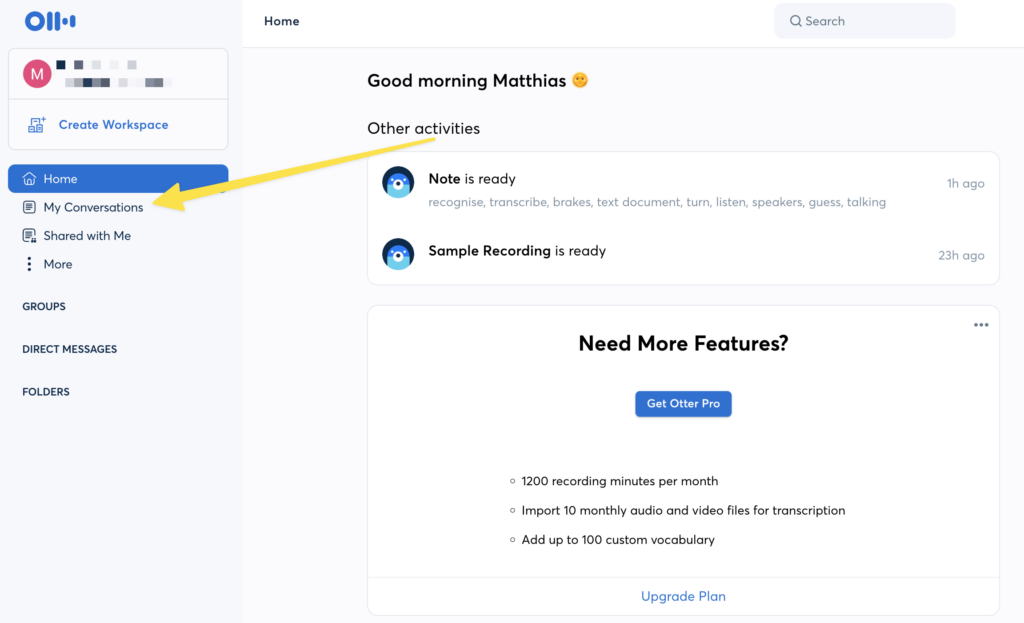
To export your transcript manually, log into your account and click on My conversations.
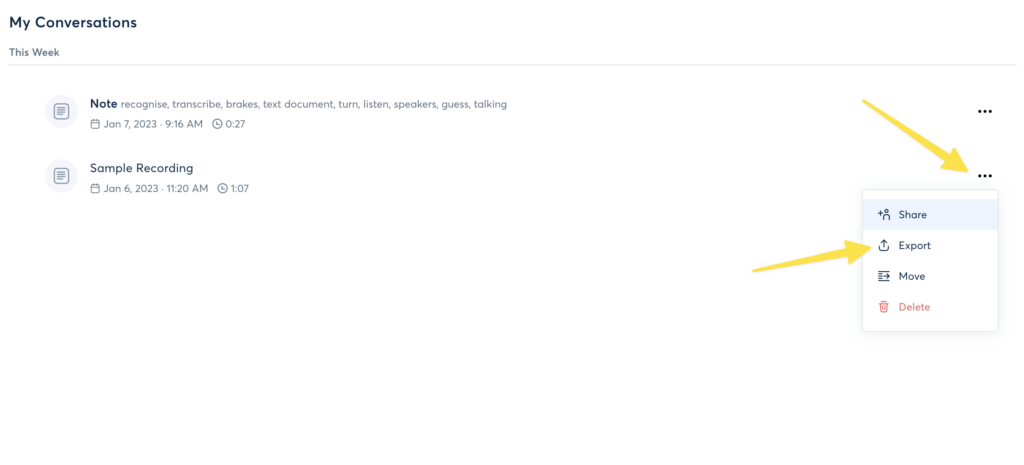
Then, click on the three dots next to the transcript and select Export.
Pick the txt format, name your file and export it.
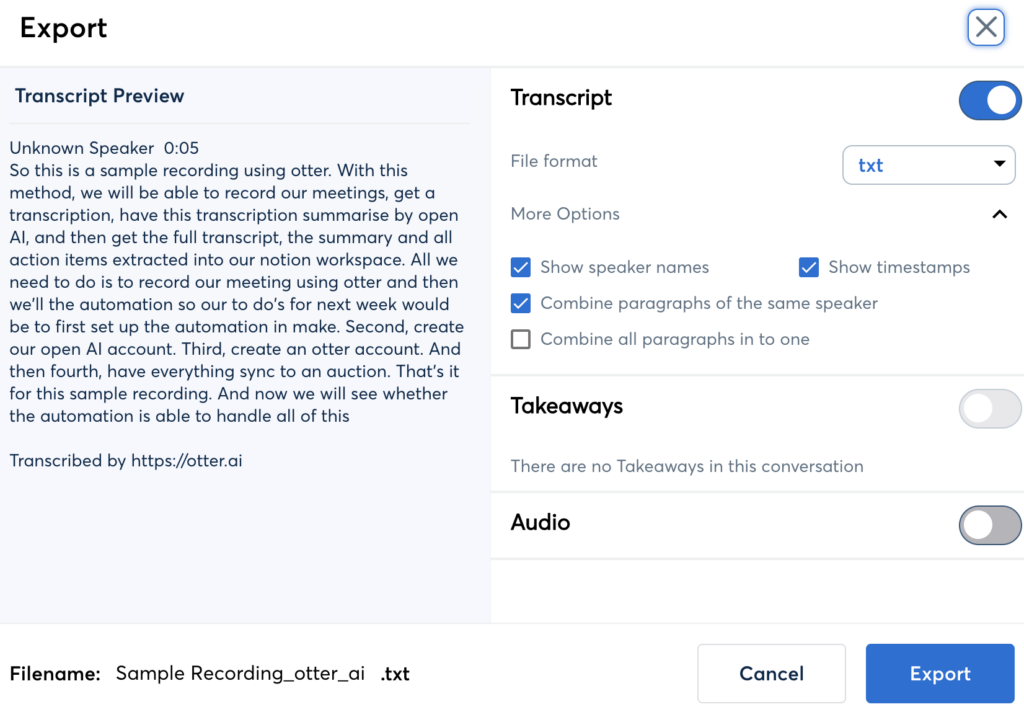
Last but not least, upload the transcript to your cloud storage of choice. We’re using Google Drive in this example, but Dropbox or OneDrive work just as well.
Make sure to create a new folder exclusively for meeting transcripts.
Step 3: Get the meeting transcript into Make
Now it’s time to build the automation. Log into your make account and click on the big purple Create a new scenario button.

Click on the big purple plus button and search for Google Drive. Pick the app and select the Watch Files in a Folder Module.

If you’ve never used Make with Google Drive before, click on the yellow Add button under Connection. Follow the instructions to authorise Make and give it access to your Drive.
Once done, set up the module to watch for newly created files in the folder that you created for your meeting transcripts.
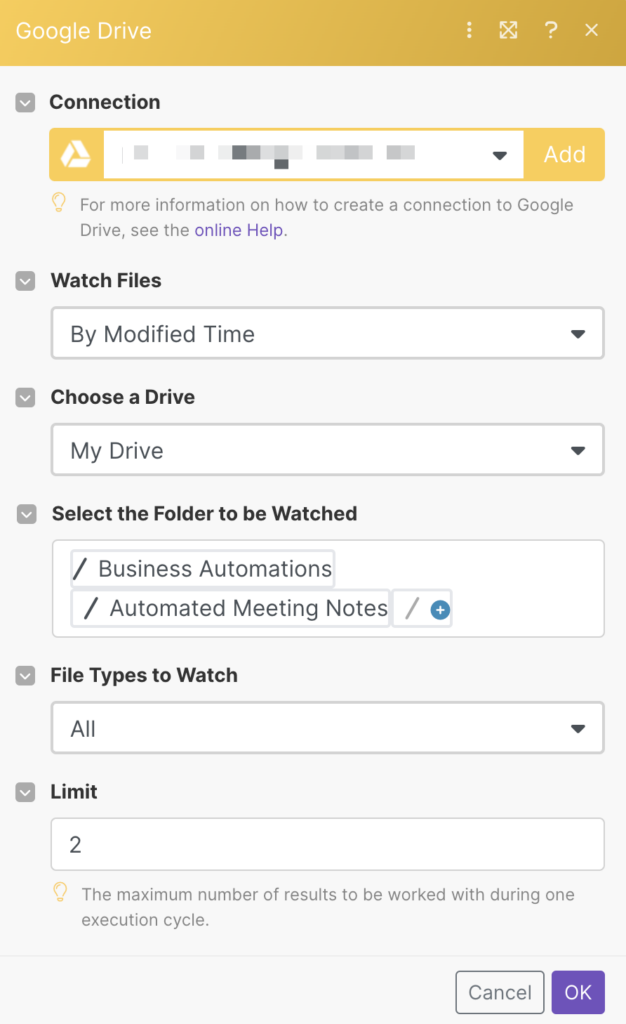
Next, add another Google Drive module, this time opting for the Download a file option.
Set it up to download the newly found file from the previous step.
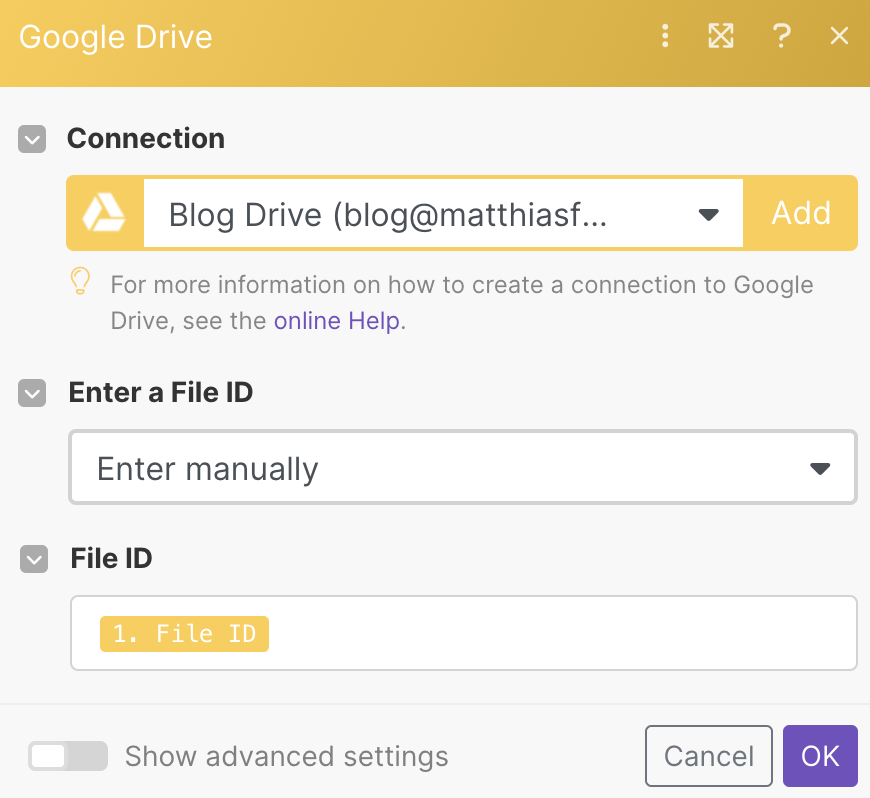
Now you’re ready to turn your meeting transcripts into meeting summaries.
Step 4: Summarise the meeting notes using OpenAI
Time to add the power of OpenAI to your automation. First, log into your OpenAI account and click on Personal in the top right corner. Navigate to your API keys.
Here, generate a new api key, copy it and save it to a secure location. You won’t be able to see the key again after you leave this window and you’ll need it in the next step. If you forget your key, you can always generate a new one.
Now head back to your automation, add a module and search for OpenAI. Select the Create a completion option.
To connect your OpenAI account, click on the green Add button under Connection and paste your API key. Navigate to https://beta.openai.com/account/org-settings in your browser and copy the organization ID to paste it in the corresponding field. Then, save your connection.
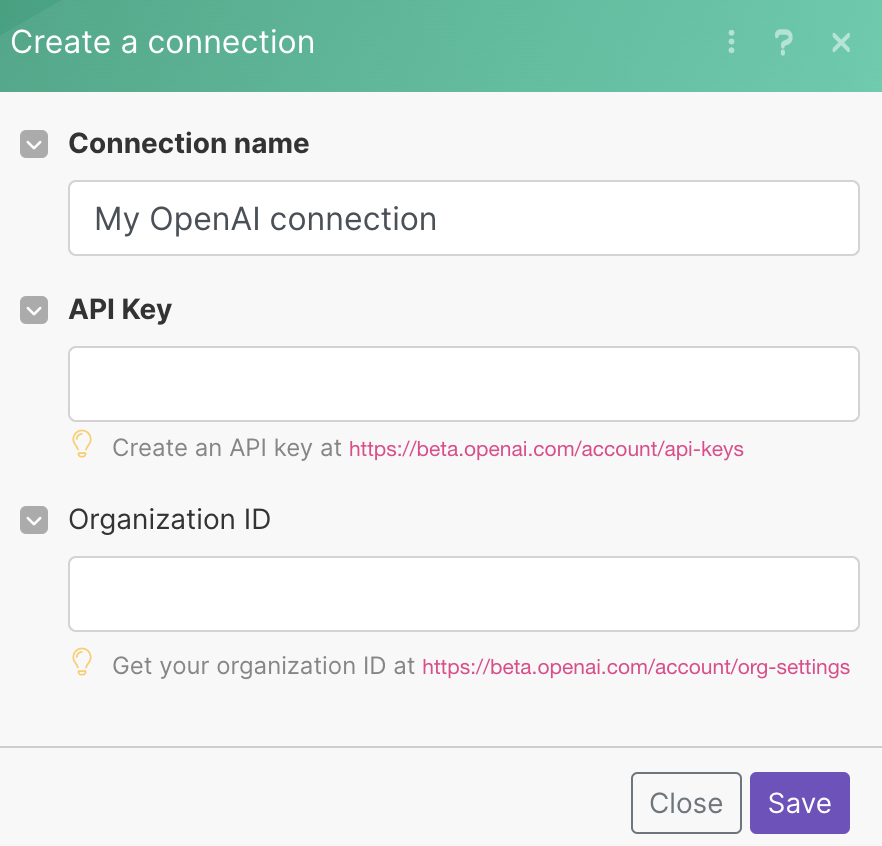
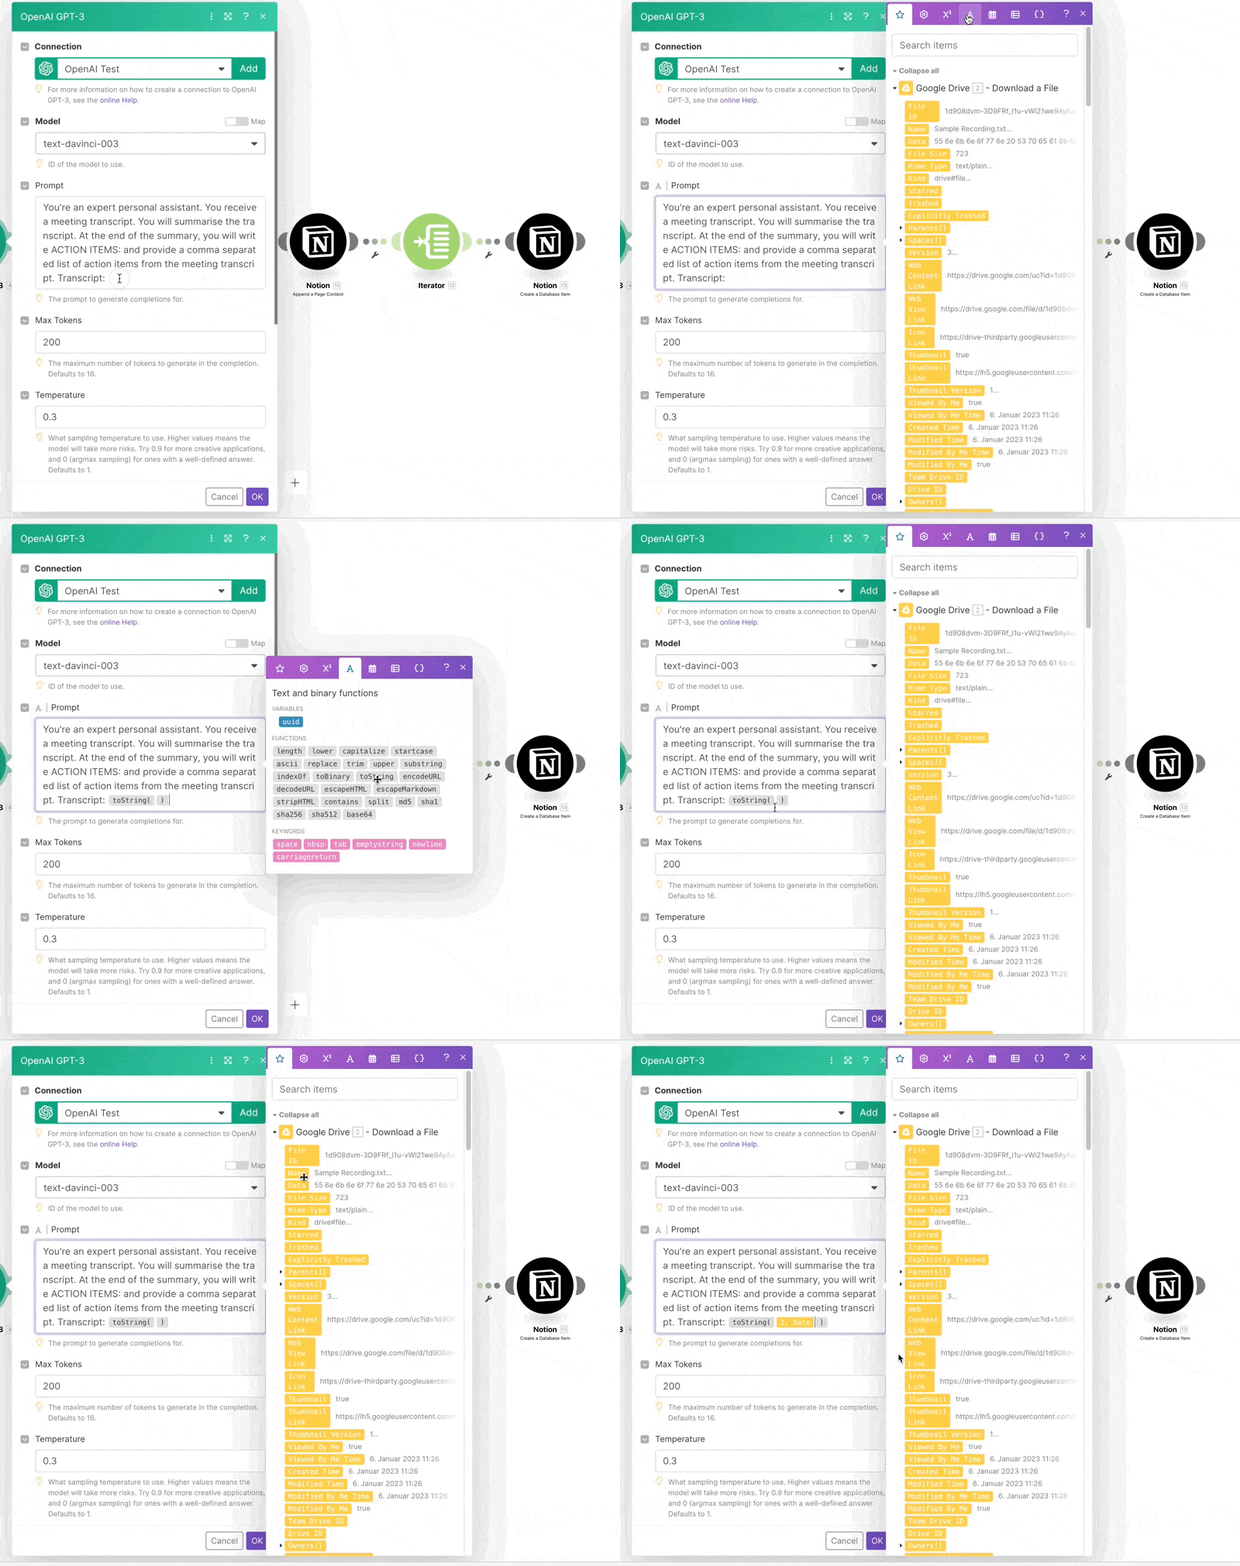
To set up the module, you first need to select a model. OpenAI has various training models with different strengths. Most of the time, it’s best to select the latest model. At the time of publishing, that’s text-davinci-003.
Afterwards, it’s time to write your prompt. The prompt is the most important part of using an AI interface like OpenAI. Think of it as the instructions of the AI. Just like you would explain to a co-worker or assistant how you want some work to be done, you need to tell the AI what you expect.
In general, more detailed prompts provide better results. For this meeting transcript summarisation, a short prompt like this one works fine:
You’re an expert personal assistant. You receive a meeting transcript. You will summarise the transcript. At the end of the summary, you will write ACTION ITEMS: and provide a comma separated list of action items from the meeting transcript. Transcript:
Feel free to adapt this prompt to your specific needs. Some possible modifications include:
- ask for a bullet list of the three key take aways at the top of the summary
- limit the summary to a length of 300 or 500 words
- ask for a sentiment analysis
Inside the prompt, after Transcript:, you need to provide the actual meeting transcript. To do so, click into the field, navigate to String Formulas (indicated by the A icon) and pick toString. Then, add the data from the downloaded transcript module.
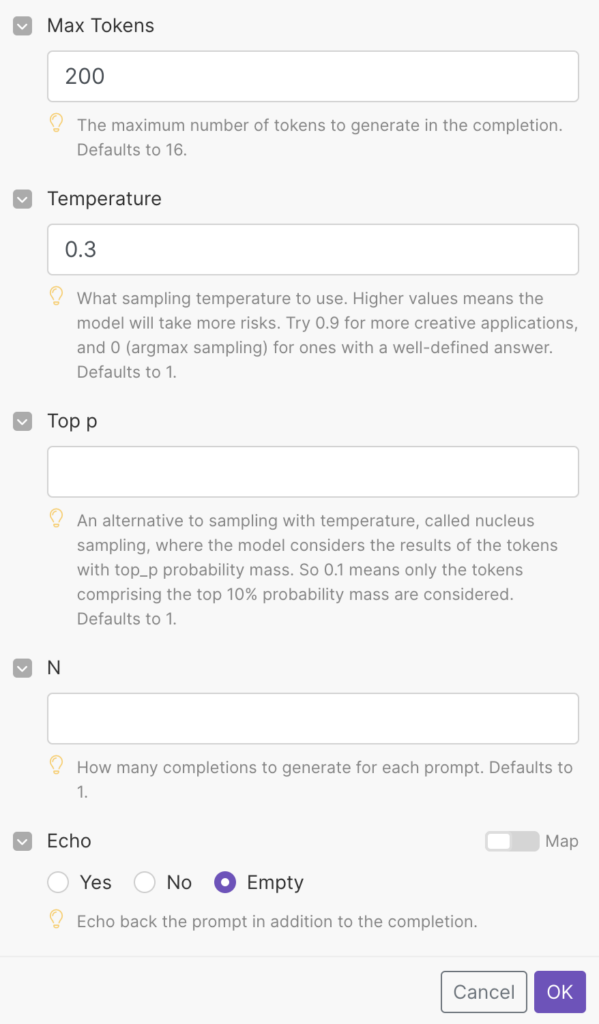
Set the Max Tokens depending on the length of your transcript you’re trying to summarise. For a short example transcript, 200 is sufficient. Check out this token calculator if you need an estimate for longer meeting transcripts.
Last but not least, set the temperature on the lower end of the range. The closer it is to 0, the less “creative” OpenAI will be with the response. Given that our meeting summaries should be fairly reliable, pick a number below 0.3.
Test your automation by clicking the purple Run once button in the bottom left corner. If everything is set up correctly, you’ll receive a summary of your transcript back from OpenAI.
Step 5: Parse Your AI Meeting Notes
Meeting summaries are great to improve your business communication, but it would be even better if you also had all the individual action items. That’s where this next step comes in.
The meeting notes summary from OpenAI should have a list of action items at the end. To isolate this list, add a Text Parser Module to the automation and pick the Replace option.
Use the following pattern to remove everything else from the summary:
^.*action items:
Make sure to set Global Match and Singleline to yes and Case sensitive to no.
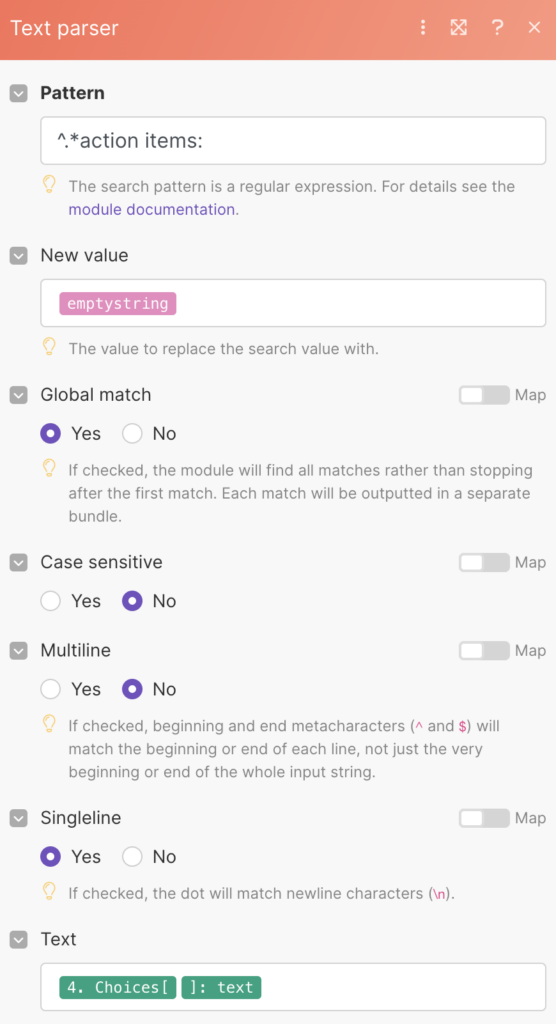
You will need this isolated list of action items later to add the tasks from the meeting as individual items to your task manager.
Step 6: Add AI Meeting Summary to Notion
Time to add your AI Meeting Notes Summary to Notion. You can use any existing databases that you have to organise your meetings and tasks or quickly create this simple setup (also included in the free Notion template at the bottom of this post):
One Meetings database with three properties:
- Name – the name of the meeting
- Summary – a text field for the AI generated meeting summary
- Tasks – a relation property to the second database
One Tasks database with three properties:
- Name – the name of the task
- Done? – a checkbox to indicate the task status
- Meeting – a relation property to the first database
Alternatively, get the Task Manager for Notion Template or the Project Management in Notion Template and use the included databases for this automation.
Then, add a Notion Module to your automation and pick the Create a database item option. Set it up to add the name of the meeting and the AI Meeting Summary as a new entry.
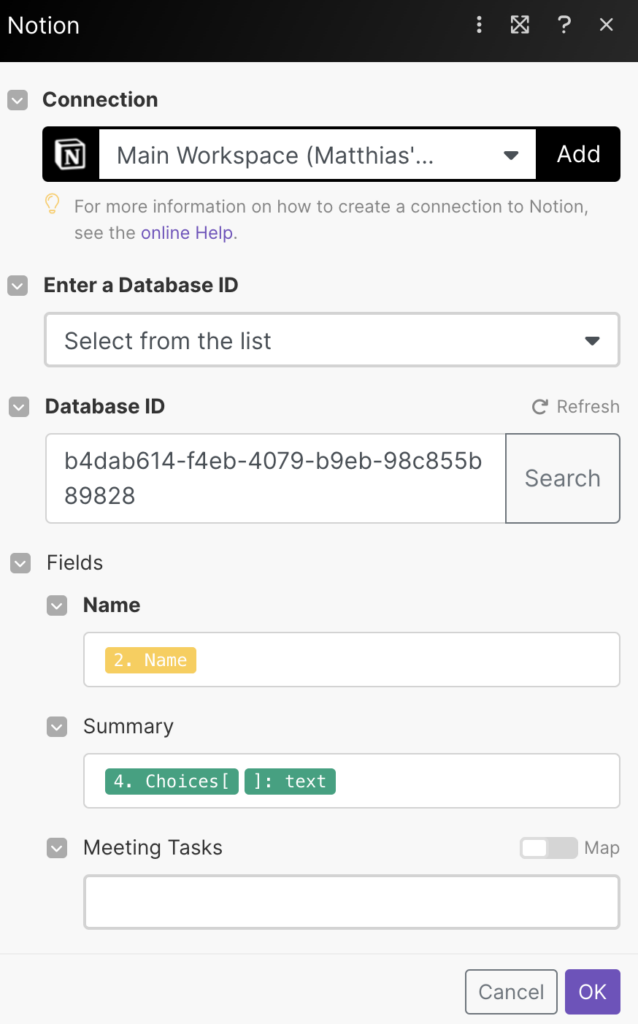
Follow up with a second Notion Module, this time going for the Append a Page Content option.
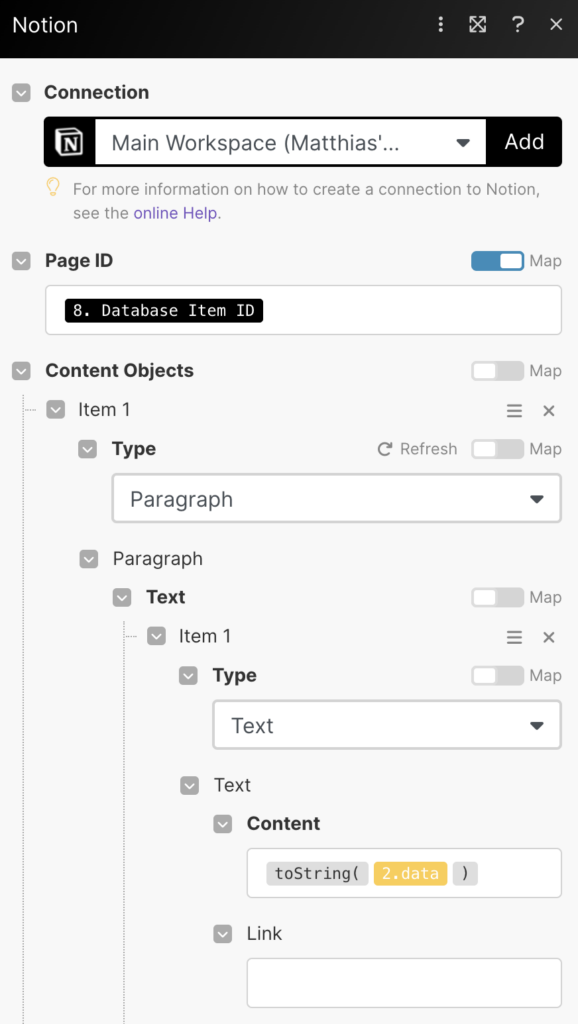
Use this to add the complete transcript to the Notion page you’ve just created. Use the same approach to convert the data to text as described in Step 4.
Step 7: Identify Tasks from Meeting Notes
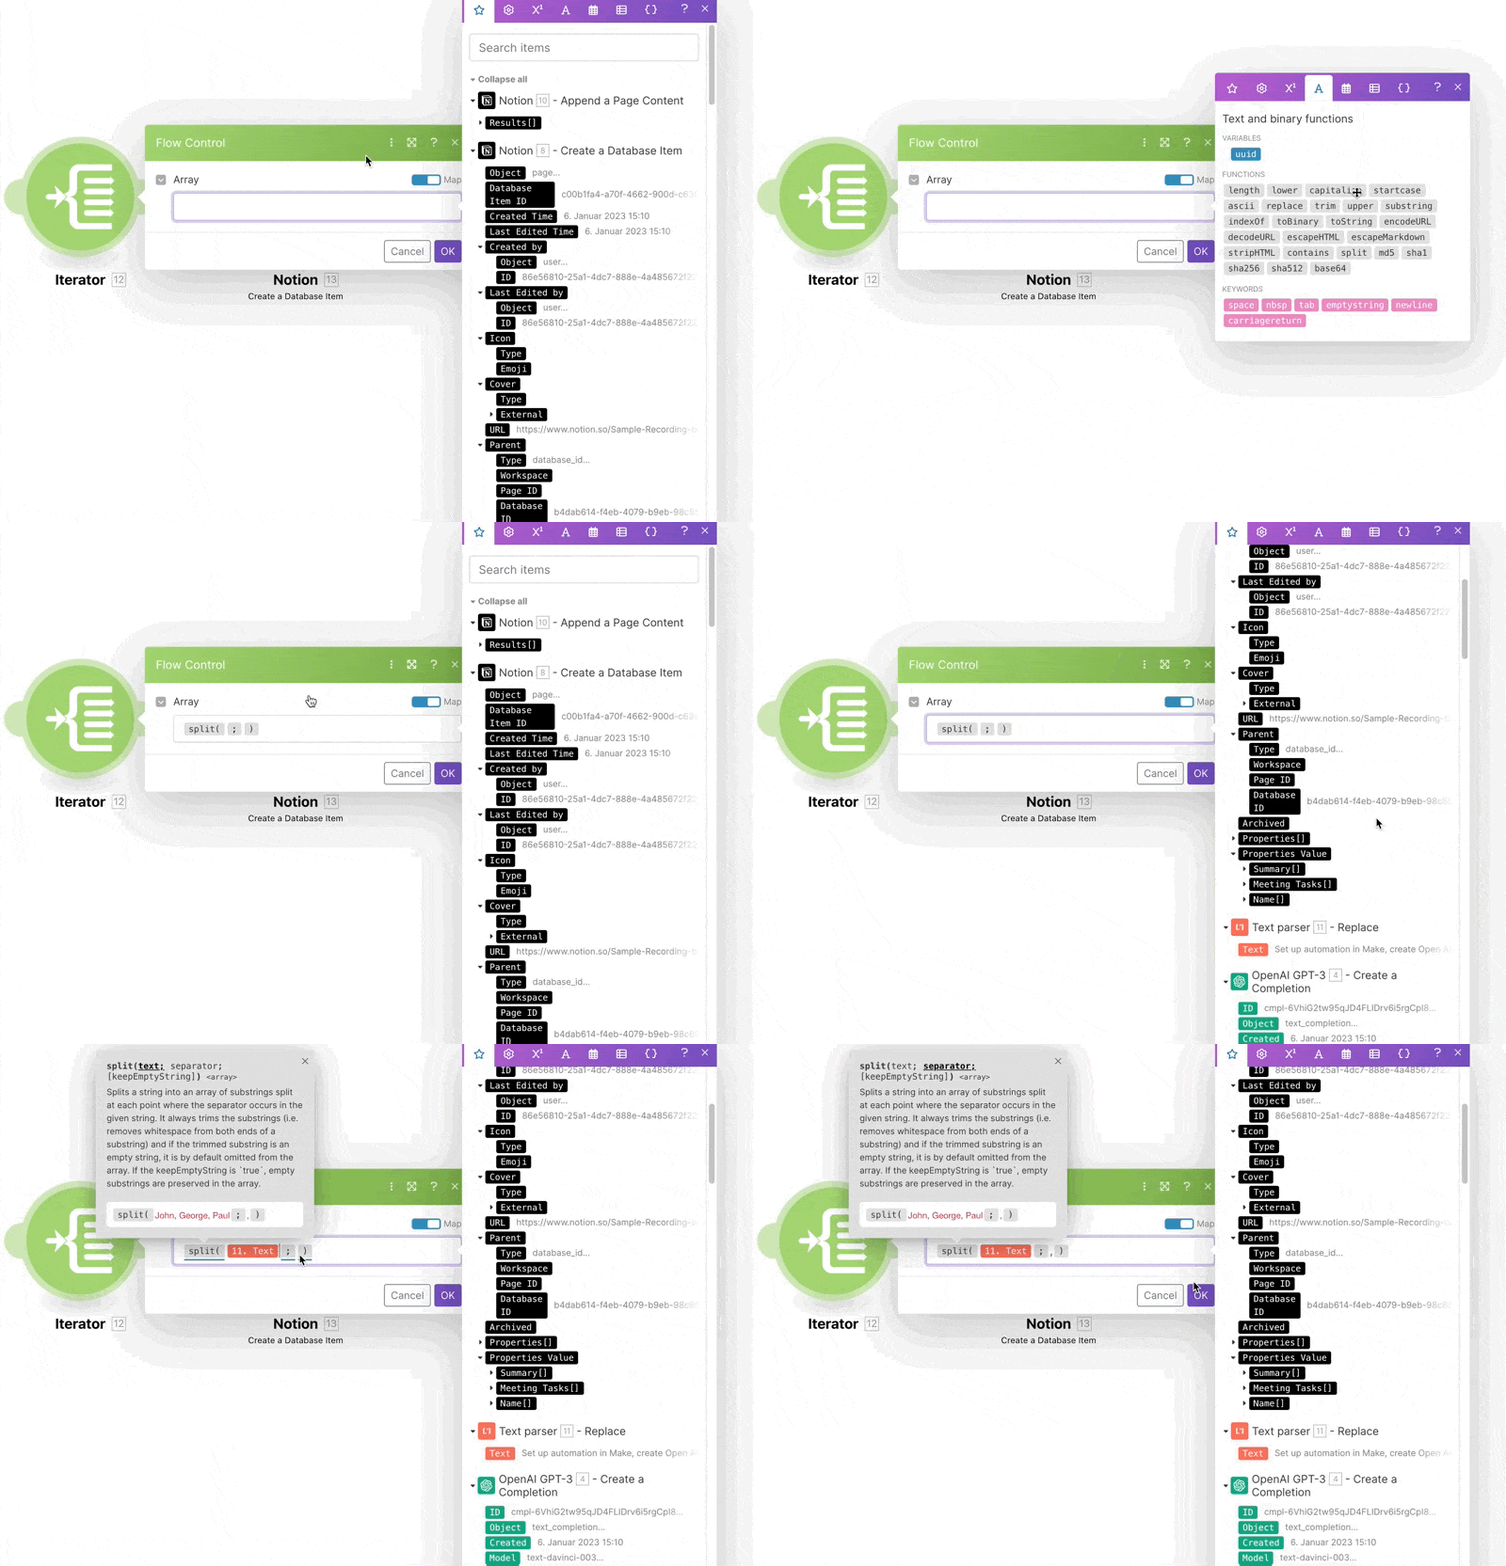
It’s time to turn the isolated list of tasks from Step 5 into individual action items. To do so, look for the Flow Control module and pick the Iterator option.
In there, add a split function to turn the string of tasks into an array. This allows you to add the individual tasks to Notion instead of having just one long comma separated list in your summary.
Use a comma as the separator (this is why we ask OpenAI in the prompt to provide a comma separated list) in the meeting summaries.
Step 8: Add individual tasks to Notion
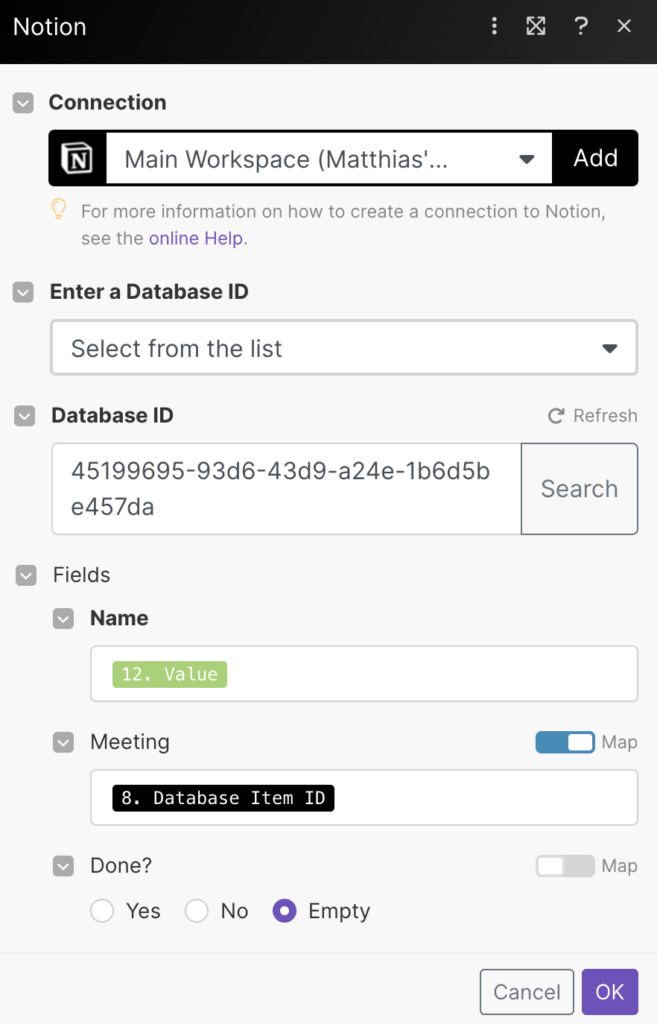
Last but not least, add another Notion Module, this time opting for Create a database item.
Set it up to add the individual values from Step 7 to the task database. Turn on Map for the Meeting relation and connect it to the meeting entry that was created in Step 6.
And that’s it!
You now have your own personal AI assistant who will take any meeting transcript, summarise it and list the individual tasks that need to be done. Meeting summaries made easy.
Get the free AI Meeting Notes for Notion Template
You can download everything you need to create your own OpenAI Meeting summaries for free below.


