Note-Taking in Notion just got a lot more powerful, thanks to ChatGPT, AI and one of the most underutilised features on your iPhone: Shortcuts. In this tutorial, you’ll learn how you can turn your iPhone into a Note-Taking powerhouse. No more scrambling to find pen and paper or forgetting your thought while you wait for your note-taking app to load. Simply ask Siri for help and let OpenAI do the rest for you. Transcribe and summarise your ideas in seconds and even get it correctly tagged. Personal Knowledge Management has never been this easy.
Continue reading for step-by-step instructions on how to build this shortcut yourself or jump to the bottom of the article to download the template.
AI-powered Note-Taking in Notion Note-Taking
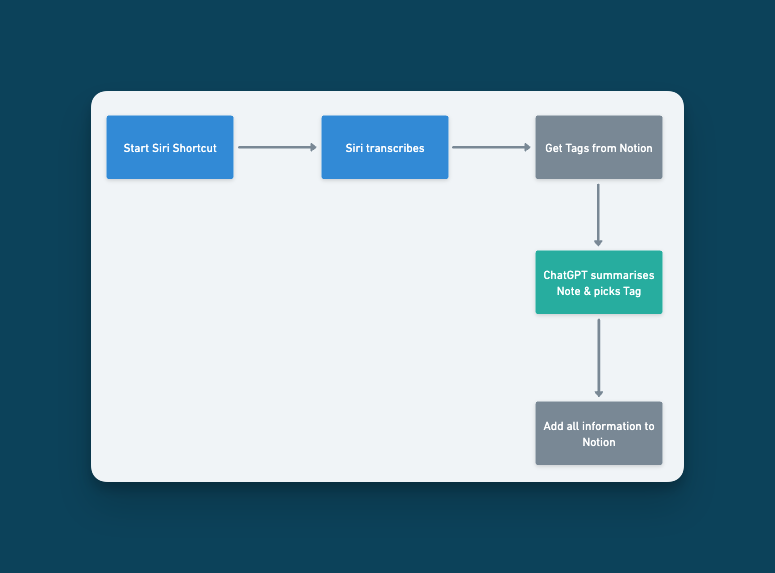
With this tutorial, you’ll be able to build a shortcut that takes your voice note, transcribes it, sends it to OpenAI for a summary and then adds everything to your Notion Notes Database. What’s more, you can also pre-define a series of tags for topics you’re interested in and the shortcut will automatically assign the correct tag to your note.
Using Tags in a separate Notion Database (so called “Global Tags”) is a powerful upgrade to your Notion Workspace, because it enables you to tag information across various databases. For a powerful example of the benefits of Global Tags, check out the Academic Writing Template.
Not interested in the AI feature of this note-taking system? Here’s how you can send and transcribe simple voice notes to Notion.
Step 1: Build Your Notion Note-Taking Backend
Start by creating your Note-Taking System in Notion. If you’re already using a Zettelkasten in Notion or a similar PKM system, you can simply adapt it for this use case.
If you want to start from scratch, create two databases:
A “Notes” database that will act as the catch-all place for your notes with the following properties:
- Name – the title property of your database storing the name of your note
- Transcript – a text property to store your full voice note
- Summary – a text property to store the AI summary of your note
- Tag – a relation property to connect your notes to the tags in the second database
Tip: confused about relations, roll-ups and all the cool things you can do with a database in Notion? Check out my complete Notion Tutorial.
A “Tags” database to externally store the tags for your setup with the following properties:
- Name – the title property of your database storing the name of your tag
- Notes – a relation property to connect your tags to the notes database
Before you build the rest of this shortcut, add a few tags to your tag database so that the automation has information to work with. No matter what tags you add, always add a “No Tag” entry to your database. This will act as a fallback in case your AI assistant can’t match your note to a tag.
With your two databases built, all that’s left is to create a Notion Integration so that you can add entries to your database directly from your phone.
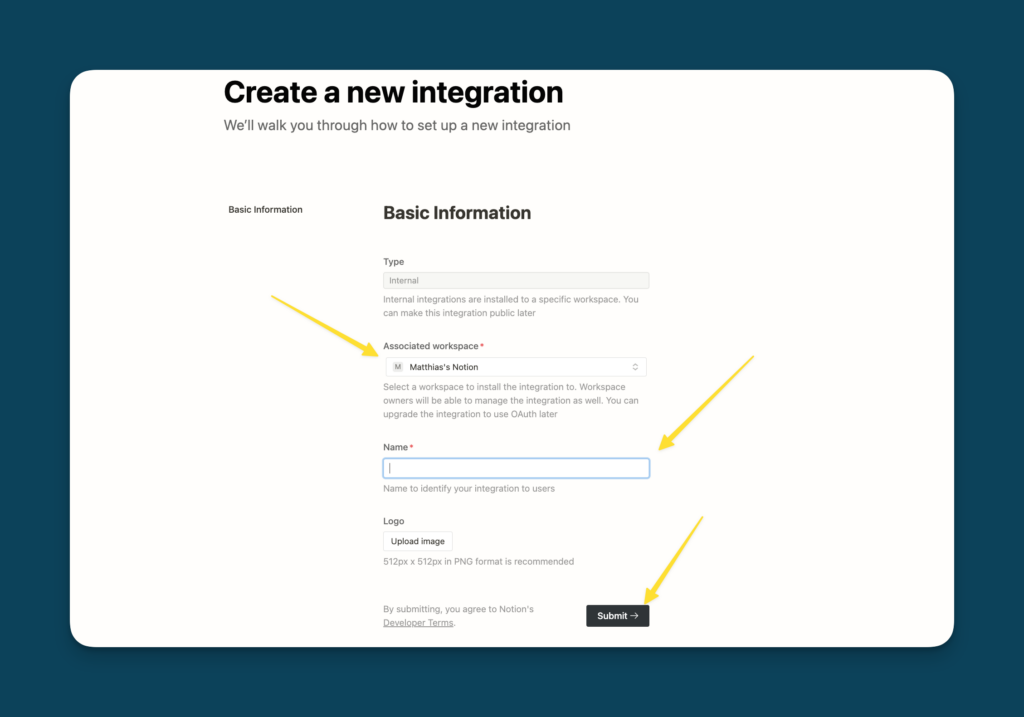
To do so, head on over to https://notion.so/my-integrations. Click on the New Integrations Button to launch the setup process.
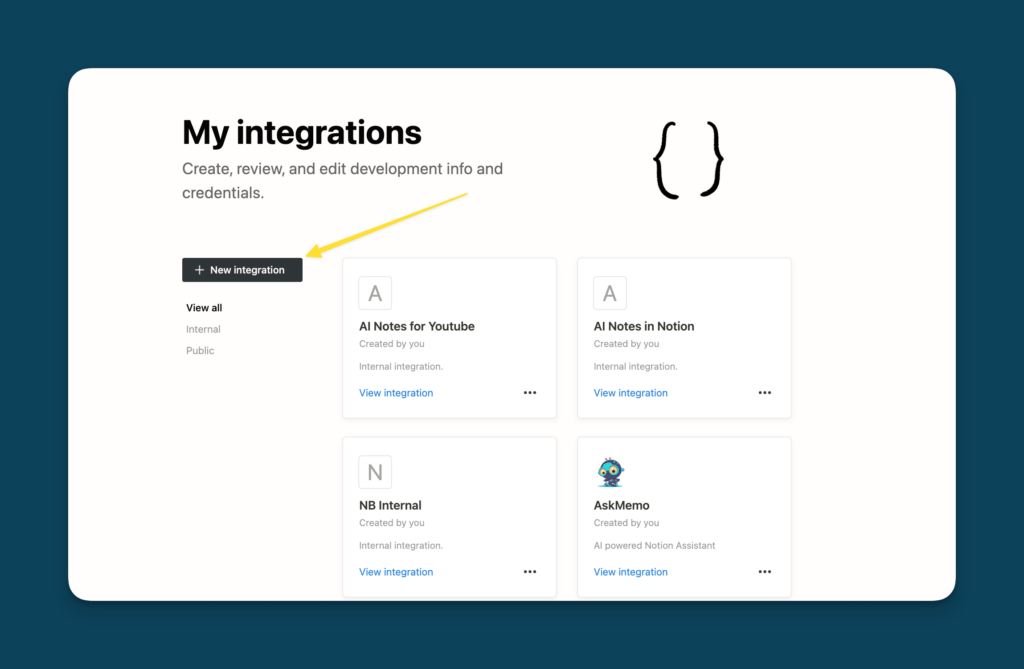
Then, select the workspace where you created your databases, give your integration a catchy name and hit submit.
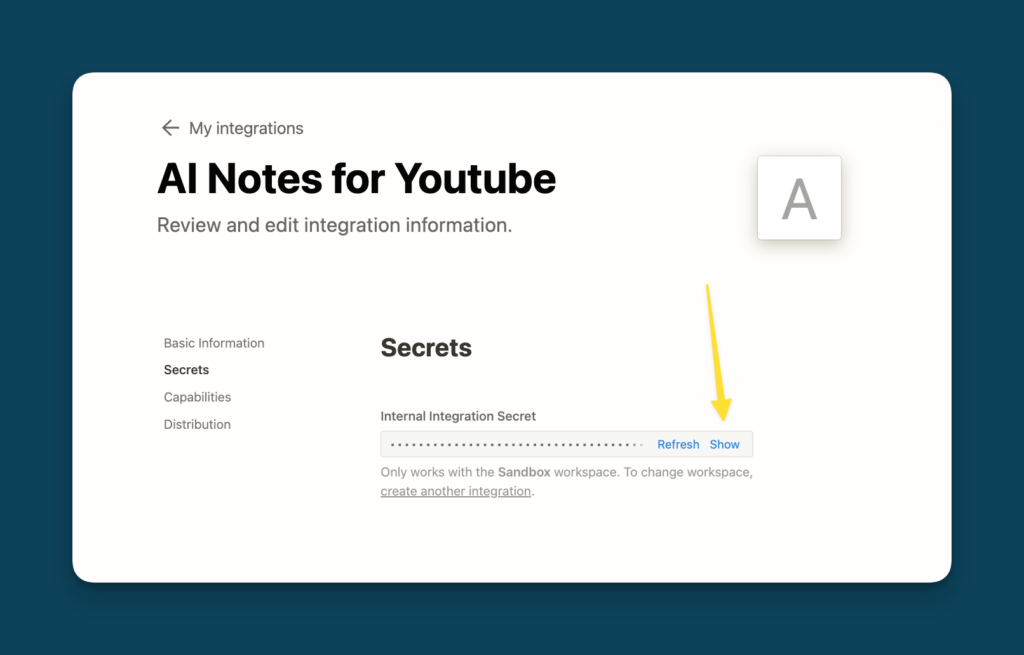
Now, hit Show and then Copy to copy your Internal Integration Secret. This is your API Key and you need it to authorise changes to the databases.
Think of it like password and user name at once. If you use this, then Notion knows who you are and that you can access your workspace.
Make sure to store this secret in a secure location. Anyone could access your workspace with it
Lastly, head back to the page that contains your databases in your Notion workspace, click on the three dots in the top right corner and scroll to Add Connections at the bottom. Click on it and select the integration you just created.
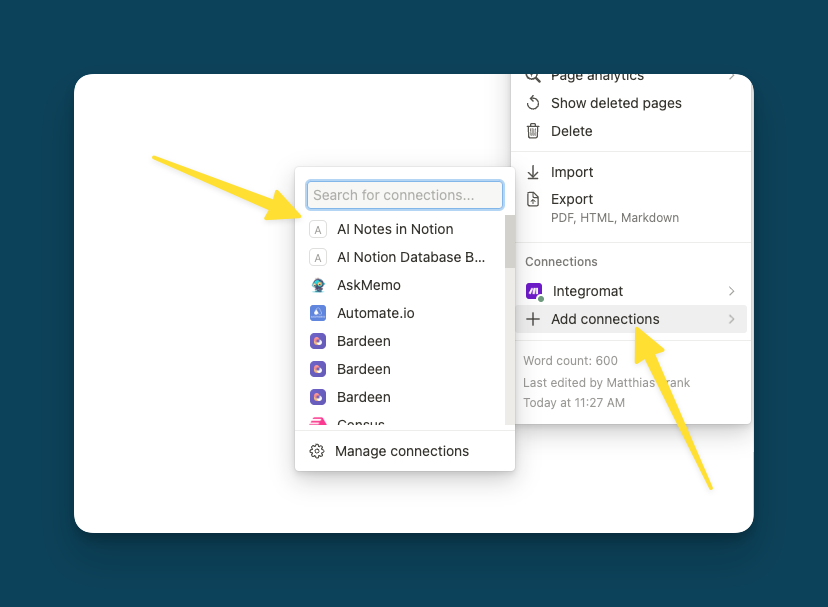
Tip: If you don’t see your integration, refresh the browser or quit and re-open Notion
Step 2: Set Up The Siri Shortcut for Notion
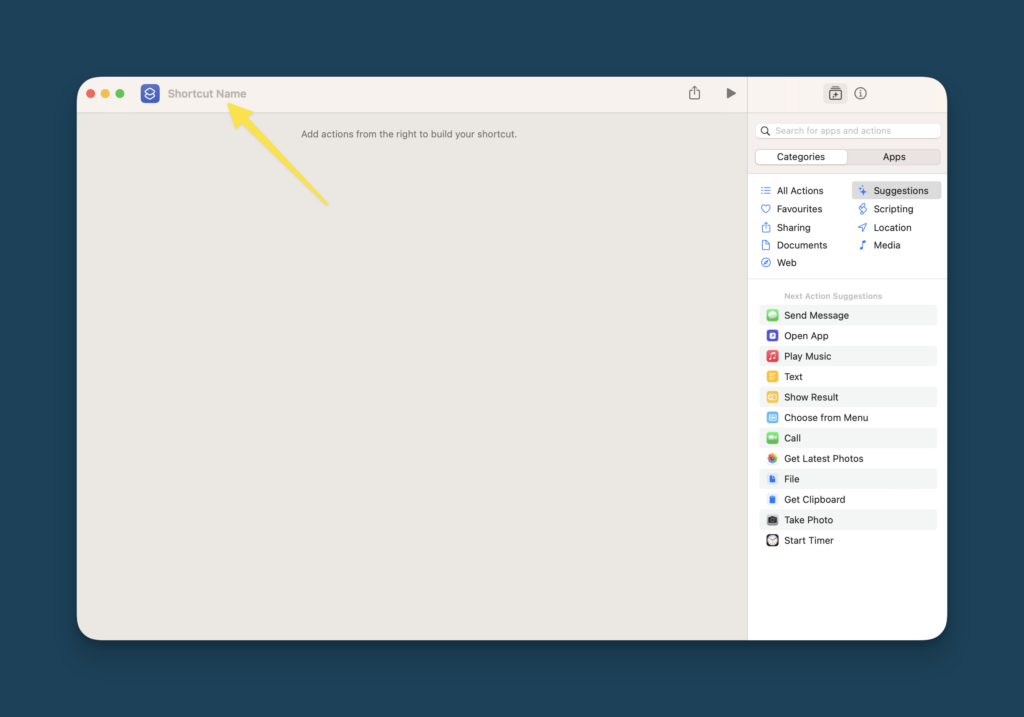
Open your Shortcuts App on the Mac, iPad or iPhone and click on the + icon in the top right corner to create a new shortcut. Before doing anything else, give it a name.
This name will later launch the shortcut if you say it after “Hey Siri…”, so make sure it’s something you can speak comfortably (like “Hey Siri, create a new note”)
Step 3: How to teach OpenAI Your Tags
With your shortcut ready, let’s teach OpenAI what topics you’re interested in. To do so, you need to query your Tags Database in Notion to list all the tags that you created.
How to Query a Notion Database using Apple Shortcuts
To do so, add the Get contents of URL module to your shortcut.
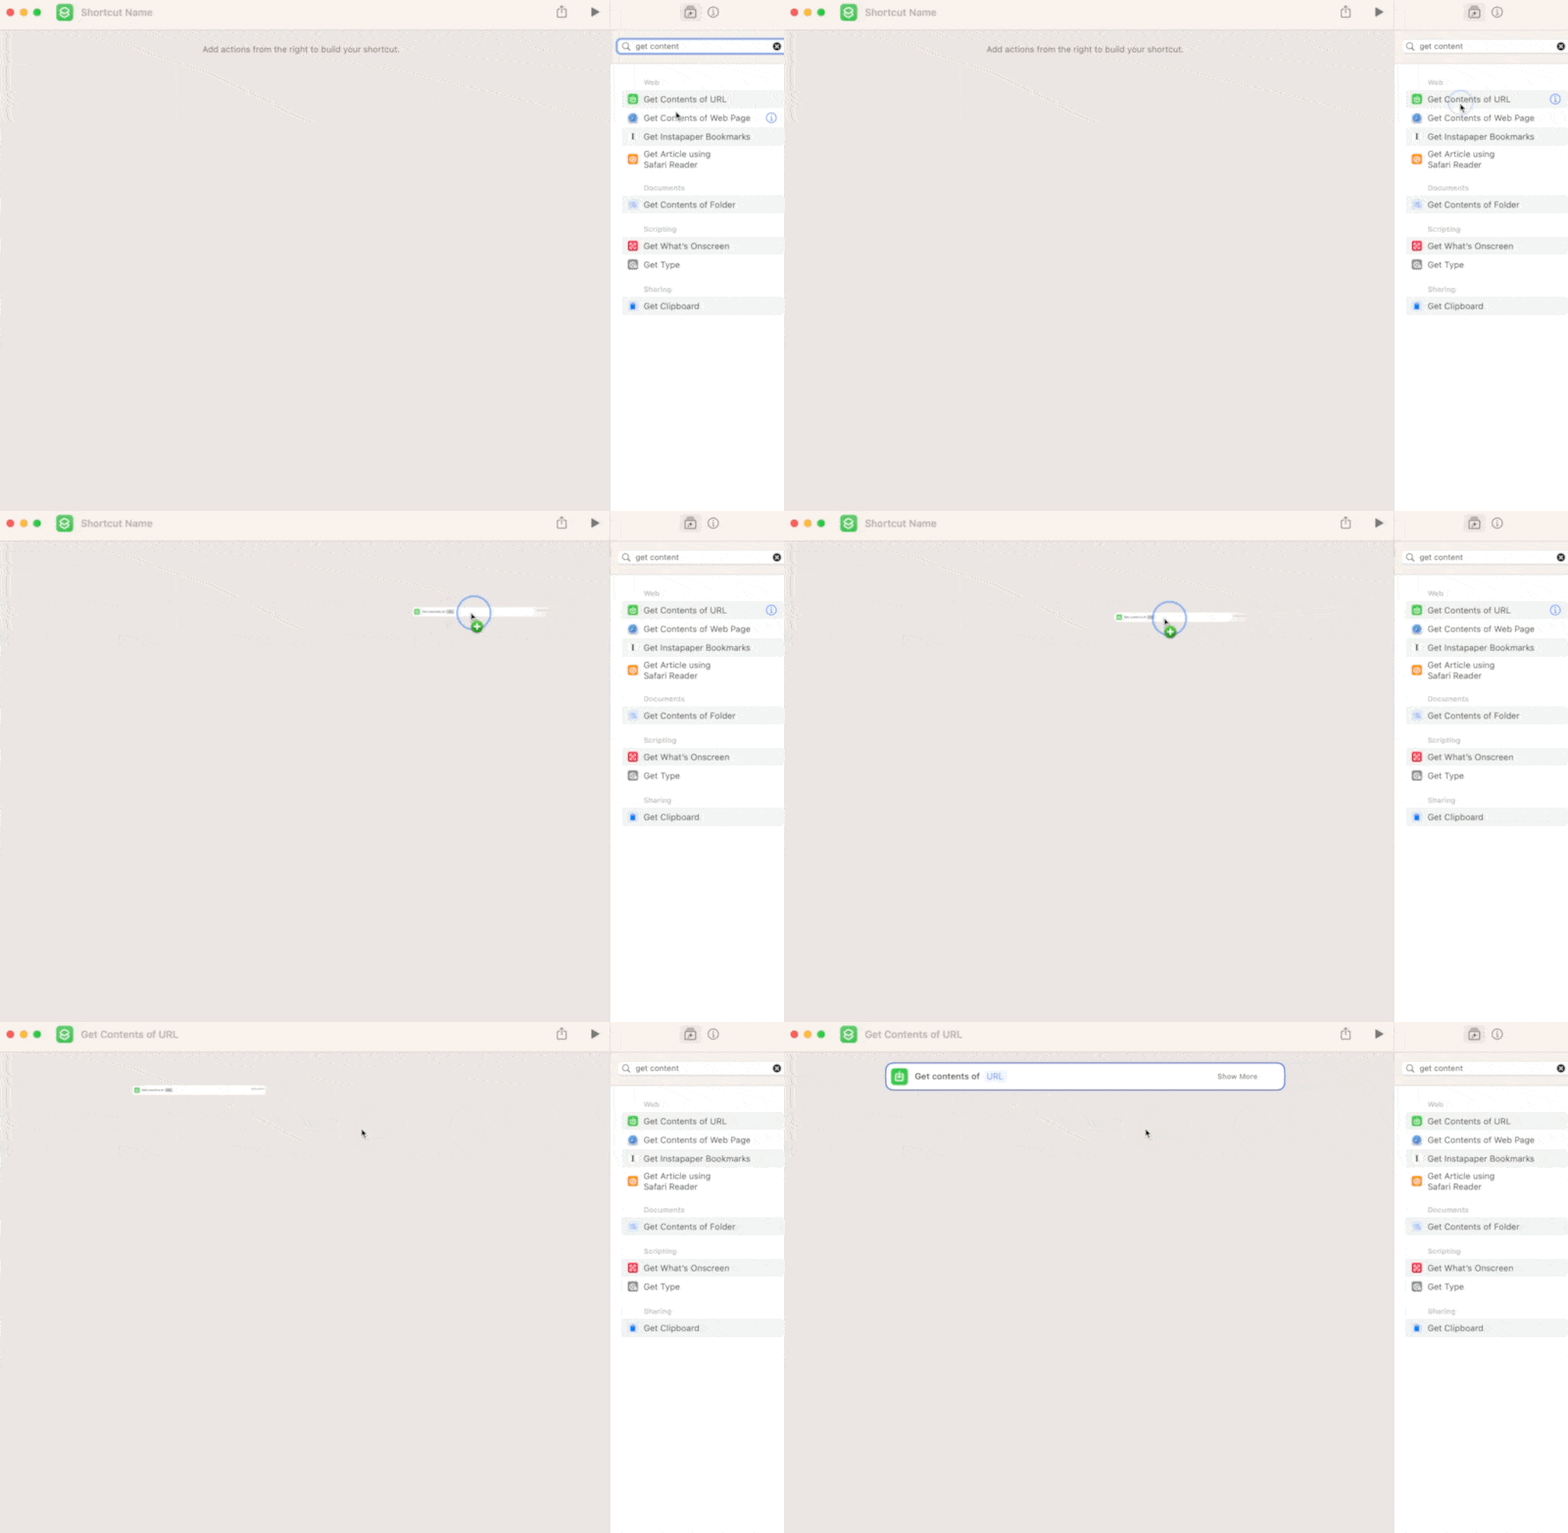
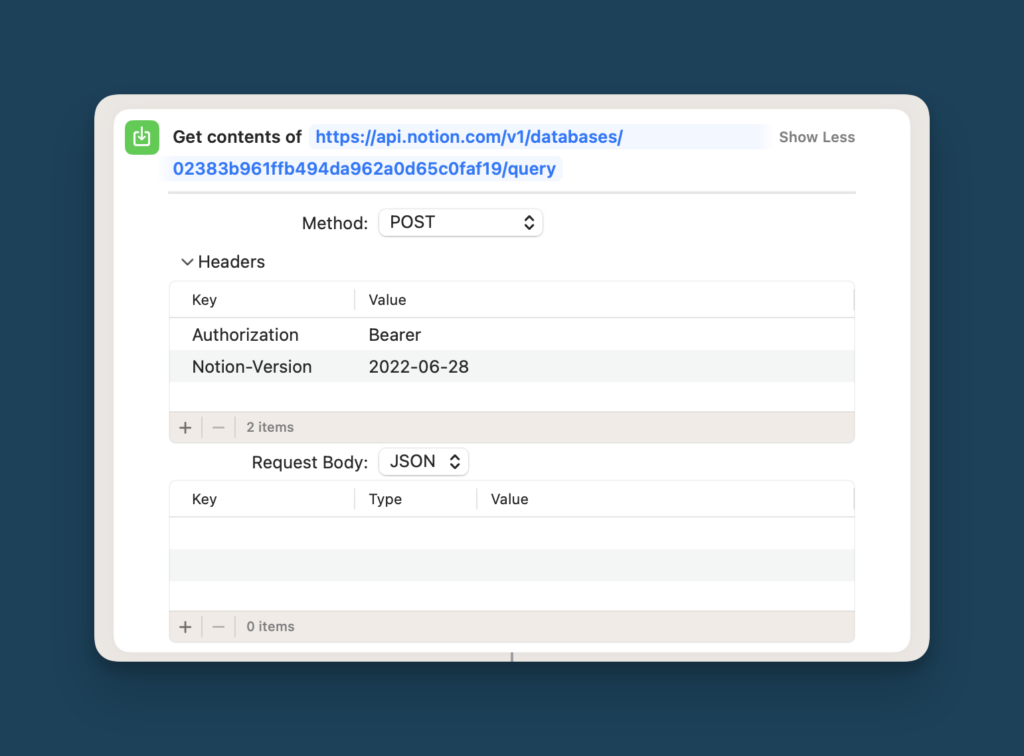
First things first: add the correct URL into the URL field.
https://api.notion.com/v1/databases/**{YOUR_DATABASE_ID}**/query
In the above URL, you need to replace {YOUR_DATABSE_ID} with the ID of your Tags Database. To find it, open your Tags Database as a full page, click on the three dots in the top right corner and click on “Copy Link”.
Then, paste that link into any text editor or your browser and inspect the URL. The weird sequence between your workspace name (after the / ) and the first ? is your database ID.

With the URL correctly set up, click on Show More to expand the options and set the Method to Post. Then, expand the Headers toggle and click on the + button to add a new entry.
You need to add a total of two headers.
For the first header, input Authorization as the key. In the value property, type “Bearer” followed by a space and then copy your integration secret. It should look something like this:
Bearer YOUR_SECRET_TOKEN_FROM_NOTION
Make sure that “Bearer” is capitalised.
Then, add a second header. For the key, input “Notion-Version” (both words capitalised). In the value property, enter “2022-06-28”.
Overall, your setup should look like this:
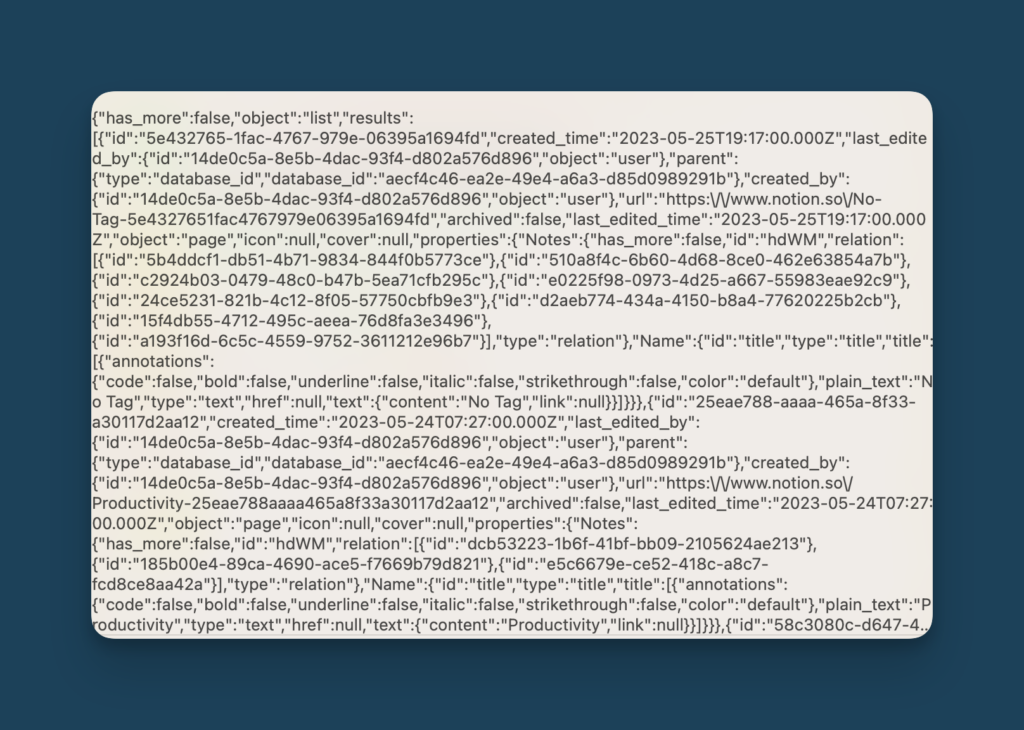
Click on the Play Button on the top of the Shortcut Builder to test your setup. You should get a long JSON object back that looks a little something like this:
How to Process the Data from your Notion Database
Next, it’s time to process the response from the Notion API to make it easier readable and ready to be passed into OpenAI.
To do so, you need do first grab the array of results from the response and then extract each tag name. Don’t worry if that sounds complicated – just follow the steps outlined below:
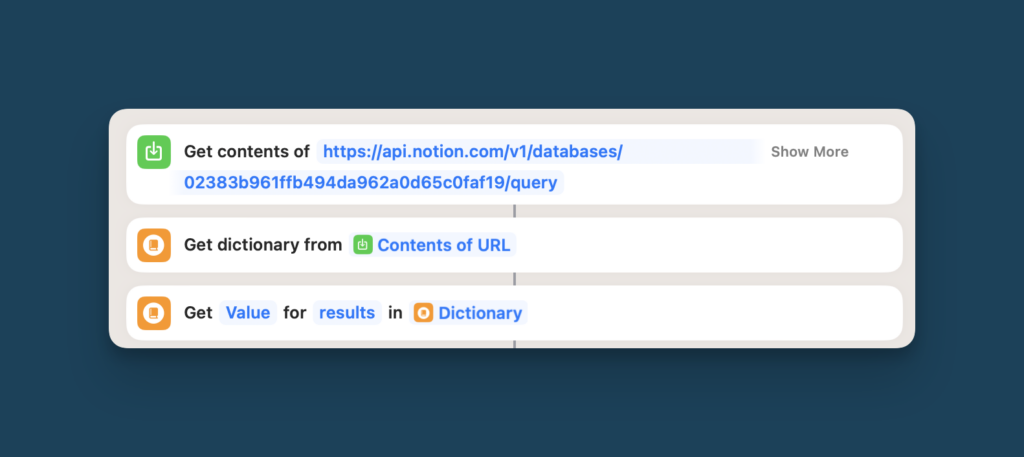
First, drag the Get dictionary from Input and then the Get Dictionary Value Module into the Builder. Type “results” (not capitalised) into the Key field. Your setup should look like this:
Next, drag the Repeat with Each module below to start your loop. Everything inside the two elements will be repeated for each element in the results array.
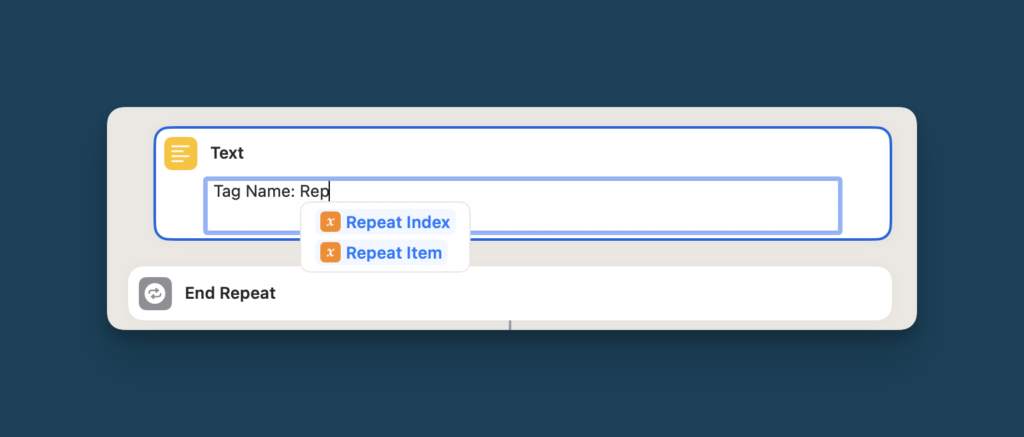
Then, add a Text Module inside the loop. Type “Tag Name:” and then type “Repeat Item”. This should bring up a special, highlighted entry. Select Repeat Item.
Double-Click Repeat Item to open up the context menu. Click into the Type Dropdown, change Text to Dictionary and then paste the following sequence exactly into the Get Value for Key: field
properties.Name.title.1.plain_text
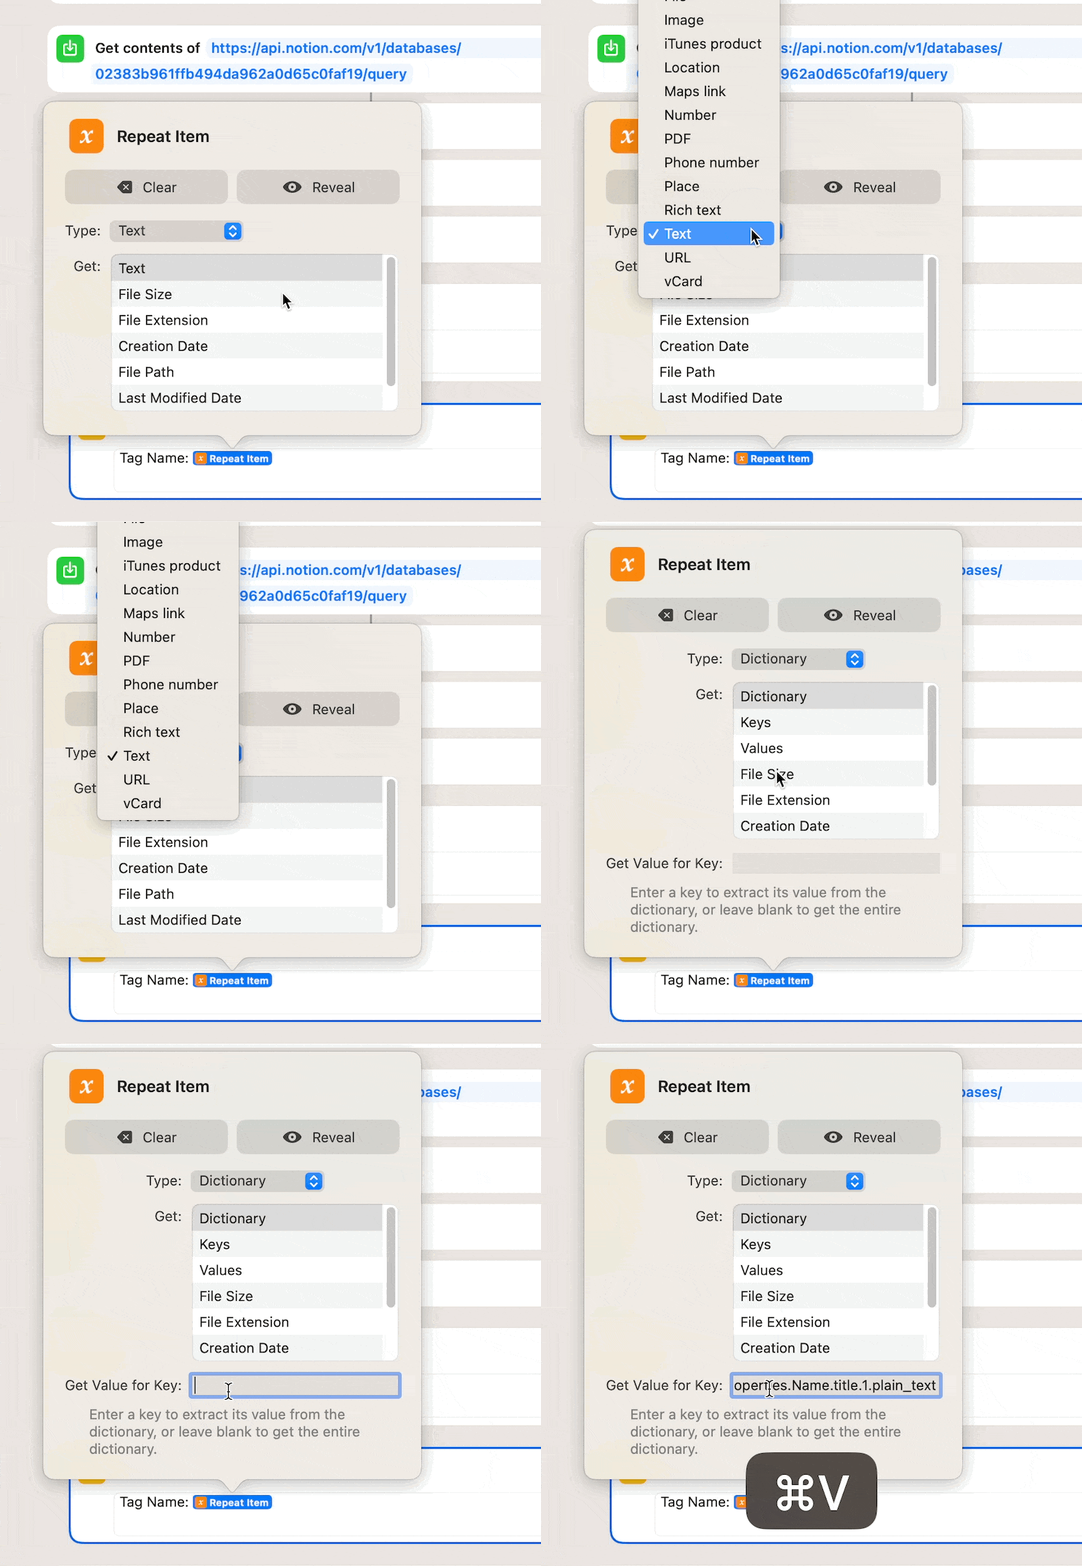
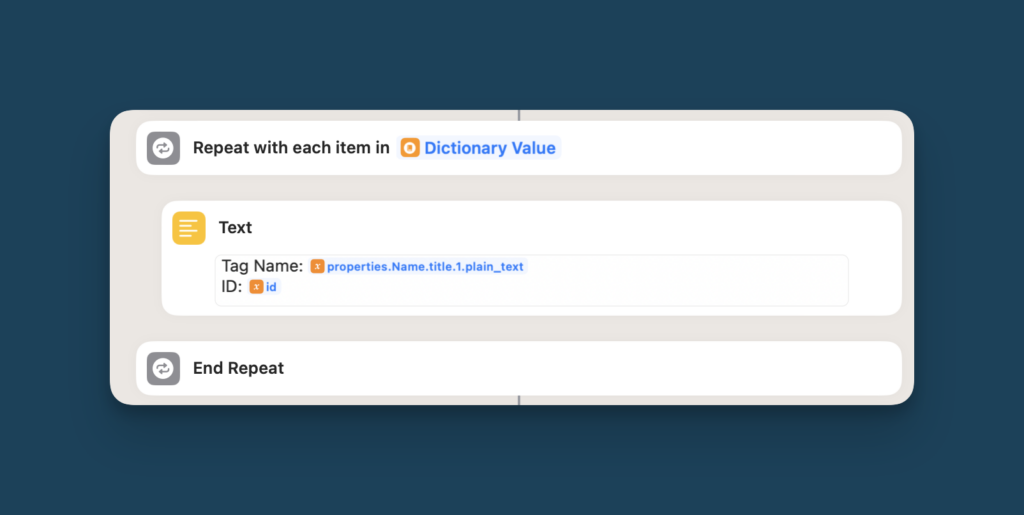
Then, hit enter and type “ID:” followed by another Repeat Item. Click into it again, change the Type dropdown to Dictionary and type “id” (not capitalised) into the Get Value for Key field.
Your setup should look like this:
Last but not least, drag a Combine Text module below the loop, which would bring everything to this:
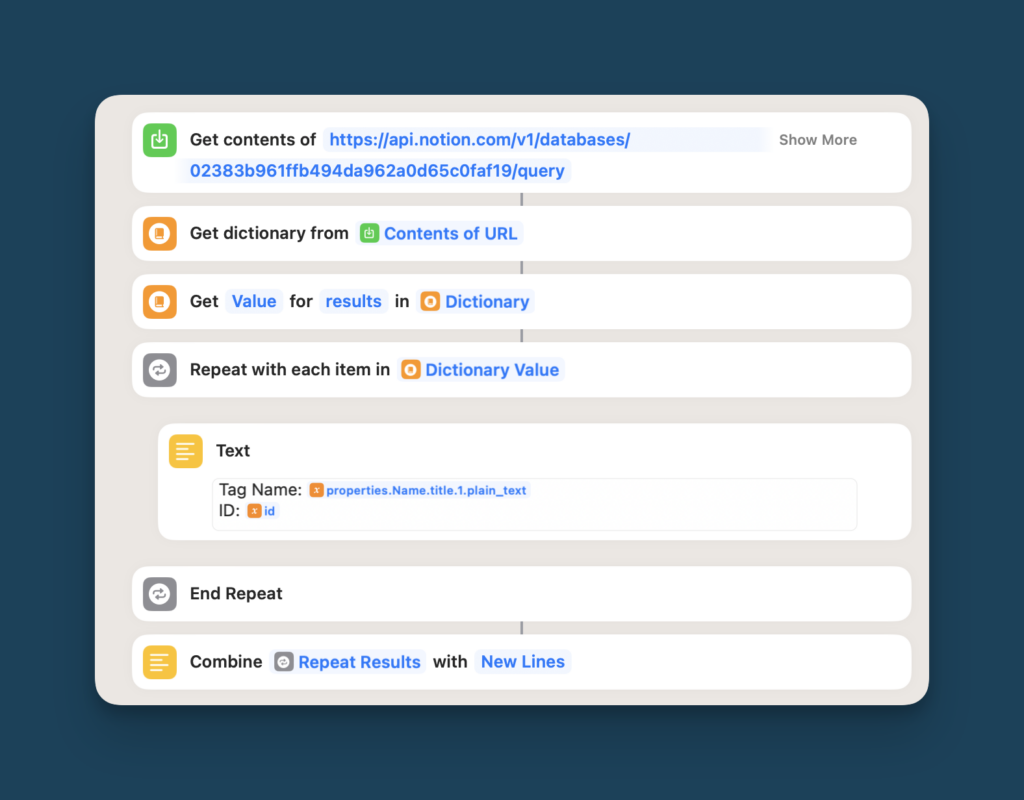
Congratulations! With this setup, you can now query your Tag database, extract the results array, loop over each entry and build a text output that contains the name and ID of each tag entry.
Hit the Play Button again to test your setup before moving on to Step 4.
Step 4: How to use OpenAI to summarise your Notion Notes
It’s time to introduce some AI magic into your workflow. In this step, you’ll learn how to build a prompt for OpenAI that dynamically includes your tag list and instructs the model to summarise your note.
Pretty cool right?
How to write a Prompt to summarise your Notion Notes
To get started, drag a Text module into the builder. Because our prompt will be quite long, it’s easier to write it in a separate text field.
Inside, paste the following information:
You are an expert personal assistant. You assist with personal knowledge management. You are given a specific note and your job is to summarise the note as concise as possible. Then, you will review a list of potential tags for the note provided to you. Each tag has a name and an alphanumeric ID. Pick the tag that fits the note the best. If no tag fits, pick the “No Tag” Tag.
You will answer in a very specific format. First write out your summary. Then, use three # symbols as a separator. Then, add the ID of the tag that you picked.
Answer Format:
YOUR_SUMMARY###ID
YOUR SUMMARY = The Summary of the Note
ID = The alphanumeric sequence after “ID:”, for example 25eae788-aaaa-465a-8f33-a30117d2aa12. Don’t include the name of the tag itself, only print out the alphanumeric sequence.
Example:
“SUMMARY###25eae788-aaaa-465a-8f33-a30117d2aa12” “SUMMARY###60asw2n1-acda-5685a-8f33-a30123aa60
Note:
“Provided Input”
Tags:
“Combined Text”
As you can see, the prompt consists of three sections.
- The first paragraph sets the context of the instructions and explains what you expect from the model.
- The big part in the middle contains very specific instructions for the answer format. That’s necessary, because we need the model to answer in a very specific way to use it in the rest of our shortcut
- At the bottom, we have two placeholders for our dynamic inputs
Feel free to modify the prompt as you need it. Particularly the first paragraph is fairly generic. You could include more specific instructions for the style or format of the summary to fit your personal style better.
For testing purposes, replace the “Provided Input” with a sample note of your choice. Feel free to use the introduction to my article on Scrintal, another awesome note-taking tool for Zettelkasten.
Meet Scrintal, a visual-first knowledge management tool designed to elevate your note-taking and idea development through a unique combination of features. You can think of Scrintal as a child between Whimsical, Notion and Roam. With an endless whiteboard canvas, bi-directional linking and markdown support, Scrintal a great tool to help you brainstorm, organize, and connect your thoughts like never before. And it’s particularly well suited to implement the famous Zettelkasten Method. Which is why in this tutorial, you’re first going to learn the fundamentals of Scrintal and then use your new knowledge to build a simple Zettelkasten System in Scrintal.
Then, replace “Combined Text” with your tag list. To do so, delete the text, right-click between the two “” and select Insert Variable – Select Variable and pick the Combined Text option from the previous step.
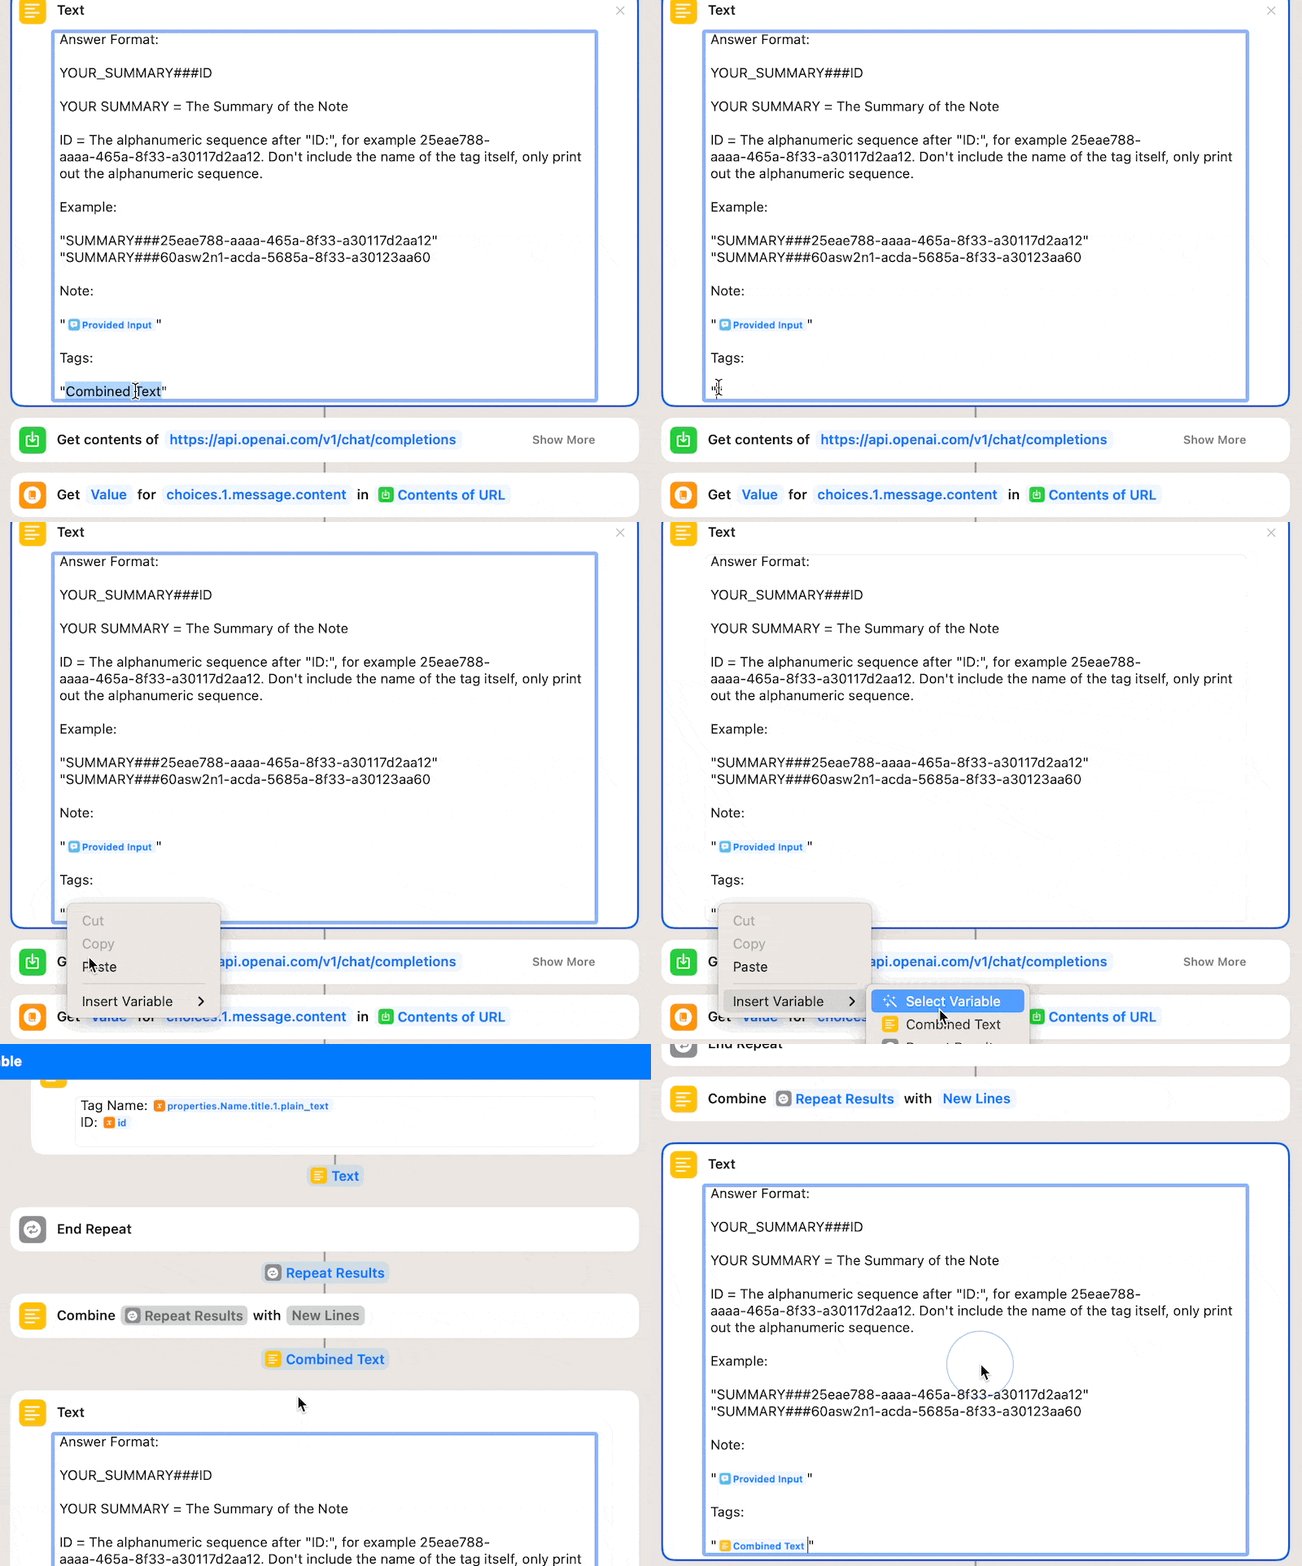
How to summarise your Notion Notes with AI
Drag another Get contents of URL module into the builder. Paste the URL below into the field:
https://api.openai.com/v1/chat/completions
Click on Show More to set up the module and change the method to Post.
Just like with the Notion API Module, you’ll need to set up some headers to authorise yourself. Hit the + icon below the headers table to add a new entry.
The first header should have the Key “Authorization” (capitalised). For the value, type “Bearer” (capitalised) followed by a space. Then, paste your OpenAI API Key.
If you don’t have an OpenAI API Key yet, head on over to https://beta.openai.com/ and create an account. Then, click on your profile icon in the top right corner and select View API Keys.
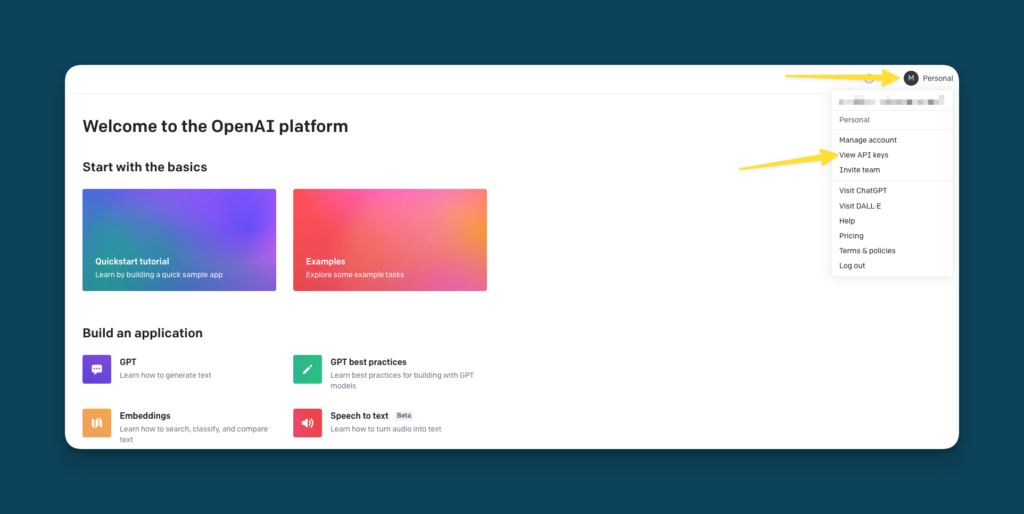
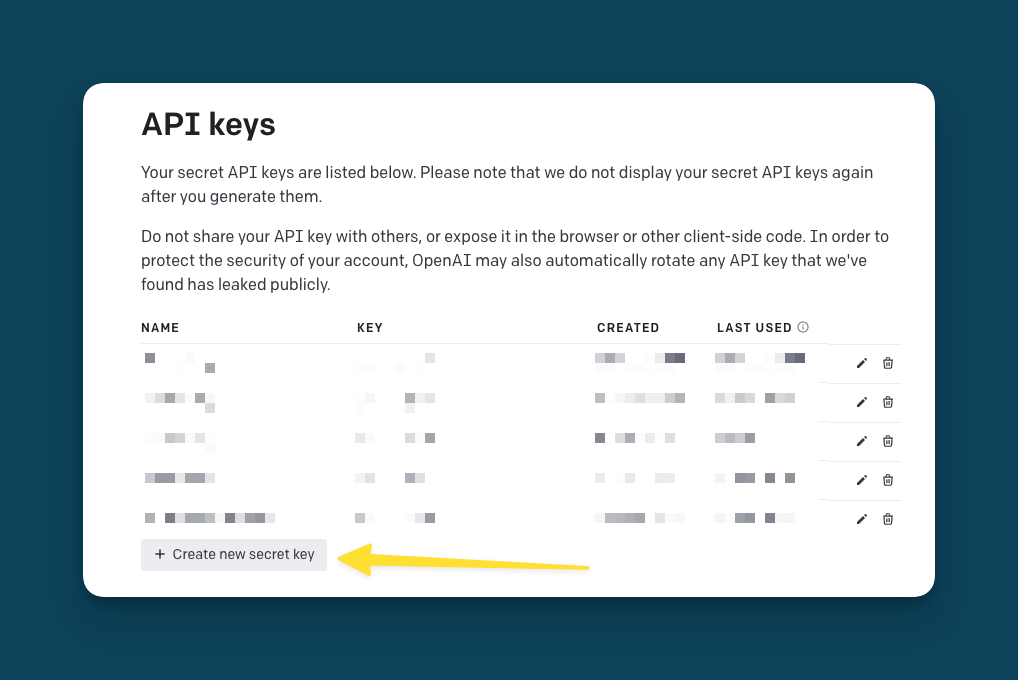
Then, click on Create new secret key. Make sure to copy the secret key immediately and store it in a secure location. You will only be able to see the key once, so if you lose it, you’ll have to generate a new one.
With the Authorization Header set, click on + to create a second header.
For this one, set the Key to “Content-Type” (both capitalised) and the value to “application/json” (both not capitalised).
Next, it’s time to set up the Request Body. Make sure you’ve selected JSON from the dropdown and then click the + button on the lower table to create a new entry here.
Entries in the Body area have three properties: Key, Type and Value.
For the first entry, set the Key to “model”, the Type to “Text” and the Value to “gpt-3.5-turbo”.
Then, add a second entry to the body, set the key to “messages” and change the type to Array.
Next, you need to nest entries inside the array. To do so, click on the expansion toggle to the left of messages, highlight the entry and hit the + icon again. You should get a nested “Item 1” entry.
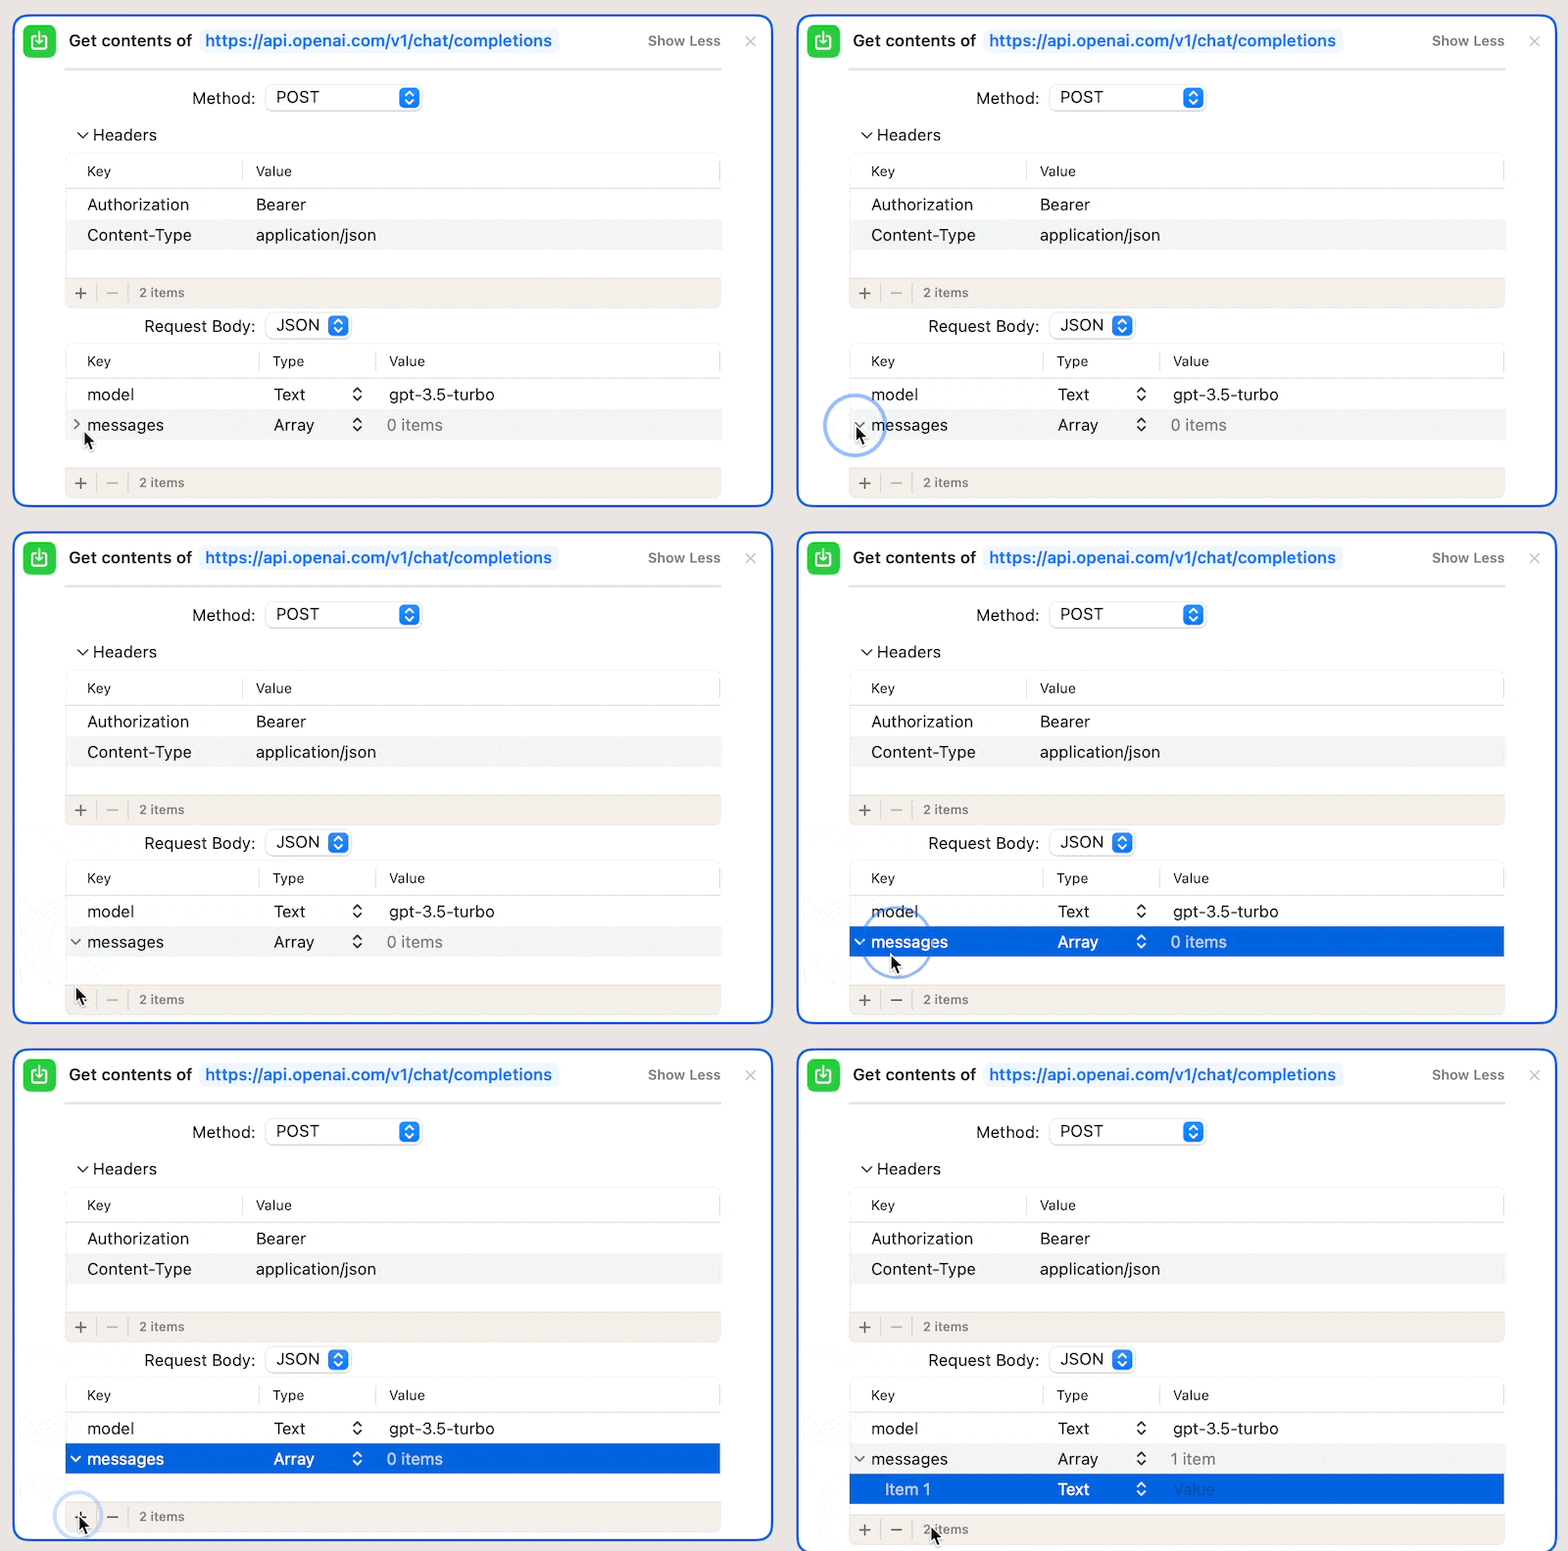
Turn the type of Item 1 into a Dictionary. Then, repeat the same steps to create two nested entries inside Item 1.
- The first entry should have the key “role”, the type set to text and the value set to “system.
- The second entry should have the key “content”, the type set to text and the value set to the short prompt below
You are a very helpful personal assistant who summarises notes and assigns tags to organise them.
Then, highlight messages again and hit the + icon to create another nested item inside the array.
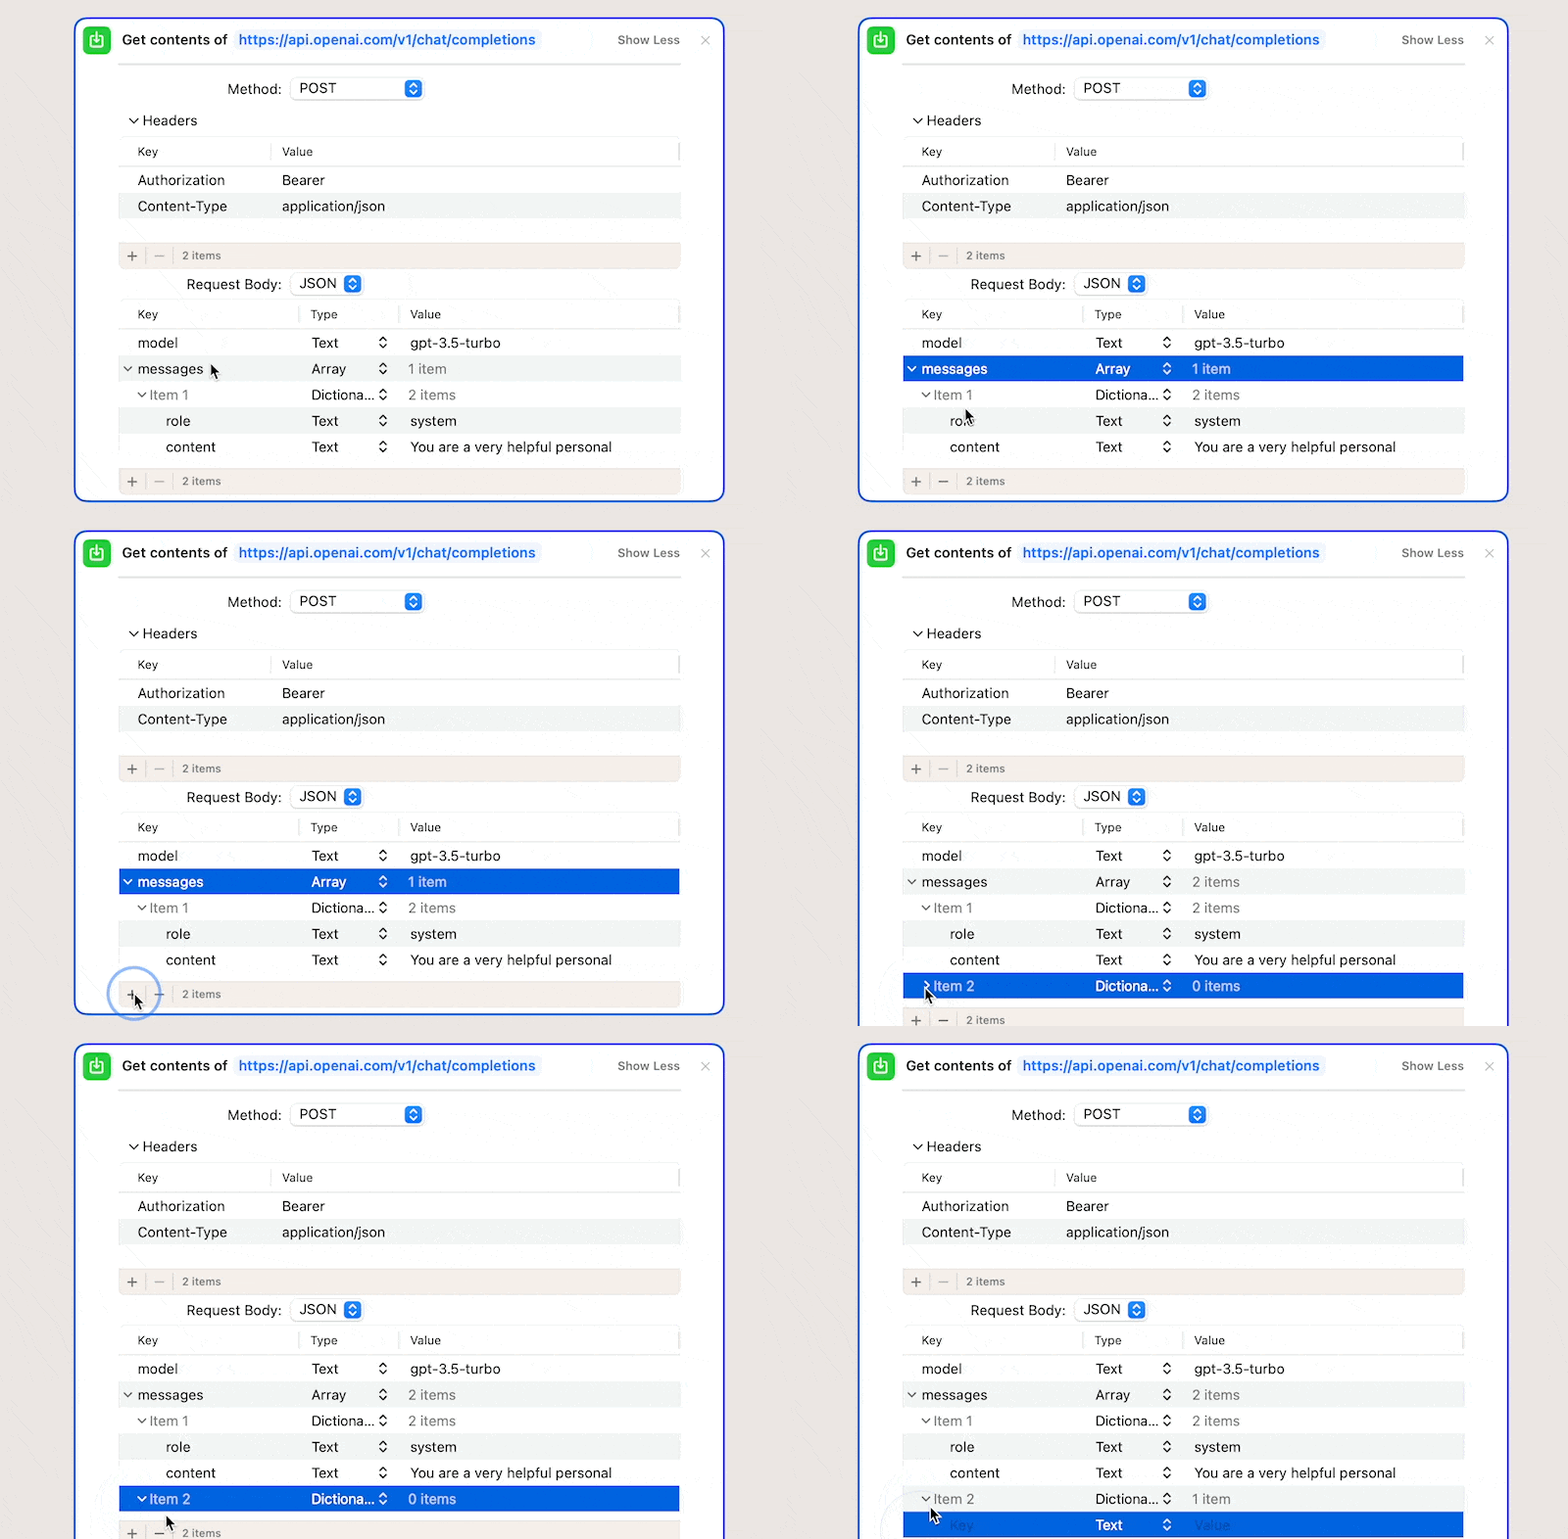
Inside Item 2, create another two entries.
- The first one should have the key set to “role”, the type to text and the value to “user”
- The second should have the key set to “content” and the type to text. For the value, right-click into the field, pick Insert Variable – Select Variable and then select the Text option that appears below the prompt field
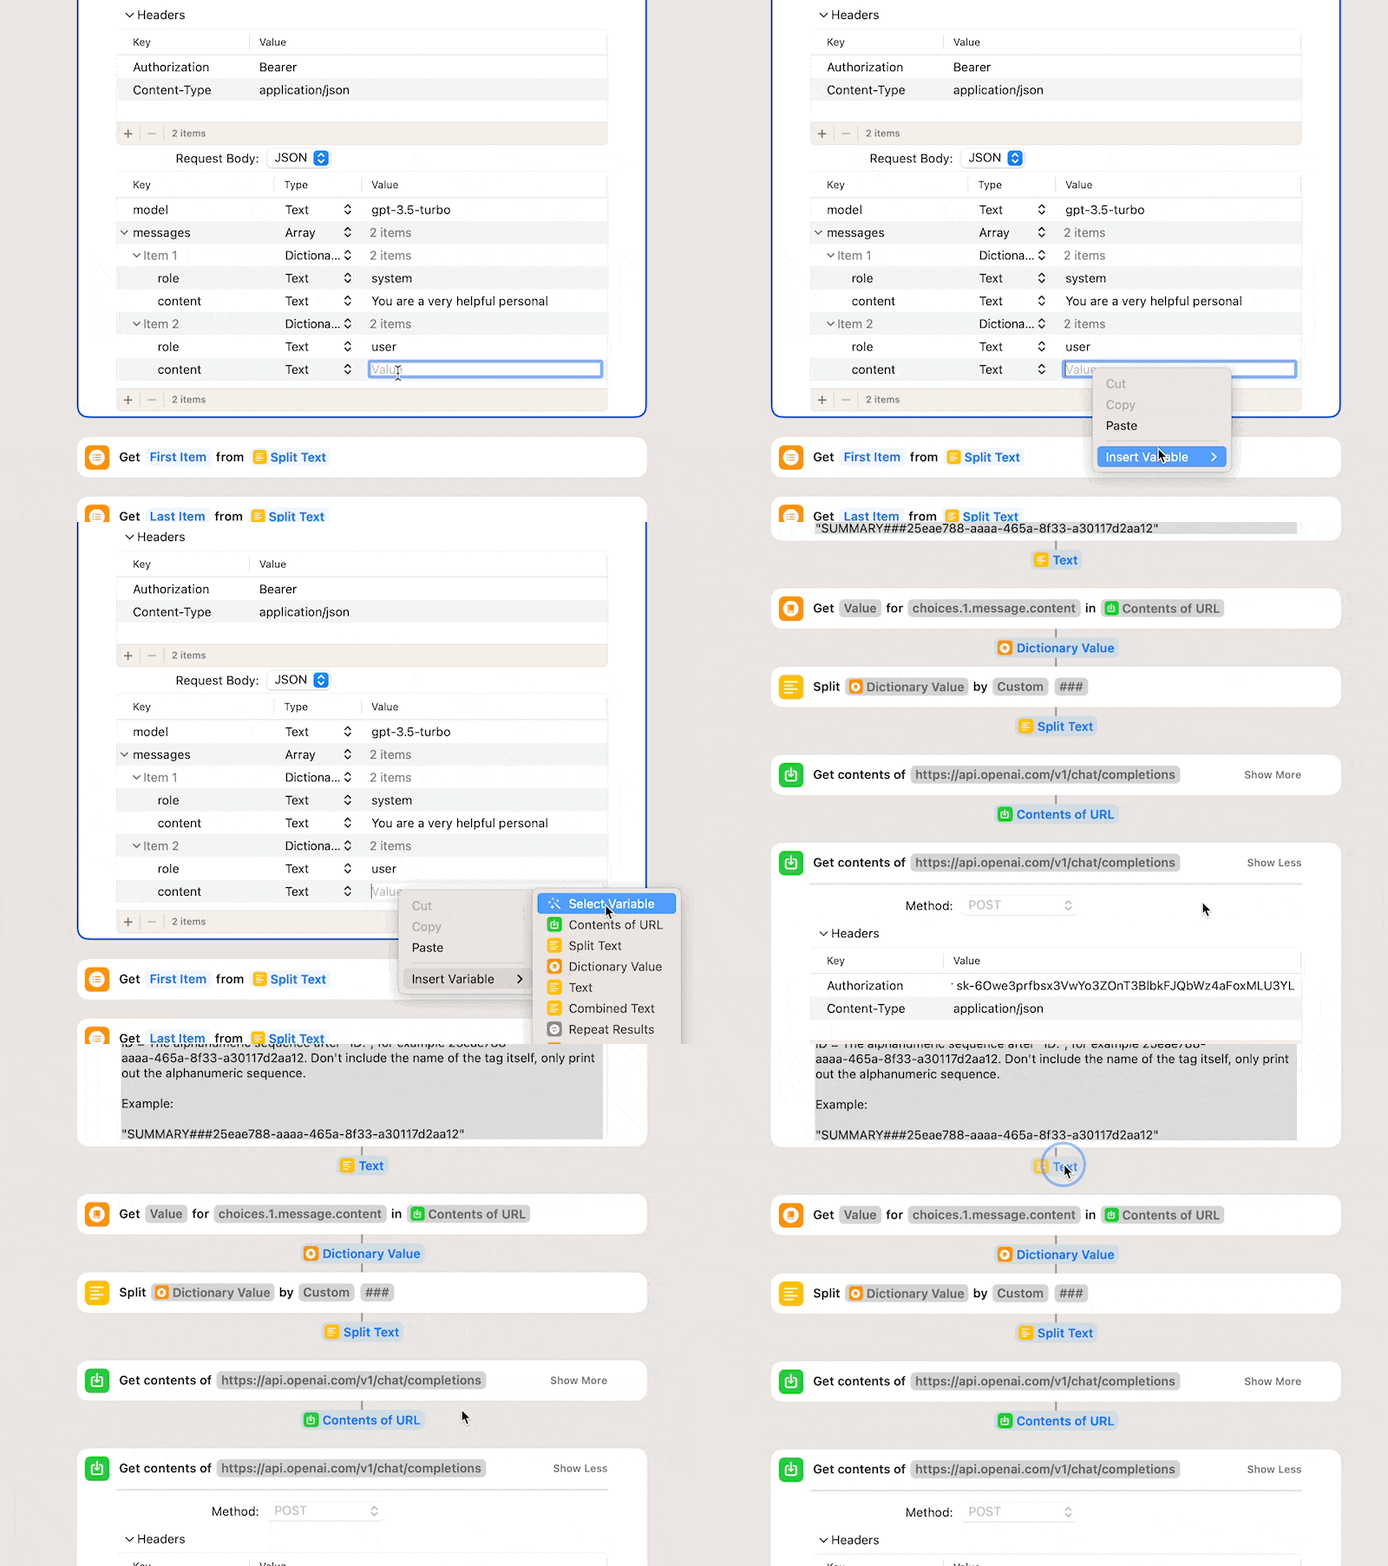
And that’s it! You’ve successfully built an API call to the OpenAI API to instruct it to summarise your Note, pick a Tag from your Notion Note-Taking System and send the response back.
Test everything again by clicking the play button. You should get a JSON object back with a status code in the 200 numbers. If you did something wrong, then you’ll receive a 400 error and an error message.
Step 5: Send AI Summary of Notes to Notion
With the hard work done, it’s time to send the results of OpenAI to Notion to store your note transcript with the summary and also tag it correctly.
How to prepare the OpenAI Response for Notion
To do so, grab the relevant part from the OpenAI API response using the Get Dictionary Value. Add the following sequence as the key:
choices.1.message.content
Then, add the Split Text module, change the “split by” to Custom and enter three hashtags (###).
Last but not least, add two Get Item From List Modules. Set the first one to get the First Item and the second to get the Last Item.
Here’s what your setup should look like:
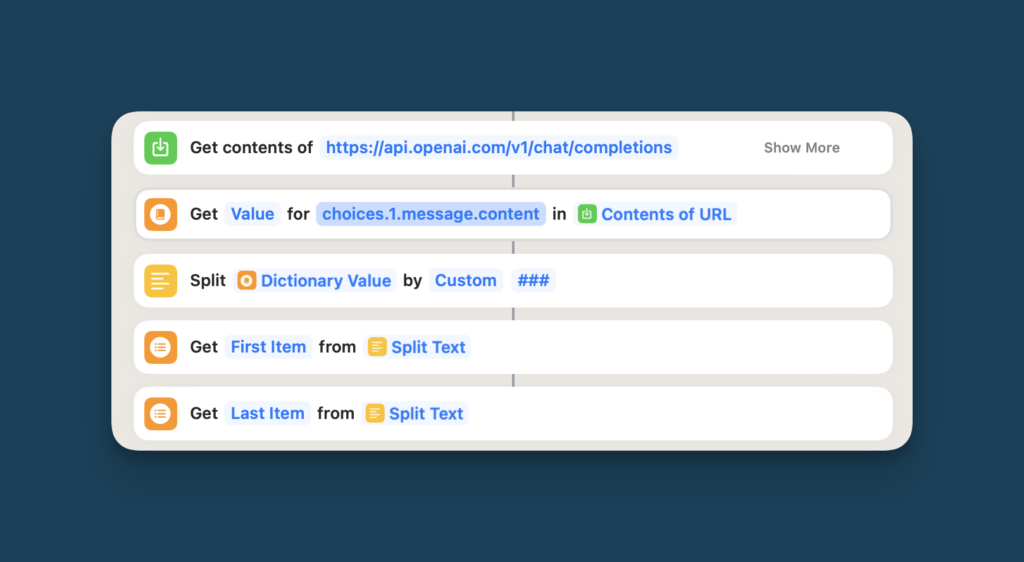
With this sequence, you parse the response from OpenAI to extract the summary as the first item and the ID of the chosen tag as the second item.
How to save your AI Notes to Notion
Drag a Get contents of URL module into the builder and set the URL to:
https://api.notion.com/v1/pages
Then, click on Show More, set the method to Post and add the same headers as in Step 3.
- Key: “Authorization” & Value: “Bearer YOUR_NOTION_SECRET_KEY”
- Key: “Notion-Version” & Value: “2022-06-28”
Next, move on to the request body and add a first element to it. Set the value to “parent” and the type to Dictionary. Open up the entry and create another nested entry inside. Here, set the value to “database_id”, the type to Text and the value to the database ID of your Notes Database in Notion.
Before, you used the ID of your Notes Database to query the tags. Now, take the ID of the other database to save your notes to Notion.
Now it’s time to tell Notion exactly what your new note should contain. This setup requires nesting a lot of entries. Here’s how it will look like for one property:
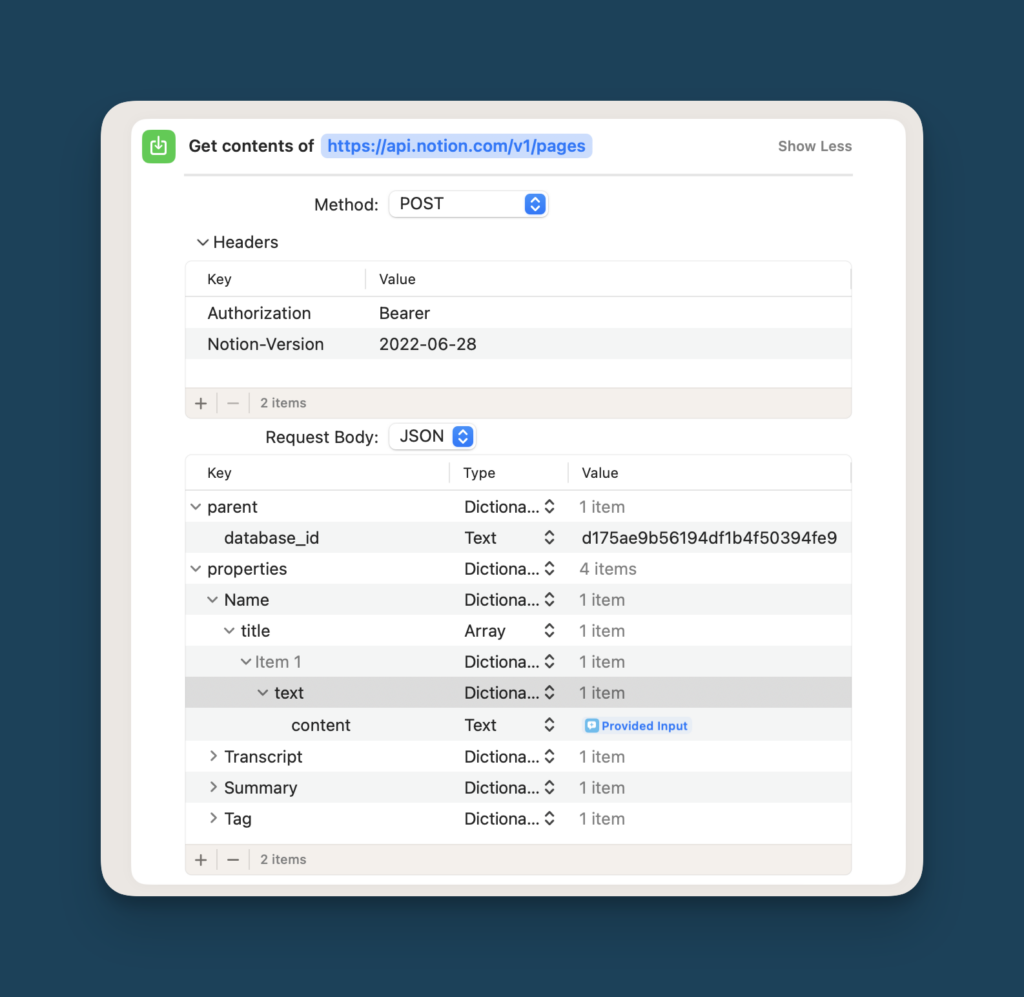
- First, create a new top-level entry, set the value to “properties” and the type to Dictionary.
- Inside, create a nested entry with the type Dictionary. Make sure to set the Key to match exactly the name of your Notion Property for the title field (including capitalisation). My property is called “Name”, but if yours is called “Note”, then put that for the value
- Open up the nested property to create another nested property. Set the key to “title” and the type to Array
- Open up the array and create another nested property. This one can’t have a key, but you can set the type to Dictionary
- You know the drill by now. Open up the Dictionary and create another nested entry with the key “text” and the type Dictionary
- Finally, create the last nested entry with the key “content” and the type text. For now, type “Test Note” into the value field.
This setup looks a bit complicated, but it’s unfortunately the type of structure that the Notion API requires if you want to create a new entry. Now it’s time to repeat the setup for the other two text properties in your Notion Database.
Select your properties entry again to create another entry on the same level as the Name property. Set the key to exactly match the name of your Notion property for your Note transcript (in my case “Transcript”). Then, go through the process again:
- Open up the nested “Transcript” property to create another nested property. Set the key to “rich_text” and the type to Array (this is the only difference in the setup)
- Open up the array and create another nested property. This one does not have a key. Set the type to Dictionary
- Open up the Dictionary and create another nested entry with the key “text” and the type Dictionary
- Finally, create the last nested entry with the key “content” and the type text. For now, type “Placeholder Note” into the value field.
And because this has been so much fun, repeat the above process for the “Summary” property. Highlight properties and create a third entry.
- Open up the nested “Summary” property to create another nested property. Set the key to “rich_text” and the type to Array (this is the only difference in the setup)
- Open up the array and create another nested property. This one does not have a key. Set the type to Dictionary
- Open up the Dictionary and create another nested entry with the key “text” and the type Dictionary
- Finally, create the last nested entry with the key “content” and the type text. Instead of typing something in the value field, right-click into it, opt for Insert Variable – Select Variable and pick the Item from List option for the First Item
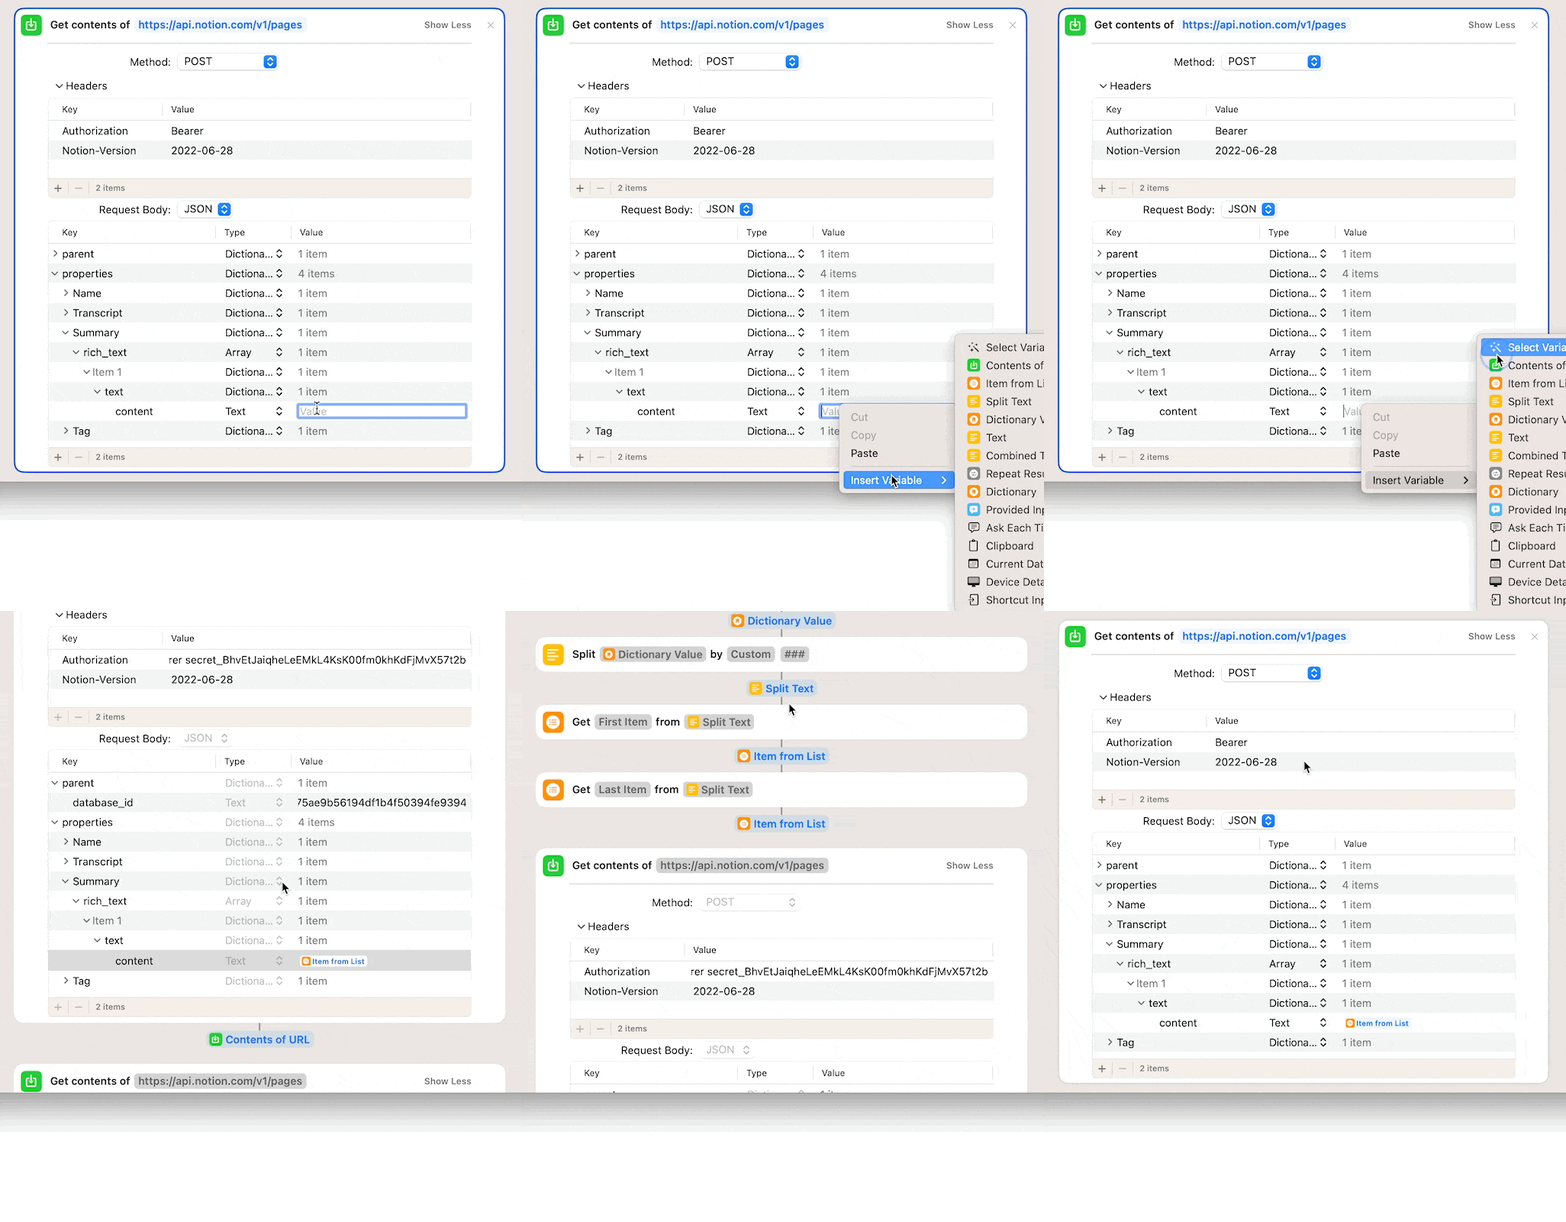
Now there’s only one last property left to be set up for your Notion Note-Taking System: the Tag property to connect your note to your stored tags.
To do so, create a fourth nested entry below the properties entry.
- As always, put the exact matching property name as the key and set the type to dictionary.
- Then, add a nested entry to it, set the key to “relation” and the type to Array
- Inside the array, create a nested entry and select the Dictionary Type
- Lastly, add a nested entry, set the key to “id”, the type to Text and insert the second list item by right-clicking into the value field, opting for Insert Variable – Select Variable and picking the second Get Item From List option from your setup
All in all, your request body should look like this, with the exception of having “Test Note” and “Placeholder Note” instead of the “Provided Input” fields in the screenshot below:
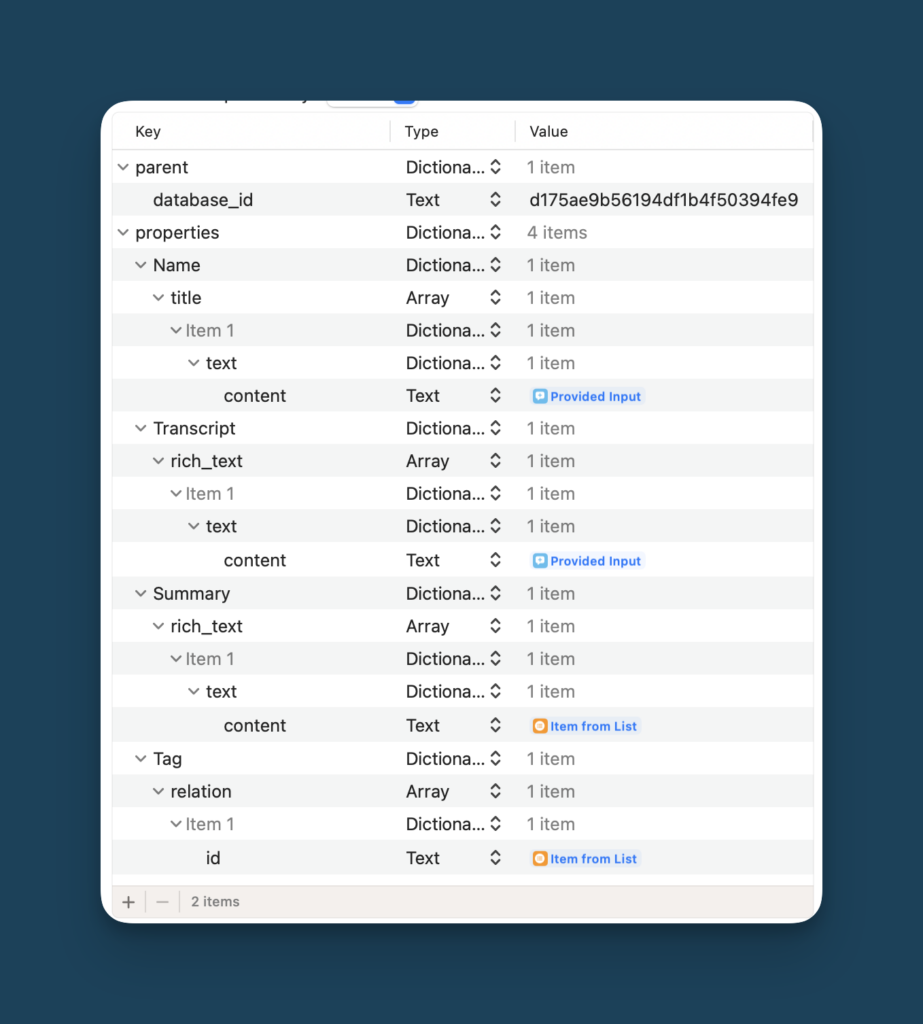
With all of this set up, hit the play button again to test everything. You should see a new entry in your Notion Database.
Step 6: How to transcribe your voice notes for Notion
With the most complicated part of the setup done, it’s time to enable voice transcription for your notes so that you can actually talk to Siri to capture a note.
To do so, simply drag two Ask for Input modules to the very top of your shortcut. Click into the Prompt field and type the question that Siri should ask you. The first module will be the title of your note and the second the actual note.
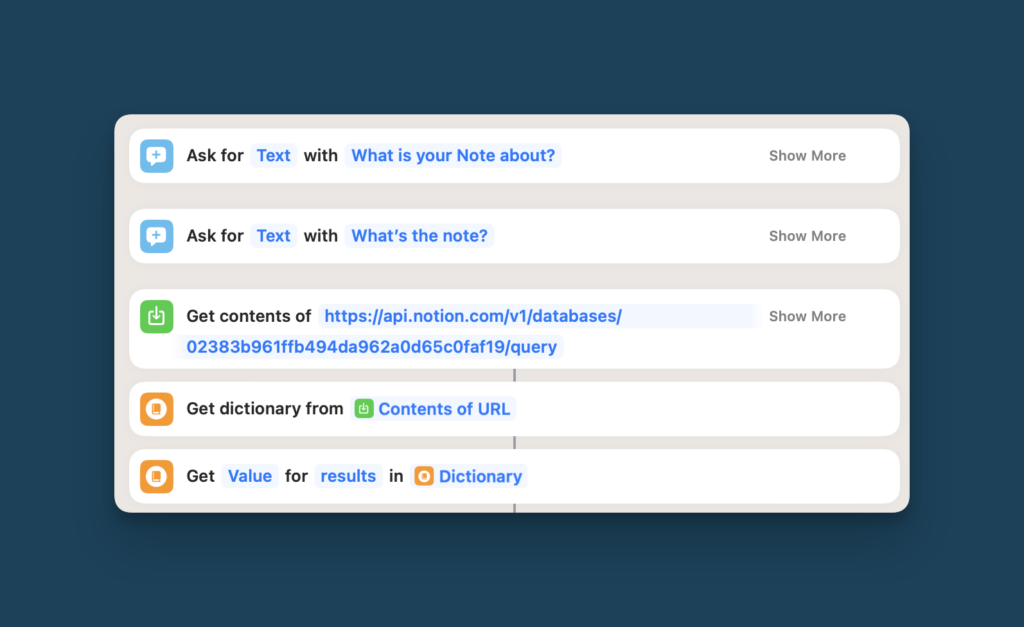
Now make sure that your input is used in the shortcut instead of the actual placeholder elements. You’ll need to change things in three places:
- Replace the placeholder note in the prompt with the input from the second input module
- Replace “Test Note” in the second Notion API call with the input from the first module. You’ll find it in the value field of the last nested level of the Name Property in the request body.
- Replace “Placeholder Note” in the second Notion API call with the input from the second module. You’ll find it in the value field of the last nested level of the Transcript Property in the request body.
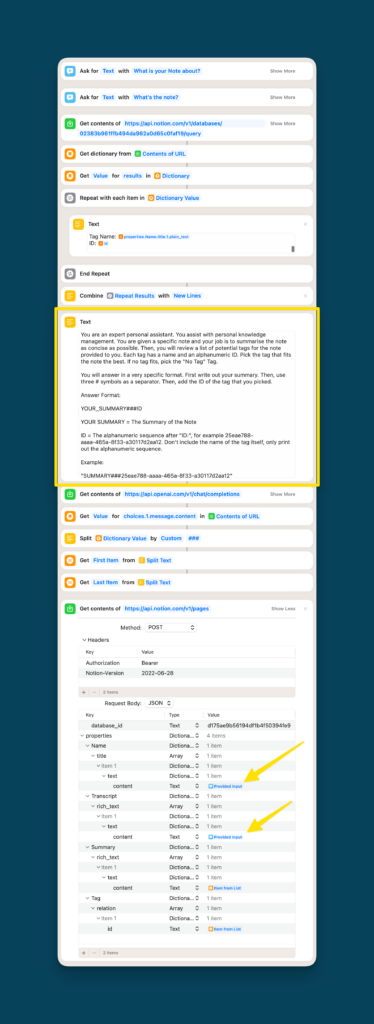
And with that, your AI powered Note-Taking Tool in Notion is done! You have two options to start the workflow:
- Say “Hey Siri, …” followed by the name of the shortcut
- Long press the shortcut on your iphone, tap share and then tap “Add to Homescreen” to add it like an app to your iPhone
Once started, the shortcut will first ask you to speak the name of your note and then ask for the actual note input itself. It will then query your Notion database to retrieve your tags and send the tags together with the transcript and the prompt to OpenAI to create a summary. After that, the transcript, summary and correct tag are all sent to Notion.
Now that you’ve supercharged your personal note-taking with AI, why not stop taking meeting notes forever? Or finally sync your email to Notion?
Get the Template
Instead of building this setup yourself, you can also get the plug-and-play version as a shortcut template.


