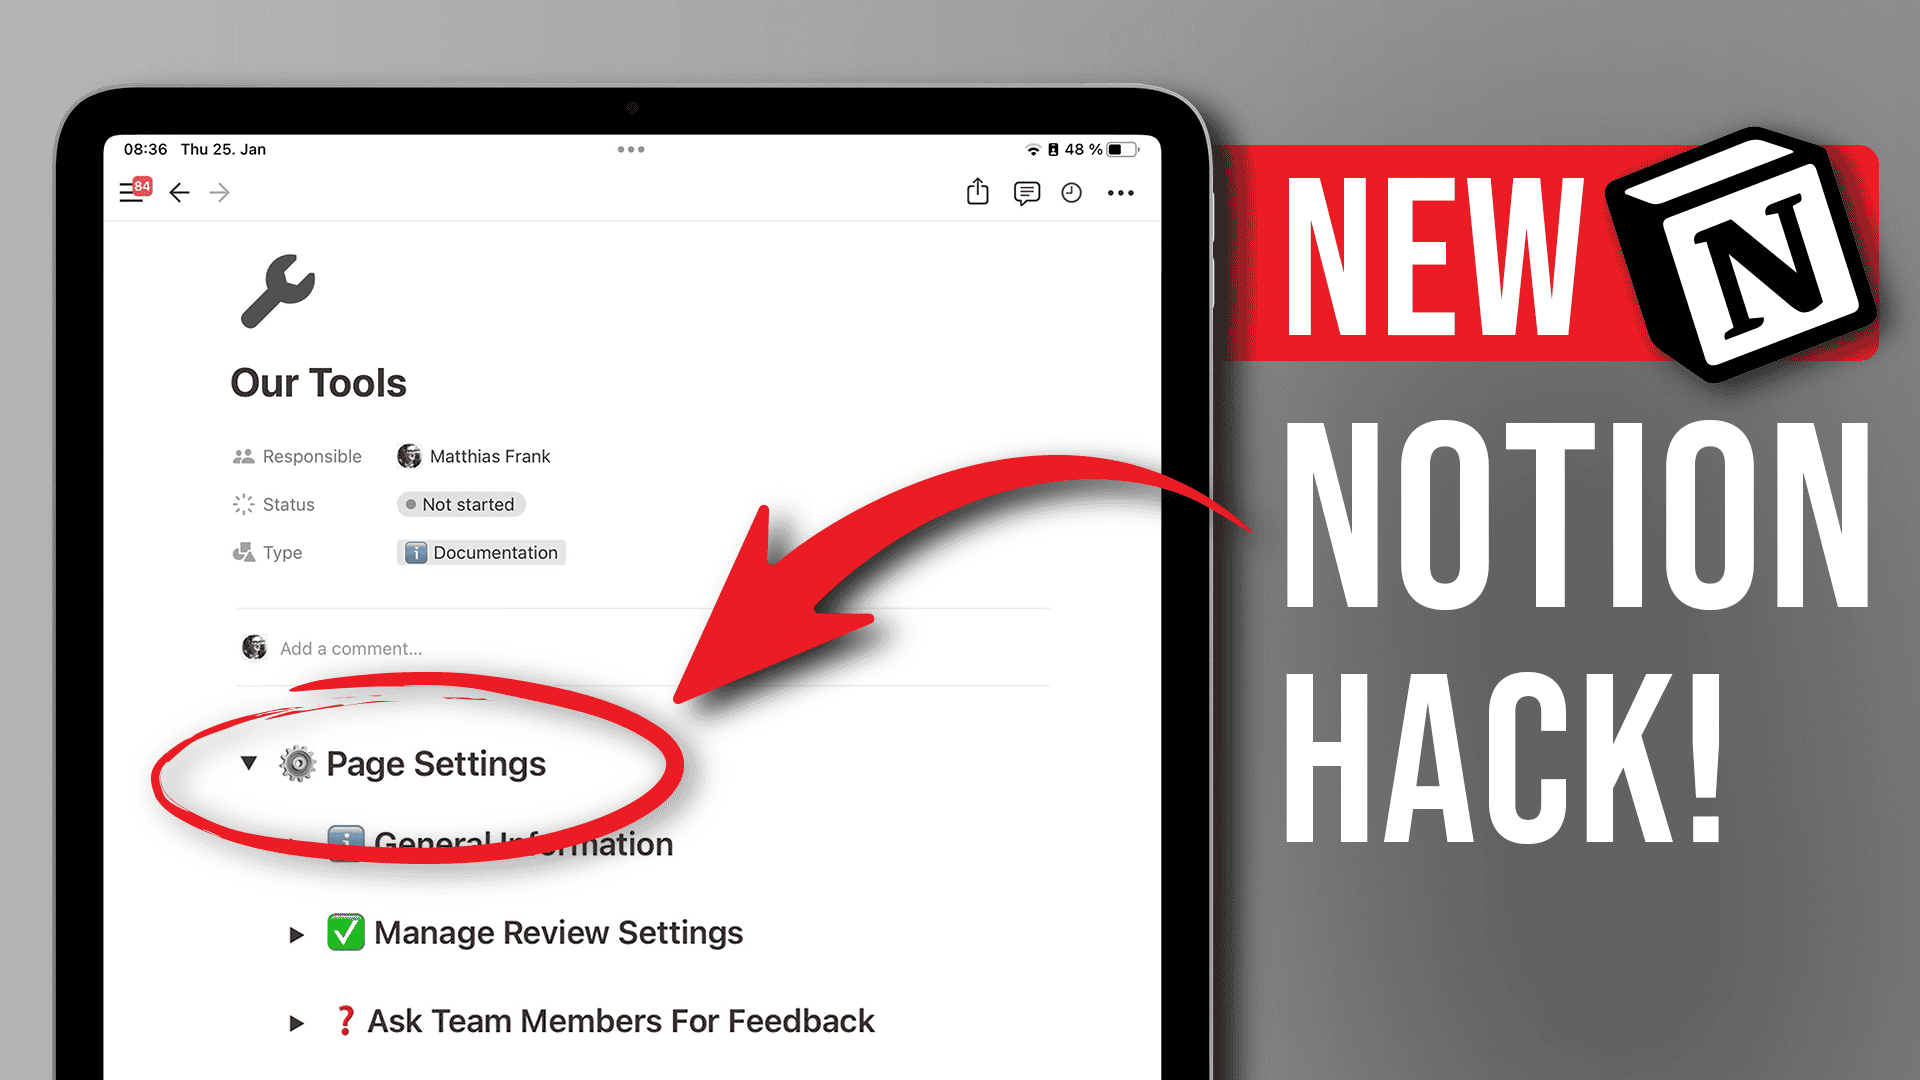
Ever wondered whether it’s possible to show specific Notion Properties inside a Notion page? Well it is, if you know the right workaround! And it’s a super useful feature to include in your build since it massively increases the user experience. Whether you’re a Notion Champion for a company, a template creator or a consultant, it’s crucial to not just build a powerful workspace – but also to make sure it’s easy to use and navigate. In this blog post, you’ll learn how to show Notion Properties inside your Notion page plus two more tricks that will help your users better understand your setup. Ready? Let’s dive in!
Can you show Notion Properties inside a Notion Page?
By default, Notion Properties have limited ways in which they can be displayed but there’s a workaround to achieve exactly that.
Usually, you’re limited to seeing Notion Properties either “above the fold” of your page in a database or as small, separate sections between the normal property area and the rest of the page.
Notion doesn’t offer a built-in feature to show pull specific properties into the main page. But the workaround shared in this blog post will allow you to freely display certain properties of that page anywhere in the page body.
How does the Notion Property Trick work?
In order to show Notion Properties inside a Notion Page, you need to combine three Notion features in a creative way:
- Notion Database Automations
- Self-Referential Filters
- Database Templates
And don’t worry – you’ll find specific step-by-step instructions below so even if you’ve never worked with these features, you’ll be able to build this in no time. Plus, there’s also a free template at the bottom of this post.
Notion Database Automations can only be created by paid users. But everyone can use pre-configured automations in templates. So even if you don’t have a paid plan, you can download the template, adapt it to your needs and use Notion Database Automations for free!
Step-by-Step Instructions for Notion Properties in Page Body
First, go to the database (‘Sample Database’ in this case) where you want to implement this workaround.
You’ll need to create a relation property to self-relate the page. Click on the Plus (+) icon to create a new property and choose the Relation property. Let’s name it Helper Page Settings. For the relation, you will select the same database you’re currently in. You may turn off the Separate directions option as you don’t need to see it twice.
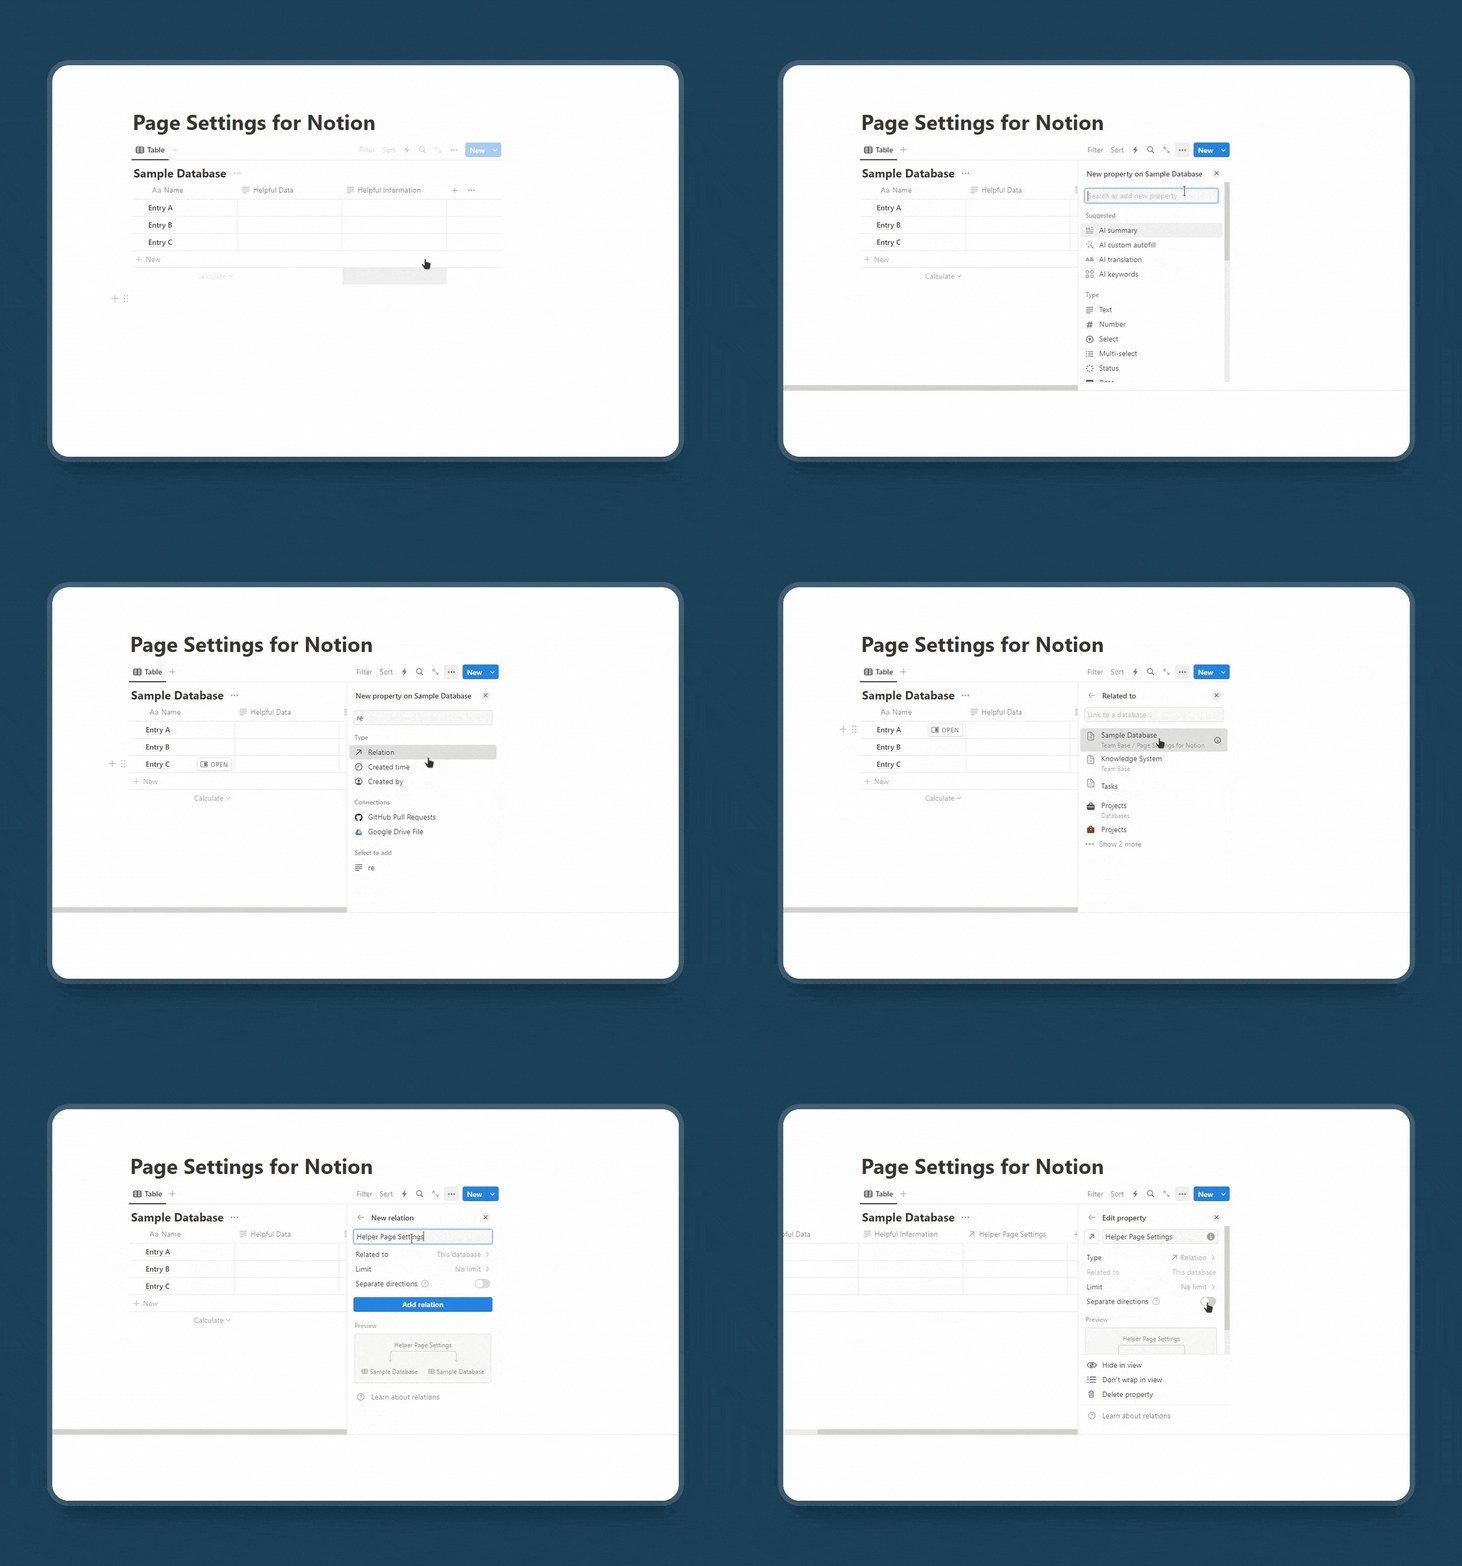
You need this self-referential relation property to show the properties relevant to the opened page.
Now whenever a new page is added, you need to relate it to itself. However, doing so manually would defeat the purpose and be quite cumbersome. Luckily, you can use Notion Automations to do this for you.
Sounds complicated? Bear with me. You will get everything in a moment.
- Click on the Automation (⚡) icon and choose + New Automation. We’ll label this Page Settings Helper.
- Now, click on the Add trigger and choose Page added as the trigger.
- Then, for the Actions you’ll need to use Edit Property. Click on Helper Page Settings and choose This Page. This way, whenever a new page is created the same new page will be added in the Relation Property (Helper Page Settings).
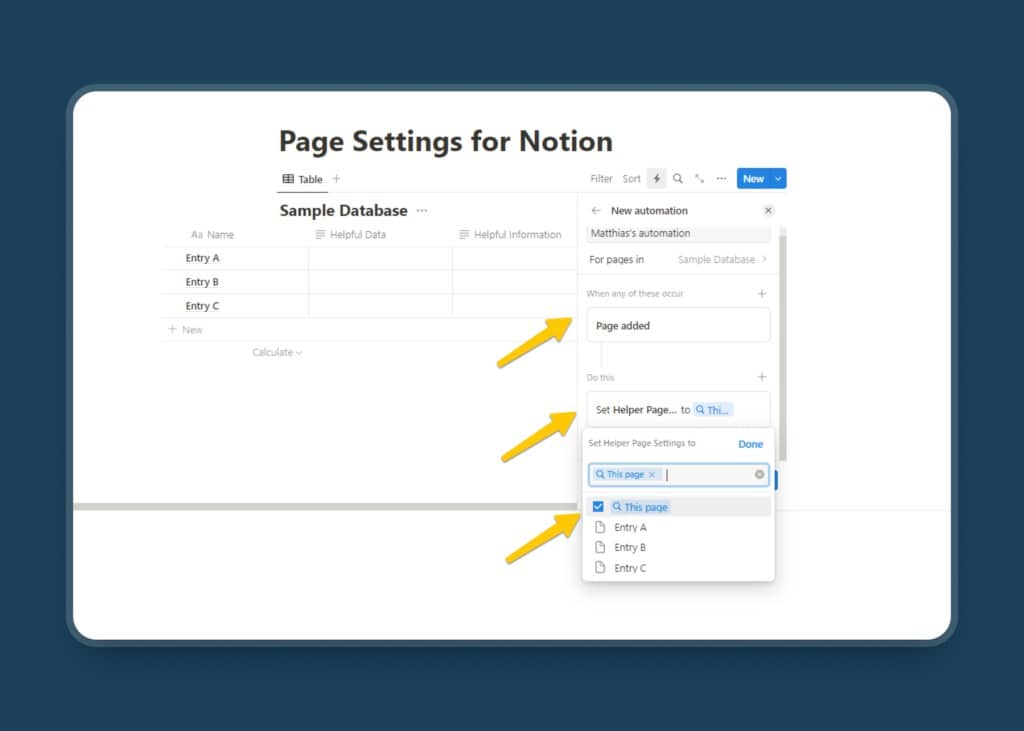
Save your automation and test that it works. Create a new entry in your database and after a short delay, the relation property should show the same page.
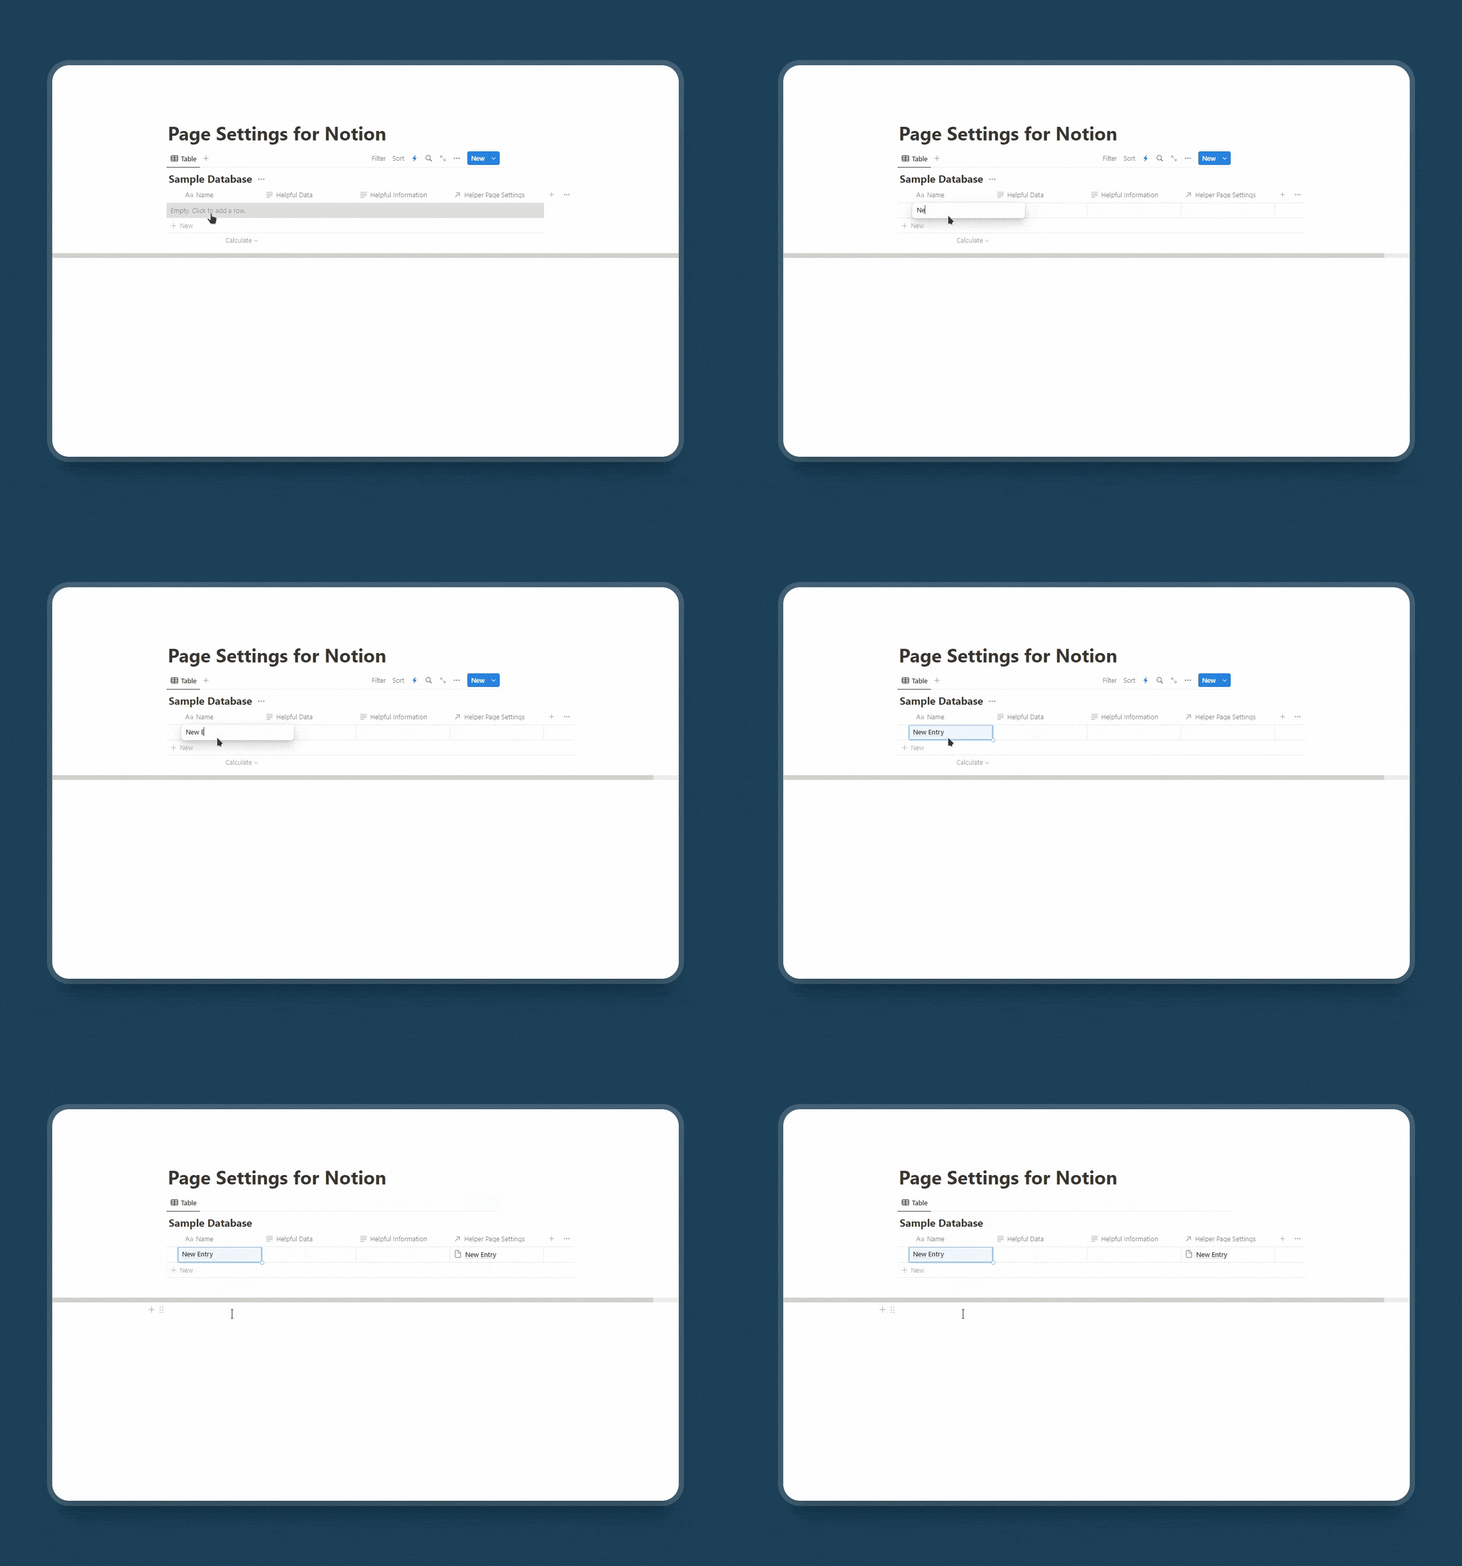
Now for the fun part. Ready?
Create a new database template by clicking on the drop down toggle next to the big blue New button in the top right corner of your database. Name it “Template”.
Then, in the empty page area, create an H1 toggle heading. Inside that toggle, type “/” and choose Linked view of database from the menu. Select the Same Database you’re in right now. For this case it’s Sample Database. You can clean up the view by hiding the database title if you want and hide/show the properties you need.
Now you need to create a filter to show only the page where you’re currently in. To do this, click on Filter and select Advanced Filter. Then, add the following settings:
- Where: Helper Page Settings
- Contains: Template (select the entry that has the exact same name as the database template you just created. It will show up at the top of the list)
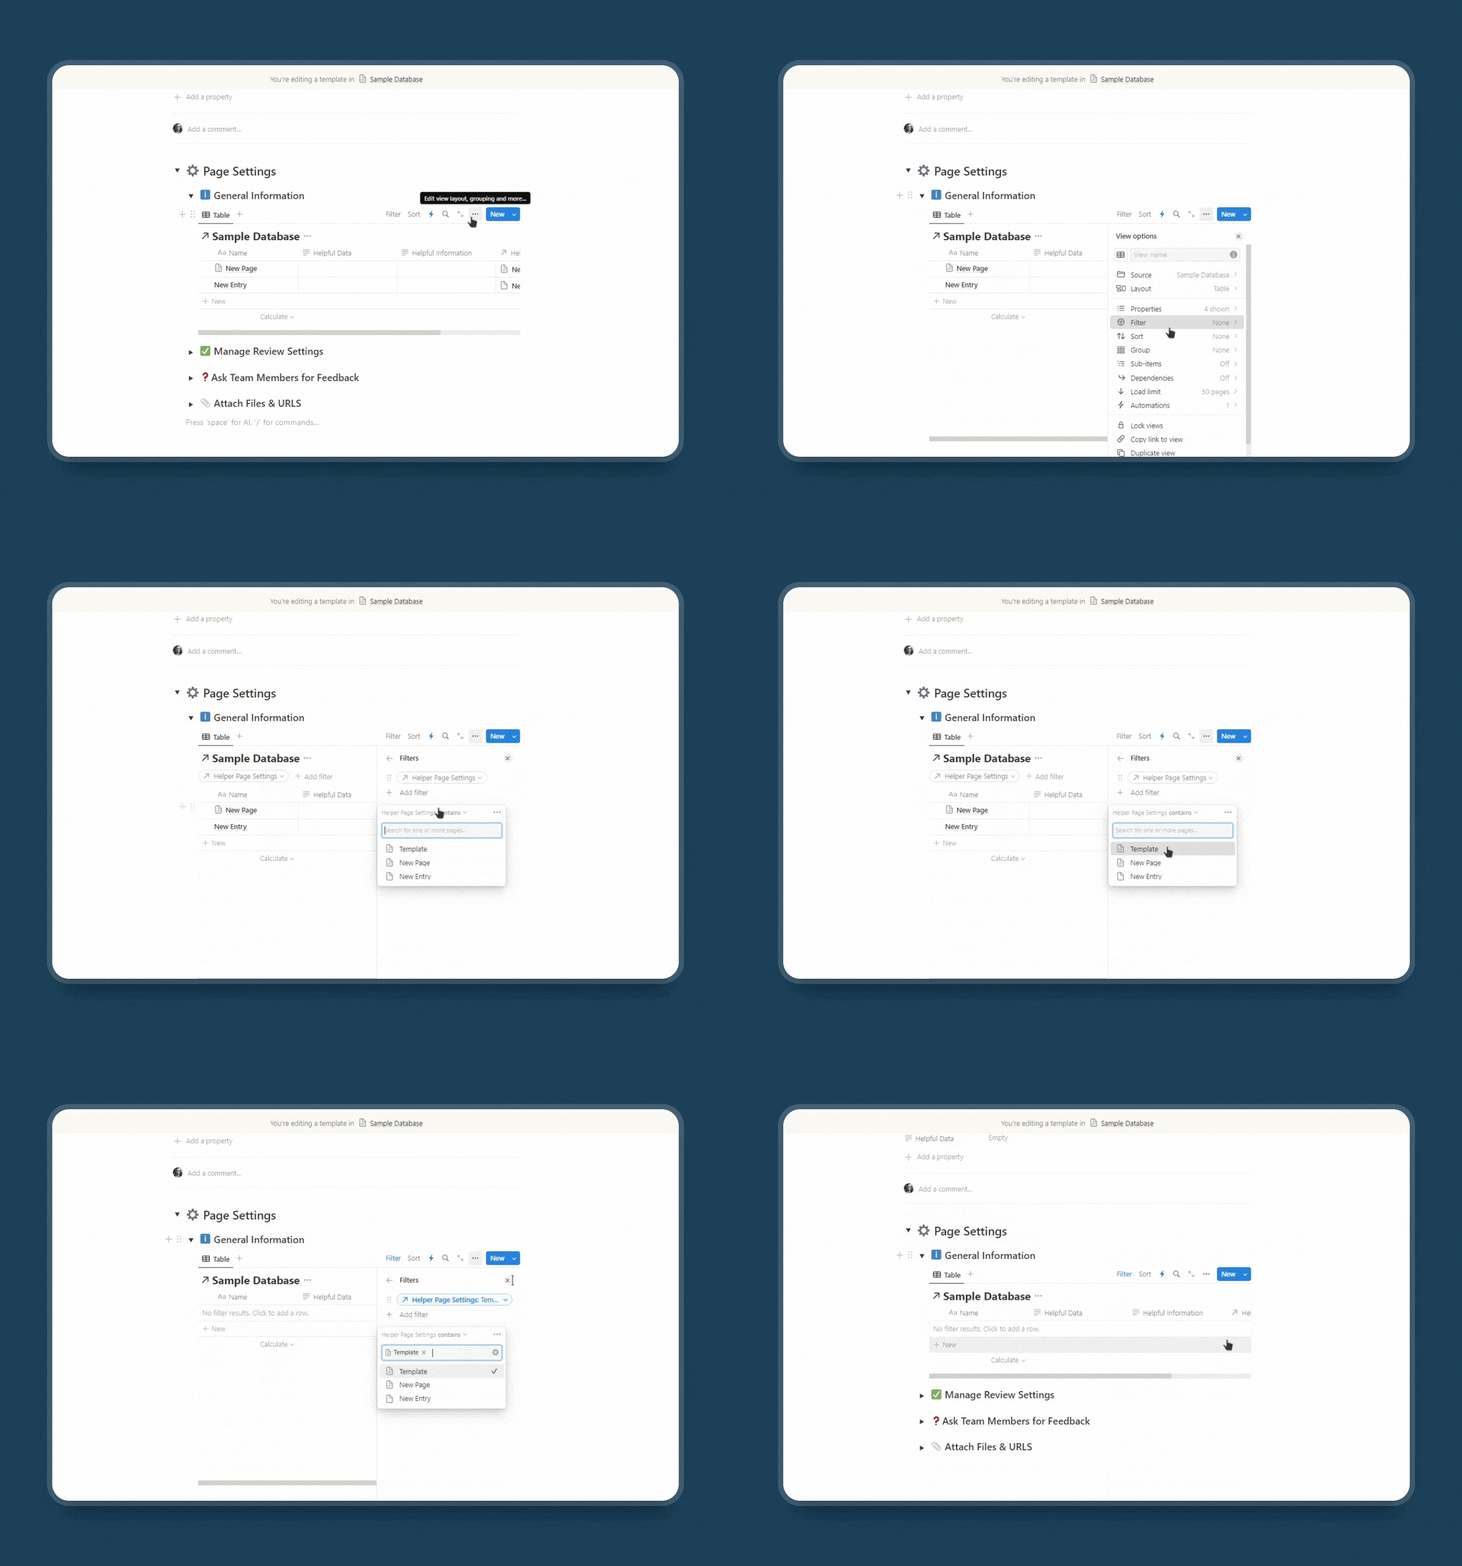
This is called a self-referential filter in Notion and it’s a bit like magic. Whenever you create a new page and apply the database template, the filter will automatically update to show only entries related to the new page!
And that’s it! You can now show Notion Database Properties freely inside your Notion Page. Just modify the shown properties and move the section around as you like. You can even create several different linked views that show different properties in different locations.
Case Study: Creating Page Settings
Let’s say, you’ve created a workspace for your team. In that workspace, there are probably databases with a ton of properties in it. Some are just powering features, while other properties must be filled out by the user.
But telling them which one to fill out and in which way isn’t always easy, and you can only show a few of the properties without hindering the user experience. But you can make things a lot easier by leveraging Notion Properties in a Notion Page to build Page Settings.
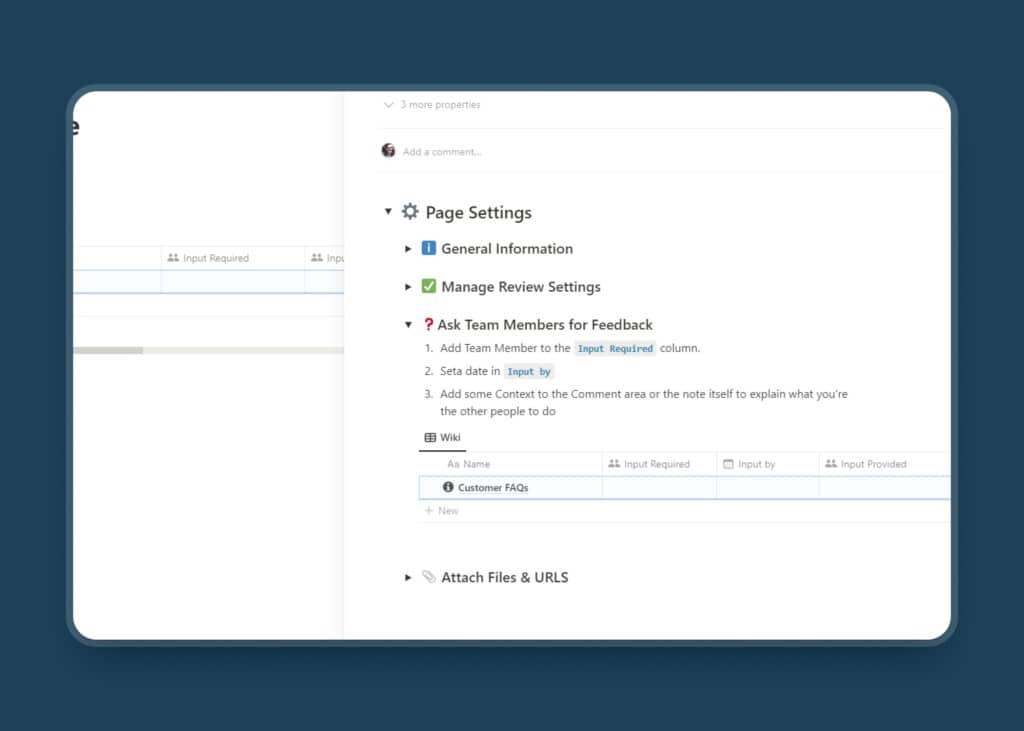
With Page Settings, your users not only will know how best to fill out a property (step-by-step guide) but also see the linked database along with relevant properties for easy access and customization. There can be multiple categories and with each category, you can add any instructions too. I’ve always thought of this workflow but never been able to implement it as it will make the Notion workspace so much more complicated.
Suppose, you have a company wiki in Notion. Whenever you open a page, you want your users to have access to the properties related to that particular page. So, they can easily change or fill out certain properties.
This way, users can easily change or fill out the relevant properties without scrolling through loads of properties. Moreover, you can create a step-by-step guide right above the linked database for a better user experience.
And once you’ve implemented this first feature, here are two more tricks to greatly improve the user experience in your workspace.
How to use Notion formulas to create a better gallery view
Balancing functionality and accessibility in Notion isn’t always easy. Particularly when it comes to displaying information.
Suppose, you have an inventory database and you want to display the Total units sold and the Total number of customers.
In the table view, it’s quite easy to get the context as the property label is already there. But, what if you want to create a gallery view? There, you’ll only see the data itself but not the label attached to it.
How will anyone know if it’s the total number of customers or total units sold?
They’ll just see numbers like 100 or 250.
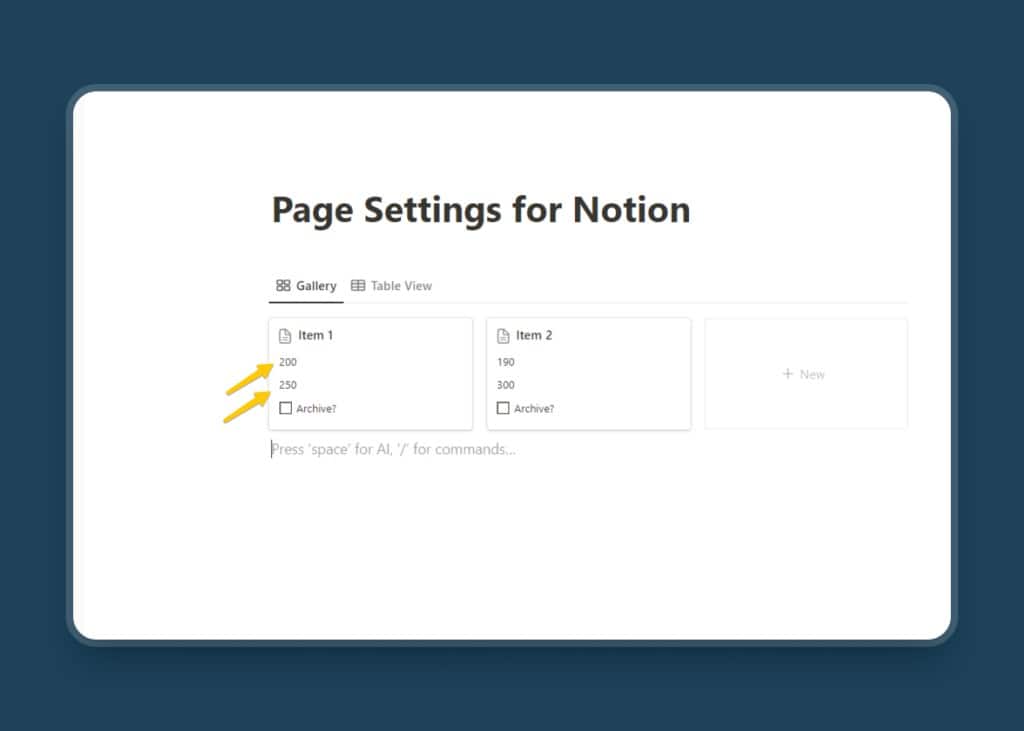
Luckily, formulas can help you out here. It might be counterintuitive, but this type of formula will make your Notion Workspace easier to navigate, particularly when using Gallery or Board Views.
I like to call them Display/Divider Formula and here’s how to use them:
Notion Formula 1: Creating a text label using Notion Formula
It’s super simple. Just create a formula property and inside the Edit Formula, type the instructions or context within quotation marks (“ ”). And that’s it – the formula is complete!
For the above example, you could create two Formula properties. In one formula, add “Number of Customers” and in the other one type “Total Units Sold”.
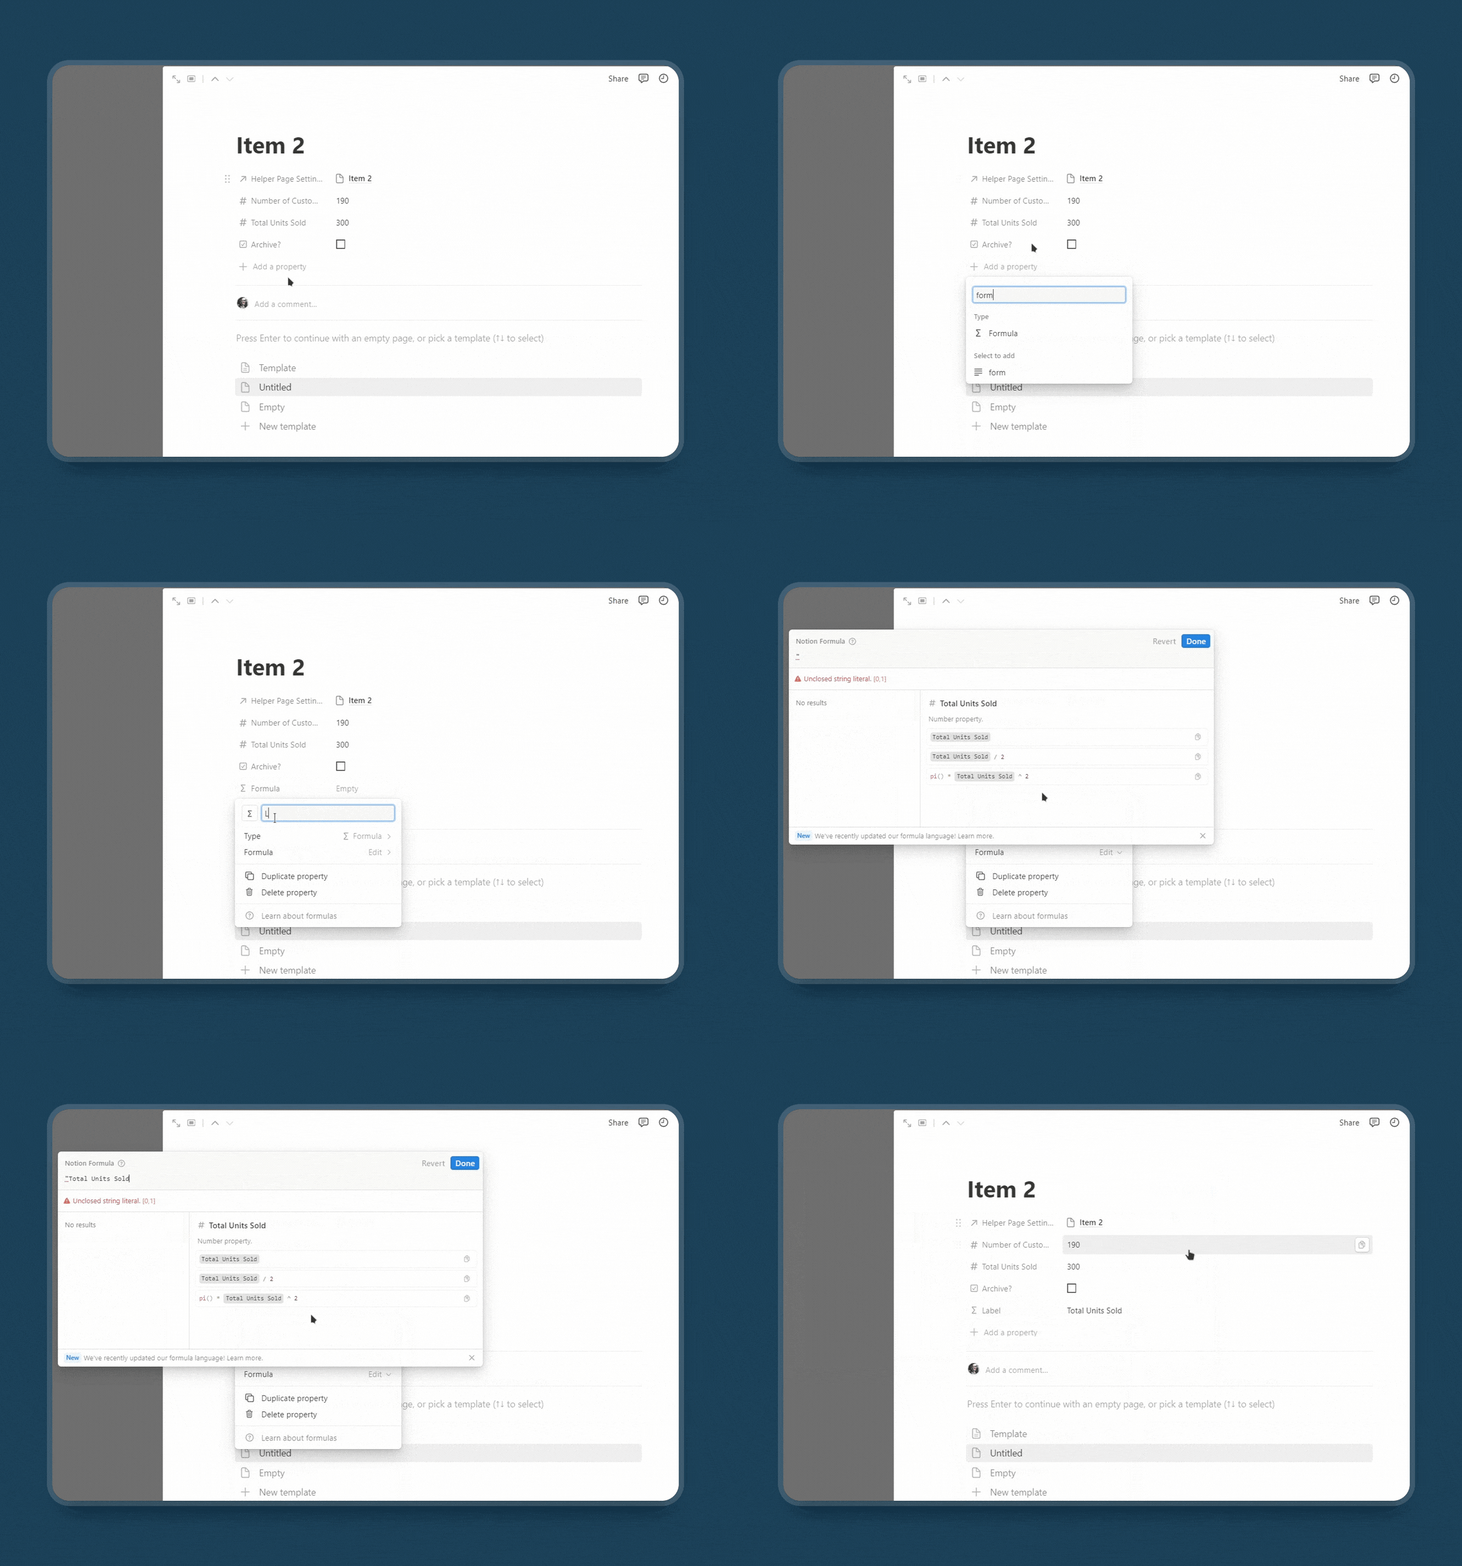
Now, go to the gallery view and click on the three-dot menu to select Properties.
From there, click on the eye icon to show the relevant Numbers fields as well as formula properties and logically rearrange them.
You may show the Display Formula first and then the Total Units Sold later.
This way, you will know what each number means in this database.
You can create as many of these as you want to better display your information.
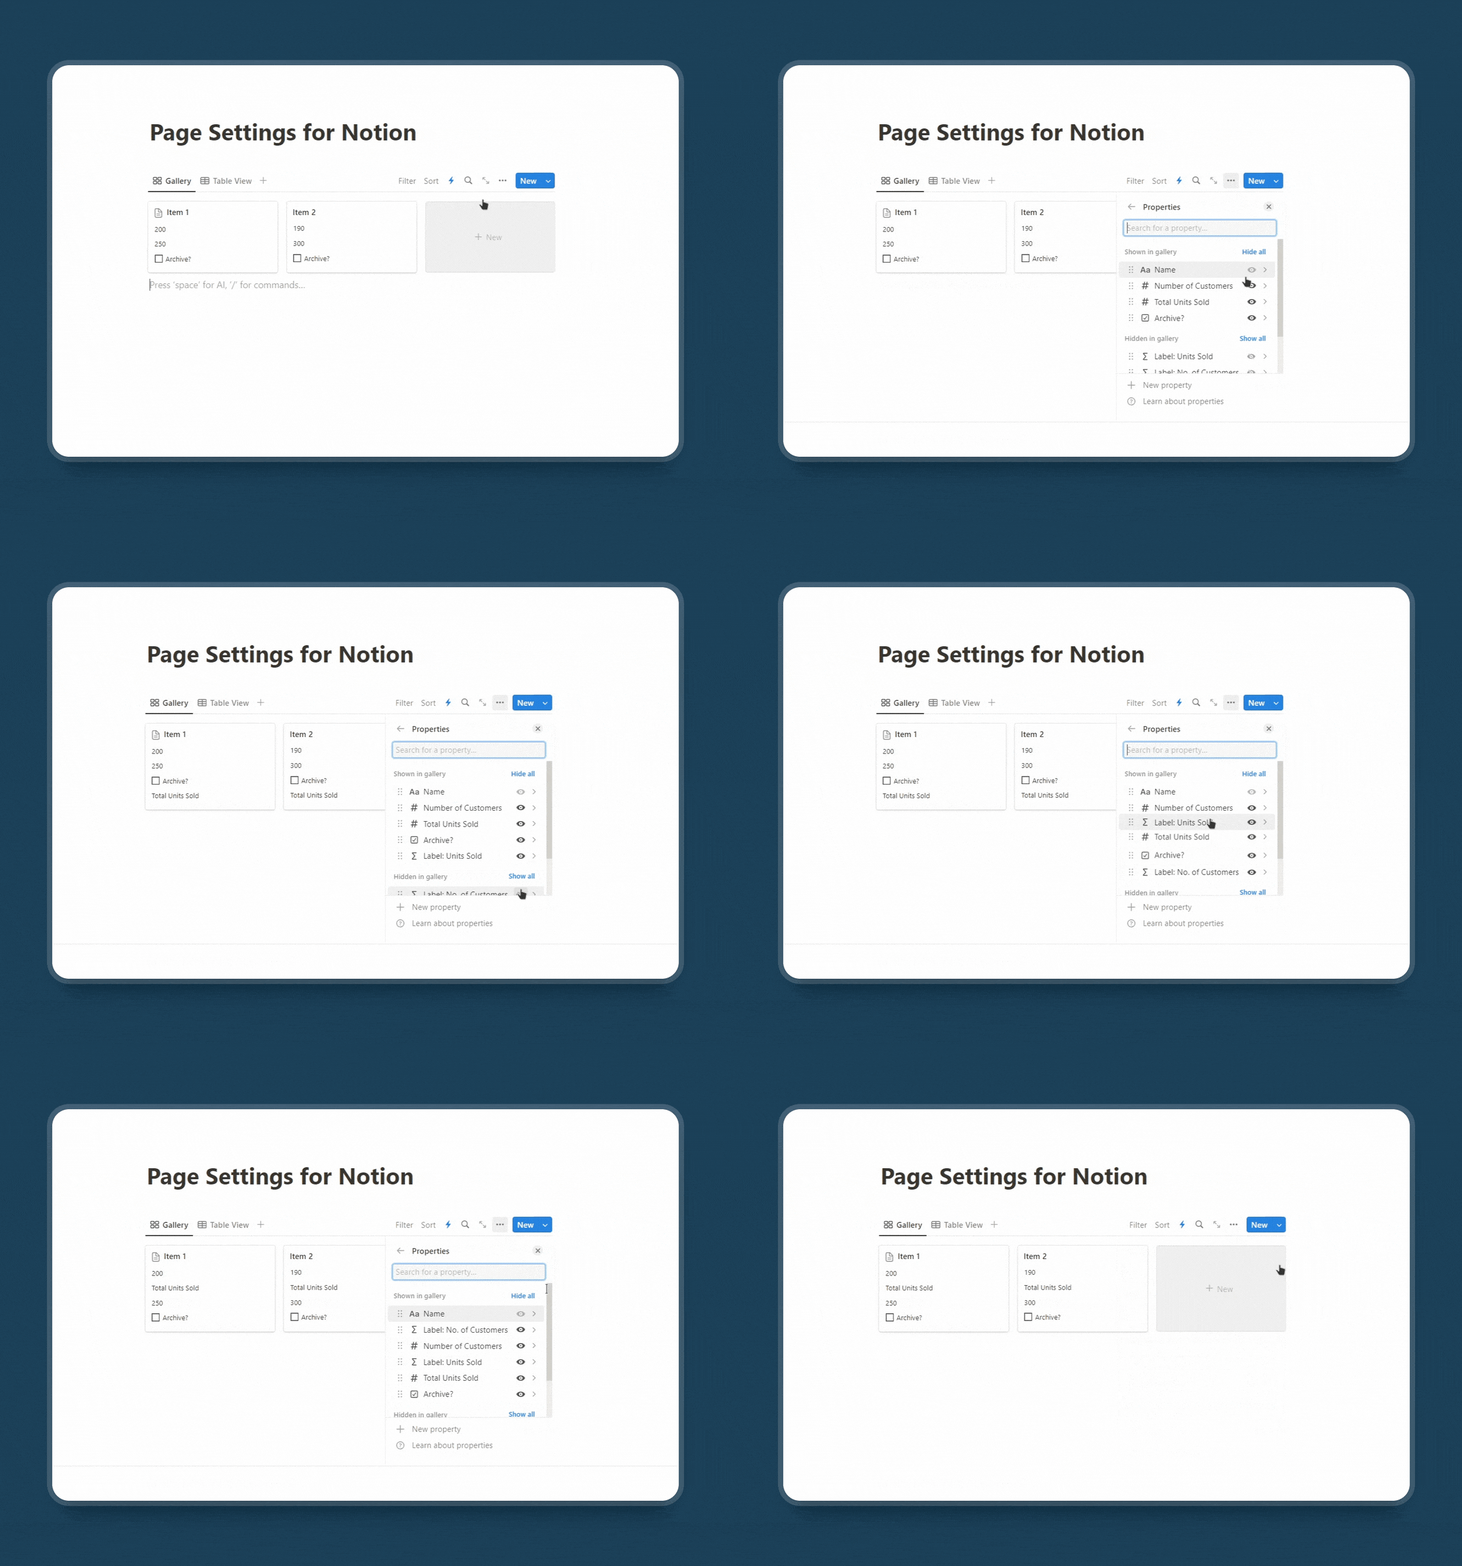
It’s looking good now, right? But what if you want to show your numbers with a little more clarity like, 50 out of 250 units sold? How will you do that? Let’s find out.
Notion Formula 2: Adding text with the Numbers property
This formula has so many use cases. Whenever you want to show a Number property with a short descriptive text, you can use this formula blueprint.
Let’s assume, you have two number properties — ‘Units Sold’ and ‘Total Units’. You want to display these two numbers together in the following way: 50 out of 250 units sold. Here’s how to do that:
For any text, use the quotation mark (“ ”), and for numbers, select a Number Property in the Notion Formula panel. In between those, use ‘+’ to form the sentence. Don’t forget to add proper space inside the quotation marks. See the example formula below:
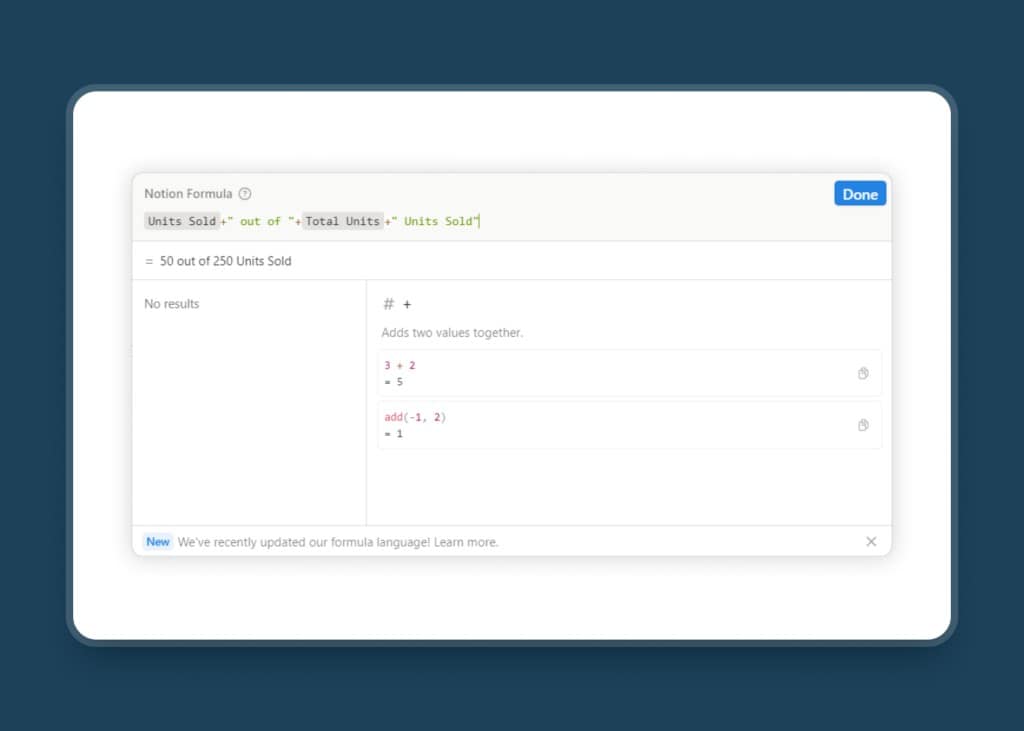
This way, your numbers will show in a better way: 50 out of 250 units sold.
However, unlike the previous one, you can’t edit or change the numbers here by clicking on it as it’s not a number property – it just displays information based on other properties in your database.
That means you need to make a decision when designing your workspace.
Do you need a quick way to update information in the view? Then pick the divider formulas from above to add some simple context around them.
Do you just want to display information in the cleanest way possible? Then use these combination formulas to show several other properties plus context in one field.
How to set up tooltips and property descriptions in Notion
Have you ever downloaded a Notion template and had no idea what a certain property does or what you should be doing with it? It’s happened to me and can certainly happen to your team or anyone who is using your template.
To solve this, Notion introduced a simple feature called Property Description. With this feature, you can add a little description of what a property does.
It’s a simple change but it can make your Notion workspace so much more accessible to your users as well as your team.
To add a Property Description, click on any property and select Edit Property. From there, look for the field that allows you to name the property.
You’ll find a small ‘i’ icon called Add property description to the right of it. Click on it and a new placeholder will appear where you can add the text or description.
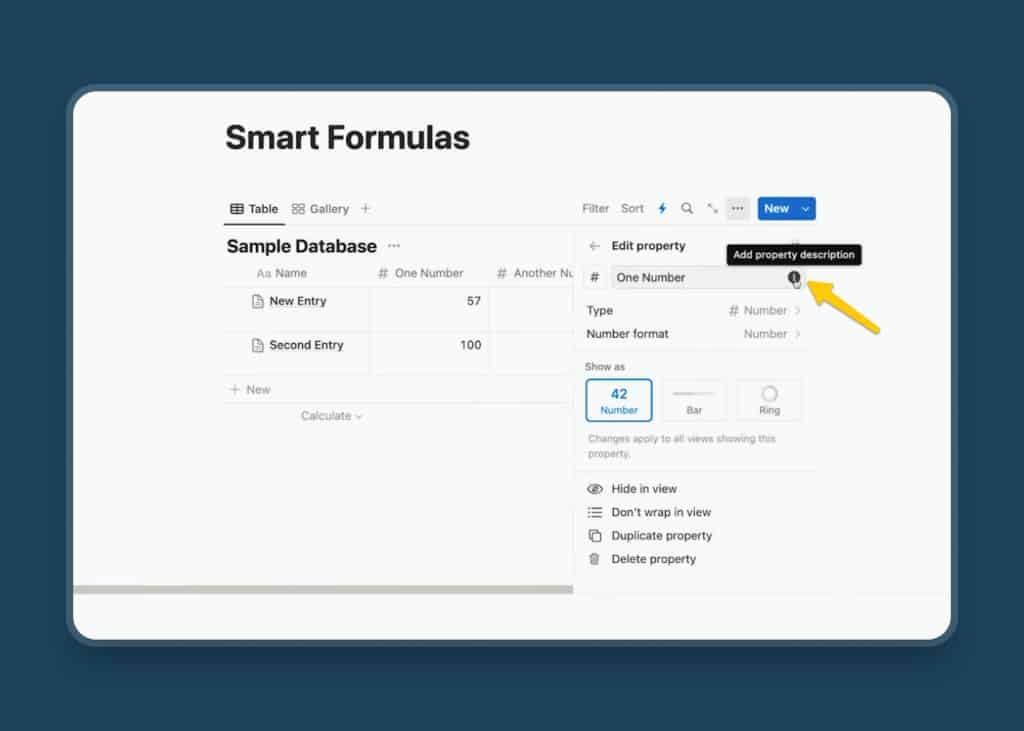
After you set a property description, Notion will now show a small “i” icon next to the name in table views and when opening the page.
Whenever anyone hovers the cursor over the icon, it will show the description like a tooltip.
Now everyone can easily know what the properties are about. This feature alone is quite helpful for teams as well as Notion template creators.
Get Your Free Notion Template
You can download this Notion Template plus another 21+ other free templates here:


