Learn how to leverage the Notion API to quickly capture images from your iPhone to your Notion workspace with just two clicks.
Notion is an awesome tool and you can use it for pretty much anything. However, there is a certain learning curve and lots of people don’t even come close to using the full potential. One such example is the Notion API. You can build powerful automations to speed up your workflow, but it can be intimidating to get started. In this article, I’ll walk you through one specific use case: quickly adding images from your iPhone to Notion. Let’s dive in.
(Want to learn more? Check out my Ultimate Guide to the Notion API)
Don’t forget to check out the video walkthrough of this tutorial.
Since I published this article, Integromat has rebranded to Make.com. Everything still works as described.
Why would I want Quick Capture for my images?
First things first: why even do this?
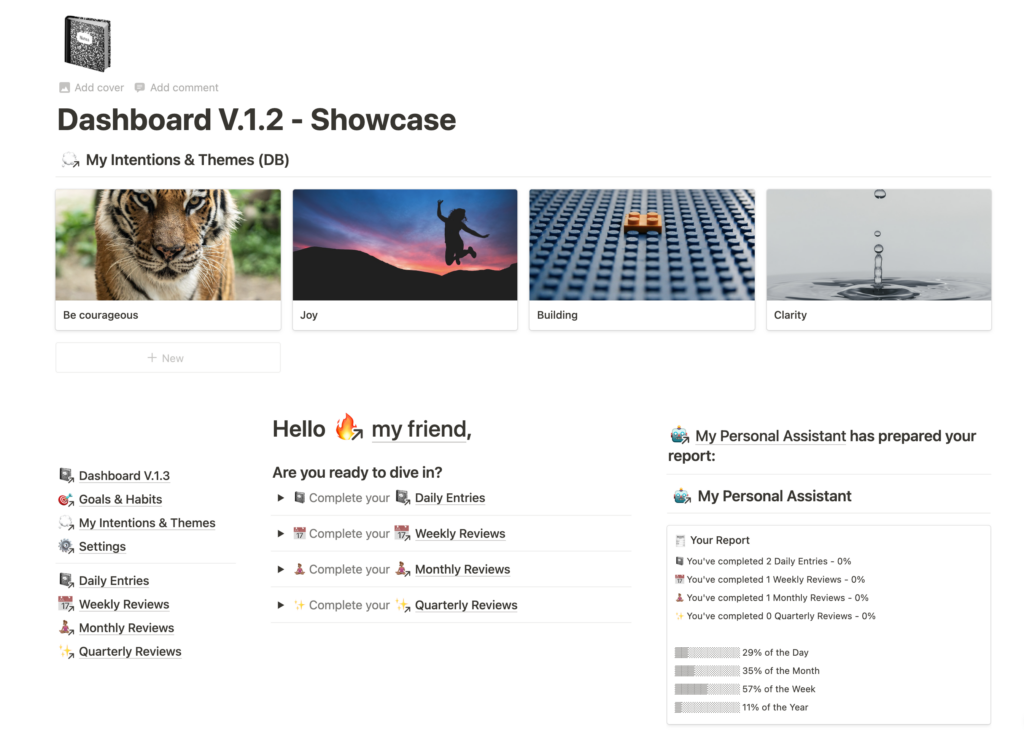
Well, say you’re using Notion as your personal journal. There’s a bunch of cool things you can do that would not be possible with a paper journal. For example, you could add an image for each day and at the end of the week, month or year, you can quickly create your personal Year-in-Review from that.
However, doing so manually is a bit cumbersome. You need to click on Add Cover, Replace and Upload and then you need to have your image ready. If you journal in the morning, you might not have a picture yet. Or you might want change it later in the day when something else happens.
(Ok I admit. It’s not THAT much work. But it just seems like unnecessary friction, so why not try to make it super easy?)
This is just one use case where Quick Capture for images to Notion comes in handy. Others would be:
- document your meals if you’re tracking what you eat
- collecting inspiration in the real world? Quickly create a swipe file by taking pictures of buildings, paintings, nature or anything else and add it to your inspiration gallery in Notion
- running an event? Create a digital wall of love through Notion and ask participants to quickly add their image to the gallery
What do you need to quickly add images to Notion?
In order for this setup to work, you’ll need to duct-tape some services together. Luckily, you can use the free plans for each of them:
- Integromat (Affiliate Link)
- Dropbox (Referral Link)
- Notion (just a normal link )
Oh and you’ll need an iPhone. I’m sure there’s a way to do the same on Android, but for now, I’haven’t figured that one out.
Quick shoutout here to the amazing Nikki Davidson who inspired this automation – check out her work for more awesome Notion content
How to set up Quick Capture for Images to Notion
We need to do three things to quickly add images to Notion
- Prepare our Notion workspace
- Set up the iPhone Shortcut
- Build the Integromat automation
Don’t worry – I’ll walk you through it step-by-step.
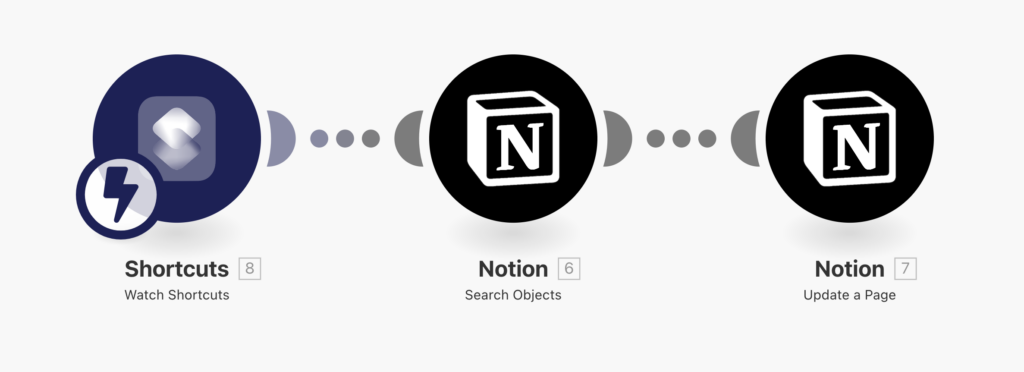
Just for context, this is what you will be building:
- Once done, you can click a shortcut on your iPhone and chose an image.
- That image will be uploaded to Dropbox.
- Our automation will automatically grab the share link to the image and plug it into your Notion database.
Ultimately, all you need are two clicks on your iPhone (”Run Shortcut” & “Select Image”) and it appears in Notion.
1. Prepare your Notion Workspace
Setting up your Notion Workspace is fairly straightforward. All you need is a database that will hold you images. Depending on your use case, you’ll want to opt for one of these two setups:
- pre-defined entries in the database that will be populated with images
- No pre-defined entry, each new image will create an entry
The first version is what you’d be using for a Journaling Template. You already created your Journal Entry for the day and when you later add an image, it should automatically be added to this entry.
For that, you’ll want to properties in your database. Created Time and a Formula property with this formula:
formatDate(prop(“Created Time”), “YYYY-MM-DD”)
We’ll later use this to add the image to the journal entry of today.
If you want the second version, you don’t need to prep your database in any particular way.
2. Set up the iPhone Shortcut
iPhone Shortcuts are super powerful but criminally underused. Let’s change that. Here, we’re using a shortcut to select the image we want to add to Notion. This image will be uploaded to Dropbox and the share link will be processed in the next step.
Sounds complicated? Well good news, you barely have to set up anything.
I’ve pre-written the shortcut for you.
Open the shortcut on your iPhone or Mac. You need to edit two things:
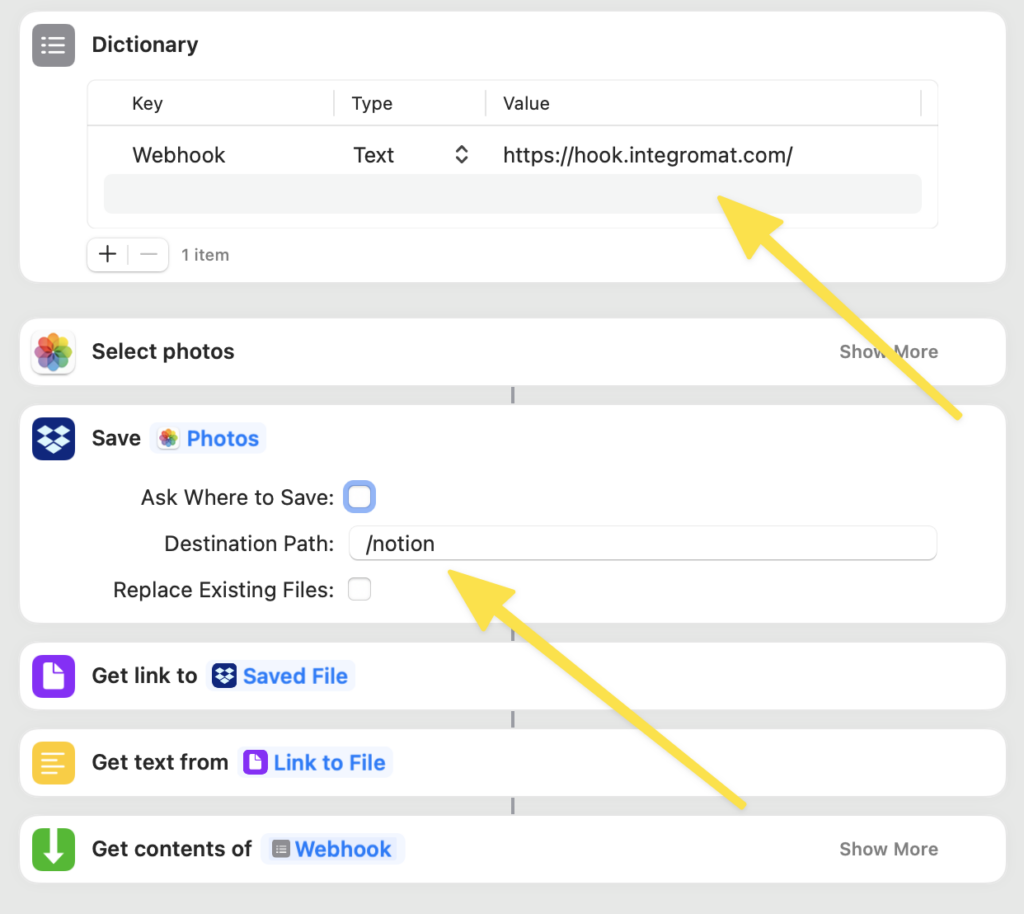
The Value of the webhook needs to be replaces with a link that we’ll identify in the next step
The Destination Path needs to point to the Dropbox Folder you’re using to store the images. It’s pretty easy to identify the path:
- not using any folders in your dropbox? Just type a simple slash /
- using folders? Type / followed by the name of the folder. If you’re using folders within folders, add another / and the name of the sub-folder.
In the example of the image, I’m using a single folder called Notion in Dropbox (so no sub-folders)
3. Build the Integromat Automation
Onto the slightly more complex part, the Integromat automation.
Integromat is a service similar to Automate.io or Zapier and helps you to integrate several apps via the API. It is slightly more complex than the other tools and has less diverse apps to integrate (yet), but it’s by far my favourite of them all. Plus, it’s the only service that allows you to do multi-step-automations on the free plan. If you want to give them a try, sign up here (this is my affiliate link)
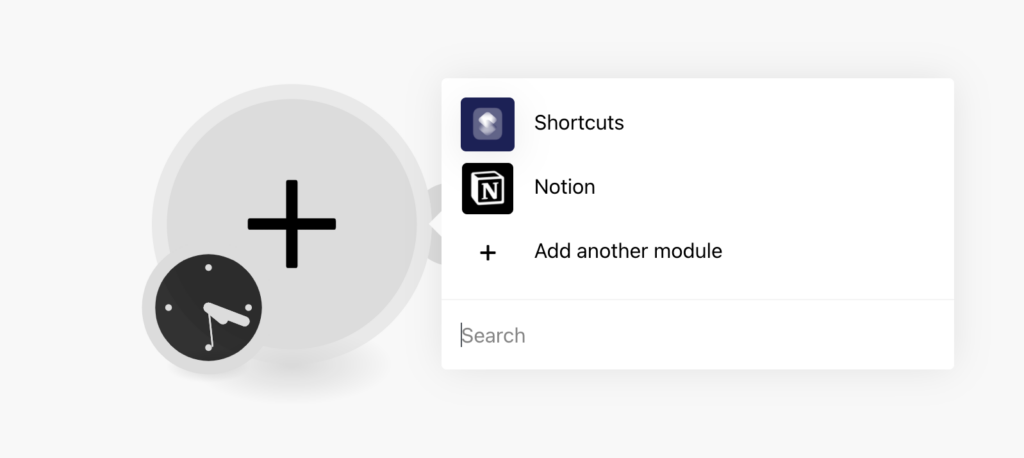
Create a new scenario and look for the Shortcuts Module to start things off.
(remember that you can also watch my Youtube Video to learn how to do this)
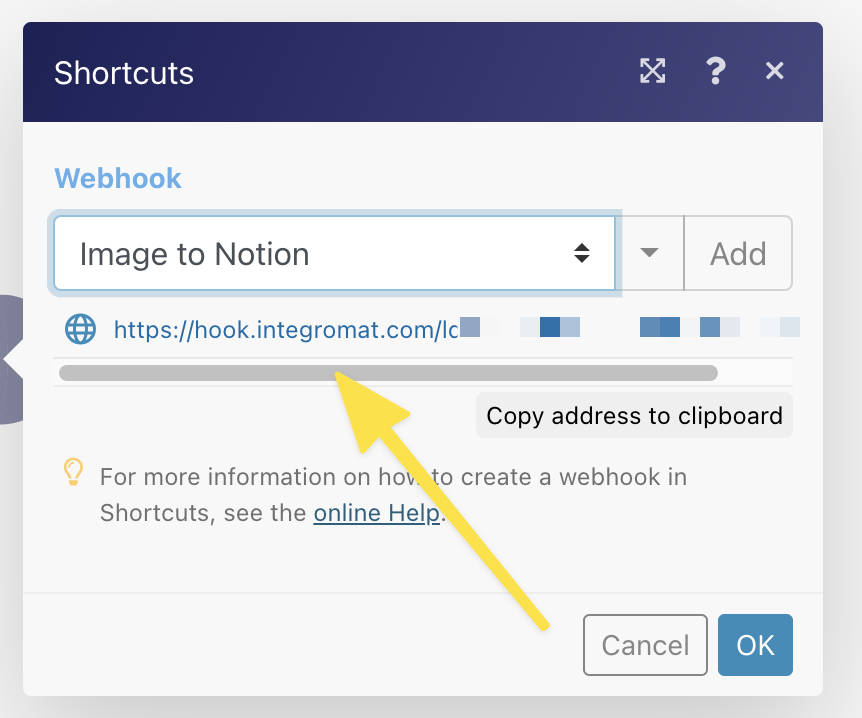
Next, click the Add Button next to the Webhook Context Menu, give it a name and save it. Now, you’ll get a long link displayed. Remember that Webhook Value in the iPhone Shortcut? We need to take this link and paste it there. Then you can click OK and close this module.
Once done, click Run once in the bottom left of your screen. Your automation is now waiting for information from your shortcut. Run your shortcut on your iPhone and pick an image to test that everything is connected. Your module should get a thought bubble with a 1 inside. If you click on it, you should see something like this:
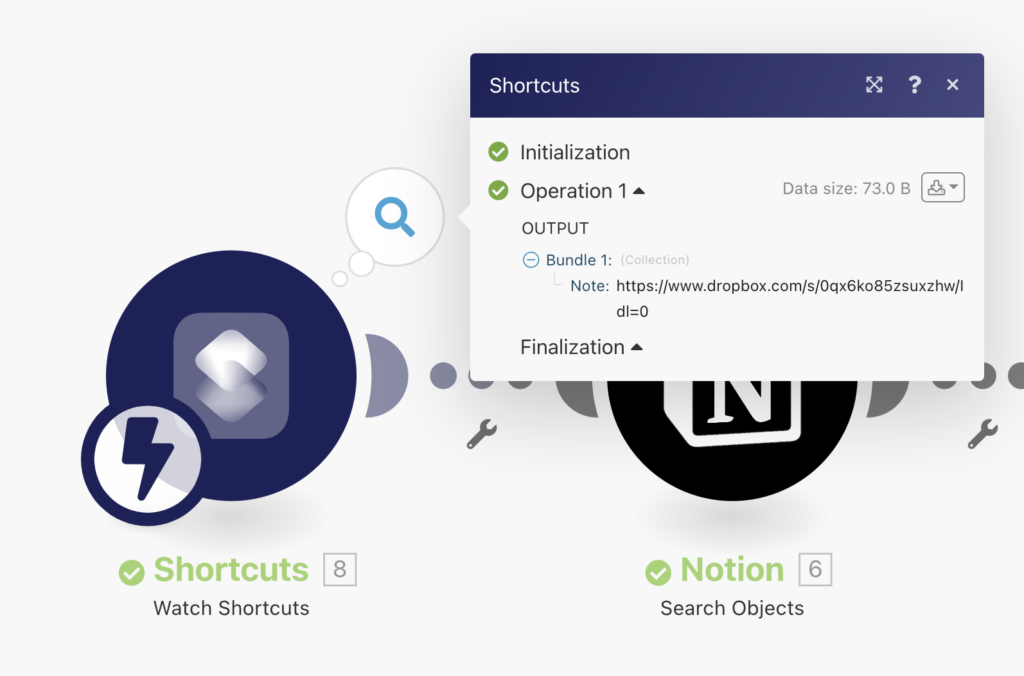
Let’s add the next module (you already see it in the image above): Notion. Selecting Notion as the next module will open a big context menu of possible Notion Actions. Which one to choose comes down to the question from Step 1:
- do you want to add images to existing database entries? That’s explained in section A.
- do you want to add images and create the database entry? That’s explained in section B.
A.1 Adding images to existing entries: Search for Entry
Pick Search Objects from the options in the Notion Module. This will open a context menu:
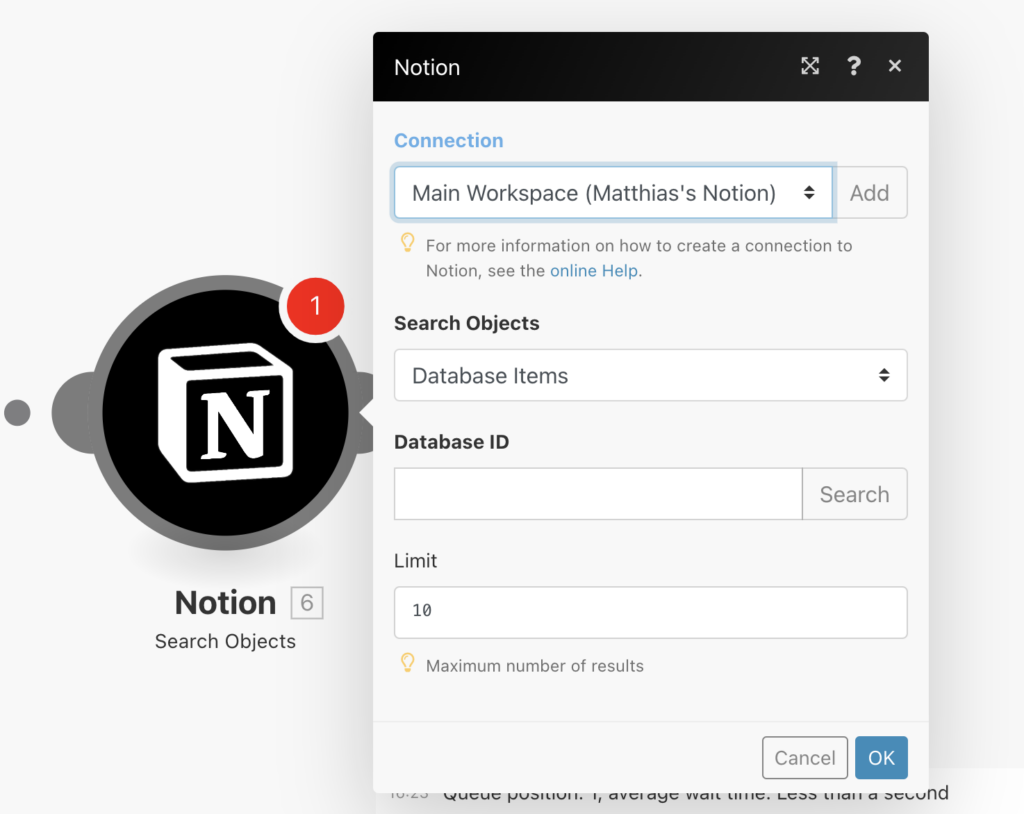
First up, you need to select your Notion Workspace. If it’s the first time using Integromat with Notion, click on Add to authorise the connection. Make sure that you select the Database with your entries from Step 1 and share it with Integromat.
Next, we need to tell Integromat the correct Database ID. Sometimes, it will automatically give you a drop down of available databases. If that doesn’t happen, copy the link to your database page (just open it and press cmd + L) and paste that URL into your browser.
See that part between after your workspace name and before the question mark?

Copy the segment inbetween (without the slash and the question mark). That’s the database ID. Paste it into Integromat. This will open up a filter option.

For the top field, pick the property in your Notion database that has the formula to render the date in the YYYY-MM-DD format. Below, write the condition as shown above.
This ensures that your image is added to the database entry of today. If you want a different condition, you’re gonna have to figure out how to filter for that specific entry. Also, you can only have one entry for today for this to work (though you could add additional rules to specify if that’s the case in your workspace).
Before you proceed to the next step, right-click on the module and pick the option Run this module only. This will make the next step easier.
(You should have a database entry for today in your Notion database before you do that)
A.2 Adding images to existing entries: Add Image
Now, add another Notion Module. This time, we want the option Update a Page. You’ll get another context menu.
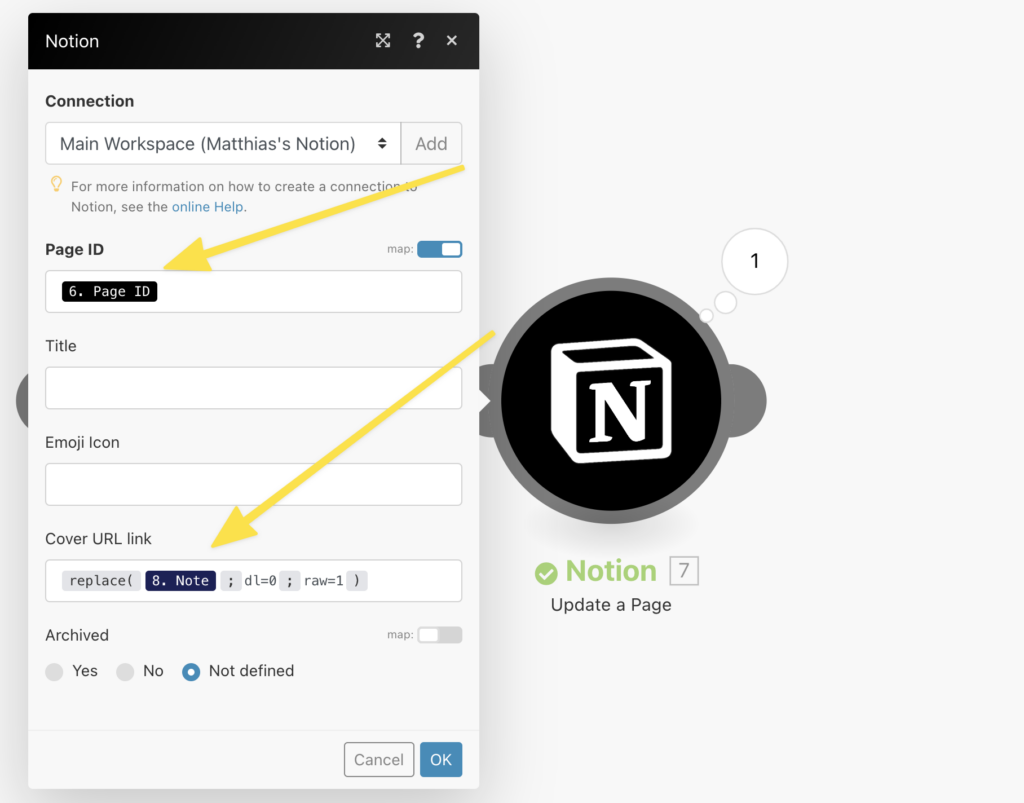
For Page ID, click in and select the Page ID that was returned by running the previous module once.
For Cover URL link, things are a little bit more complicated. By default, Dropbox gives us a sharing link that does not render correctly in Notion. It has something to do with the very end of the share link that will look something like this:
…dl=0
We need to modify the share link so that the image actually displays in Notion. Don’t worry – just write this formula into the field (you can’t copy paste it – Integromat needs to recognise the operators as operators and that only works if you type it).
replace( PLACEHOLDER ; dl=0 ; raw=1 )
Here’s where you’ll find the placeholder (8. Note in the image above)
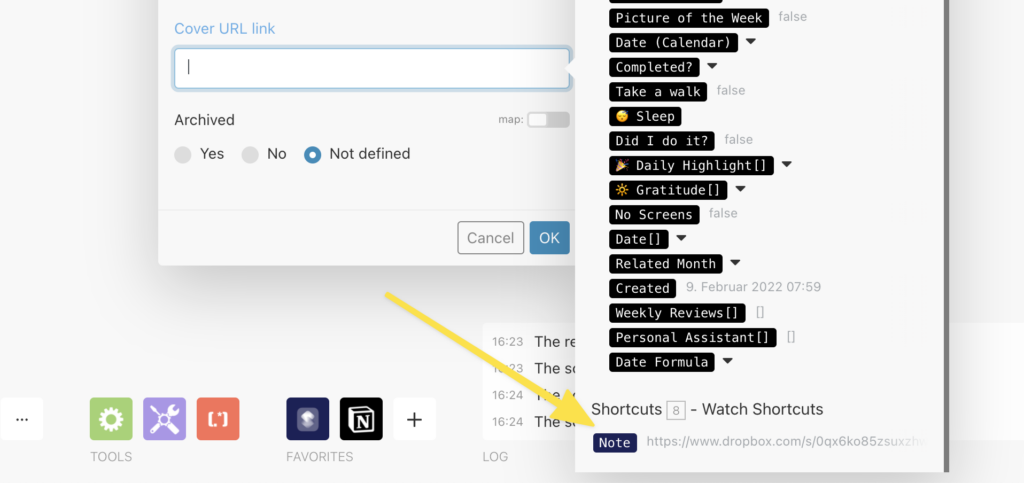
The formula will replace the wrong link ending “dl=0” with the correct “raw=1” that can be displayed in Notion
B. Adding images to Notion as new entries
If you don’t want to add the image to an existing entry and instead want to create a new one, then you need to pick Create a Database Item as your second module.
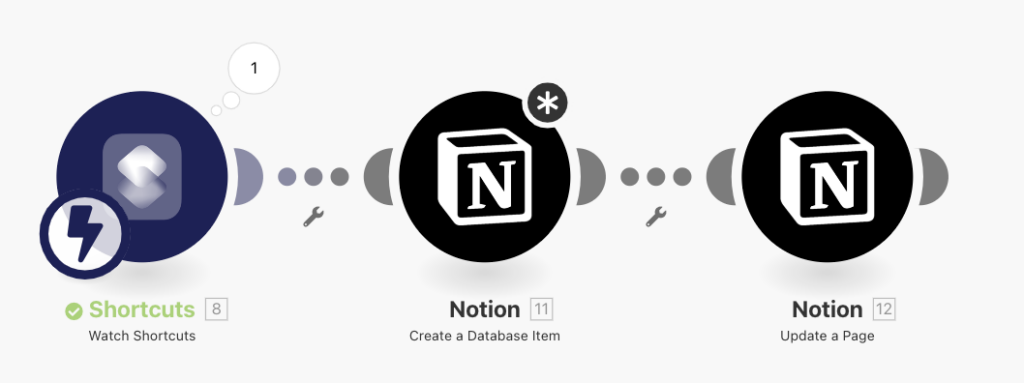
The second step remains the same. You’ll use the Database Item ID to add the image URL to the newly created
The second step remains the same. You’ll use the Database Item ID to add the image URL to the newly created entry. Remember to use the same formula as above to modify the sharing link.
replace( PLACEHOLDER ; dl=0 ; raw=1 )
Using Quick Capture for Images in Notion
Now you have everything in place to quickly capture images to Notion using your iPhone.
- a database in Notion to save the images
- the iPhone Shortcut that will add the image to dropbox
- the Integromat automation that will add the link to Notion
Tip: you can add the shortcut to your iPhone Home Screen to run the automation even quicker – or you can ask Siri to start it for you (to do so, say “Hey Siri” followed by the title of the shortcut).
That’s it for this tutorial. You can find more awesome Notion content here. There’s also a video version of this tutorial here.
Lastly, if you’re looking to finally build a journaling habit, kickstart your Personal Growth and track your progress towards your goals, then check out this Smart Journal Template in Notion.
