Time-Tracking in Notion is a great way to level up your productivity. Whether you want accountability on where you actually spend your time or need a robust time-tracking setup to invoice your clients, you can quickly expand your Notion workspace with this feature. In this article, you’ll learn about the 2 best methods for time-tracking in Notion. The first method is built 100% in Notion and utilises Notion’s game-changing Button feature. The second method integrates Toggl Track via Make with Notion to create the perfect Time-Tracking Setup for Teams.
Read on for the step-by-step tutorial, watch the video for a walkthrough or jump to the bottom of the page to download the free Notion template.
Time-Tracking in Notion using Notion Buttons
You can do Time-Tracking in Notion without the help of any third-party tools by using Notion Buttons in three easy steps:
- Create Your Database Setup for Time-Tracking in Notion
- Add a Database Template with Notion Buttons
- Use Roll-ups to calculate the total time spent
It’s a powerful yet simple setup and great if you need time tracking for an individual. However, it won’t support multiple timers running at the same time. If that’s something you need, check out the second method.
Let’s take a closer look at the individual steps.
Create Your Database Setup for Time-Tracking in Notion
To track your time in Notion, you’ll need two databases:
- A core database containing the things you want to track time for, i.e. projects, tasks or clients
- A helper database containing the actual time trackers
For a super simple setup, start by creating a core database with the following properties:
- Name, the main property of your database
- Time Trackers, a relation property to your helper database
Then, create the helper database and add these properties:
- Name, the main property of your database
- Start Time, a date property to record the starting time
- End Time, a date property to record the end time
- Tracker Status, a status property to indicate whether the timer is running or paused
- Connected Entries, the relation property to your core database
You can of course customise this setup to your liking or use any pre-existing databases or task managers that you already have in Notion.
Add a Database Template with Notion Buttons
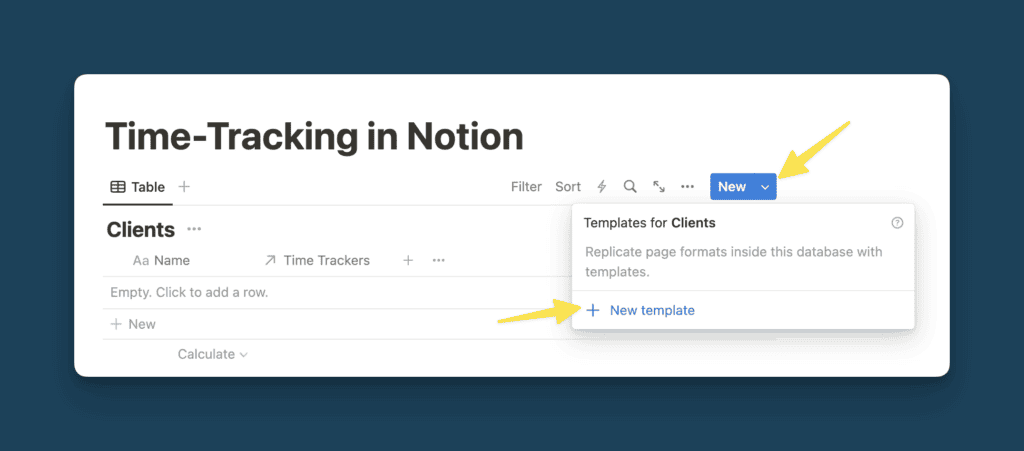
Next, add a new template to your core database.
Then, create a linked database view of the Tracker Database in the body of the page and set up a self-referential filter to only show the entries related to this page.
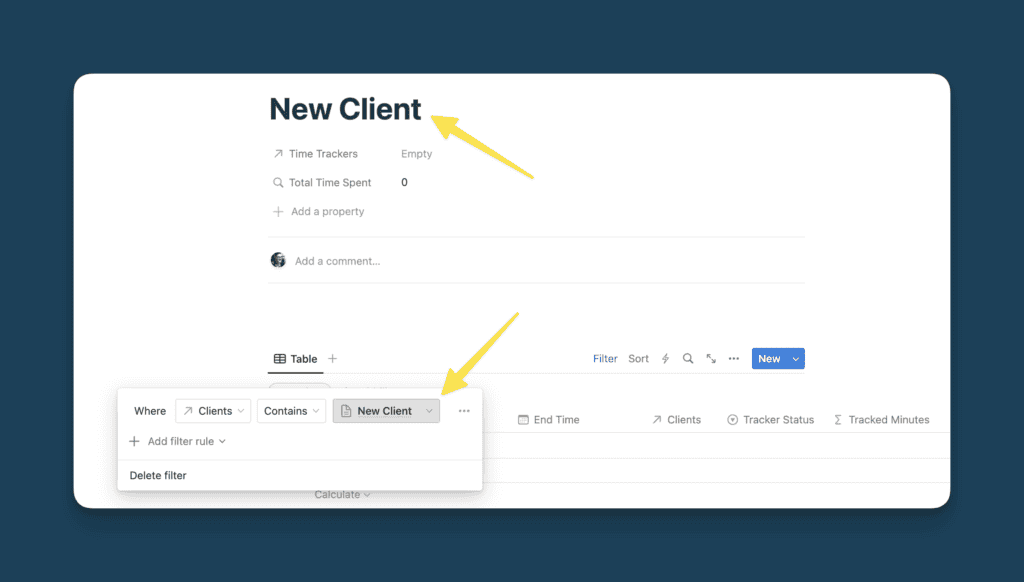
Tip: Not sure what a self-referential filter is? Check out the Database video in my (free) complete Notion Tutorial.
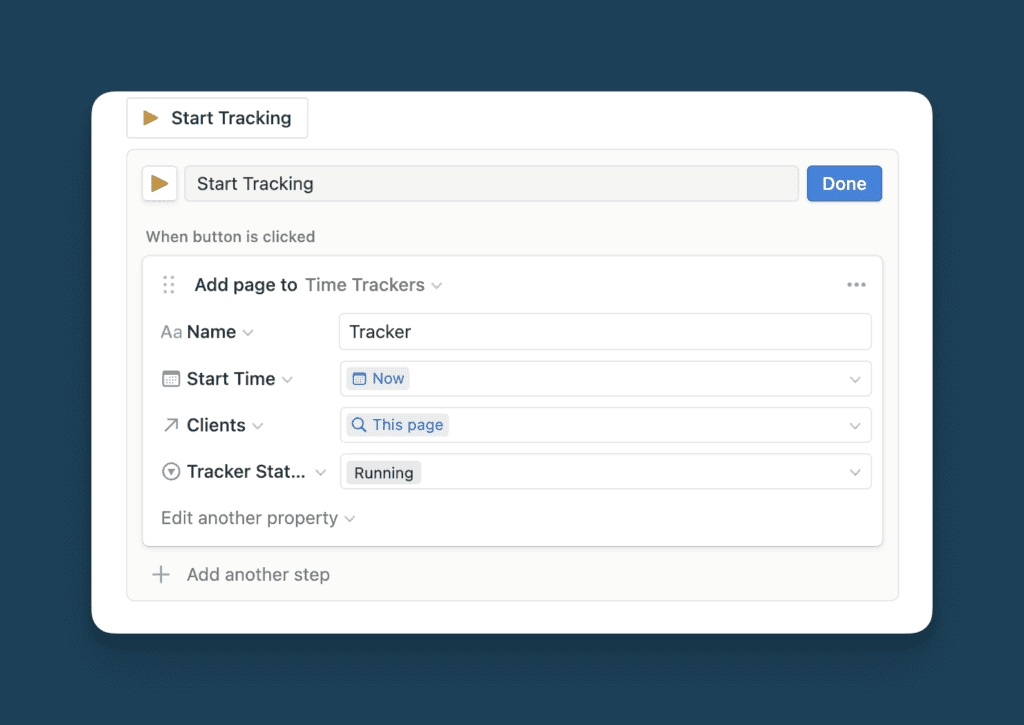
Now add a Notion Button to the page called Start Tracking. The button should trigger this workflow:
- Add page to Tracker Database
- Fill the Start Time with the current time
- Connect the “Connected Entries” relation to the page you’re currently on
- Set the Tracker Status to running
Then, add a second Notion Button to the page and title it Stop Tracking. Pick the Edit pages in option, select your Time Trackers database and then click on the grey All pages in Time Trackers drop down on the right to set up a filter. It should only apply to entries where the Tracker Status is set to Running.
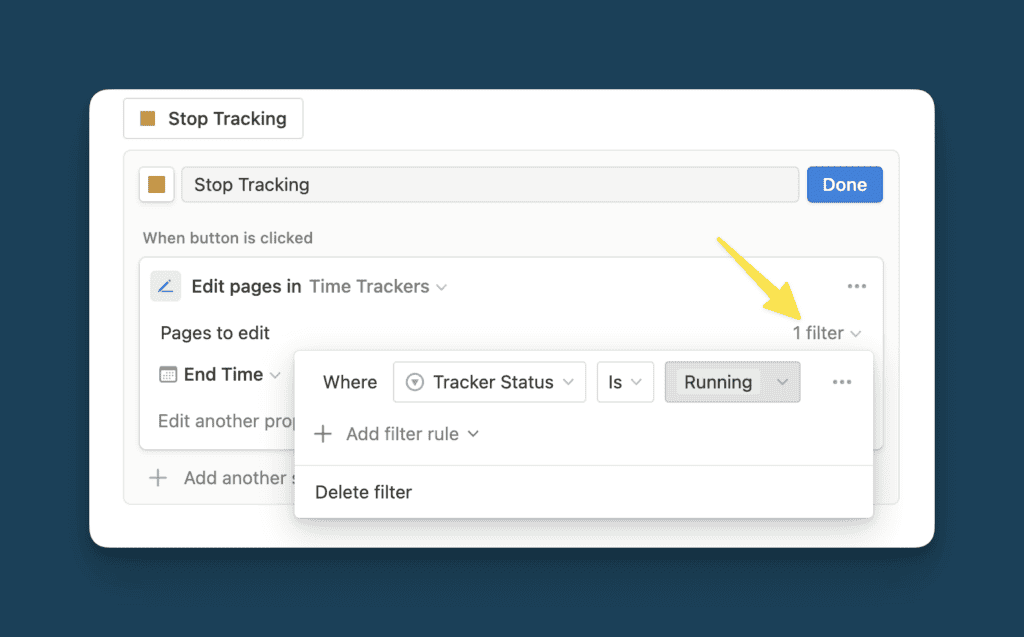
This step shows the current limitation with this setup. Since we cannot yet use self-referential filters within the filter setup of Notion Buttons, it’s not possible to only stop timers connected to the current page – instead, clicking the button will stop all running timers. Effectively, that means you can only have one timer running at a time. If you need to work in a team environment with several trackers, check out the second method in this post: Time-Tracking in Notion using Toggl Sync
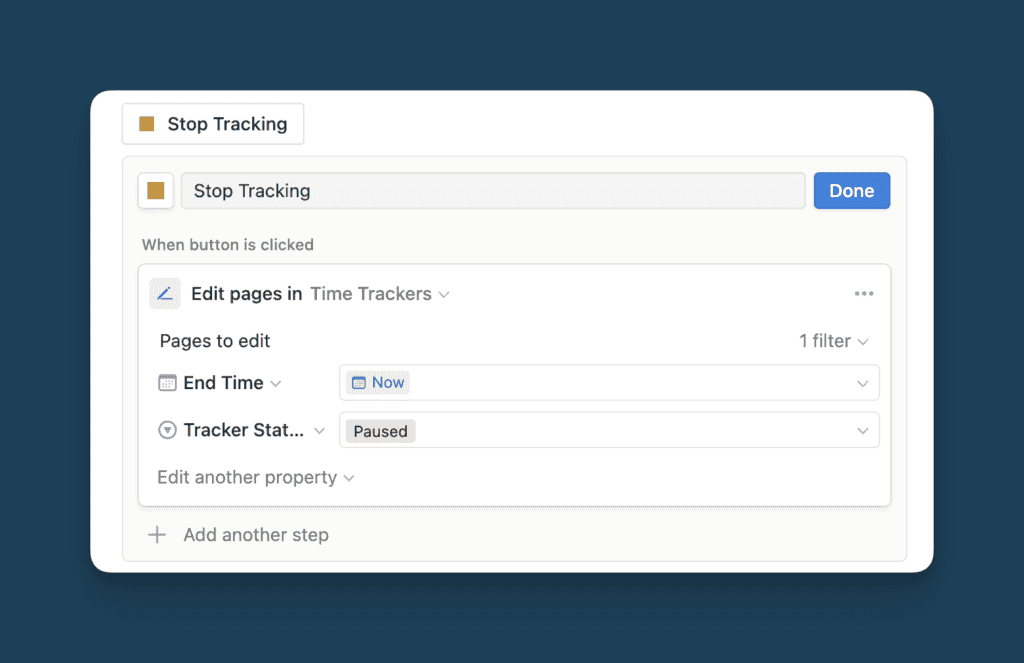
With the filter set up, configure the workflow to
- Fill the current time as the End Time
- Set the Tracker Status to Paused
Last but not least, add a column to your template to align the two buttons next to each other.
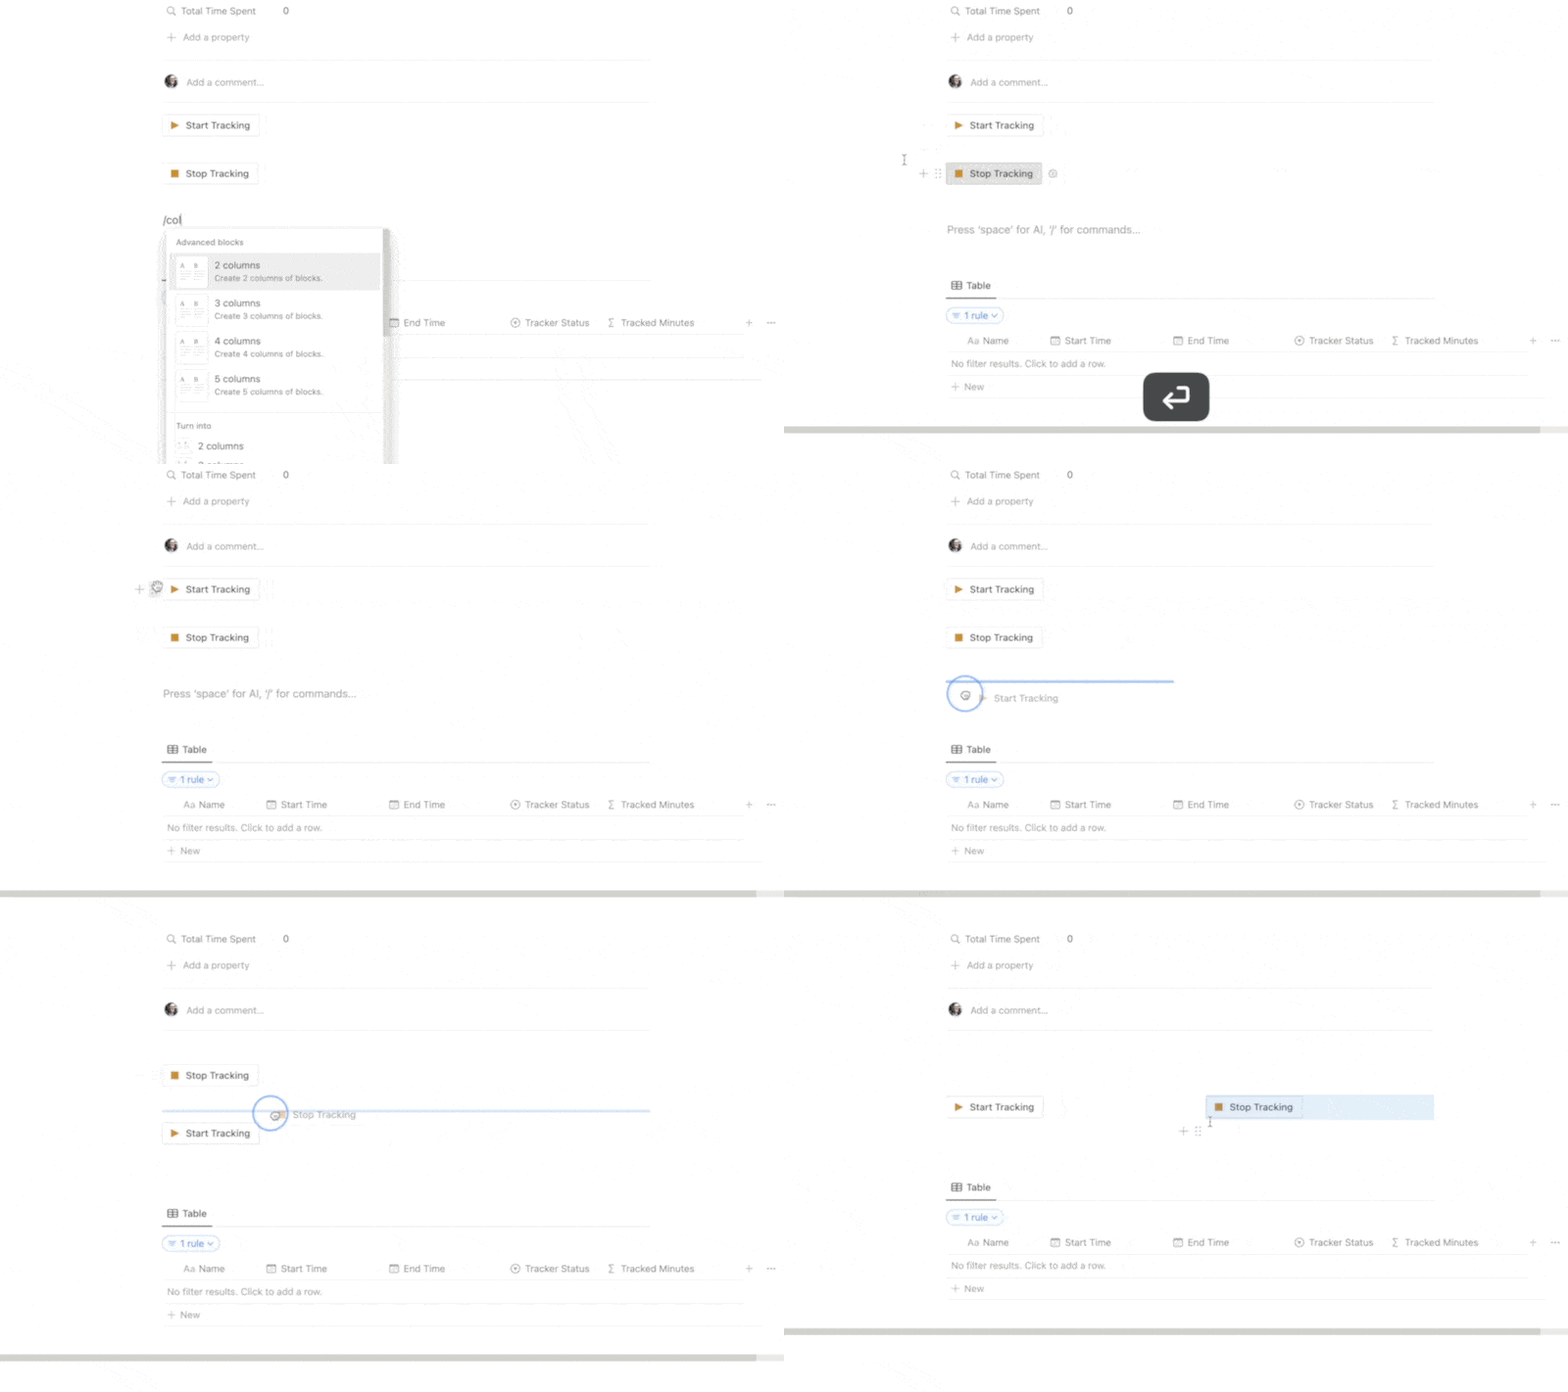
Your Time-Tracking setup in Notion is now able to record start and end times whenever you work at the click of a button.
Use Roll-ups to calculate the total time spent
To calculate the total time spent for your Notion Time-Tracking Setup, you need to add a few more properties to your setup.
Start by adding a formula property to your Time Tracker database and paste the formula below:
dateBetween(prop(“End”), prop(“Start”), “minutes”)
This will automatically calculate the minutes for each time entry.
Then, create a roll-up in your core database and roll up the sum of the formula property you just created. That way, you’ll see the sum of all time tracker entries.
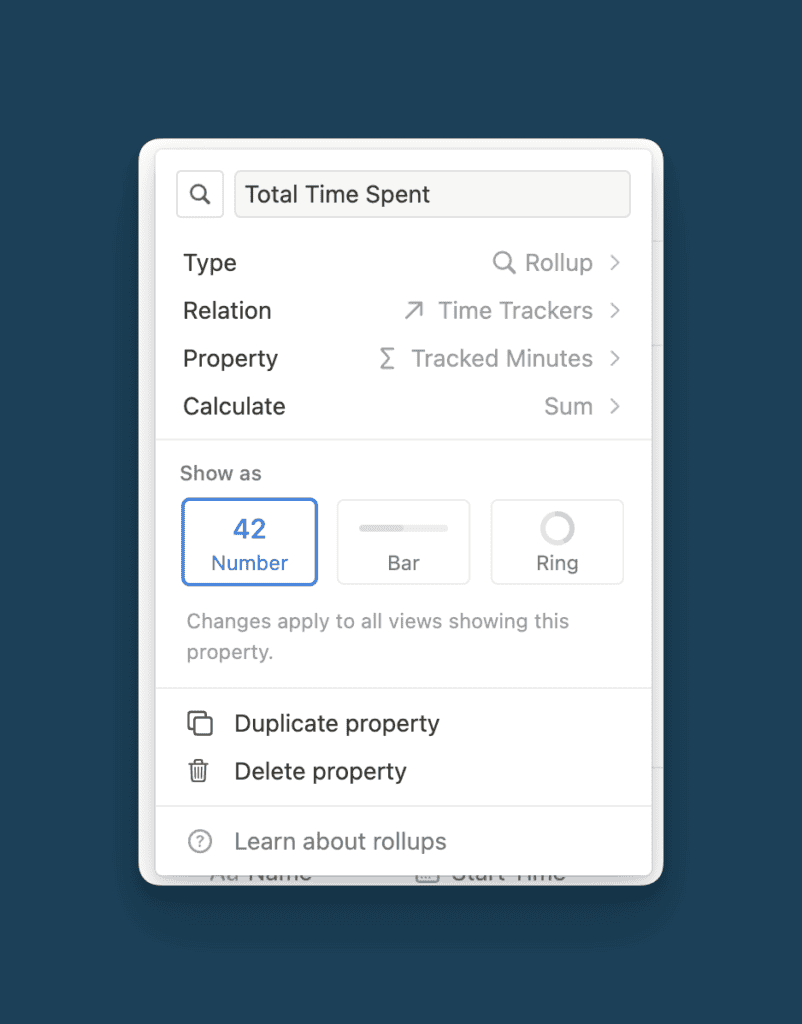
Last but not least, you can add another formula property to your core database to turn the tracked minutes into an HH:MM display with the formula shown below.
(prop(“Total Minutes”) / 60 == 0) ? “00:00” : (format(floor(prop(“Total Minutes”) / 60)) + “hr ” + format(prop(“Total Minutes”) – floor(prop(“Total Minutes”) / 60) * 60) + “min”)
If you want to take this setup one step further, check out my guide on how to get charts in Notion and easily visualise where your time is going.
Time-Tracking in Notion using Toggl Sync
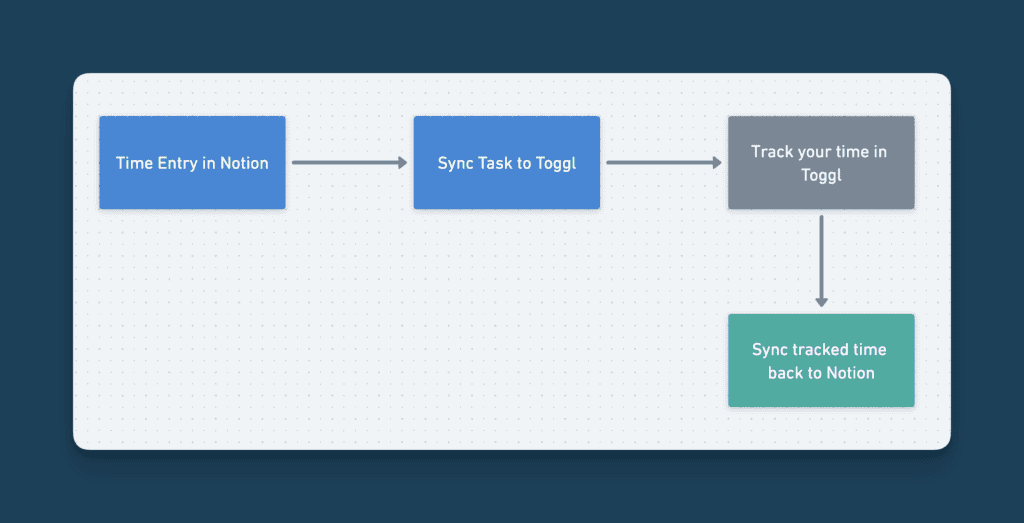
You can connect Toggl to Notion for a more advanced Time-Tracking setup with these three steps:
- Set up your database backend in Notion
- Build a first automation to sync your Notion entries to Toggl
- Build a second automation to sync the tracked time from Toggl to Notion
While the setup is slightly more complex than the Notion Button method, it supports multiple timers running at the same time, which is great if you need this for a team. The one downside? You need to be on the first paid plan level on Toggl to support the full workflow.
Set Up Your Database Backend for Toggl in Notion
If you use Toggl to track your time in Notion, you only need one database with the following properties:
- Name, the main property of your database
- Toggl ID, a number property to store the ID of the Toggl entry
- Toggl URL, a URL property to store the direct link to start your Toggl Timer
- Sync to Toggl?, a formula property to check whether an entry needs to be synced to Toggl
- Done?, a checkbox property to indicate the status of your task
- Tracked Minutes, a number property to record the total time spent on the task
- Sync Time To Notion?, a formula property to check whether the time tracked in Toggl should be synced back to Notion
Here’s the formula for Sync to Toggl?
empty(prop(”Toggl ID”)
And here’s the formula for Sync Time to Notion?
and(empty(prop(“Tracked Minutes”)),prop(“Done?”)==true)
Of course, you don’t need to limit the setup to one database. For example, you could easily connect this database to a larger project database and roll up individual entries to calculate the total time spent on the project. See the first method mentioned on this page for a sample setup.
Build An Automation To Sync Notion Entries To Toggl
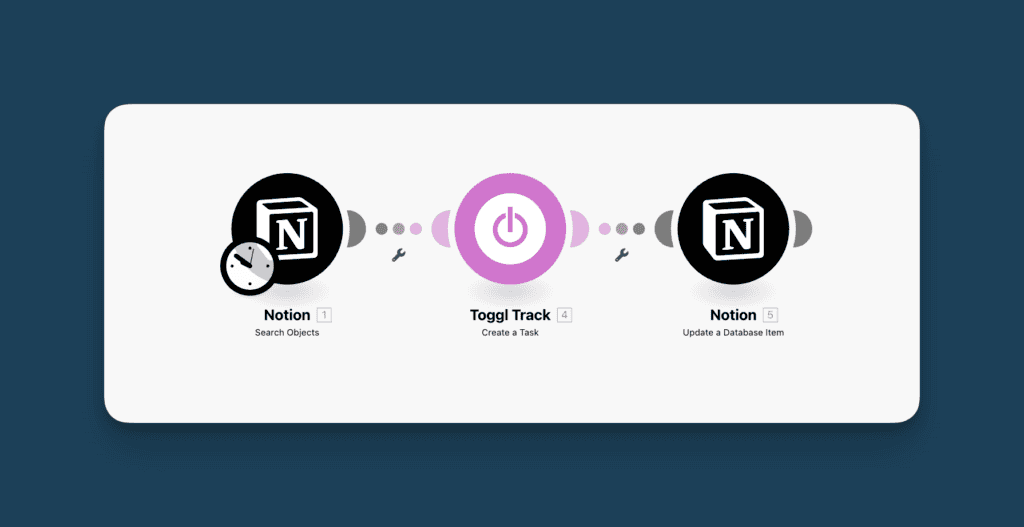
My automation tool of choice is Make – a powerful no-code automation builder with a great free plan. After creating your account, click on the New Scenario button to build your automation.
Next, click on the big purple plus icon in the centre of the screen to add your first module. Search for Notion and opt for the Search Objects option.
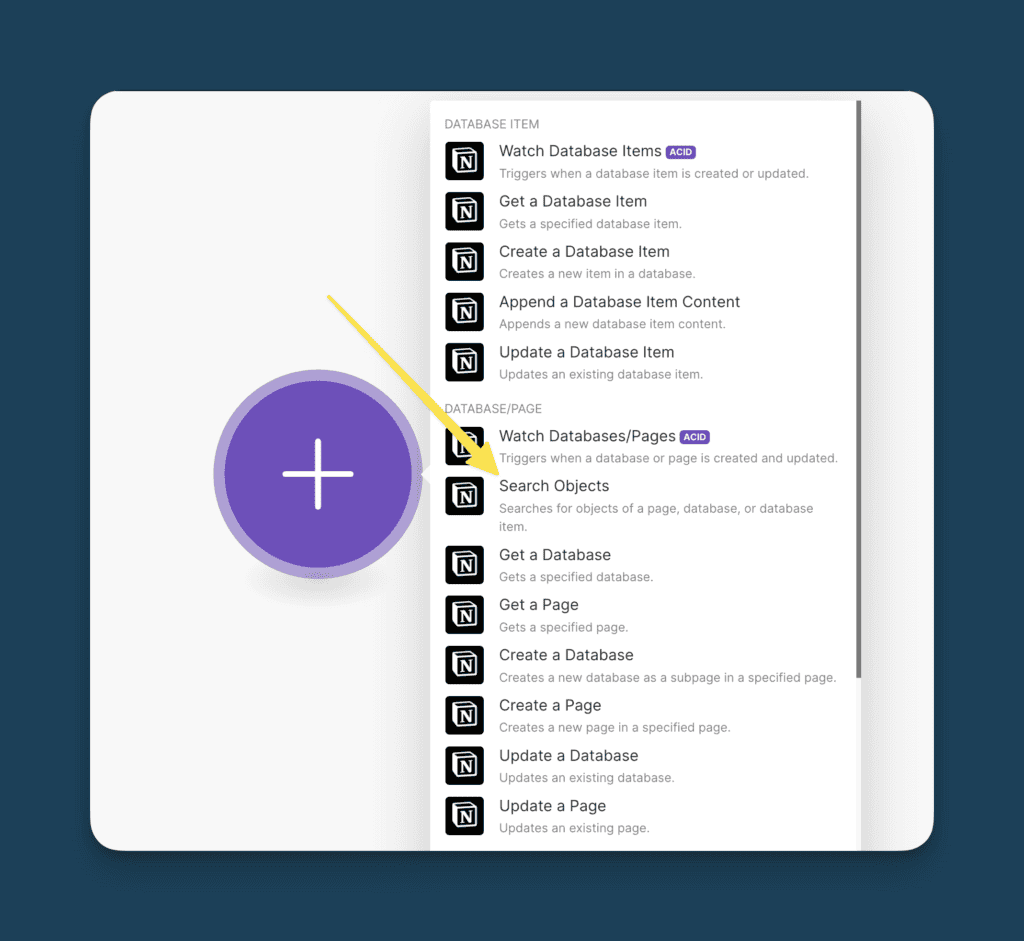
This will open a context menu with various options to configure the module.
- Start by clicking on Add under Connection to connect your Notion workspace to Make. Give it access to the page that contains your Notion Time-Tracking Database
- Then, hit the Search button and type in the name of your Notion Time-Tracking Database. This should either bring up several options for you to choose from or automatically fill the correct database ID
- Last but not least, add a filter and set it up as shown in the image below. It should only return database items for which the Sync to Toggl? checkbox is checked (i.e. true).
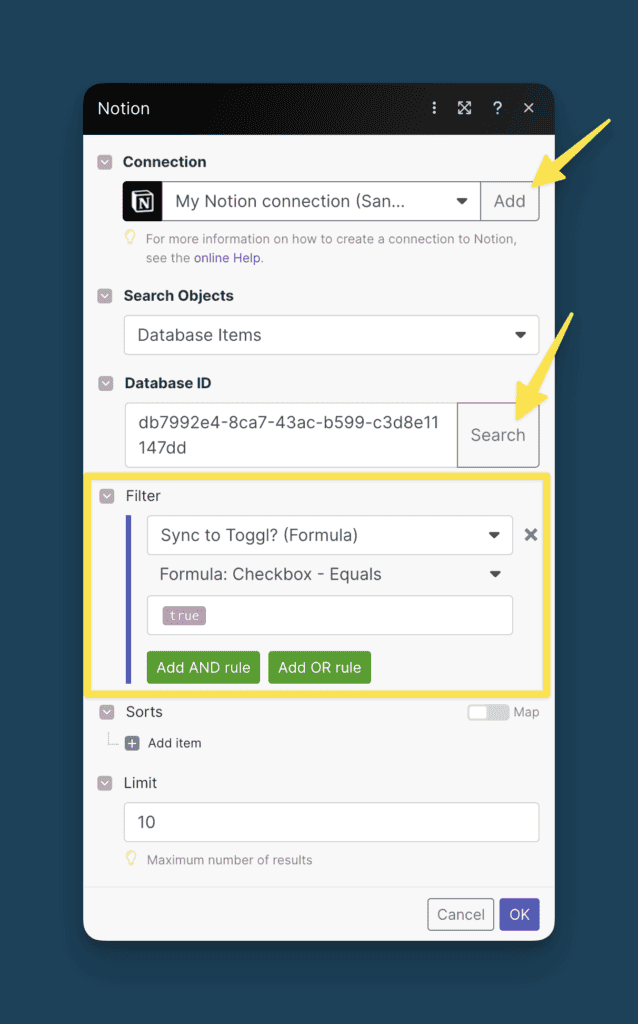
Then, click on OK in the bottom right corner to close the setup. Right-click the model and select Run this module only to test your setup.
Before doing this, you should add at least one test entry to your Notion Database
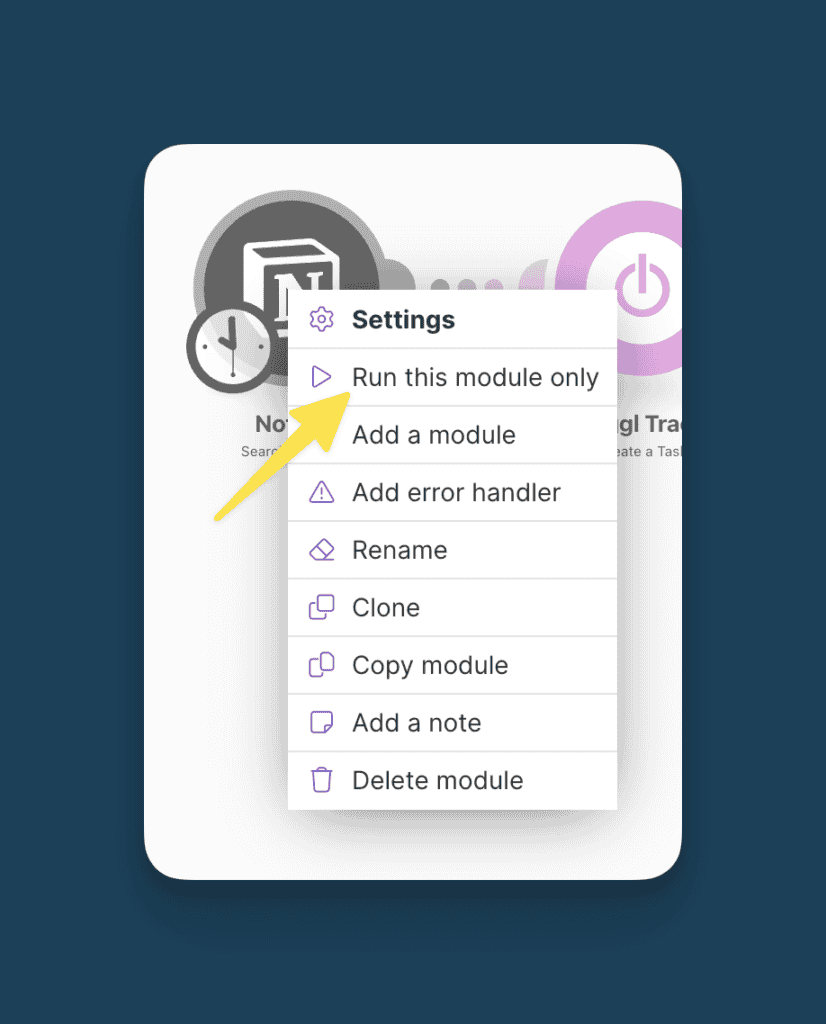
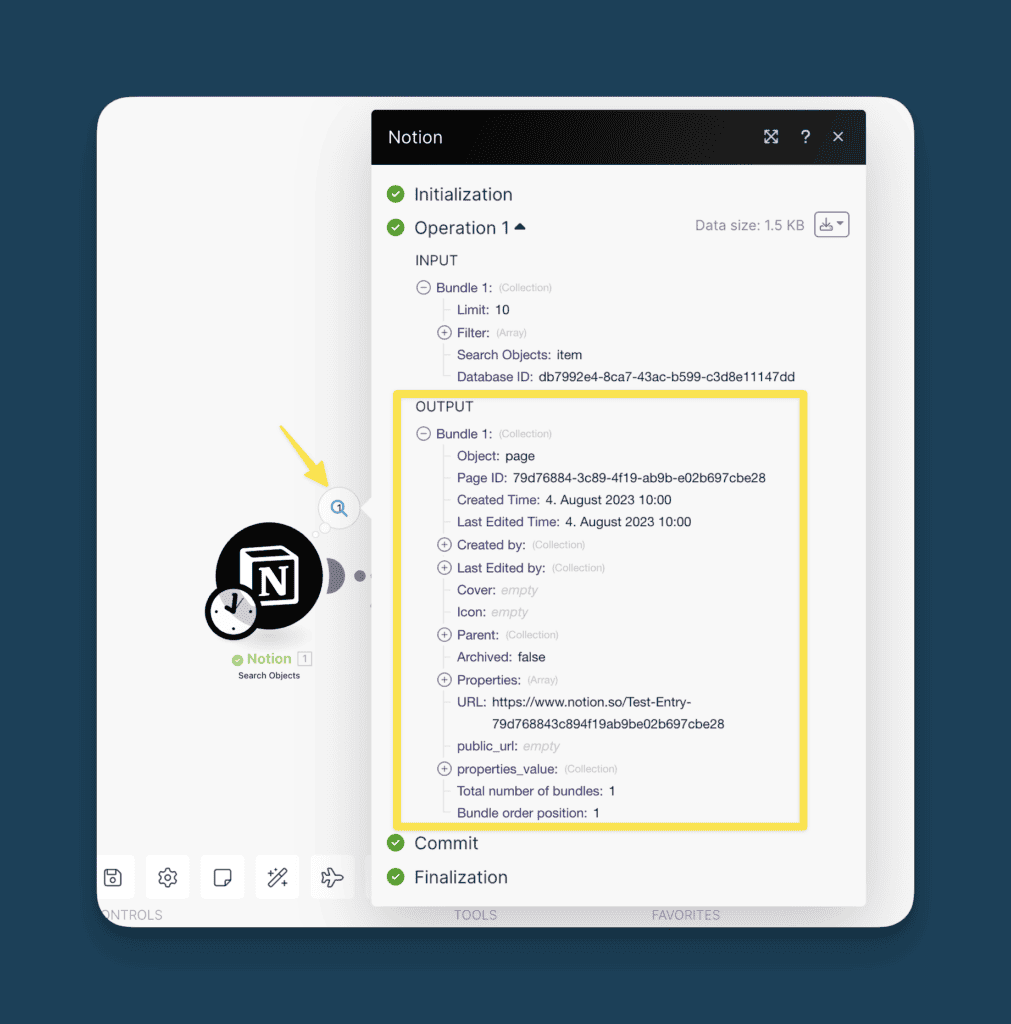
You should see a small bubble pop up. Click on it and inspect the results. As shown in the image below, you should see at least one output.
Add a second module to your automation by clicking the grey half-circle next to your Notion Module. This time, search for Toggl Track and opt for the Create a Task Module.
- Start again by clicking on Add under Connection to authorise and connect your Toggl Account
- Then, click into the Name field and map the information from the previous step by searching for properties_value → Name → plain_text
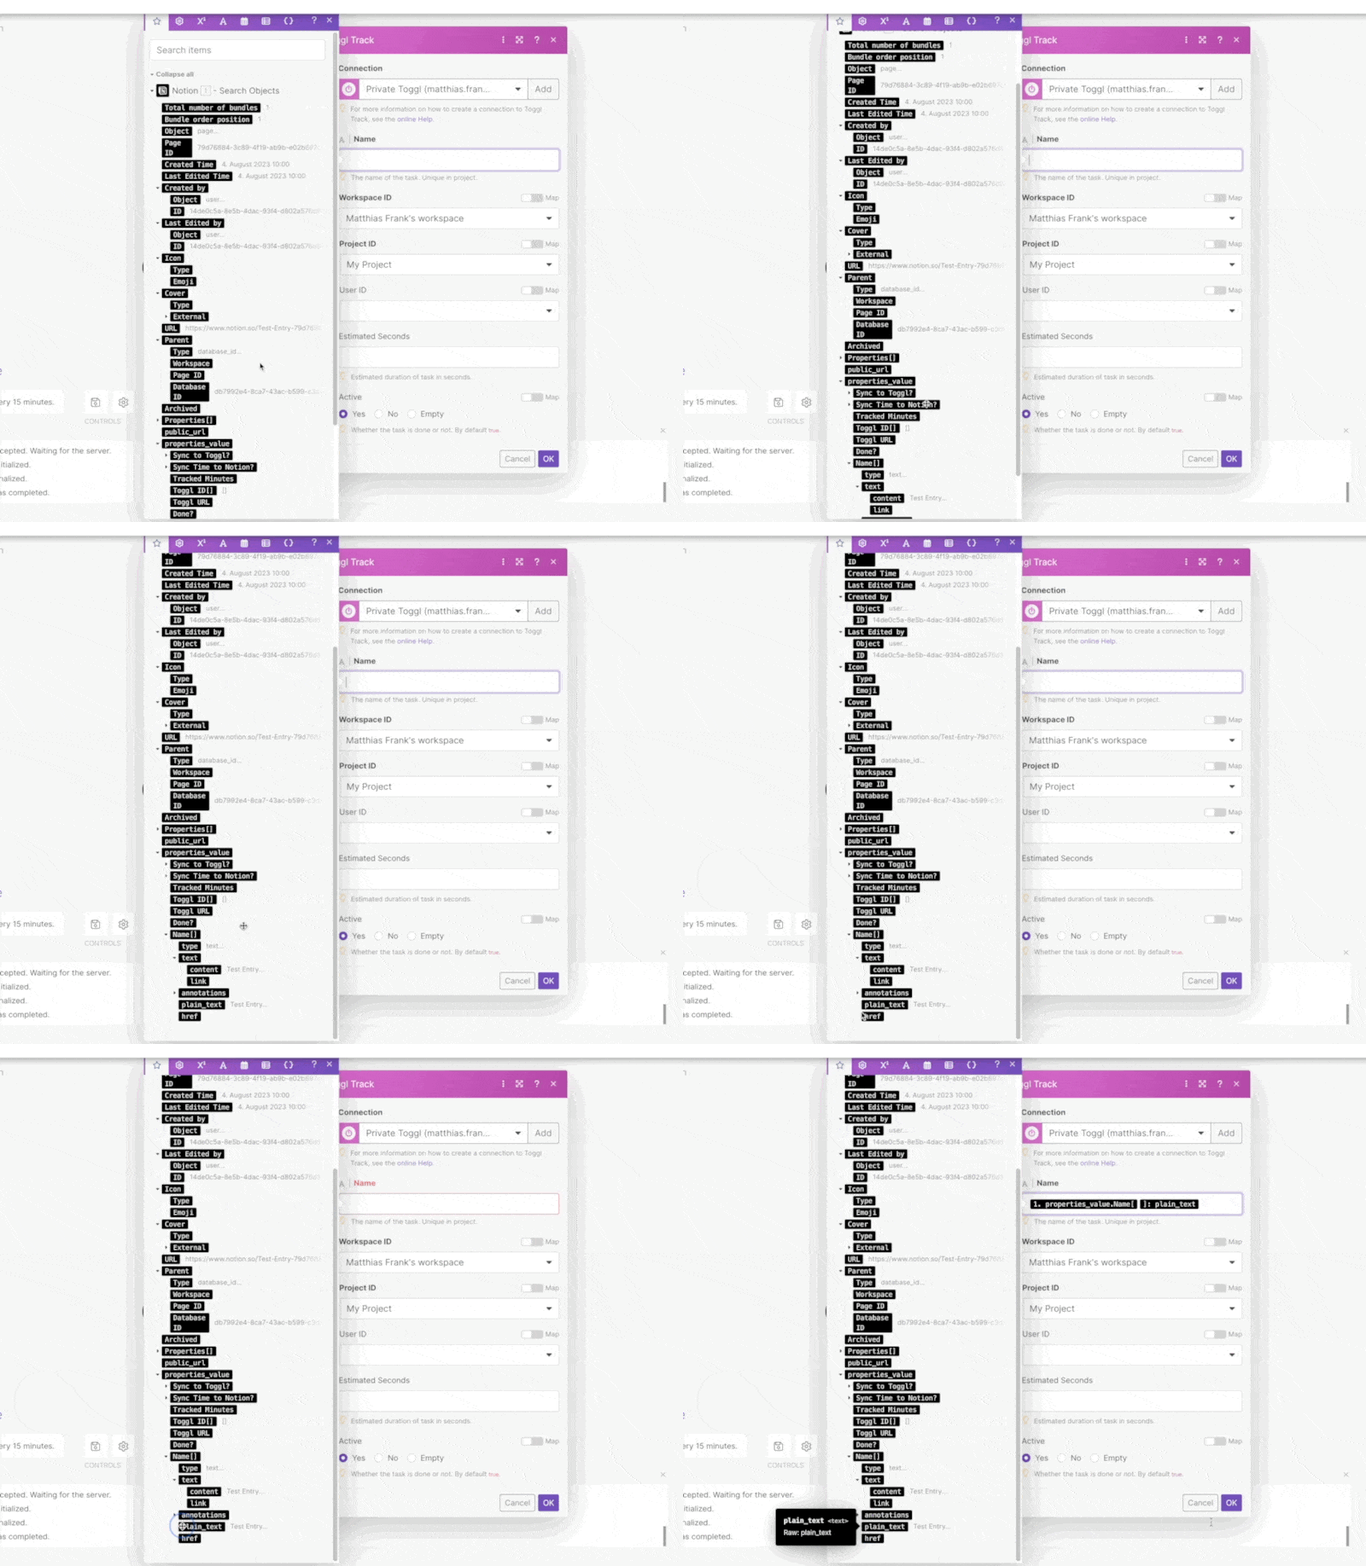
- Select your Workspace ID and default project. If you don’t see the dropdown menu as shown in the image below, make sure that the Map option is toggled off.
- Set Active to true
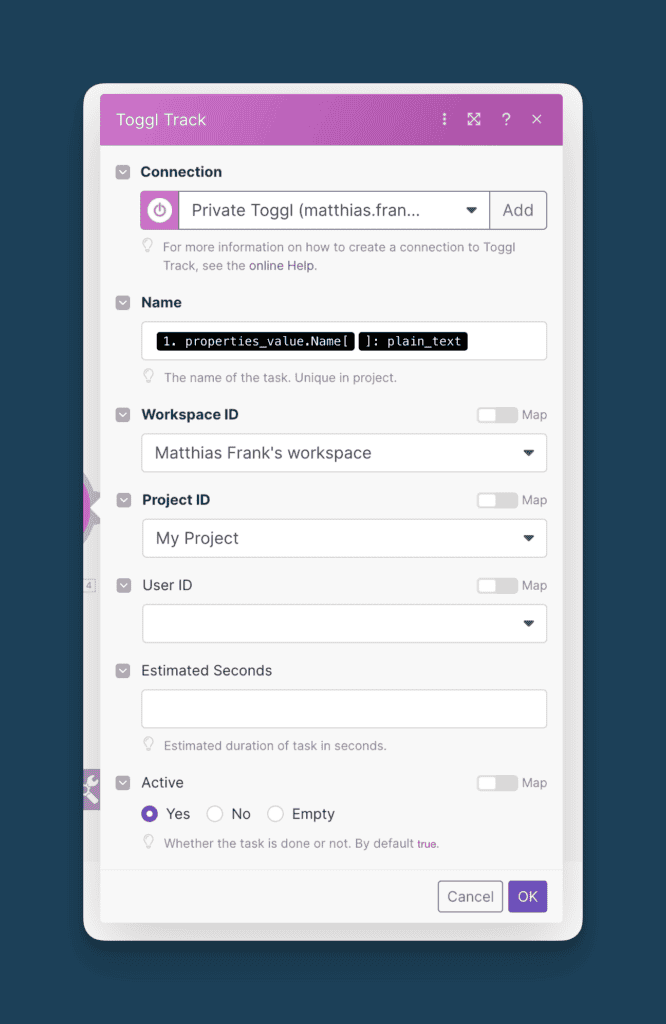
Then, hit OK to close the setup.
Test everything before moving on to the next step by clicking on the big purple Run once play button in the bottom left of your screen. Afterwards, you should see a new task created in your Toggl Account based on your test entry in Notion.
To finish the setup, add a third module to the chain. This time, opt for Notion and select the Update a database item option.
- Start by adding your Notion Account. Since you already connected it, you can simply select it from the dropdown
- Then, use Search to look for your database in Notion
- Under Database ID, click into the field and map the value for Page ID
At this point, you’ll see both black Notion entries and pink Toggl entries when mapping information. Make sure to grab the information from the right app
- Leave Name and Tracked Minutes empty, but fill Toggl ID with the Task ID returned by Toggl and then add the URL as shown below
https://track.toggl.com/timer/start?wid=TOGGL_WORKSPACE_ID&billable=true&pid=TOGGL_PROJECT_ID&tid=TOGGL_TASK_ID
- Replace the placeholders for Workspace ID, Project ID and Task ID with the respective values from the Toggl module.
This will automatically generate a URL in Notion. Once you click the URL, it will open Toggl and automatically start the timer for this task.
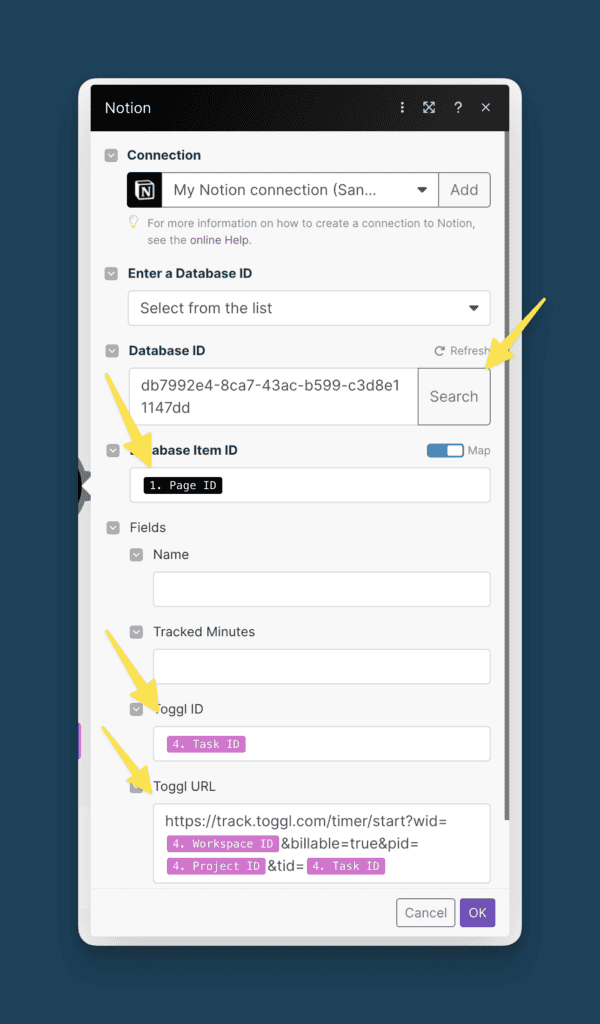
Then, hit OK to save the setup.
Test your setup one last time to make sure everything is recorded correctly in Notion.
To do so, delete your first testing entry and create a new one with a different name. In Toggl, Tasks need to have unique names per project and you already created a task with the first entry, so you need a new task name or it will throw an error.
Build An Automation To Sync Tracked Time From Toggl To Notion
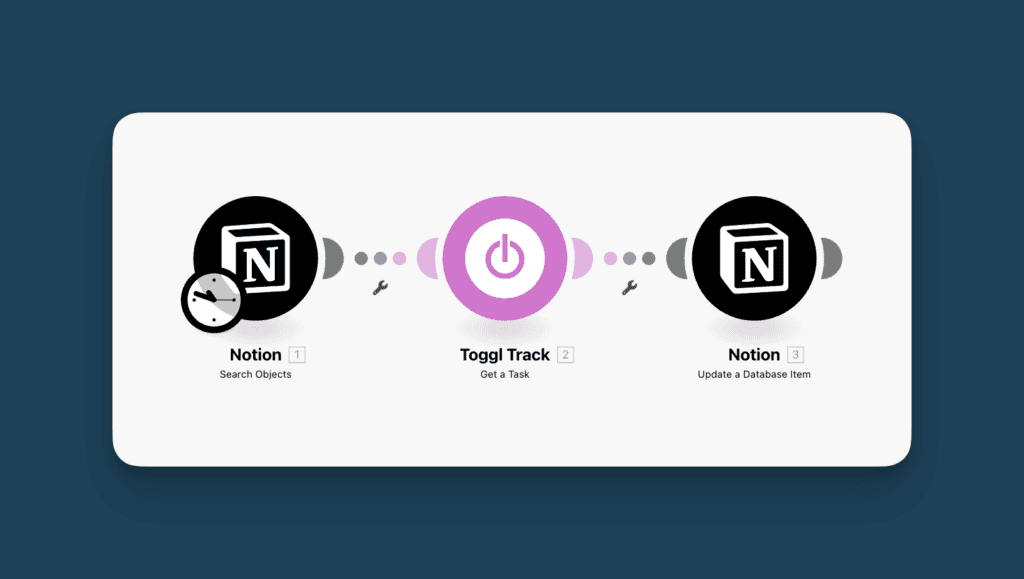
All that’s left now is the second part of the automation: once you check off a task as done in Notion, we want to sync the total time tracked back from Toggl to Notion.
Start by creating a new scenario in Make, add a Notion Module and pick again the Search Objects version.
Set it up just like before with only one exception. Instead of filtering for the Sync to Toggl? checkbox, you now filter for the Sync Time to Notion? checkbox.
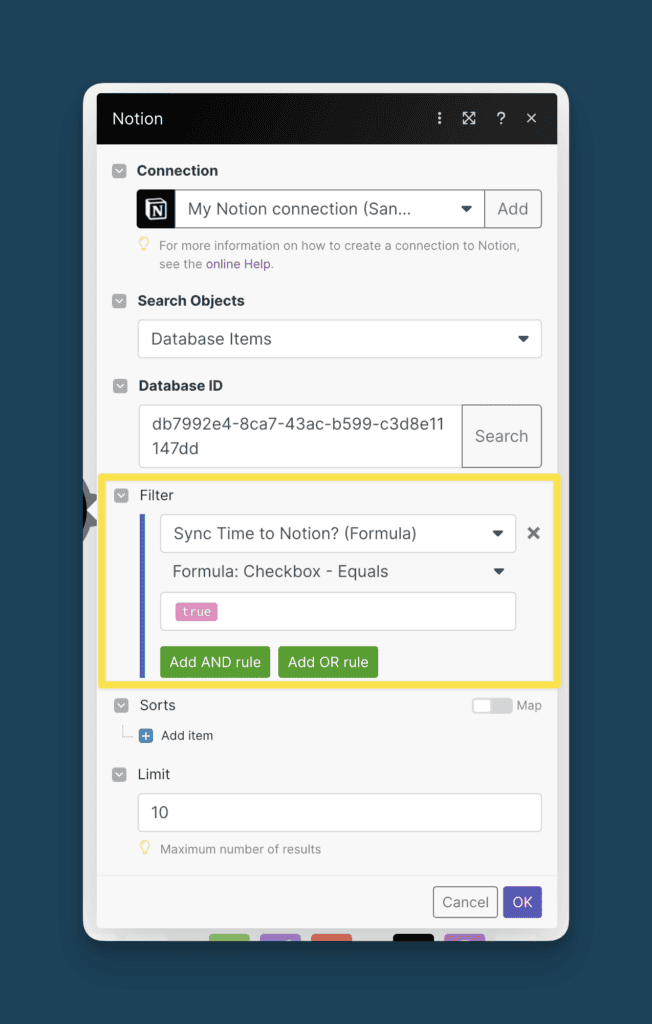
As always, test your setup quickly to see whether it pulls in any data.
Prior to testing, make sure that you have a test task in your Notion Database that you’ve already synced to toggl, that has an ID and URL in Notion and where you tracked at least a few seconds in Toggl.
Then, add a second module to your scenario. Choose Toggl Track and opt for Get a Task.
Not much to set up here. Simply connect your Toggl Account, choose the right Workspace and Project and then map the Toggl ID value that you store in Notion to the Task ID as shown below.
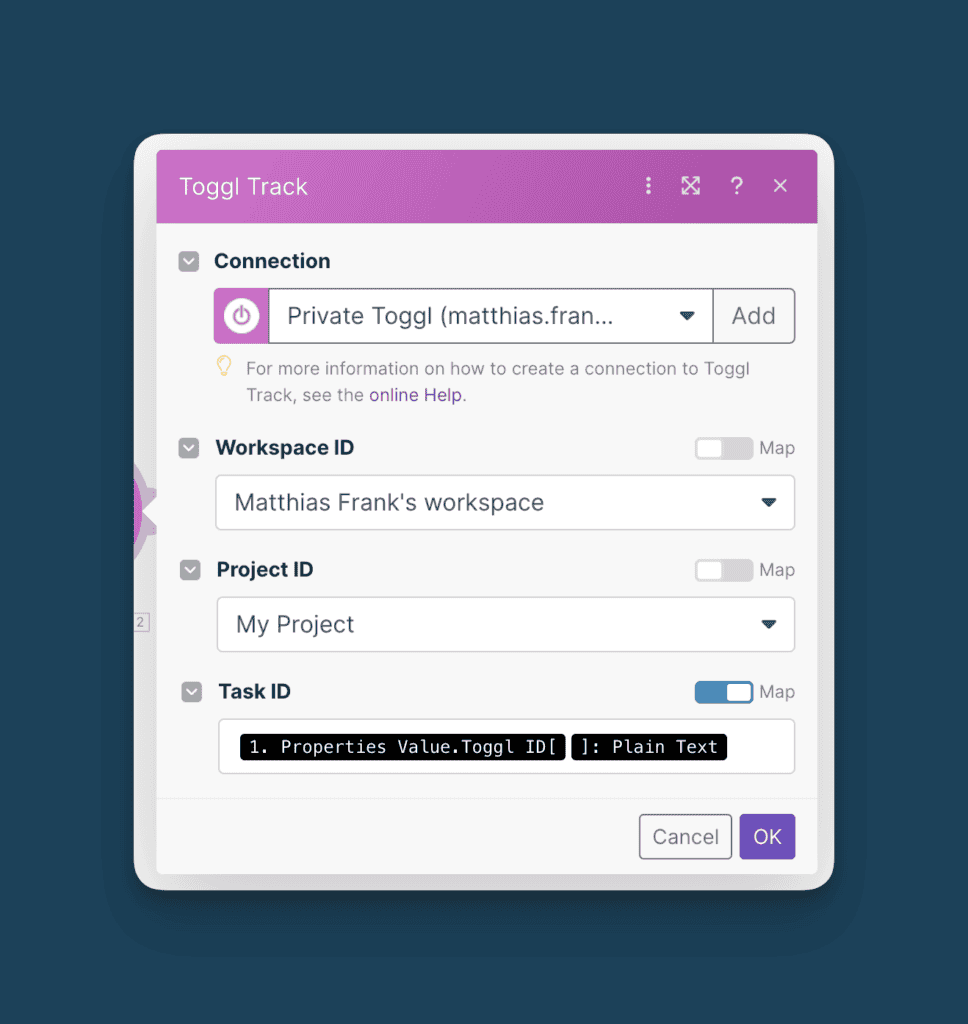
Test your setup and then add a third module. This time, it’s again a Notion Module. Pick the Update a database item option.
- Connect your Notion Account and search for your database just like in the previous steps
- Map the Page ID of the first Notion Module to Database Item ID.
- Leave all fields empty except for Tracked Minutes. In there, map the Tracked Seconds from Toggl and then use the math operators from the math menu to divide by 1000 and by 60
Toggl tracks your time in Miliseconds, but Make still shows them as seconds in the context menu. Dividing by 1000 and 60 gets you the tracked minutes, but you could of course also use any other time interval
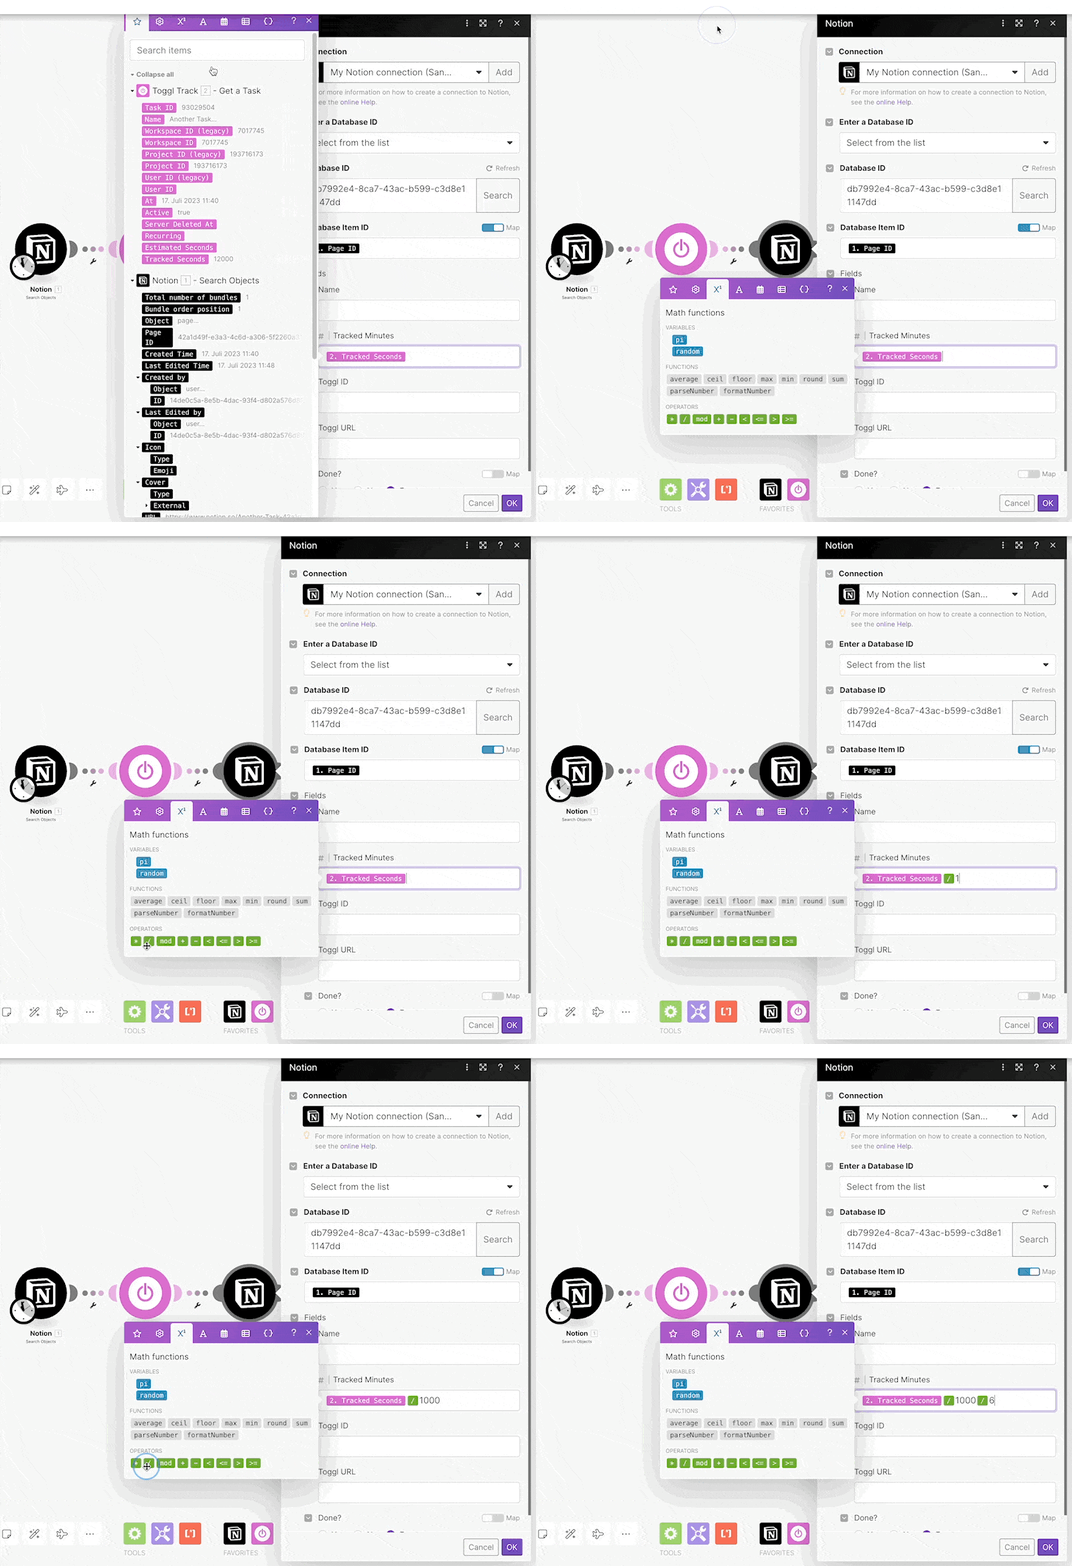
Here’s the full setup:
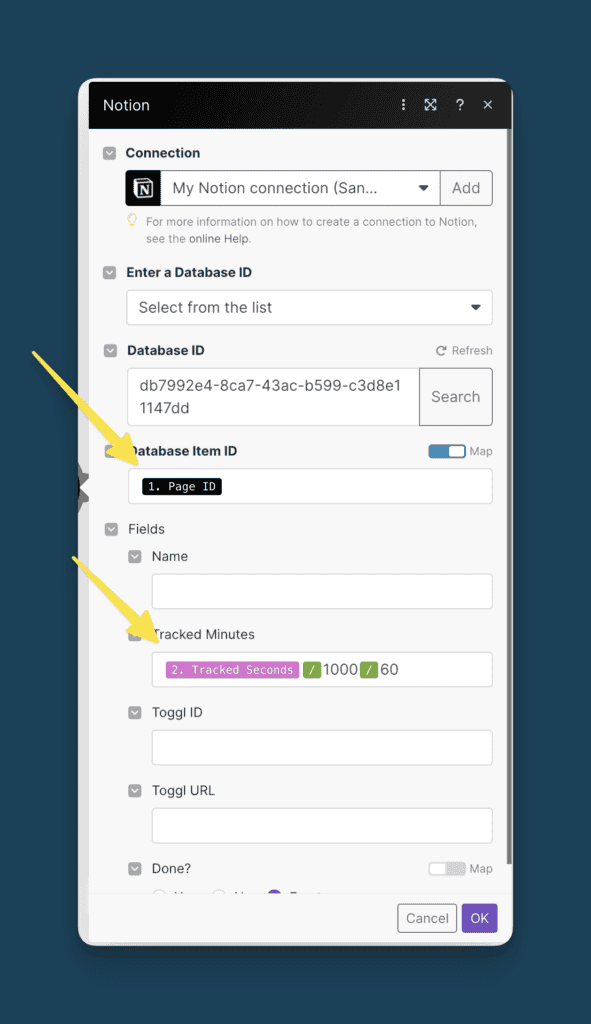
And that’s it! Test your setup one last time to make sure everything works as intended.
Congratulations – you now have a Notion Time-Tracking system that connects Notion to Toggl and allows you to run several timers for different team members simultaneously.
And while you’re building out your Notion Workspace, why not add some advanced AI Use Cases to Notion?
- Check out my complete Notion AI Guide
- Learn how to create AI Meeting Summaries in Notion
- Get your emails (and an AI Summary) in Notion
Get The Free Time-Tracking in Notion Template
You can download this Notion Template plus another 21+ other free templates here:


