When you ask AI to do something you’re not good at yourself, you usually get mediocre results — and there’s a clean three-step process to fix that. Most of us have a comfortable workflow for teaching AI the things we already understand: write a clear skill, distil our expertise into instructions, and let the model execute. That approach (often called ACDC) works beautifully when you know what “good” looks like. But the moment you try to delegate something you can’t do yourself — design, copywriting, code in a language you’ve never touched — the whole thing breaks. Generic prompts produce generic outputs, and you’ve got no taste to course-correct with. This article walks through the process I’ve landed on for teaching AI hard things — the ones you can’t ACDC your way through.
Why Can’t You Just Tell AI To “Make It Good”?
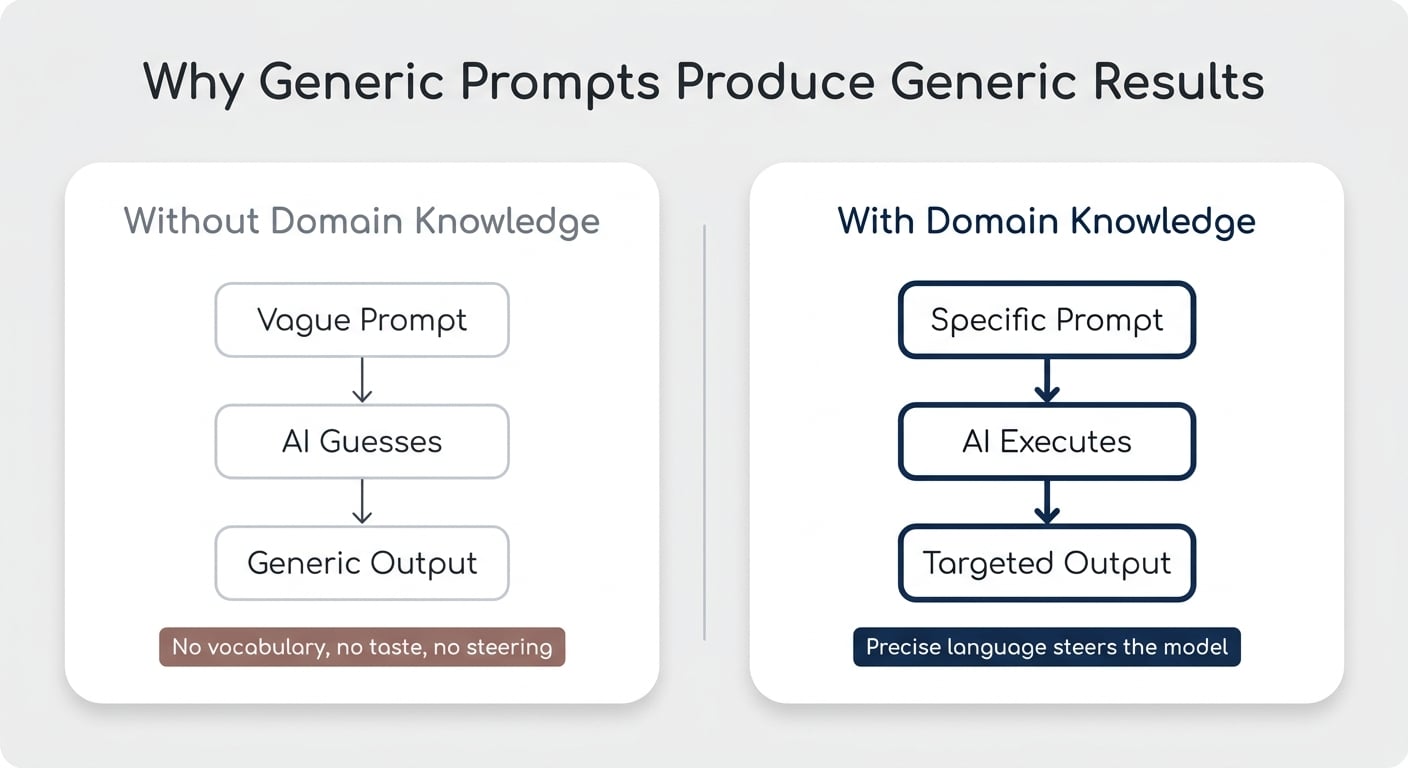
If you ask AI to “create something cool” in a domain you don’t understand, you’ll get exactly what you asked for: something generic.
I learned this trying to generate visuals through Higgsfield, an AI media platform that connects you to a full stack of image and video models in one place. The tool is incredibly powerful. My prompts? Not so much. “Visualise the concept of the human context window” gave me three completely different outputs — all clearly AI-generated, none of them useful.
The issue wasn’t Higgsfield. It was me. I don’t have the vocabulary a designer uses. I can’t describe a style, a mood, or a composition with the precision needed to steer the model. And if you’re trying to teach AI to do something you suck at, you’ll hit the same wall — whether it’s design, finance modelling, video editing, or anything else outside your zone of competence.
Pro Tip: If you can’t describe what “good” looks like in your own words, no amount of prompt engineering will get you there. The fix is upstream of the prompt.
What’s The Three-Step Process For Teaching AI Hard Things?
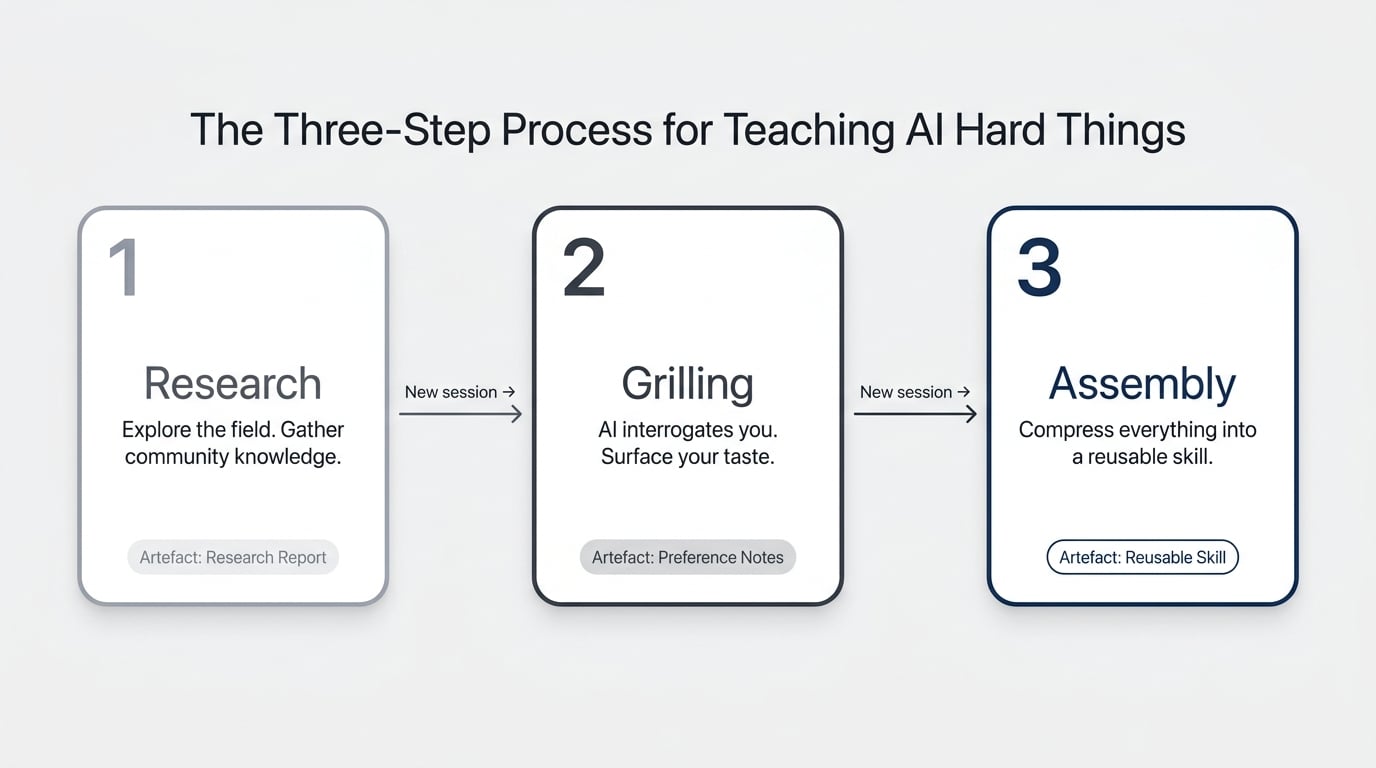
The process breaks into three stages: Research, Grilling, Assembly. Each one runs in its own AI session, each one produces an artefact, and each one feeds the next.
The point is to systematically build up the context and taste you don’t yet have — and then bottle it into a skill you can run again and again.
Here’s the shape:
- Research — Send AI out to explore the field and gather what the community already knows
- Grilling — Use AI to interrogate you on your preferences and surface your taste
- Assembly — Turn the combined output into a reusable skill with swappable style guides
Each stage produces a document. The skill at the end is the compounding asset.
How Does The Research Step Work?
Research means sending AI to find out what other people are already doing in the domain you’re trying to learn. Chances are you’re not the first person tackling this — designers, copywriters, marketers, and developers have all been figuring it out, and a lot of it is open source.
Give AI a clear brief: “Find the best community skills, GitHub repos, and reference material for [your domain]. Pull anything practical.” Point it at sources like the OpenClaw skill library, GitHub, and the official docs of whatever tool you’re trying to use.
There are two angles to cover:
- What AI-specific approaches exist — prompt patterns, skills, workflows others have built
- Domain vocabulary you’re missing — the actual language used in the field, with examples
For my icon project, I needed both. I wanted to see how other people structured design skills, and I needed someone to teach me the difference between flat, isometric, and skeuomorphic styles so I could form an opinion in the first place.
The output is a research report. Read it, but don’t get precious about it — it’s raw material for the next step.
What Is The Grilling Step And Why Does It Matter?
Grilling is where AI flips the script and asks you the questions. The idea, originally documented by Matt Pollock in a community GitHub skill, is that once you’ve got a research report on the table, the fastest way to extract your own taste is to be interrogated about it.
Start a new AI session — not a continuation of the research one. Load the grilling skill and the research artefact. AI will start asking things like: “Do you prefer this style or that one?”, “How would you describe the vibe you’re going for?”, “Which of these reference examples actually appeals to you?”
The reason this works: you don’t know what you want in the abstract, but you can recognise it when you see it. Grilling forces choices, and choices reveal preferences you couldn’t have articulated on your own.
Pro Tip: Use voice dictation here. Conversational answers carry the nuance AI needs. Typing short bullets strips out the context that makes the grilling worth doing.
A quick note on why this is a new session, not a continuation: keeping research and grilling separate stops the context window from bloating, keeps AI focused on one job at a time, and burns through fewer tokens. Every stage closes with an externalised artefact, then you start fresh.
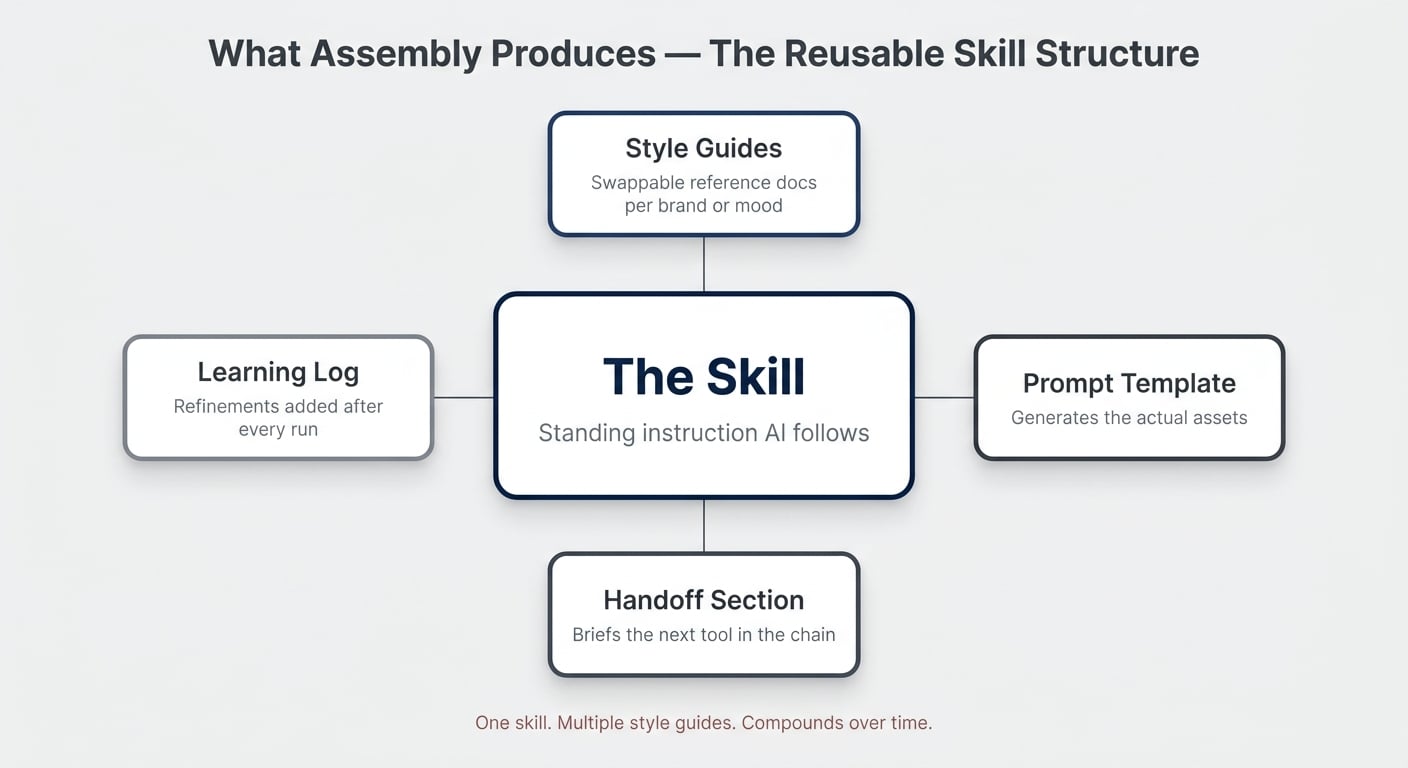
How Do You Assemble Everything Into A Reusable Skill?
Assembly is where you take the research report and the grilling outputs and ask AI to compress them into a reusable skill. This is the compounding moment — everything you’ve learned over the last two sessions becomes a tool you can run on demand.
The structure I land on for creative-asset skills looks like this:
- The skill itself — a standing instruction explaining the process AI should follow
- One or more style guides — separate reference documents describing different aesthetics
- A prompt template — for actually generating the assets
- A handoff section — for the next tool in the chain (Higgsfield, in my case)
The reason to split the skill from the style guide: you only have to build the skill once, but you can develop multiple style guides for different brand identities, projects, or moods. “Generate an icon in this style” or “Generate an icon in that style” — same skill, different reference loaded.
How Does This Look In Practice With Claude And Higgsfield?
In practice, you run the whole flow inside an AI coworking environment with the right tools connected. I use Claude Cowork, but the same approach works with Codex, Cursor, or any tool that can read local files and call MCP servers.
The setup needs three things:
- A project folder containing your three process skills (research, grilling, assembly)
- An MCP connector to your generation tool — for visuals, Higgsfield exposes its full model stack through
mcp.higgsfield.ai - Voice dictation enabled — the single biggest upgrade you can make to your AI workflow
Once that’s in place, the whole pipeline runs through chat. AI reads your skills, orchestrates the generation tools, and you stay in one window.
Why You Should Generate In Threes At Every Step
For creative work, generate three options at every decision point. The pattern: three concepts, three renderings, three animations.
When you ask AI for one output, you have nothing to compare it to. When you ask for three, you start seeing which direction is closer to what you want — even if none of them are perfect on the first pass. Subtle changes in the prompt produce noticeably different results, and only seeing them side by side builds the feel for what’s working.
The flow:
- Brainstorm three concepts for the asset (e.g., three ways to visualise “real-time sync”)
- Pick the one closest to your vision
- Generate three still versions of that concept through Higgsfield
- Pick the best still
- Generate three animated versions from that still
Why You Should Always Start With A Still
Going straight from prompt to animated video produces weird, glitchy results. Animations work best when they’re built on top of a stable still image.
Generate the still first, get it right, then animate from it. This applies whether you’re using Higgsfield, Runway, or any other video model — the model has a much easier job when it has a clear starting frame to work from.
When Should You Use This Vs. ACDC?
The two approaches solve different problems. ACDC works when you already know how to do the thing and want to compress your expertise into a skill. Research–Grilling–Assembly works when you don’t know how to do the thing and need to build the expertise first.
| Approach | Best For | Your Starting Point | Inputs | Output | Time Investment |
|---|---|---|---|---|---|
| ACDC | Things you’re already good at | You have the expertise; AI doesn’t | Your knowledge, distilled | A skill that mirrors your process | One focused session |
| Research – Grilling – Assembly | Things you’re not good at | You lack the vocabulary, taste, or process | Community knowledge plus your preferences | A skill plus reusable style guides | Three sessions, then ongoing refinement |
Why Every Skill Should Be A Living Document
The first run of a new skill won’t be perfect — and that’s the point. Treat the skill as a living document that gets better with every use.
After each run, give AI feedback. “These three icons came out too flat.” “The animation prompt kept triggering safety filters.” “Seedance 2.0 keeps forcing 16:9 even when I ask for 1:1.” Then have AI update the skill with what it just learned.
Some teams keep a separate “learning stock” file inside the skill folder — a running log of refinements. Over time, the skill becomes specific to your taste, your tools, and your quirks.
Pro Tip: At the end of every session, ask AI: “Work backwards from the outputs I liked. What principles can we add to the skill?” That’s the compounding loop. Without it, every run starts from zero.
The Bigger Picture
Teaching AI to amplify your strengths is the obvious play. Teaching it to fill your weaknesses is where the real growth happens — because that’s where you previously had a hard ceiling.
Most of the time, the answer isn’t “find a designer”, “hire a copywriter”, or “learn a new craft from scratch.” It’s “build the system that lets AI handle it on your behalf.” Research–Grilling–Assembly is one way to build that system. It’s simple. It’s not always easy. But it’s worth it.
Frequently Asked Questions
Does This Work With Notion AI, Or Only Claude And Codex?
Yes — the process is tool-agnostic. Research, Grilling, and Assembly are about how you structure the work, not which AI you use. Notion AI, Claude, Codex, ChatGPT, or any capable assistant can run all three steps as long as it can read your skill files and (for the practical demo) call the generation tools you’ve connected.
How Is This Different From ACDC?
ACDC assumes you already have the expertise and just need to teach AI to replicate your process. Research–Grilling–Assembly is for the opposite situation — when you don’t have the expertise and need to build it (or borrow it from the community) before you can write a sensible skill. The two are complementary, not competing.
Why Use A New Session For Each Step?
Three reasons: cost, focus, and quality. Every message in a long thread re-sends the previous history, so token usage grows exponentially. A bloated context window also makes AI worse at the current task because there’s more noise to filter through. Starting fresh after each step keeps the work clean and the bill manageable.
Do I Really Need Voice Dictation?
You don’t need it, but it’s the single biggest upgrade for the Grilling step. Voice carries the qualifiers, hesitations, and tangents that reveal your actual preferences. Typed answers tend to be short and stripped of nuance — which is exactly what you don’t want when the goal is to extract your taste.
What Happens If The First Run Of My Skill Produces Bad Results?
Expect it. The first run is diagnostic, not final. Note what didn’t work, ask AI to run another round of grilling against the new outputs, and update the skill. Two or three iterations in, you’ll have something that produces reliably good results — and a skill that genuinely reflects your taste rather than a generic baseline.
📬 Want more Notion AI strategies? Join 37,000+ readers and get 42 free templates instantly → Subscribe to the newsletter
💼 Need the support of certified Notion Consultants? My team and I are here to help! → https://matthiasfrank.de/en/notion-consulting/