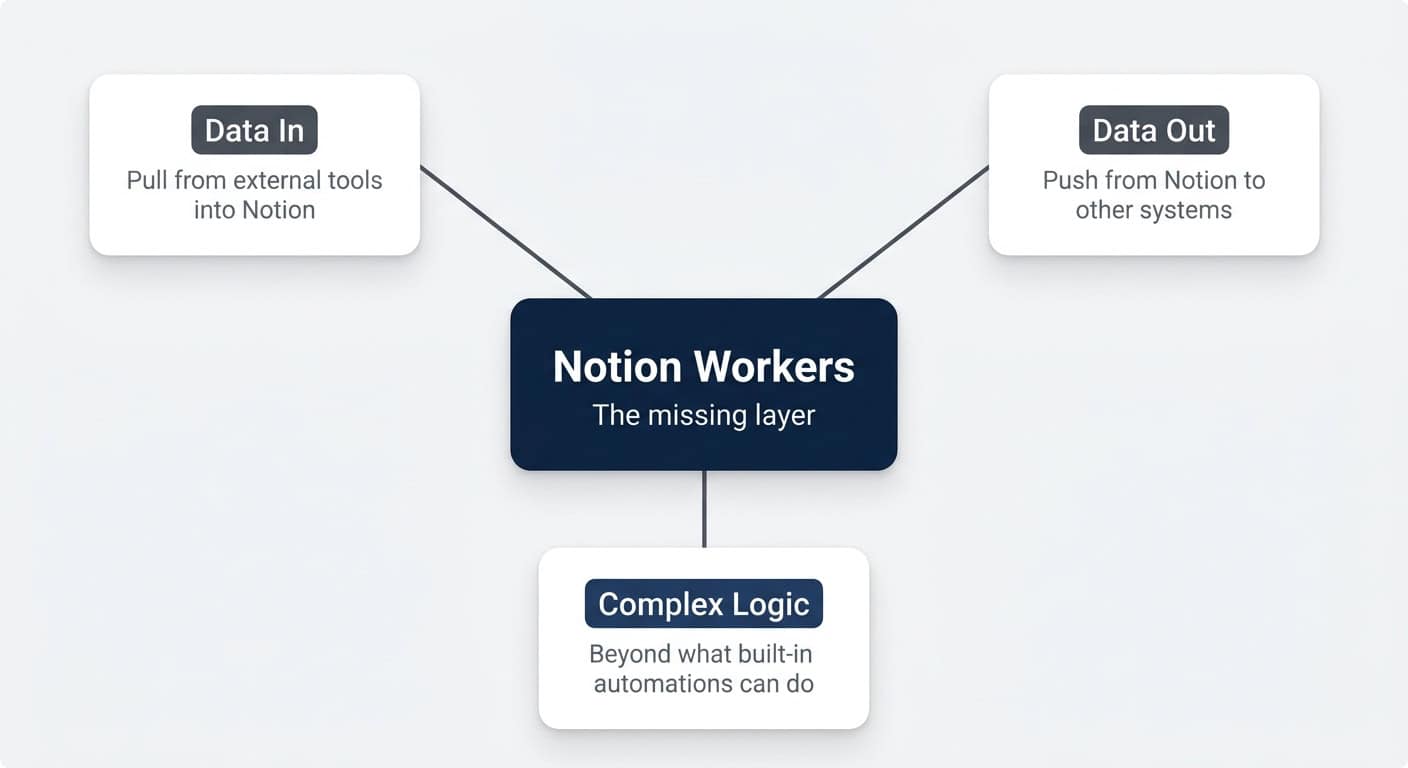
Notion Workers are the biggest unlock the platform has shipped in years, and almost nobody can use them yet. They are small TypeScript programs that you describe in plain English, deploy with a single command, and Notion runs for you — no servers, no DevOps, no headache. The promise is huge: pull external data into Notion, push Notion data out to other tools, codify any business logic you can imagine, and hand your custom AI agents brand-new abilities. The catch, in the official documentation, is that you need to write code. The reality, in 2026, is that you do not — you just need an AI coding assistant and the ability to think clearly about what you want. This guide is your complete walkthrough: by the end you will have a sharp mental model for the three worker archetypes, a clean machine setup, and three shipped workers solving three different problems in your Notion workspace.
Last updated: 27 May 2026 · Notion Workers are currently in public beta on Business and Enterprise plans. Free during the beta, then on Notion credits from 11 August 2026. You can find full Notion Workers pricing details here.
Why Do Notion Workers Matter?
Notion Workers matter because they finally close the three biggest gaps every serious Notion setup hits sooner or later: getting data in, getting data out, and running complex internal logic that built-in automations cannot handle.
If you have ever run a Notion workspace for a real team, you already know the wall. Notion is amazing for structured collaboration — databases, relations, views, AI on top — but the moment you need to pull data from a tool Notion does not natively connect to, push something to WordPress or Slack on a schedule, or run logic more elaborate than “when X happens, set Y”, you hit the limits of built-in automations.
Until now, the answer was always some external system. Make, Zapier, n8n, a small script on someone’s laptop, a hosted server somewhere. Workers replace that entire layer — and they run on Notion’s infrastructure, so you do not host anything yourself.
Here are the three classic situations where you outgrow Notion’s defaults:
- External data into Notion. Pulling your CRM deals, your Stripe customers, your Ōura ring data, your newsletter analytics, or anything from a tool Notion does not have a pre-built connector for (or has a connector that does not do what you need).
- Data out of Notion. Publishing a Notion page to WordPress, syncing rows to your newsletter tool, pushing project updates into a Slack channel, generating invoices from a milestone.
- Complex internal logic. “When a project moves to In Progress, check our process database, find the standard tasks for this project type, create them in the task database, assign them to the right role, and set due dates based on the project start date.” Built-in automations cannot do that. A worker can.
Are No-Code Tools Dead?
Short answer: yes, with a handful of exceptions. The three reasons no-code tools existed — speed, cost, accessibility — are no longer reasons in 2026.
The original pitch of no-code was solid. You could ship workflows faster than traditional development, you paid a fraction of what custom software cost, and you did not need an engineer to wire it together. AI coding assistants flipped all three of those statements.
- Speed. A well-prompted Claude Code or Codex session can scaffold and deploy a working Notion Worker faster than you can drag-and-drop the same flow in Make.
- Cost. Workers run on Notion’s infrastructure. You are not paying per operation, per minute, or per scenario run.
- Accessibility. This guide is the proof. You will ship three workers without touching a line of code yourself.
There are still a few legitimate use cases for traditional no-code platforms — but they are narrow, and shrinking fast. For 90% of what teams used to build in Make or Zapier, Workers + a coding agent is now the better answer.
💡 Pro Tip: If you have a hammer, everything looks like a nail. Workers initially feel redundant if you already think in no-code terms. The unlock is not “workers replace no-code one for one”. The unlock is “AI-generated code is now your no-code”.
What Are The Three Types Of Notion Workers?
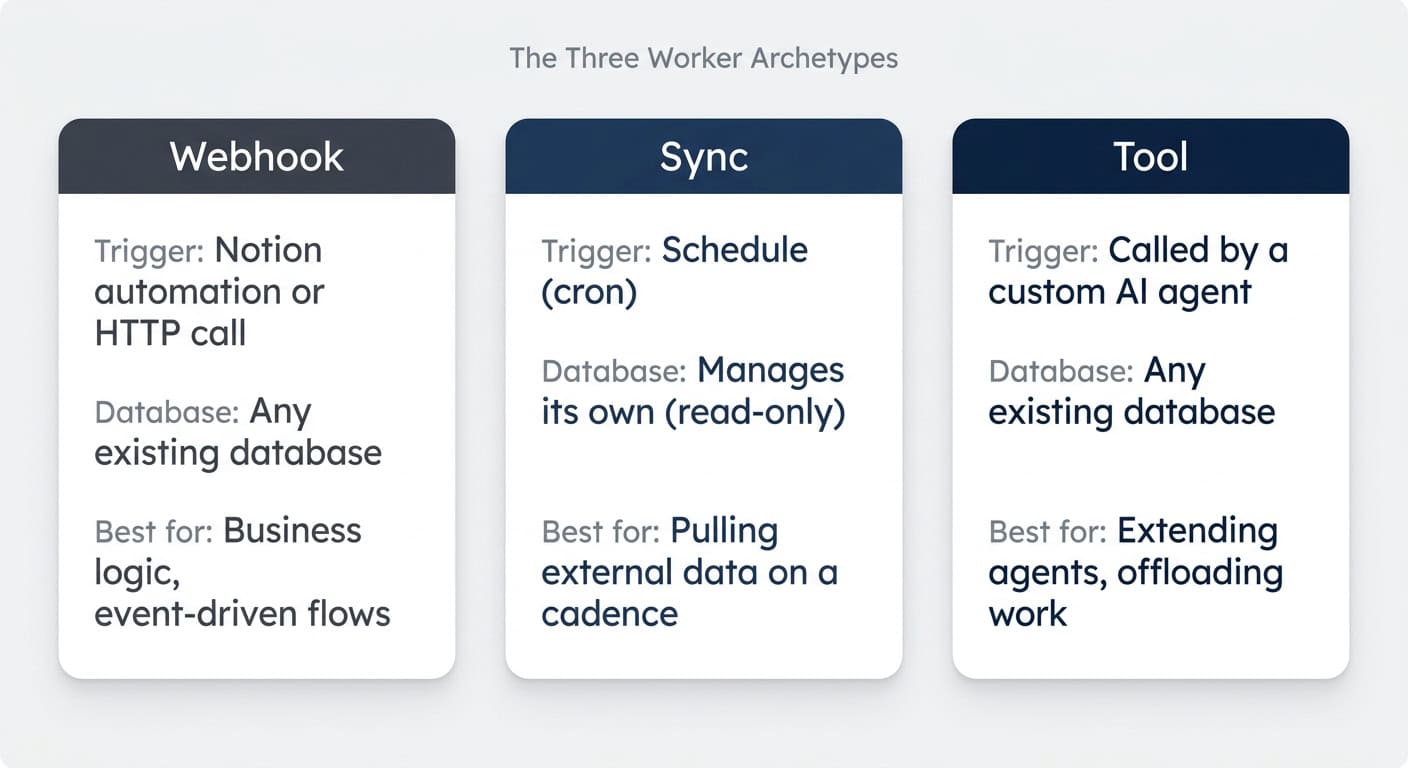
Notion ships three worker archetypes, and you choose between them based on what triggers the worker and whether it manages its own database. Pick the wrong type and you will fight the system for hours; pick the right one and the build is almost trivial.
Here is the at-a-glance map:
| Aspect | Webhook Worker | Sync Worker | Tool Worker |
|---|---|---|---|
| Trigger | A Notion automation, button, or any external HTTP call | A schedule (cron) you define | A custom AI agent calling it as a tool |
| Database | Works on any existing database | Creates and manages its own read-only database | Works on any existing database |
| Native scheduling | No (workaround: scheduled webhook from a Notion automation) | Yes (the only worker type with built-in cron) | No |
| Best for | Business logic, task automation, event-driven flows | Pulling external data into Notion on a cadence | Extending AI agent capabilities, offloading deterministic work |
| Tutorial example | Auto-create tasks from a process database | Pull Hacker News top 10 daily | Enrich glossary entries from Wikipedia |
The three types overlap a little — a sync runs on a schedule, but a webhook can also be triggered on a schedule from a Notion automation — but the cleanest mental model is the table above. Pick by trigger and database ownership.
A second view that helps you choose, based on the actual job you need done:
| You want to… | Use this worker |
|---|---|
| React when something changes in Notion (status, button press, page created) | Webhook |
| Mirror an external data source into Notion (one-way) | Sync |
| Run something on a strict schedule, writing to your own existing databases | Webhook (triggered by a scheduled Notion automation) |
| Give a Notion custom agent the ability to call an external API | Tool |
| Make a custom agent cheaper by offloading deterministic work | Tool |
| Build a two-way sync between Notion and an external system | Webhook (sync workers are one-way only) |
With the map clear, the rest of this guide walks through one full build of each type.
How Do You Set Up Notion Workers For The First Time?
The one-time setup takes about 15 minutes and you never repeat it. You install a coding agent app, create a top-level folder, install the Notion CLI, authorise your workspace, and enable Workers in Notion settings.
Here is the checklist:
| Step | What you do | Where |
|---|---|---|
| 1 | Install Claude (or Codex) desktop app | Your machine |
| 2 | Create a top-level /Claude or /Codex folder in your user directory |
Finder / File Explorer |
| 3 | Install the Notion CLI (ntn) — native on macOS, Linux, and Windows (via winget or npm) |
Terminal or via your coding agent |
| 4 | Authorise your Notion workspace (ntn login) |
Terminal |
| 5 | Enable Workers under Settings → Features → Workers | Notion app |
| 6 | Install VS Code as a file browser | Your machine |
| 7 | Install a dictation tool (Monologue on Mac, Wispr Flow on Windows) | Your machine |
Install Claude Or Codex
You need a coding agent. The two friendliest options are the Claude desktop app (switch to Code mode in the top-left) and Codex from OpenAI. Both work brilliantly. Claude Code in the terminal is also fine if you are already comfortable there, but the apps are easier for beginners.
A few app-level defaults to set once:
- Model: the smartest available (Opus 4.7 or GPT-5.5 / equivalent). When you are learning, use the best model — it has the highest chance of correctly interpreting fuzzy instructions.
- Reasoning level: high or extra high. Drop only if you are burning through your usage limits.
- Permission mode: start on auto so the agent asks before destructive actions. Move to bypass once you know what to expect.
- Fast mode: off. It chews through credits much faster.
Create A Top-Level Folder
On your machine, create a single top-level folder called /Claude (or /Codex) inside your user directory. Every worker you build will live as its own subfolder inside this. That is the entire “project structure” you need.
Install The Notion CLI
The Notion CLI is a small command-line tool called ntn. It is how your machine authenticates to Notion and how you deploy workers.
Platform support: ntn runs natively on macOS, Linux, and Windows (Windows x64; macOS and Linux on x64 and arm64). Native Windows support shipped via winget install Notion.ntn or npm install --global ntn (Node.js 22+). WSL is no longer required, though it still works if you prefer it. Once ntn is installed, everything below works identically.
There are two ways to install:
- Via the install script (recommended): Run the one-liner from Notion’s install docs in your terminal. No prerequisites — it handles everything.
- Via npm: Run
npm install --global ntn. This requires Node.js 22+ and npm 10+ already installed on your machine. If you do not have Node.js yet, the script method is easier.
The easiest way, regardless of method, is to just ask your coding agent:
Can you please install the Notion CLI on this machine? Here is the documentation: https://developers.notion.com/cli/get-started/installationThe agent will pick the right install method for your system, run it, confirm it works, and (helpfully) list a few common commands like ntn doctor for diagnostics.
Authorise Your Notion Workspace
Once ntn is installed, run ntn login in your terminal (or ask your agent to walk you through it). A browser window opens, you pick the Notion workspace you want to deploy workers to, and you confirm. That is it.
Enable Workers In Notion Settings
The final prep step happens inside Notion. Open Settings → Features → Workers. Two things to know:
- You need to be on a Business or Enterprise plan.
- You need to be a workspace owner to enable Workers for the workspace. If you are not, ask one.
Once enabled, the workspace owner chooses who can deploy workers: everyone, admins only, or specific groups. After that, you are ready to build.
💡 Pro Tip: Install Monologue (Mac) or Wispr Flow (Windows) before you start. Dictation completely changes how you work with coding agents — you describe complex builds in 30 seconds instead of typing for five minutes. The first time you talk to Claude instead of typing, you do not go back.
What Folder Structure Should Every Worker Use?
Each worker gets its own subfolder, and each subfolder gets the same four-file scaffold: a README, a learnings file, a changelog, and the Notion worker skills loaded from official docs. The AI maintains all of these — you never edit them manually.
Here is why this matters more than it sounds:
- README — explains the what and why of this specific worker. When you come back in three weeks, you remember the goal in 30 seconds.
- LEARNINGS — every time the AI figures out a quirk of the Notion API or your workspace, it writes it down. Next session, it does not relearn the same lesson.
- CHANGELOG — a running history of what changed. Useful for debugging and for picking up where a previous session left off.
- Notion Workers skills — small instruction files (loaded from Notion’s official skill repository) that teach your AI exactly how the worker SDK behaves.
When you start each new project, your first message to the agent is essentially:
Before we start, please set up the standard structure for this project:
README, LEARNINGS, CHANGELOG, and load the Notion Workers skills from
https://github.com/makenotion/workers-template. Keep all of these maintained as we go.
The agent handles everything from there. You never touch those files yourself.
How Do You Build A Webhook Worker? (Worker 1)
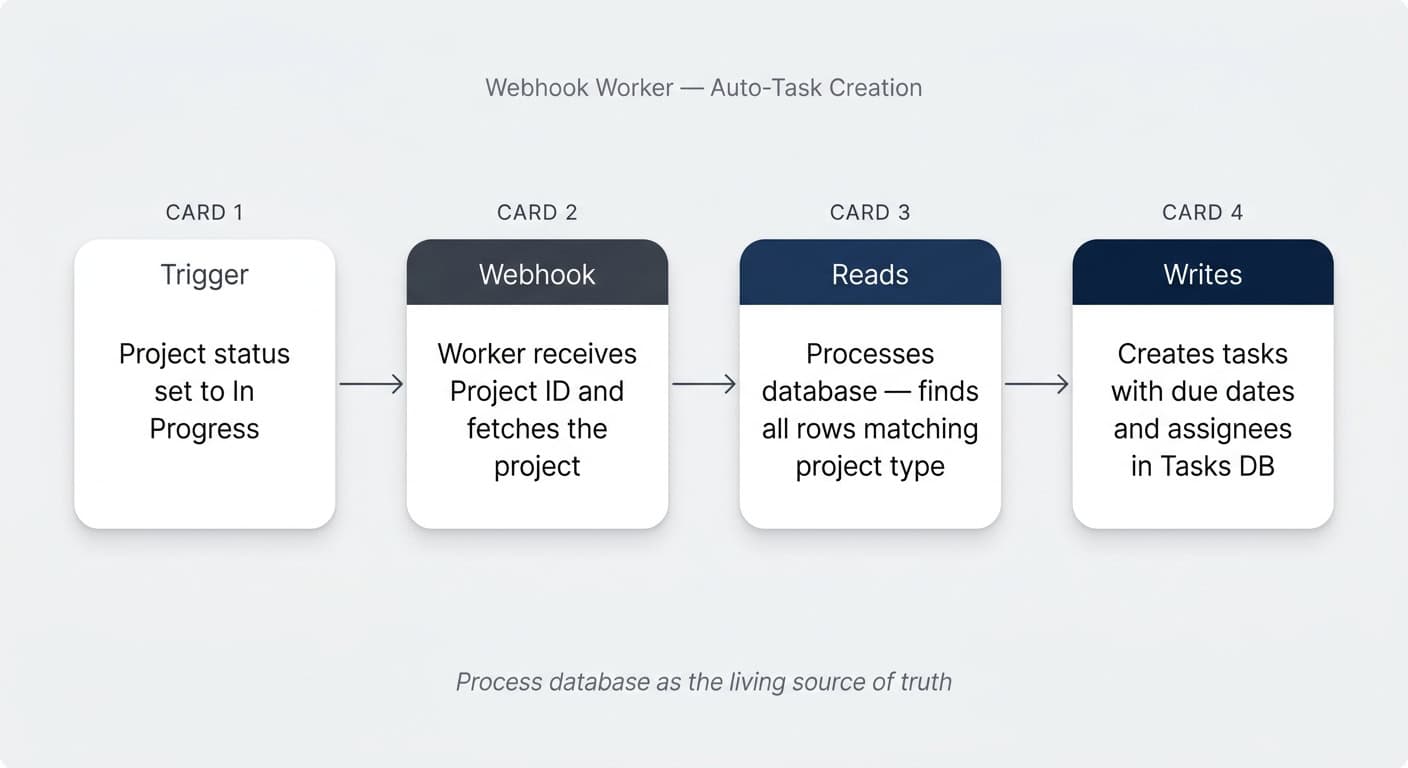
Webhook workers fire when something happens. The classic use case is auto-creating tasks when a project moves to *In Progress*, pulling the standard task list from a process database, assigning each task to the right role, and setting due dates from the project start date.
This is the kind of business logic teams have wanted in Notion forever. Built-in automations get you 60% of the way there; workers take you the rest of the way.
The Notion Side: Projects, Processes, Tasks
You need three databases:
- Projects — your existing project database, with a Status property (status), a Project Type property (select), a Start Date property (date), and an Owner (person).
- Tasks — your existing task database, related to Projects.
- Processes — a new database that lists the standard tasks for each project type. Each row has a Task Name, a Project Type relation or select, an Order (number), a Due Date Offset in days (number), and a Role (a person property — or a text key if you are mapping roles to people elsewhere).
The processes database is your living documentation. The seven default tasks for a Marketing Campaign live here as seven rows. When the team adds nine steps for the next campaign type, you add nine rows. The worker reads whatever is current — so your documentation is automatically the source of truth for execution.
💡 Pro Tip: This pattern alone is worth the price of admission. Most teams have a documentation problem — they write SOPs that nobody follows, or they execute tasks that nobody documents. A process database wired to a worker fuses the two: updating the documentation is updating the execution.
Describe What You Want To Build
Open a fresh project folder, ask your coding agent to set up the README / LEARNINGS / CHANGELOG / skills, then dictate what you want.
In Notion, we have a Projects database. When a project's status moves
to "In Progress", I want the worker to check our Processes database,
find all process rows matching that project's Type, and create one
task per process row in the Tasks database.

Each task should:
- Be related back to the project
- Have its due date set to the project start date plus the
  process row's Due Date Offset
- Be assigned to the person matching that process row's Role on
  the project (falling back to the project owner, then to the
  person who created the project)

Three databases: Projects, Processes, Tasks. Here are the links:
[paste your three database URLs]

Before you build anything, ask me any clarifying questions you need.
That last line is the magic. Hidden assumptions are the single biggest reason AI builds fail. Forcing the agent to grill you for five minutes saves you an hour of debugging later.
The agent will come back with sharp questions — which exact status value triggers the worker, what happens if a project has no start date, what if there is no role match, should we deduplicate against existing tasks? — and you answer each one. Then it builds.
Deploy Your First Worker
The build itself takes the agent a few minutes. When it is ready to deploy, two things will block it the first time:
- An integration token. The worker needs a way to actually call the Notion API. You create an internal integration in the Notion developer portal, name it (e.g. Auto Task Creation), and copy the token.
- Database access. That integration token only works on databases you explicitly connect it to. On each database (or on a parent page that contains all of them — permissions inherit downward), open the three-dot menu → Connections → Add connection and add your new integration.
Wire Up The Webhook In Notion
A webhook worker does nothing until something pings it. The agent will give you a webhook URL in a text file (it deliberately writes the URL to a file rather than printing it to screen — the URL is effectively a password).
In your Projects database:
- Click on + New automation.
- Set the trigger: When Status is set to In Progress.
- Add the action: Send webhook.
- Paste your worker’s webhook URL.
- Click Enable.
You can also wire the same webhook to a button on the project page (“Create Tasks”), so you can trigger it manually for testing.
💡 Pro Tip: Notion webhook actions cannot send custom body content — only headers. If Claude or Codex asks you to put values in the request body, gently remind it: Notion’s automation only lets you set headers. Have it pull what it needs by re-fetching the page from the page ID Notion sends.
Secure Your Webhook With A Header Secret
Anyone with your webhook URL can ping your worker. That is fine for a demo, but for anything real you want to add a shared secret.
Ask your agent: “Please add a header secret so the worker rejects any request that does not include the right value.” It generates a random secret, stores it in your worker’s environment, and tells you what to put in the Notion automation:
- In your automation, click Add custom header.
- Set a key (e.g.
X-Worker-Secret) and the value the agent generated.
The worker now ignores any ping without that exact header. Five extra minutes, dramatically tighter security.
Test, Troubleshoot, Iterate
Before you flip any status, ask the agent to watch the worker for the next five minutes:
Ready to test. Please watch the worker logs while I trigger
a few runs, and let me know what happens.
Then go and trigger it. Try the happy path. Try a project with no project type set. Try a project with no start date. Try a project with no owner. Each edge case teaches the agent something — and because LEARNINGS is being updated continuously, those lessons stick for next session.
A real example from the build: a project with a Type but no Start Date failed the first run because the worker treated start date as mandatory. The fix took one sentence: “If there is no start date, fall back to today.” Edge cases like that are precisely where workers shine vs. no-code — codifying weird business rules is trivial in code, painful in a visual builder.
💼 Need the support of certified Notion Consultants? Workers are powerful, but the real value is where and how you wire them into a system your team actually uses. If you want a full transformation of your Notion setup — from KM architecture to AI agents to workers — or a focused workshop to upskill your team, my team and I are here to help. → matthiasfrank.de/en/notion-consulting/
How Do You Build A Sync Worker? (Worker 2)
Sync workers pull external data into Notion on a schedule and write it into a database the worker itself manages. The Notion side is read-only, which guarantees the data always matches the source.
The canonical example: every morning at 7am, fetch the top 10 stories from Hacker News and mirror them into a Notion database. Replace “Hacker News” with your CRM, your product analytics, your newsletter tool, your Ōura ring — same pattern.
What Makes Sync Workers Special
Three things distinguish sync workers from the other two types, and they matter for how you design:
- They manage their own database. You cannot point a sync worker at an existing database you already use. It creates a fresh one, owns the schema, and writes to it. Think of it as a database that is read-only in the Notion UI for the synced fields.
- They are the only worker type with native cron. If you want something to run every 15 minutes, every hour, every day — and write to its own dedicated database — sync is the way.
- They are one-way. Sync workers protect synced fields from edits in Notion, which guarantees integrity. You can still add your own properties to the database and relate it to other databases.

Build A Hacker News Top 10 Sync
Open a fresh project folder, set up the standard scaffolding, then dictate:
New worker — a sync worker this time. I want to pull the top 10
front-page stories from Hacker News once per day and mirror them
into a managed Notion database under [paste a parent page URL].

Each story should include: title, author, source URL, Hacker News
discussion URL, points, comment count, and posted-at time.

From one daily run to the next, replace — I only want to see the
current top 10, not the historical accumulation.

Ask me any clarifying questions before you build.
The agent will ask the right things — which Hacker News API endpoint, should the database accumulate or replace, what is the cadence, what is the structured ID for matching — and then ship.
A few minutes later, you open Notion and there is the database. The synced columns are visibly locked — try to edit a title and Notion will not let you.
Extend Your Synced Database With Your Own Properties
The synced columns are read-only. Everything else is yours. You can add:
- A tags property and let a custom agent classify each story.
- A relation to your internal Content Ideas database.
- A rating select for your own commentary.
- A second worker that reads each story URL and pastes a summary into the page body.
This is the pattern most teams underuse. The worker guarantees the integrity of the synced fields; you build everything else around them without fear of breaking the sync.
Need A Two-Way Sync? Here’s The Workaround
Sync workers are one-way only. If you need a two-way sync — Notion edits push back to the source — sync workers will not get you there.
The workaround: use a webhook worker instead, and trigger it on a schedule from a Notion automation. Notion’s automations can fire a webhook on a cadence, so you get scheduling without sync’s database ownership. The downside: you lose the protection that read-only fields give you. The upside: you can write to your existing databases and you can build bidirectional logic.
💡 Pro Tip: If you want a managed sync database and the ability to edit values, you currently cannot have both. Hopefully Notion will close that gap in a future release. For now, choose based on which problem matters more — integrity guarantees (sync) or editability (webhook).
How Do You Build A Tool Worker For A Custom Agent? (Worker 3)
Tool workers extend the capabilities of Notion custom agents. The agent gains a new ability — call an external API, run a deterministic calculation, post to another system — and decides for itself when to use it.
There are two reasons to give an agent a tool, and they are equally valuable:
- Capability. Let the agent talk to systems it otherwise cannot reach. Query your data warehouse. Publish to WordPress. Read your Stripe customers. Call any API your business uses.
- Cost. Offload deterministic work from the agent. A deduplication tool that returns “these three rows look like the same person” is hundreds of times cheaper than asking the agent to scan a database row by row.
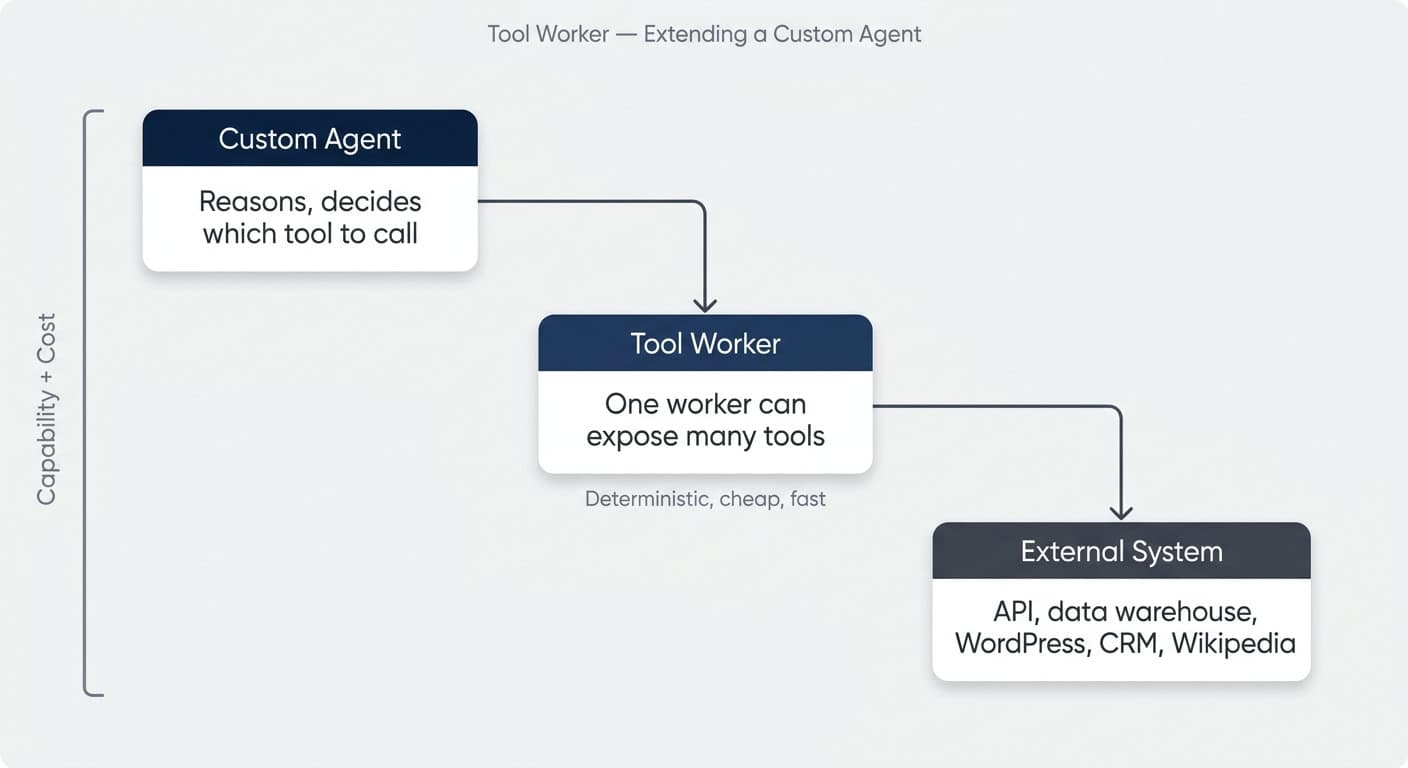
Why Give Your Agent Tools
Think of it this way: agents are great at reasoning. Code is great at running the same thing reliably and cheaply every time. A well-designed custom agent uses tools for the second category and saves its tokens for the first.
A Recare-style data agent that answers Slack questions about hospitals or products is a perfect example. The agent decides which tool to call. The tool runs a SQL query against the warehouse. The agent formats the answer. You pay agent tokens once per question instead of once per row examined.
Build A Wikipedia Enricher
The simplest possible tool worker: given a topic, fetch the Wikipedia summary, write a glossary entry, and return a confirmation.
New folder, scaffold, then dictate:
I want a tool worker that exposes one tool to a Notion custom agent.
The tool takes a topic name, calls the Wikipedia REST API for that
topic, and writes a new row into our existing Glossary database
[paste URL] with the summary, source URL, and thumbnail.

This writes into an existing database — not a managed one.

Ask me any clarifying questions before you build.
A few questions and a few minutes later, the worker is deployed.
Attach The Worker To A Custom Agent
Tools can only be attached to custom agents, not to your personal Notion Agent. So if you do not have a custom agent for this yet, create one (Notion AI can scaffold one for you from a description — paste the tool’s purpose into the prompt and let it do the work).
In the custom agent’s settings:
- Open Connections at the bottom of the agent config.
- Click Add connection and pick your worker from the list.
- Choose which of the worker’s tools to expose.
- Save and run the agent.
Then test: “Add a glossary entry for capybara.” The agent calls the tool, the tool calls Wikipedia, the row appears in Glossary, the agent confirms.
⚠️ Heads up: Only the person who deployed the worker can attach it to a custom agent. You cannot build a worker, share it with a teammate, and have them wire it into their own agent. They would need access to your deployment first. Hopefully Notion lifts this in a future release.
One Worker, Many Tools
One worker can expose many tools. If your data agent needs 15 different SQL queries against your warehouse, you do not deploy 15 workers — you deploy one worker with 15 tools.
When you connect that worker to an agent, you choose which tools the agent can use, and whether new tools added to the worker later become available automatically. This is how mature teams scale: a small number of well-organised workers, each exposing a coherent toolkit.
How Should You Work With AI When Building Workers?
This is the section most tutorials skip and it is the section that makes the difference between shipping in 20 minutes and giving up after an hour. Building with AI is a discipline — a small one, but a real one — and once you have it, every project you do gets faster.
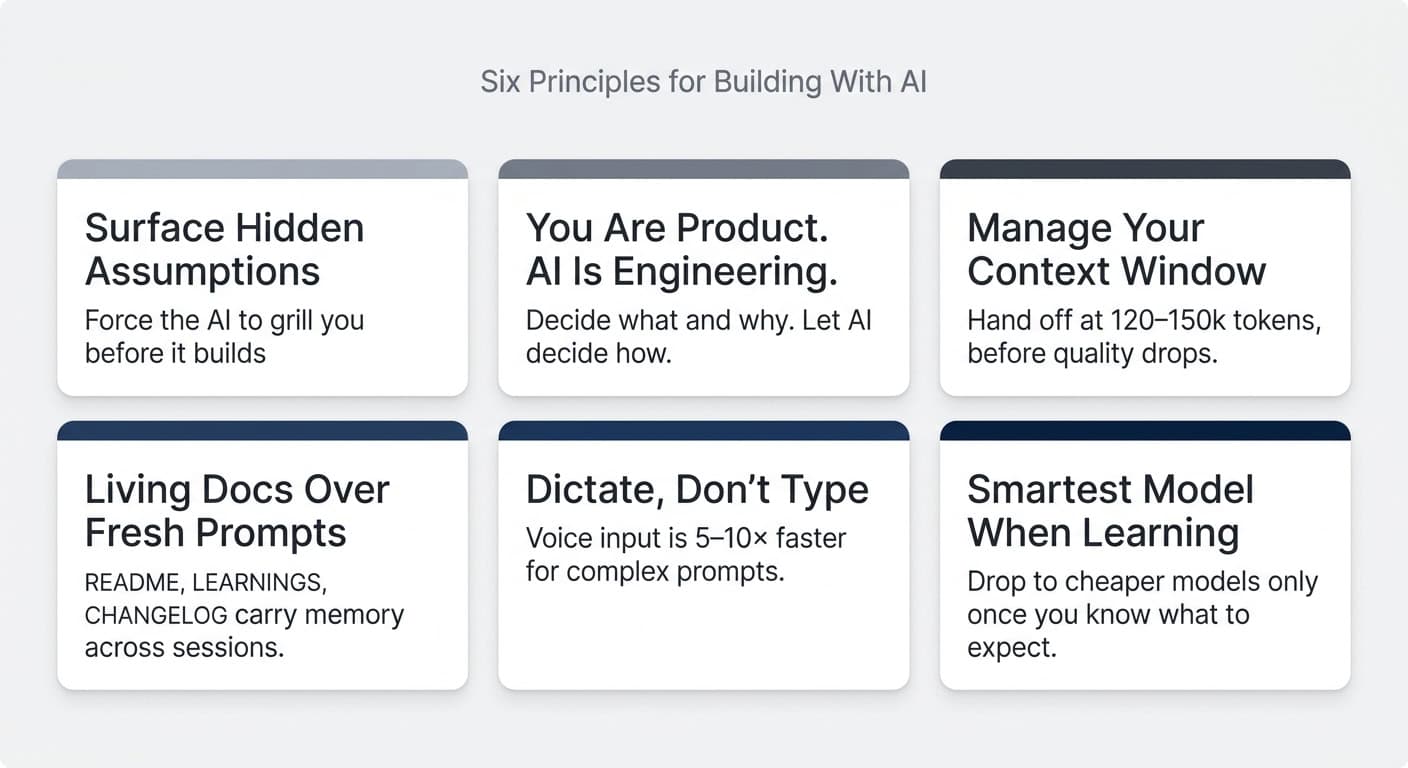
The core principles:
| Principle | What it means in practice |
|---|---|
| Hidden assumptions kill builds | Force the AI to grill you with clarifying questions before it writes code |
| You are product, AI is engineering | Decide what and why. Let the AI decide how — unless you have a strong reason |
| Manage your context window | Hand off to a fresh session around 120–150k tokens, before quality degrades |
| Living docs over fresh prompts | README / LEARNINGS / CHANGELOG are the AI’s working memory across sessions |
| Dictate, don’t type | Voice input is 5–10× faster than typing for complex descriptions |
| Smartest model when learning | Opus 4.7 or equivalent. Drop to cheaper models only once you know what to expect |
Hidden Assumptions Are The Biggest Reason AI Builds Fail
AI does not fail at building. AI fails at building the thing you actually meant. The gap between what you said and what you meant is where every botched build lives.
The fix is mechanical: never let the agent build until it has asked you clarifying questions. Two ways to enforce this:
- Add it to your prompt. End every build prompt with “Before you build anything, ask me any clarifying questions you have.”
- Use plan mode or a grill skill. Claude has a built-in Plan mode that does this for you. For more depth, install the
grill-meskill from Peter Pocock — it forces the agent to ask far more questions than feels comfortable. That discomfort is the value.
When the agent comes back with questions, answer them. Do not skip ahead.
You Are Product. AI Is Engineering.
In a traditional software team, product decides what to build and why. Engineering decides how. When you build with Claude or Codex as a non-engineer, you are stepping into the product role — and the agent is your engineer.
That means: when the agent asks you a product question (should this run every hour or every day? Should missing values fall back to a default or fail?), answer it. When the agent asks an engineering question (should we use polling or webhooks? Which Hacker News endpoint is more efficient?), tell it to make the call.
If you do not have an opinion, do not invent one. Tell the agent: “You are the expert here. Pick what you think is best and document why.”
Manage Your Context Window Aggressively
Every coding agent has a context window. Opus and equivalents can technically hold 1–2 million tokens. In practice, 120–150k is the sweet spot — beyond that, response quality drops, your usage limits drain faster, and the model starts making mistakes it would never make in a fresh session.
The move: when you cross that threshold, ask the agent to write a handoff document.
We're at about 130k tokens of context. Before we go further,
please document everything we've decided and built so far
into the project's HANDOFF.md. Then write me a one-paragraph
prompt I can paste into a fresh session to continue from
where we are.
You close the session, open a new one, paste the prompt, and you are back to ~5k tokens of context with no quality lost. Doing this aggressively is what separates people who ship from people who get frustrated with AI.
Use Plan Mode And Grill-Me Skills
For anything more complex than the demos in this guide:
- Plan mode (Claude) — switches the agent into “do not execute, just plan” mode. It will ask, propose, refine, and only build when you explicitly approve.
grill-meskill (Peter Pocock) — forces a much deeper questioning pass. Installable as a small instruction file in your project’s skills folder. Brutal for simple builds; perfect for complex ones.
For a tutorial-grade build like the three in this guide, “please ask clarifying questions” is enough. For a real client project that will run for years, use the heavier tools.
Dictate, Don’t Type
For complex prompts, voice is 5–10× faster than typing. Monologue (Mac) and Wispr Flow (Windows) are the two go-tos. Both work everywhere on your machine — including in Claude, Codex, your terminal, and your browser.
The quality of your prompts goes up when you dictate, not down. You naturally include more context, more constraints, and more nuance than you ever would when typing. And the AI is more than smart enough to handle the odd self-correction or “actually, scratch that” mid-sentence.
Let Your Documents Live
README, LEARNINGS, CHANGELOG, HANDOFF — these are not paperwork. They are how the agent remembers across sessions, and how you remember when you come back in three weeks. Make sure your initial setup prompt instructs the agent to keep them current as you go. Then trust the system.
What Security Best Practices Apply To Notion Workers?
A few non-negotiables:
- Never paste integration tokens or secrets directly into the chat. Use a
.envfile. Your coding agent will set this up correctly if you ask — and it will warn you if you try to do it the wrong way. - Add a header secret to every webhook worker. Five extra minutes; prevents anyone with the URL from triggering your worker.
- Scope your integration tokens narrowly. Give the integration access only to the databases it needs. Notion’s permissions cascade downward, so granting at a parent page is fine — but never grant workspace-wide unless the worker genuinely needs it.
- Rotate keys if you ever expose them. If a token appears in a screenshot, a screen recording, or a public document — rotate it immediately in the Notion developer portal.
- Use VS Code as a glorified file browser. You do not need to write code in it, but inspecting your
.envand your handoff documents in a real editor catches mistakes the chat never will.
💡 Pro Tip: Treat every webhook URL like a password. Notion writes them to a text file rather than printing them on screen for exactly this reason. Do the same in your own workflow — never paste them into Slack, email, or anywhere they might persist.
What Should You Build Next?
Three shipped workers later, the world really is your oyster. The hard part was never the building — it was knowing which type of worker to reach for and how to talk to the AI when you got there.
A few starting points to spark ideas:
- Webhook: when a deal in your CRM moves to Won, create a kick-off project with all standard tasks.
- Webhook: when a recurring task is completed, create the next instance.
- Sync: mirror your Stripe customers into a Notion database for cross-referencing with Customers in your CRM.
- Sync: pull your weekly fitness data (Ōura, Whoop, Apple Health) into a personal dashboard.
- Tool: give your team’s Ask-Anything agent the ability to query your data warehouse for live numbers.
- Tool: let a content custom agent publish a finished post to WordPress in one step.
Notion built workers to be built with AI coding agents. You do not need to learn TypeScript. You need to know what you want, and you need the discipline of working with AI well. This guide gave you both.
Frequently Asked Questions
Do I Need To Know How To Code To Use Notion Workers?
No. Notion explicitly designed Workers to be built with AI coding agents like Claude Code, Codex, or Claude Code in the terminal. You describe what you want in plain English, the agent generates the TypeScript, and you deploy it with a single command. Reading the code is helpful for debugging — writing it from scratch is not necessary.
What Plan Do I Need For Notion Workers?
Workers are in public beta on Business and Enterprise plans, including Business trials. During the beta they are free to try. Starting 11 August 2026, Workers will require Notion credits, which workspace admins can purchase as an add-on to Business and Enterprise plans.
Can A Custom Agent’s Tools Be Shared Across My Team?
Indirectly. Only the person who deploys the worker can attach its tools to a custom agent. Other teammates can use the agent (and therefore the tools) once the agent is shared with them — but they cannot wire the same worker into a different agent on their own. Hopefully Notion lifts this restriction in a future release.
Can A Sync Worker Write To A Database I Already Have?
No. Sync workers create and own their database. The synced fields are read-only in the Notion UI to guarantee the data matches the source. You can add your own properties to a synced database and relate it to other databases — you just cannot point a sync worker at an existing database you already use.
If you need to write into an existing database on a schedule, use a webhook worker triggered by a Notion automation set to run on a schedule.
How Do I Build A Two-Way Sync Between Notion And An External System?
Not with a sync worker — those are one-way only. Use a webhook worker instead. Set up a Notion automation that fires the webhook on a cadence (every 15 minutes, every hour, etc.), and write the bidirectional logic inside the worker. You lose sync workers’ read-only protection on the Notion side, but you gain the ability to push edits in either direction.
Should I Replace All My Make Or Zapier Scenarios With Workers?
For most cases, yes — eventually. Workers are faster to build with a coding agent than scenarios are to wire up by hand, cheaper to run (no per-operation pricing), and more flexible (you can codify any logic you want). The few exceptions are flows that rely heavily on a tool’s native integrations to systems you do not otherwise have an API for. Even there, the gap is closing fast.
How Do I Debug A Worker That Is Not Running Correctly?
Ask your coding agent to read the worker logs. Notion logs every worker run automatically. The flow is usually: “The worker ran four times in the last 10 minutes and didn’t create the expected tasks. Can you check the logs and figure out what’s happening?” The agent reads the logs, identifies the issue (usually a missing field or an edge case), proposes a fix, and re-deploys. For more visibility, you can also create a dedicated Worker Runs database in Notion and have the worker log to it on every run.