Building a custom Notion Chrome extension used to mean hiring a developer or learning to code yourself — and now it doesn’t. With AI coding agents like Claude Code and Codex, you can describe what you want in plain English and ship a working browser extension that reads from and writes to your Notion workspace, even if you’ve never written a single line of code. The real skill isn’t coding anymore; it’s learning to direct AI the same way you’d direct an engineering team. This guide walks through the exact five-stage workflow we use to build Notion Chrome extensions for clients — from a rough idea to a working tool plugged straight into your Notion CRM.
What Can A Notion Chrome Extension Actually Do?
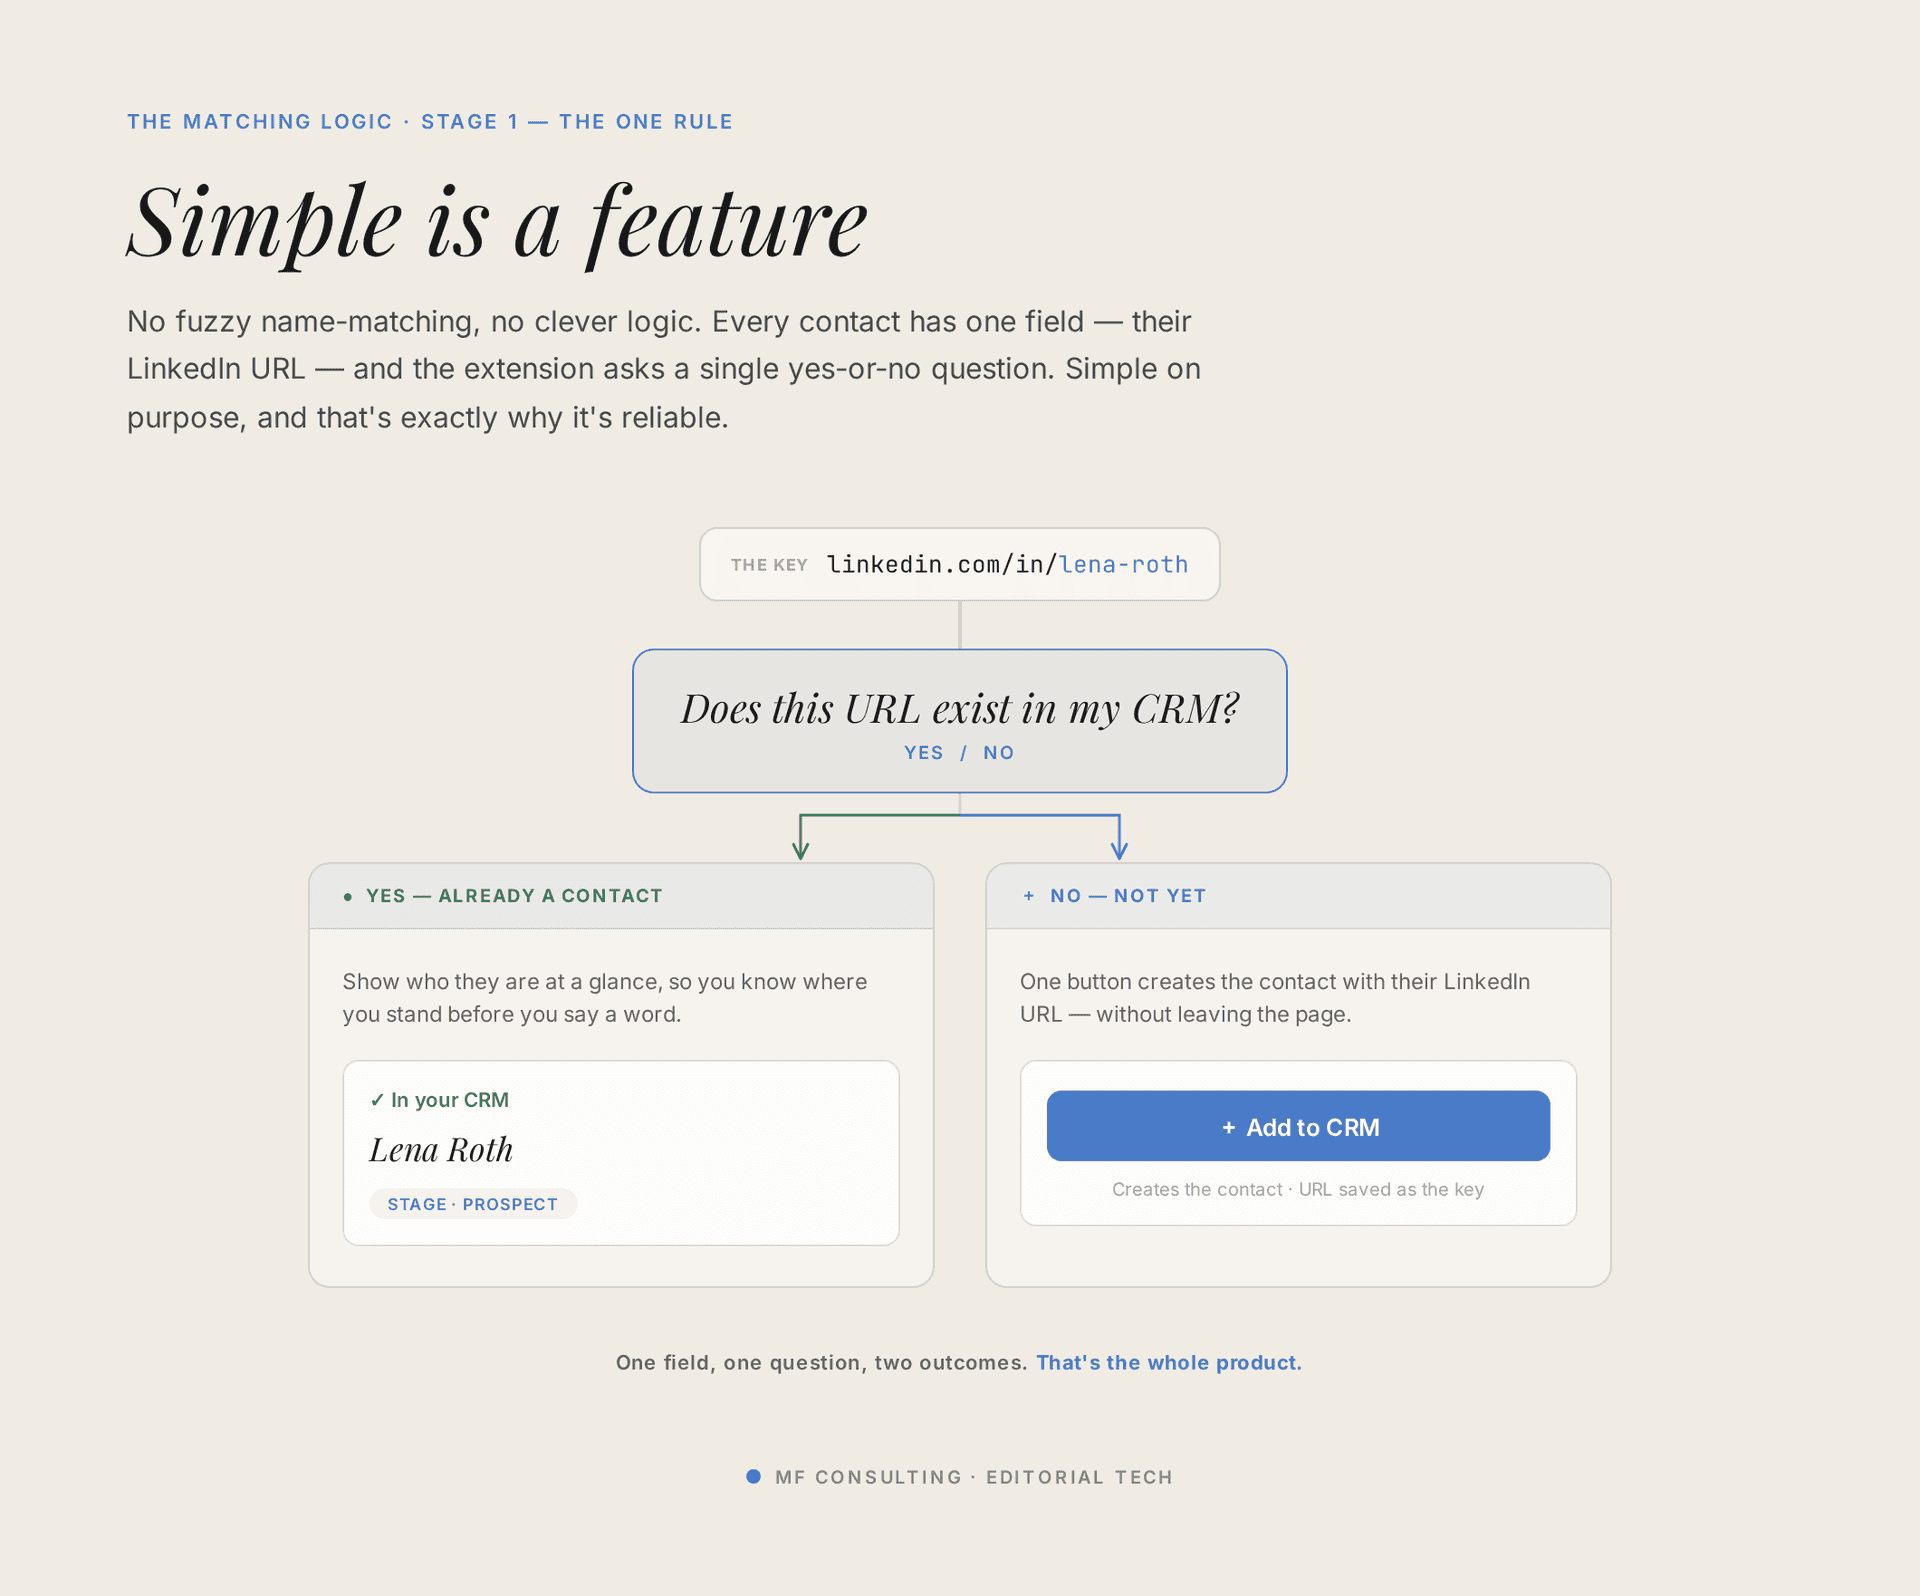
A Notion Chrome extension brings your Notion data into the websites where you actually work.
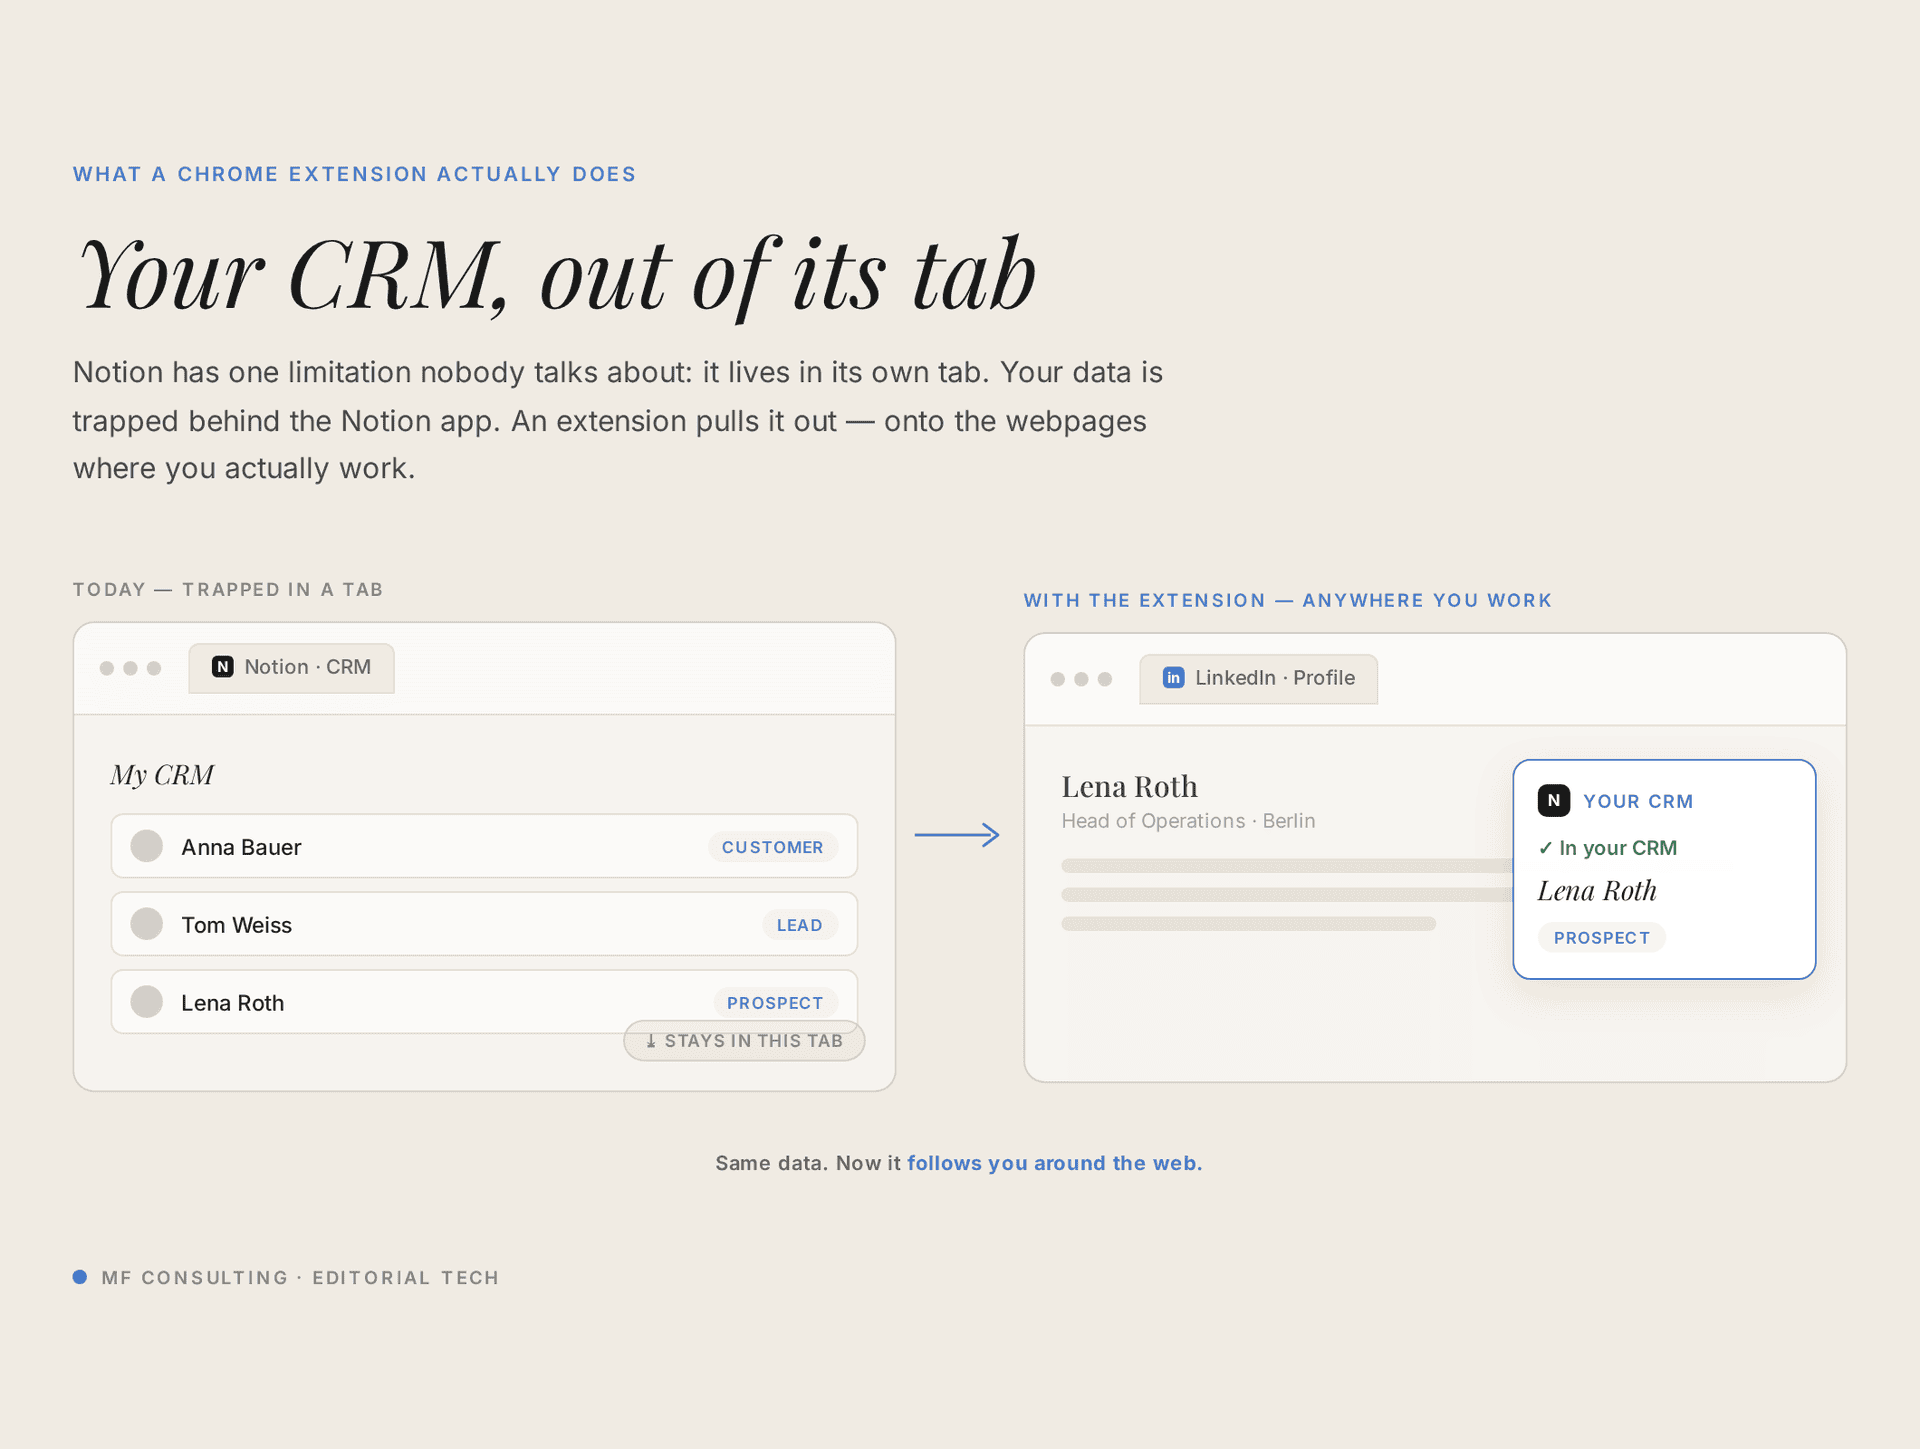
Imagine browsing LinkedIn and seeing, at a glance, whether the person on your screen is already in your Notion CRM — along with their deal status — and being able to save a new contact with a single click. That’s the example we’ll build here: a LinkedIn-to-Notion bridge sitting on top of a simple companies-and-contacts CRM.
The same pattern unlocks far more, though: a save-to-Notion clipper for your marketing team, a campaign-capture tool, or any bridge that pushes external data into your single source of truth.
What Is The Five-Stage Workflow For AI-Powered Engineering?
Every AI build — not just Chrome extensions — moves through five stages: feasibility, PRD, grill me, plan, and build.
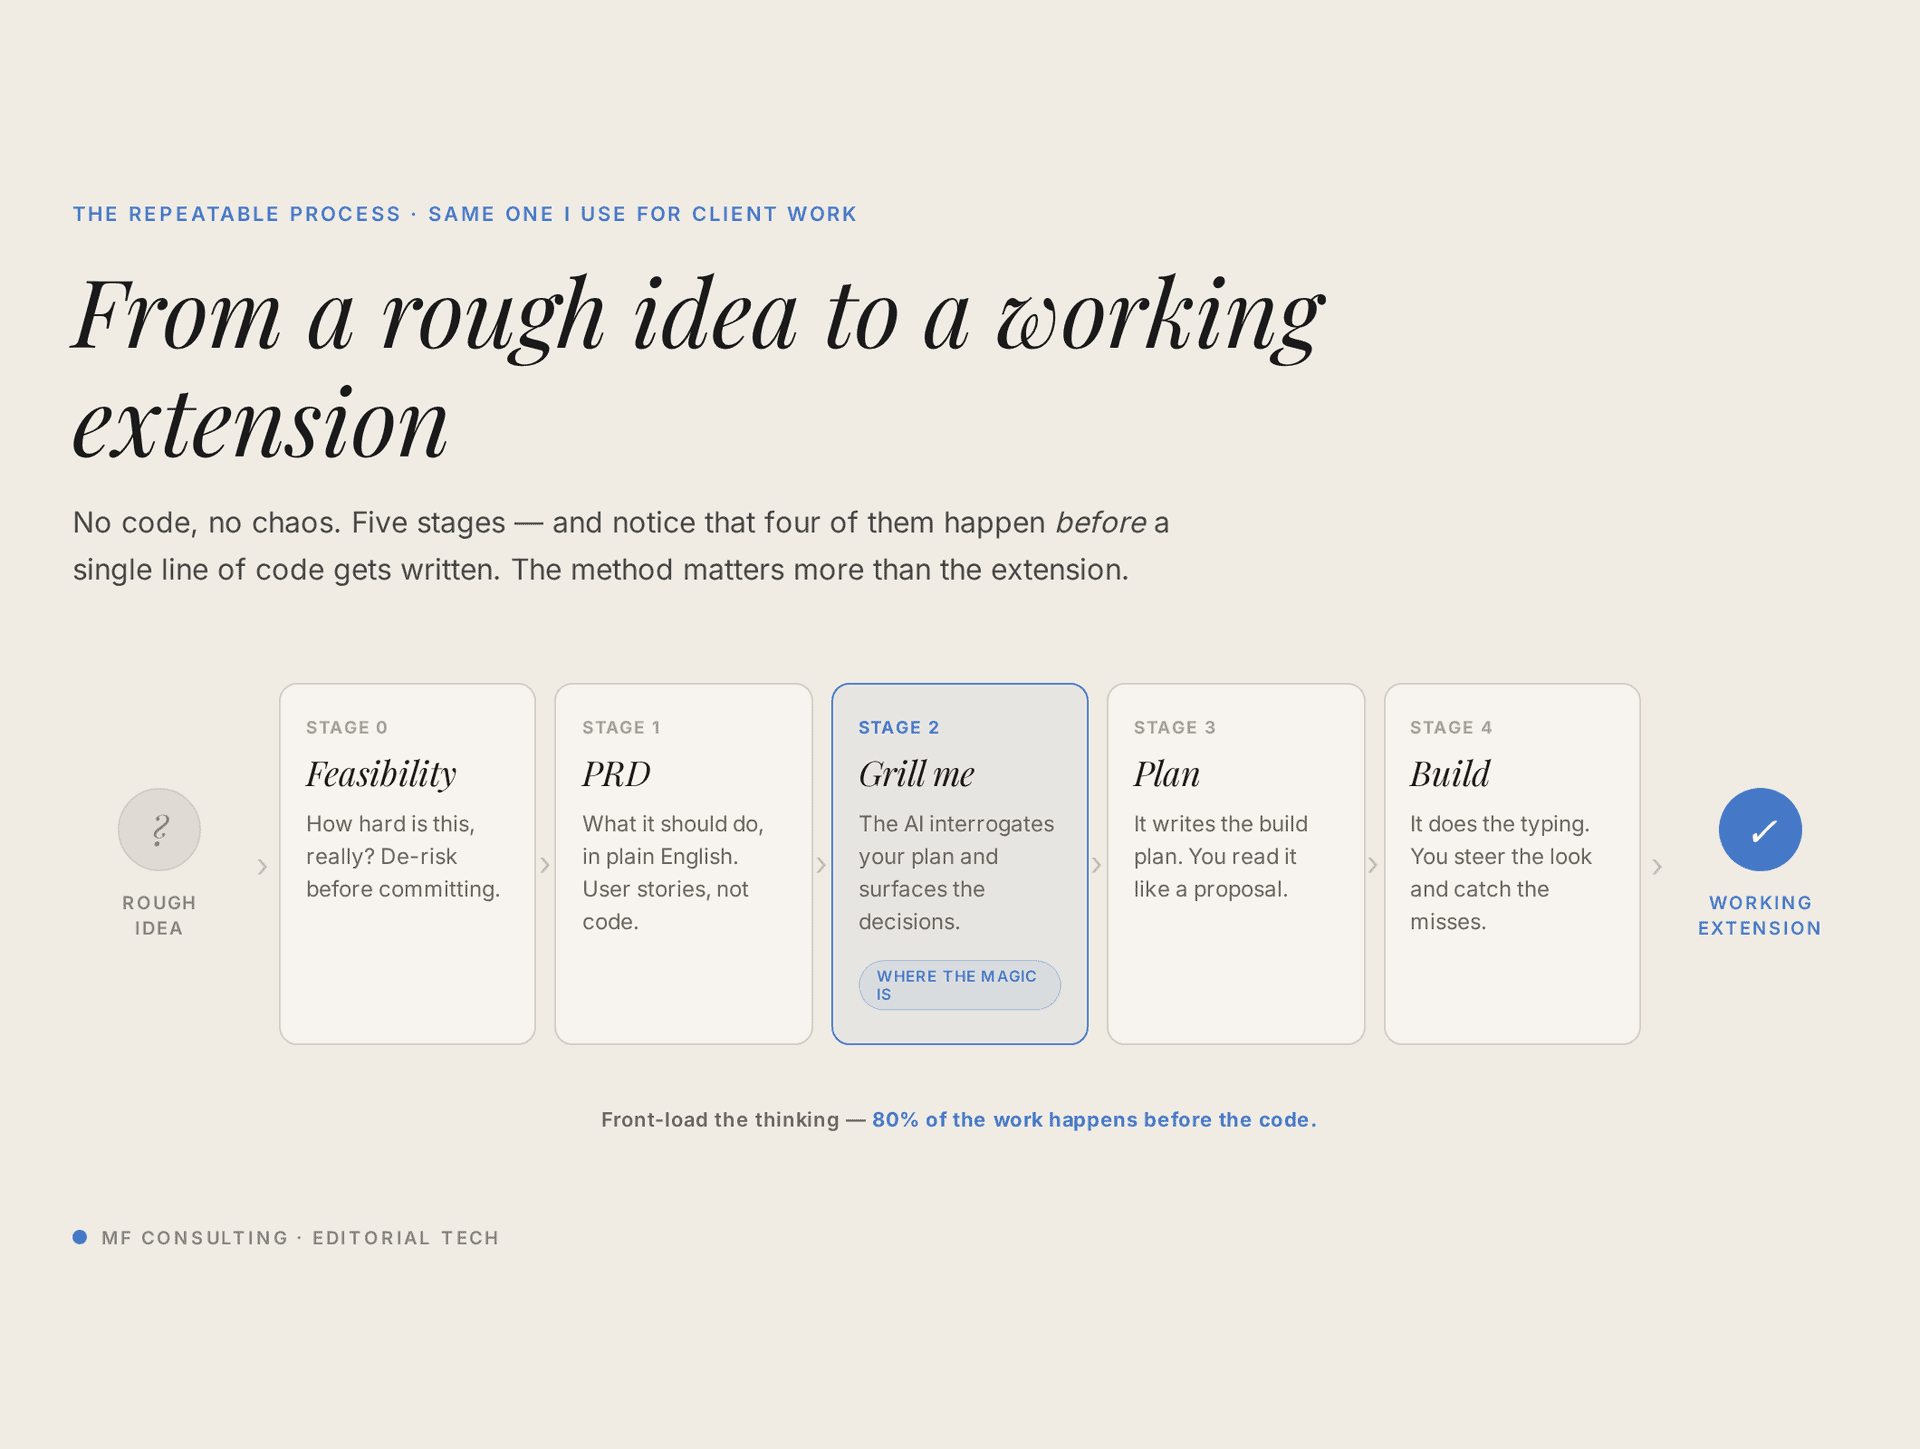
The big shift is where your time goes. Before AI, most of the effort went into the build itself. Now the build is fast and cheap, so your leverage lives in the four stages before it — getting the thinking right so AI can execute clearly.
| Stage | What Happens | Who Leads | Output |
|---|---|---|---|
| 1. Feasibility | Brainstorm the idea with AI and pressure-test how hard it really is | You + AI | Confidence it can be built |
| 2. PRD | Write what should happen, in plain English, from the user’s point of view | You (product) | A product requirement document |
| 3. Grill Me | AI interviews you to surface the product decisions you forgot to make | AI asks, you answer | Resolved scope and edge cases |
| 4. Plan | AI turns the PRD into a step-by-step implementation plan | AI (engineering) | A plan a fresh session could execute |
| 5. Build | AI writes the code one slice at a time while you review | AI (engineering) | A working extension |
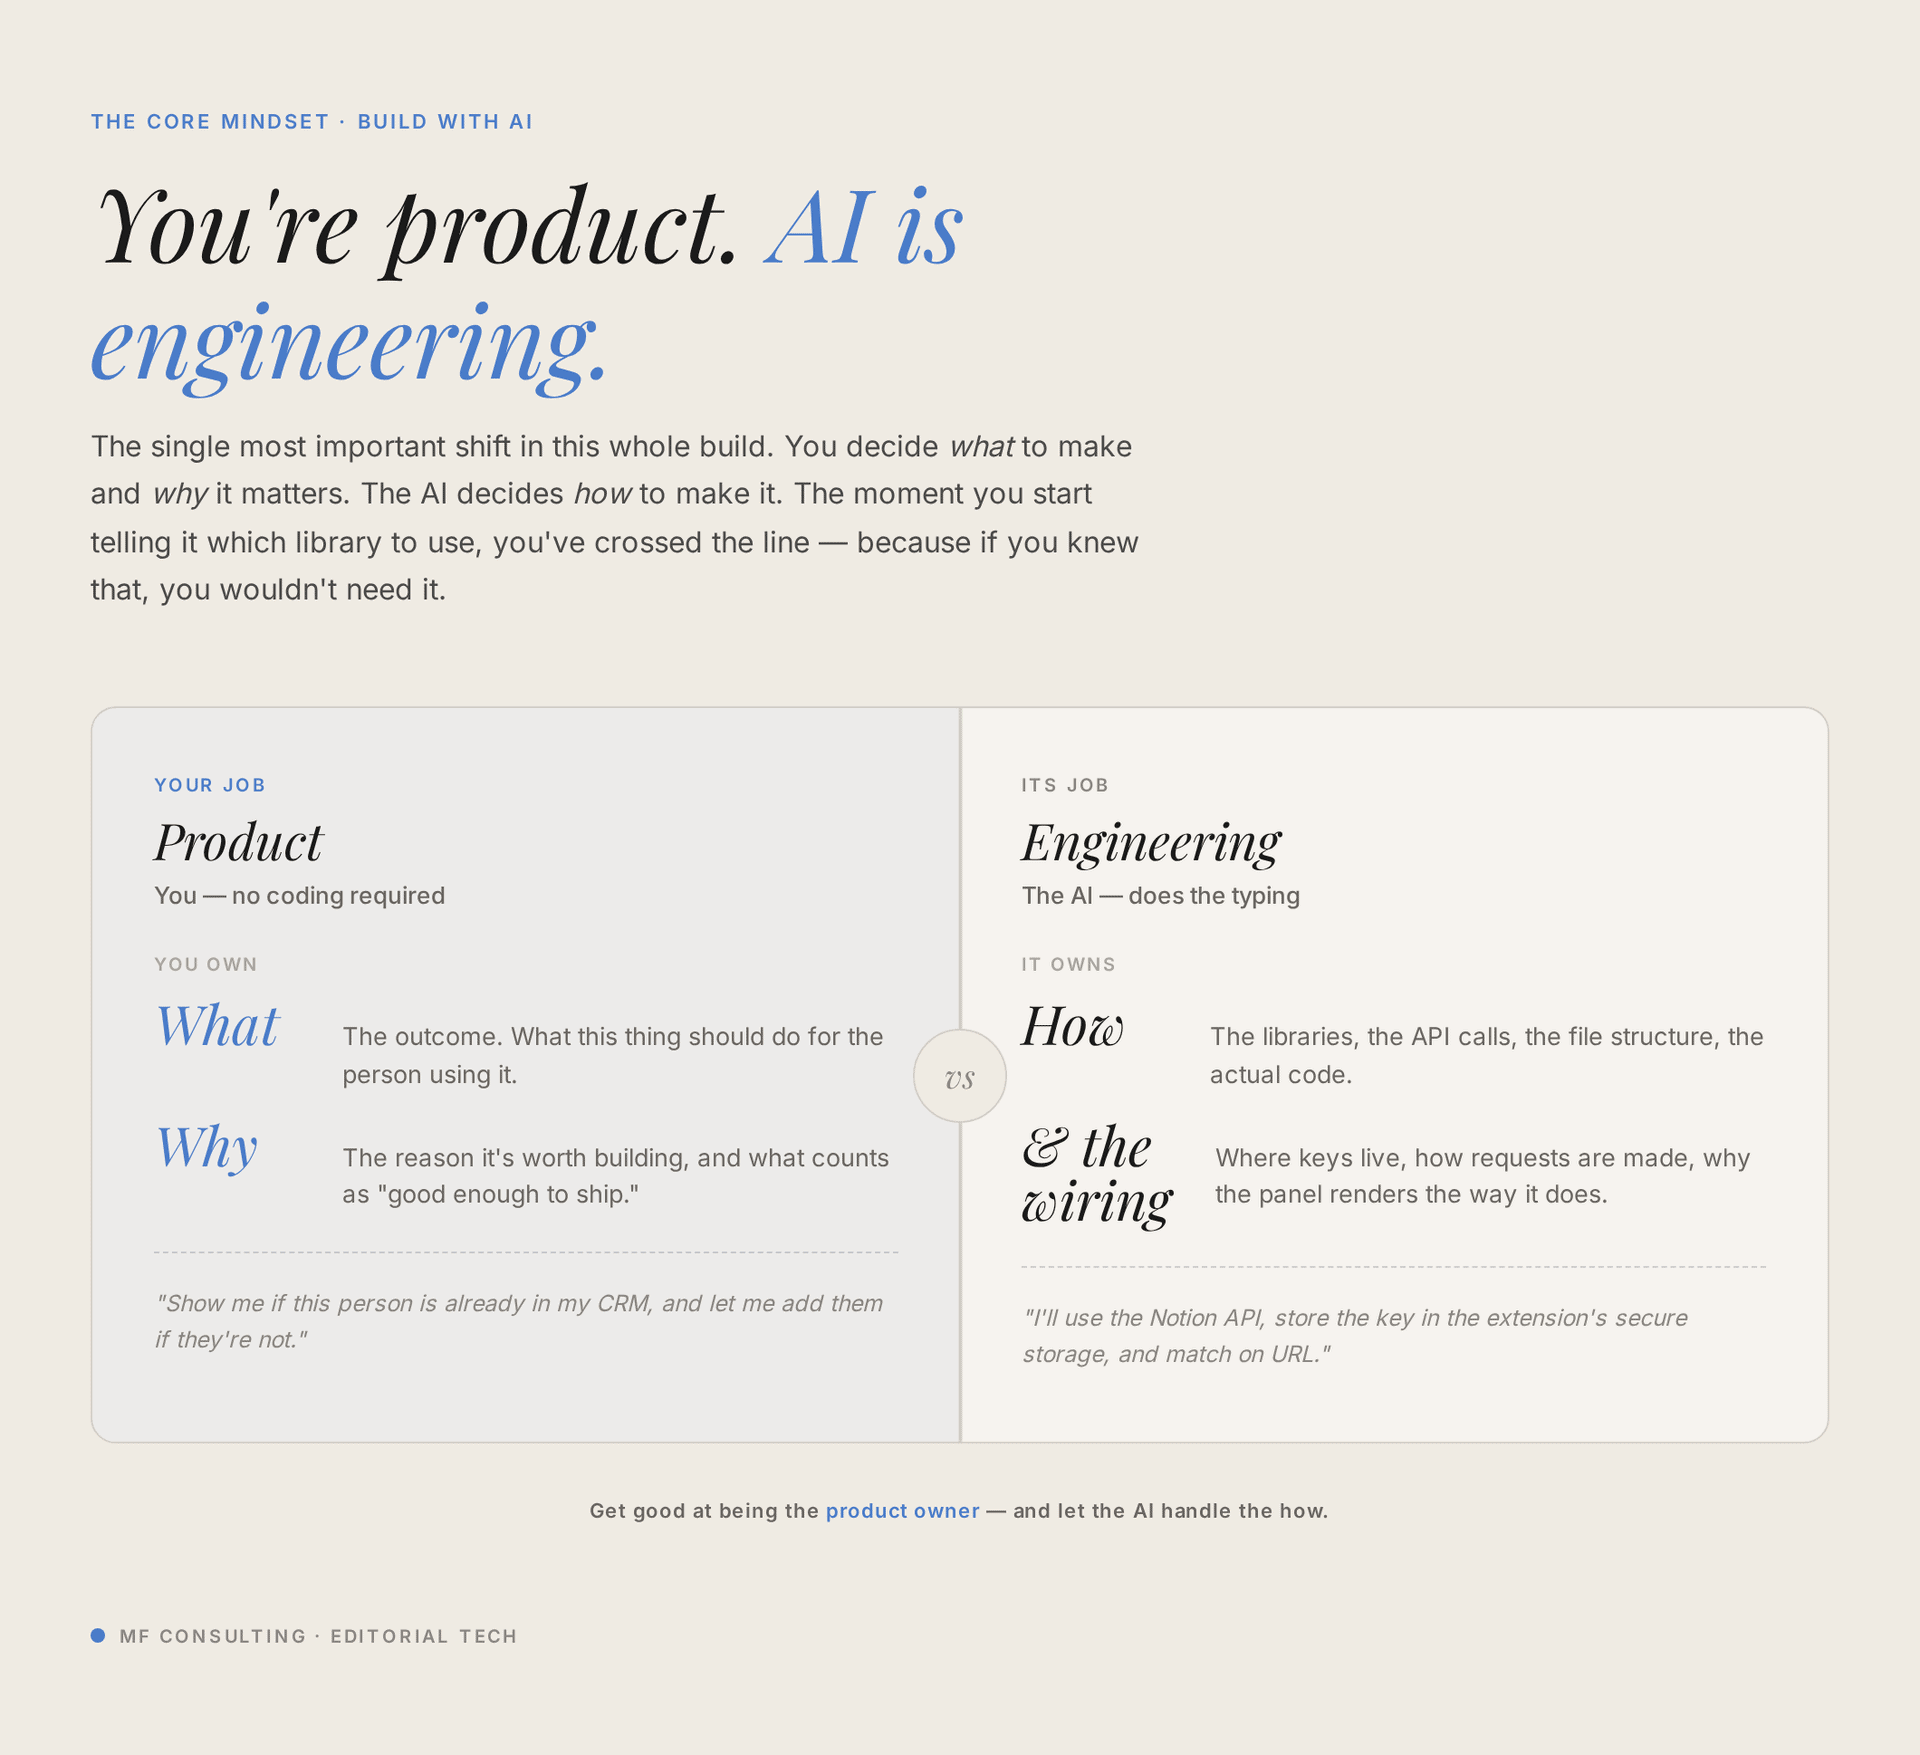
Think of it as a role split you already know from any company: there’s product (what to build and why) and engineering (how to build it). You’re product. Claude or Codex is your engineering team — and the same communication challenges you had between humans now sit between you and the AI.
How Do You Check If An Idea Is Even Feasible?
Start by brainstorming the idea with AI to pressure-test how hard it really is.
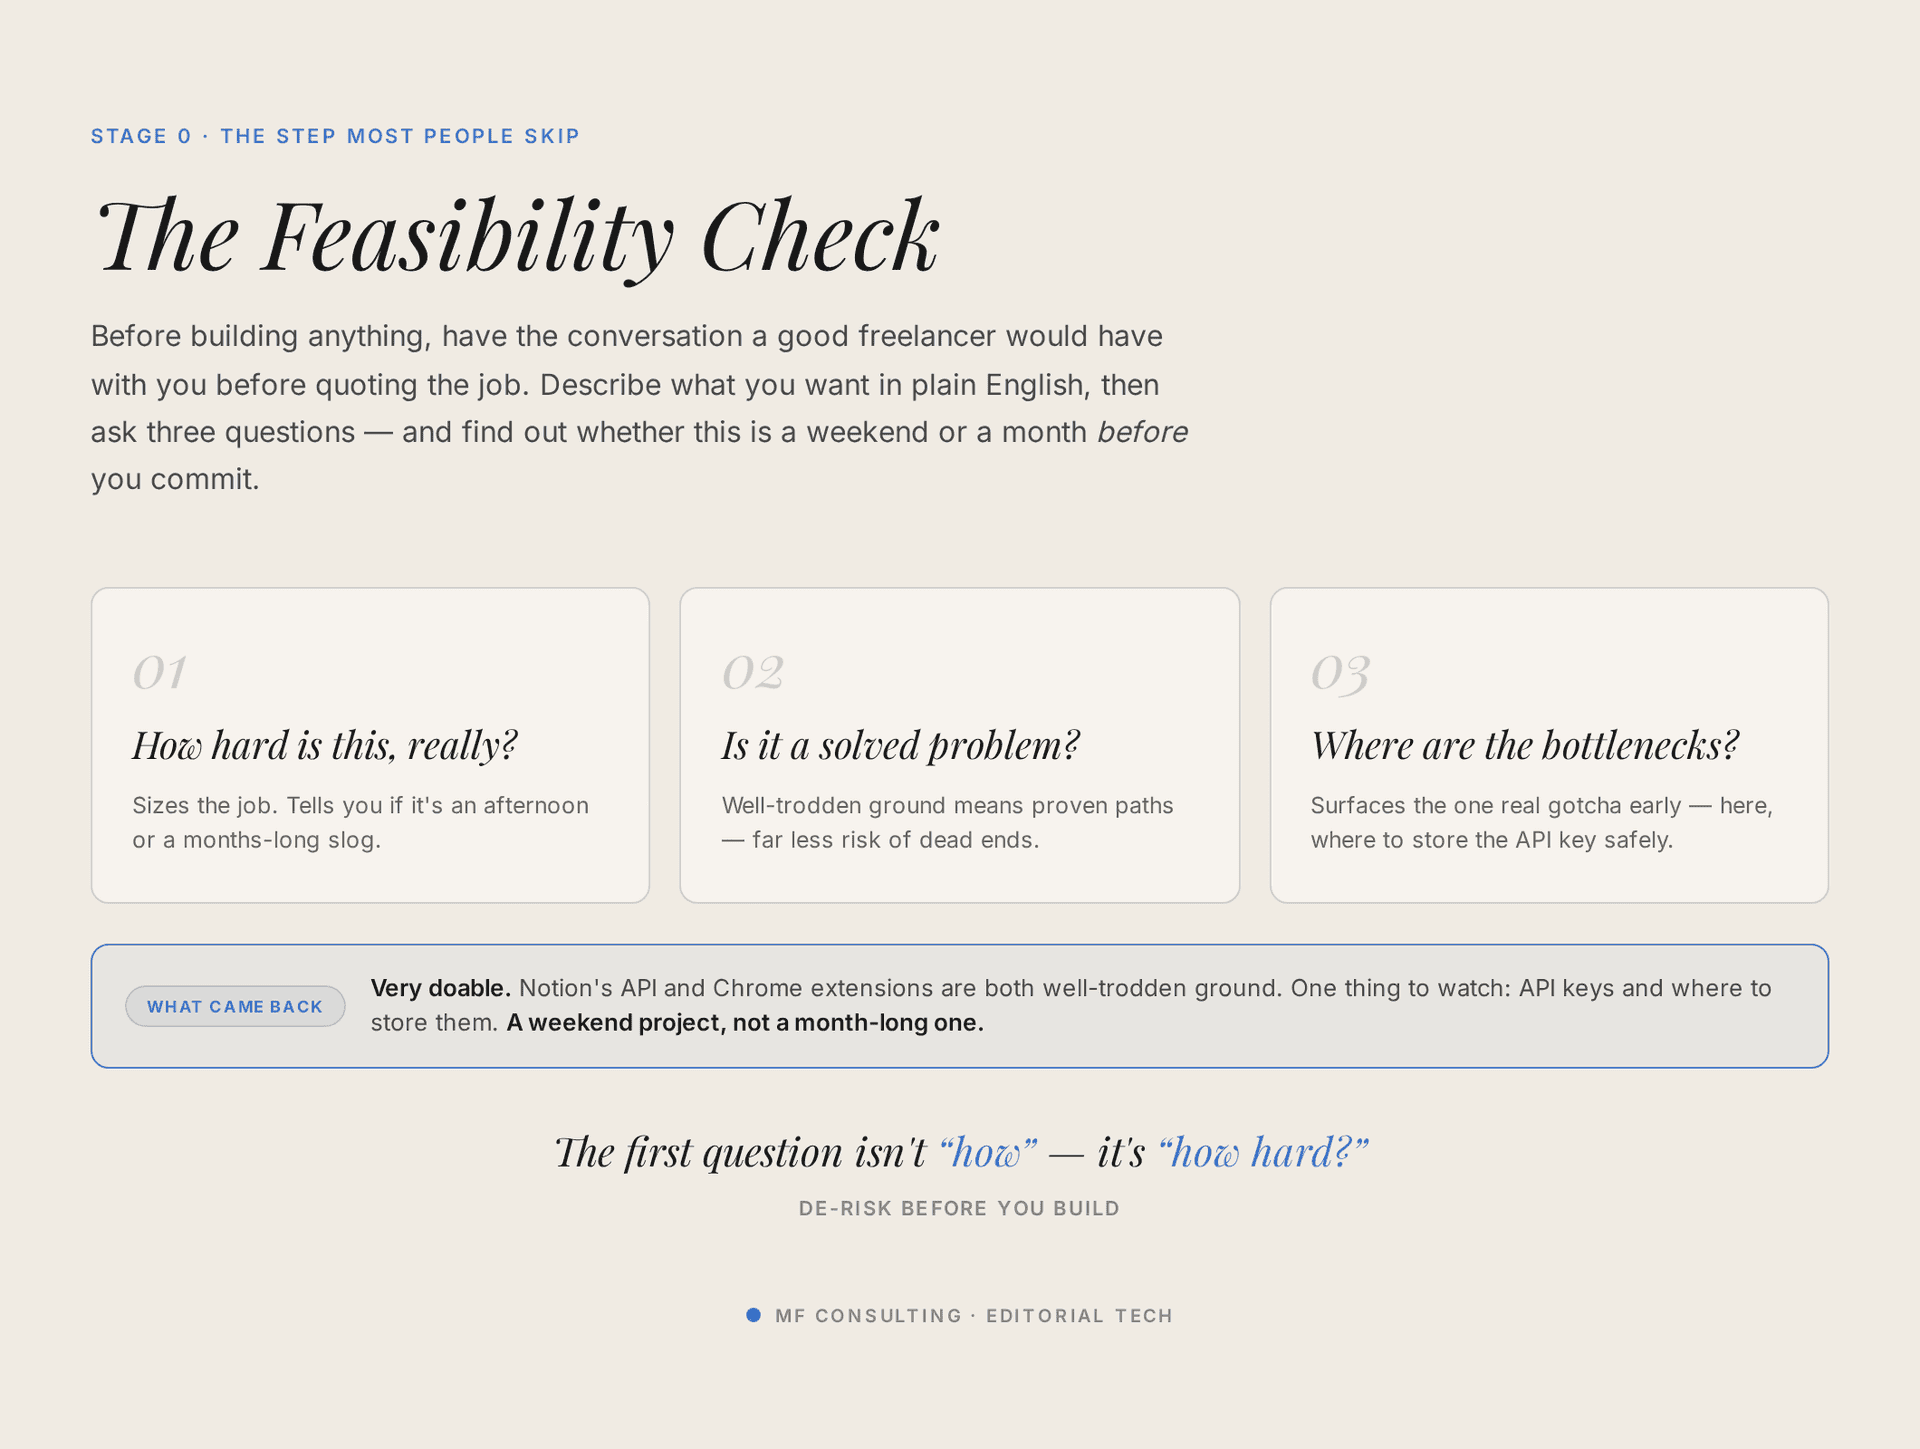
Open your AI tool of choice on its smartest thinking model, turn on dictation, and just talk through what you want. Dictation matters here — speaking gives the model far richer context than you’d ever bother typing.
Ask it directly: is this a solved problem in code? Are there big bottlenecks I’m missing? What kind of project am I actually looking at? Especially early on, you need a thinking partner to build your intuition for what’s easy and what’s still hard in this new world.
💡 Pro Tip: If it’s your first time, spend real time here. Once you’ve built a few things, you’ll often already know an idea is feasible and can skip straight to the next stage.
What Is A PRD And Why Should You Write One?
A PRD — product requirement document — is a plain-English description of what should happen, written from the user’s perspective.
It deliberately avoids the how. You’re not specifying libraries or architecture; you’re capturing the experience. For our extension, the whole PRD boils down to: “When I land on a LinkedIn profile, I want to see whether this person is in my CRM, see their deal status if they are, and save them with one click if they’re not.”
Hand your feasibility conversation to AI and ask it to draft the PRD. Once you’ve done this a few times, package it as a reusable skill so next time you can simply say “write the PRD” and it knows what you mean.
What Is The “Grill Me” Skill?
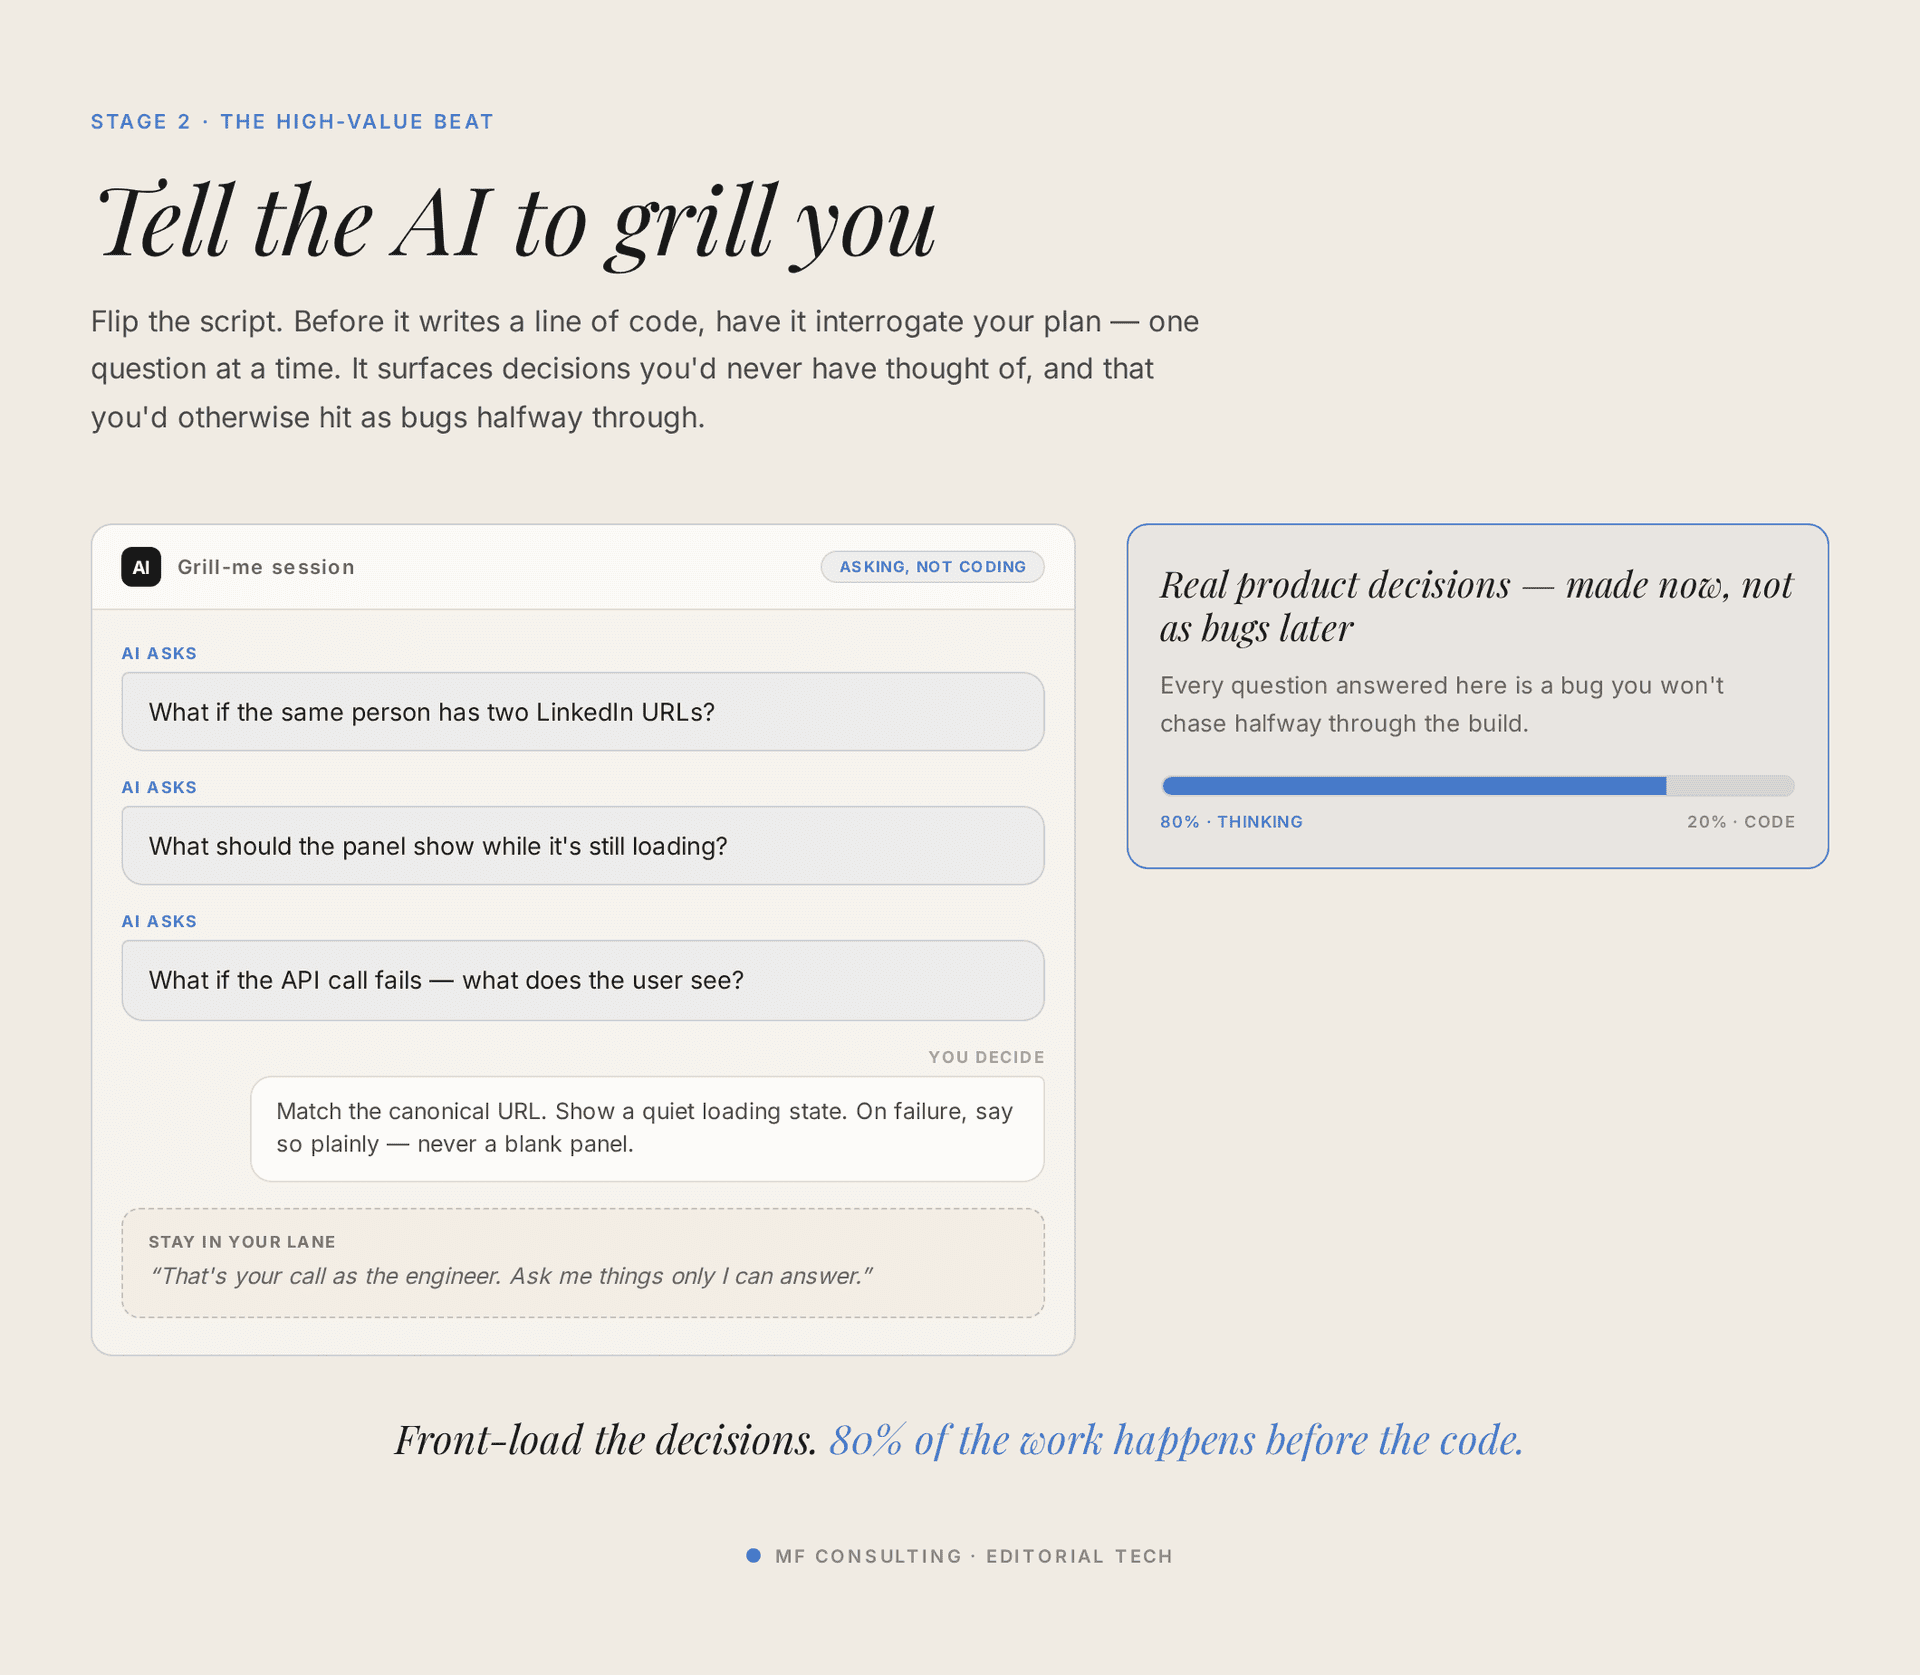
Grill me is a skill that flips the script: instead of you instructing AI, AI interviews you to surface every decision you forgot to make.
Credit where it’s due — this concept comes from Matt Pocock, who shares brilliant work on AI development. We’ve adapted it for non-technical builders.
Here’s the key: a good grilling session asks product questions, not engineering ones. If AI starts asking which library to use and you catch yourself saying “whatever you recommend” over and over, stop. That’s the signal your skill needs fixing.
Make it explicit that you’re product and AI is engineering. AI owns the tech decisions; what you want from it are trade-offs translated into plain language you can actually weigh in on. Instead of “which storage approach should we use?”, you want: “If we do it this way, only one person can use the extension. If we do it that way, your whole organisation can — but it’s more complex. Which matters more?” That’s a question you can answer.
Here’s a simplified version of the grill-me skill:
---
name: grill-me
description: >
  A relentless interview that stress-tests a plan, PRD, or feature idea
  before any code gets written. Use it whenever you're about to plan or
  build something and want to surface the decisions you haven't made yet.
---

# Grill Me

Interview me relentlessly about this plan until we reach a shared
understanding. Walk down each branch of the design tree, resolving
dependencies between decisions one at a time.

## Rules

- Ask **one question at a time**. Wait for my answer before the next one.
- For every question, give your **recommended answer** so I can just say
  "yes" when you're right.
- If a question can be answered by reading the codebase or the existing
  docs, go and check instead of asking me.

## Decision zones

- **Product zone — grill me hard.** The user story, the outcomes, what the
  user sees, priorities, edge cases, what counts as "done". These are my
  calls.
- **Engineering zone — don't grill me.** Architecture, libraries, file
  layout, test strategy, trade-offs. These are yours. Decide them and
  record the rationale.

If you catch yourself asking me something I can't evaluate, stop. Either
make the call yourself, or reframe it as a product trade-off I *can*
weigh in on (e.g. "single user vs. whole organisation").
Which Decisions Are Yours, And Which Are AI’s?
The cleanest way to run a grilling session is to know your lanes before you start.
| Product Zone — Your Call | Engineering Zone — AI’s Call |
|---|---|
| What the user sees and experiences | Which libraries and dependencies to use |
| Which features matter, and in what order | How the code is structured |
| What happens in edge cases (e.g. multiple deals) | Test strategy and error handling |
| What “done” actually looks like | Technical trade-offs (surfaced to you in plain language) |
How Does AI Plan The Work?
Once the questions are resolved, ask AI to write a plan before it touches any code.
Complex, longer-running builds go far better when AI plans first and then executes step by step, rather than jumping straight to the finish. The plan should be detailed enough that a fresh AI session could pick it up and build the feature without asking you anything.
Here’s a simplified version of the plan skill:
---
name: plan
description: >
  Turn a PRD or feature brief into an implementation plan detailed enough
  that a fresh AI session could execute it without asking questions.
---

# /plan

Produce a plan file in `docs/plans/<slug>.md`. The bar: a brand-new
session could pick it up and build the feature with no further context.

## Order of operations

1. **Research, then verify reality.** Map the files, patterns, and
   conventions relevant to this feature. Then check anything external the
   plan depends on — the real shape of an API, a live schema, how the data
   actually behaves. Never plan against an assumption you could have
   checked.
2. **Grill me on the product decisions.** Use the grill-me discipline:
   interview me on the user story and outcomes. Make the engineering calls
   yourself and write them into the plan with a one-line rationale.
3. **Write the plan.** Break the work into thin vertical slices, each one
   independently testable. List the files touched, the acceptance check
   for each slice, and any open questions.

Stop and hand the plan back for review before any code is written.
💡 Pro Tip: Keep the grilling and the planning in the same session to protect that context. Then start a fresh session to actually build.
How Do You Get AI To Build It?
In the build stage, your job is to get out of the way and let AI work.
Hand it the plan and let it implement one slice at a time, verifying as it goes. This is the part that used to swallow all your time and now happens fast — precisely because you front-loaded the thinking.
Here’s a simplified version of the work skill:
---
name: work
description: >
  Execute an approved plan one vertical slice at a time, verifying after
  each slice before moving on.
---

# /work

Implement the plan in `docs/plans/<slug>.md`. If no plan is named, list the
plans, pick the most recent, and confirm with me before starting.

## Order of operations

1. Take the **next unfinished slice** from the plan.
2. Build just that slice — nothing further down the plan.
3. **Verify it** (run it, test it, or show me the result) before moving on.
4. Log a one-line rationale for any engineering decision to
   `docs/decision-log.md`.
5. Repeat until the plan is done.

Engineering calls are yours. Anything that touches a live system, or that's
a genuine product decision, comes back to me first.
Because you invested in the earlier stages, you can comfortably hand over execution — the same way you’d trust an engineer you onboarded properly, rather than approving their every keystroke.
How Do You Set Up A New AI Project?
Before building, scaffold a clean project folder so every build starts from the same baseline.
Create one top-level folder for all your AI projects, then a sub-folder per project. Inside each, set up four default docs: a CLAUDE.md (agent instructions for that project), a README (the overall purpose), a learnings file, and a changelog. A “bootstrap” skill automates all of this so you never start from a blank slate.
Here’s a simplified version of the bootstrap skill:
---
name: bootstrap
description: >
  Scaffold a brand-new AI engineering project with a consistent folder
  structure and the four default docs every project should start with.
---

# /bootstrap

Set up a fresh project folder so every build starts from the same clean
baseline. Ask me for the project name, then scaffold it.

## What to create

Inside `~/projects/<project-name>/`:

- `CLAUDE.md` — agent instructions specific to this project (the root
  context the agent reads first).
- `README.md` — the human-readable purpose and overview.
- `learnings.md` — things we discover as we build, captured as we go.
- `CHANGELOG.md` — what changed, so a future session can catch up fast.

## Then

1. Run `git init` and make a first scaffolding commit.
2. (Optional) Register the project in Notion — create a Projects row and
   add a first task — so the build is tracked from day one.

## Rules

- Ask one section at a time — don't dump every question on me at once.
- Leave tech-stack choices open until planning, unless I've already decided.
- If I hand you a PRD, move it into `docs/` as part of setup.
How Do You Stop AI Conversations Getting Too Expensive?
Watch your context window and move to a fresh session at natural checkpoints.
The longer a conversation runs, the more the context window fills up and the more each request costs — and model quality slowly drops too. A good rule of thumb: once you pass roughly 150K tokens, move to a new session at the next checkpoint.
How Do You Handle Security When Building With AI?
Using AI doesn’t mean throwing out good security practice — it means applying it sensibly. Three things matter most for an internal build like this:
- ✅ Distribution. This extension is internal-only — you load it directly in your browser, so it’s never published to the web store. The moment you have unknown users, the complexity changes completely.
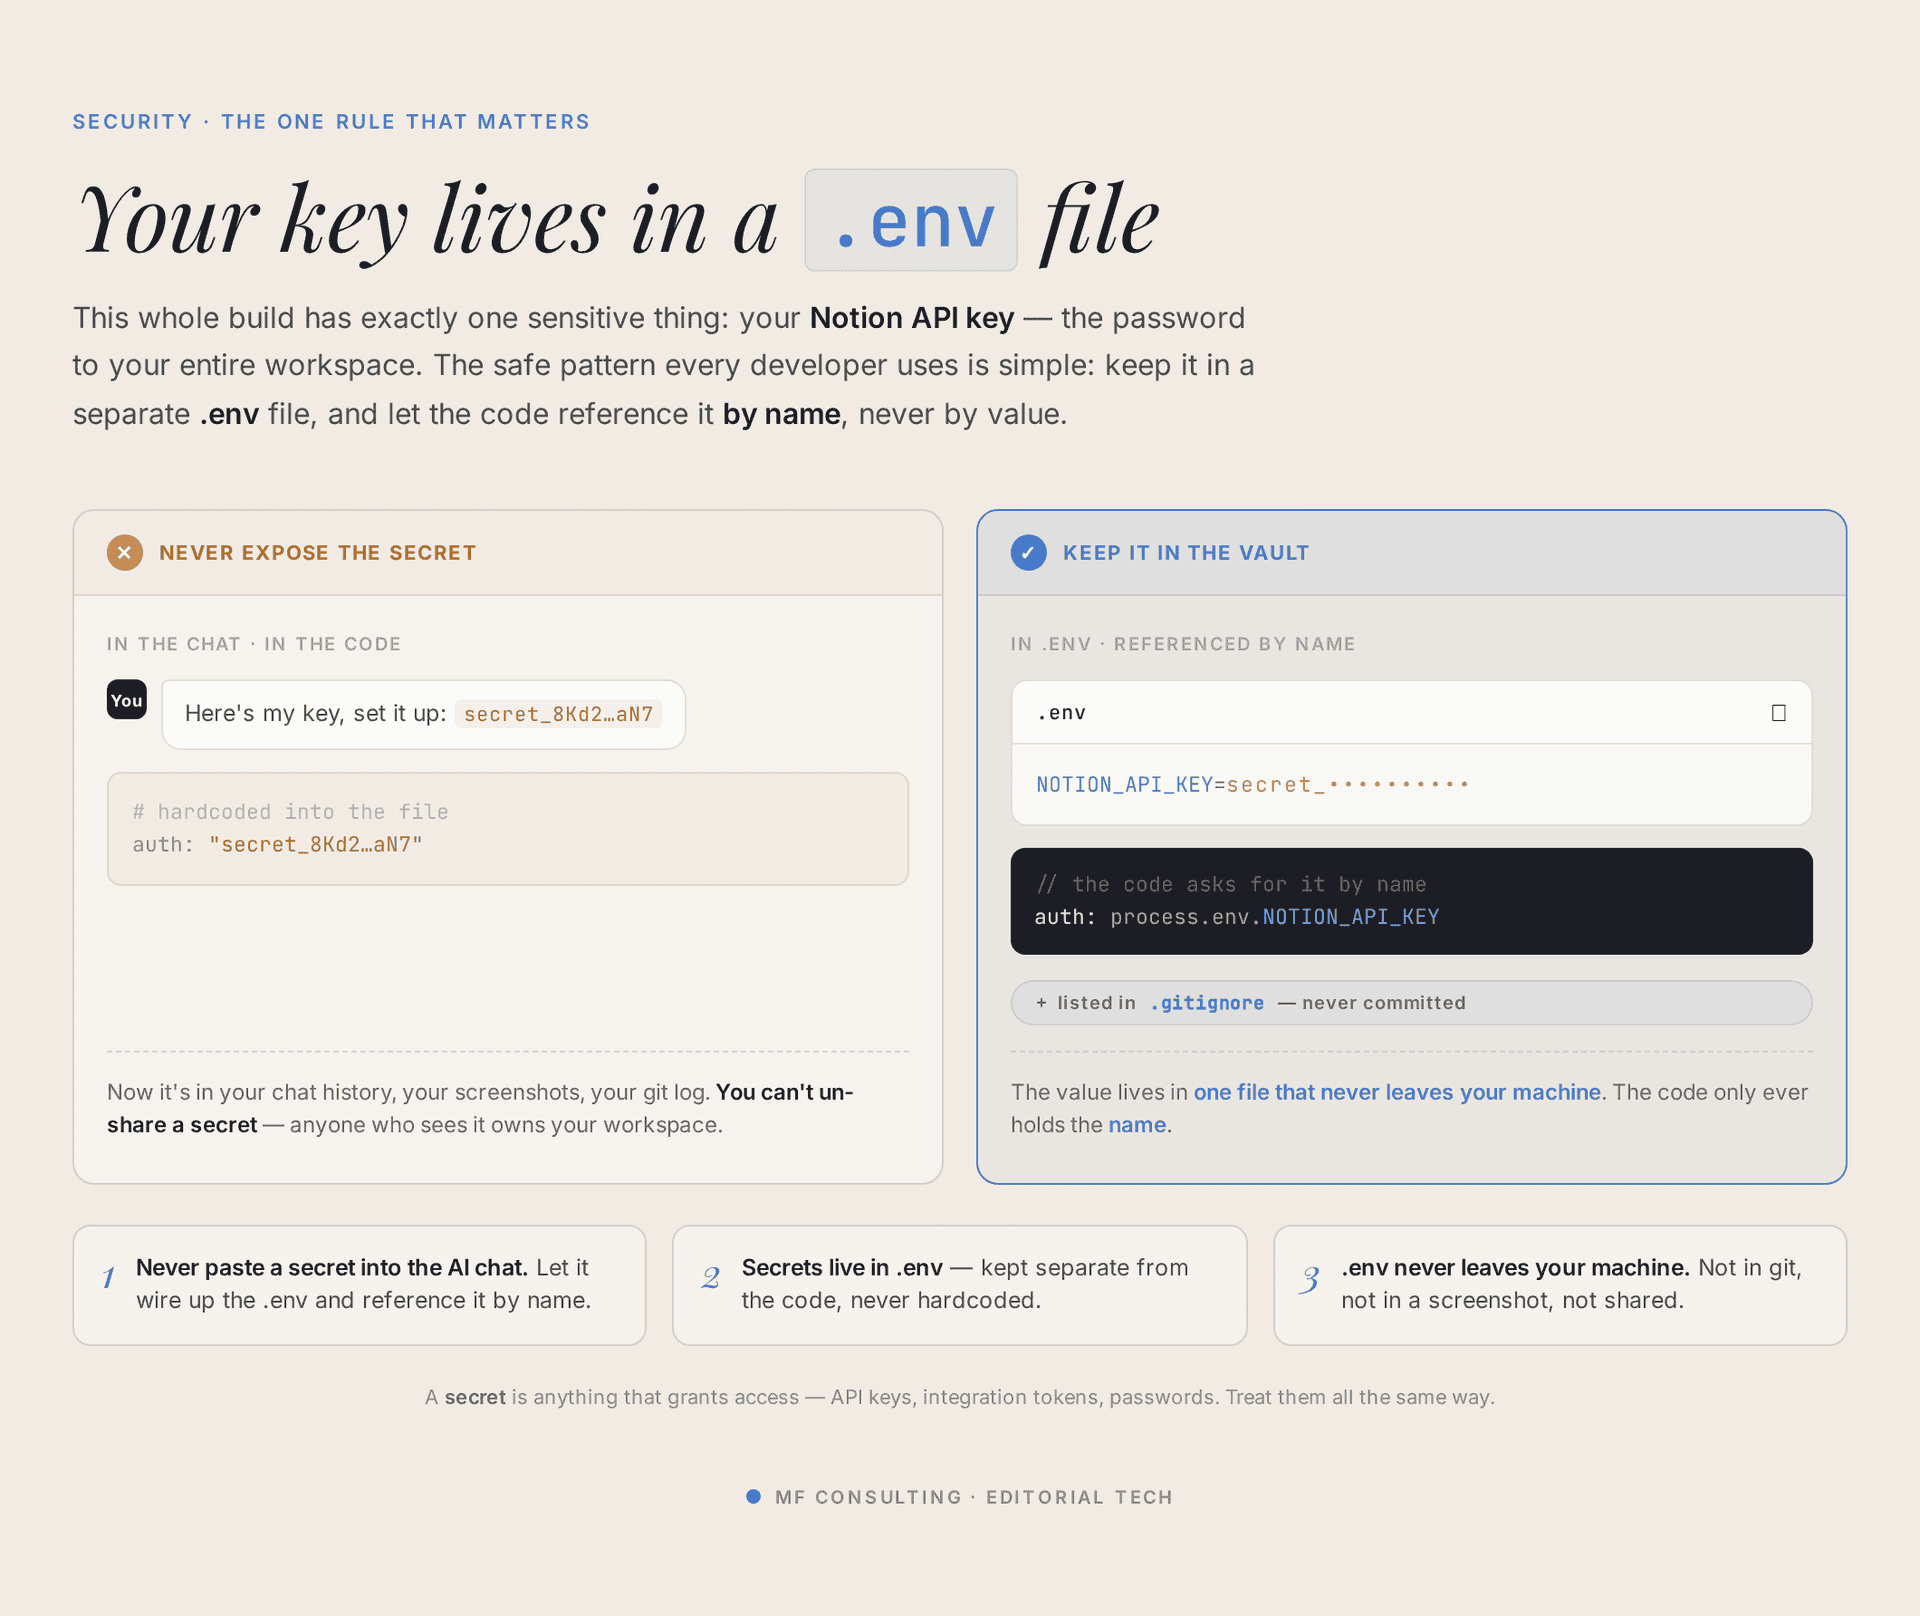
- ✅ Secrets. Your extension needs a Notion integration token to read and write your workspace. Never paste secrets into the AI chat — the second you do, they become part of that session’s context.
- ✅ Use a .env file. Store secrets in a
.envfile (a special hidden file holding your environment variables) so AI injects them into the code without ever reading them into the conversation. Keep the master copy in your password manager.
To get your token, head to the Notion Developer Portal, open Connections, and create a new integration in the workspace where your CRM lives. You can toggle exactly which capabilities it gets — for our extension, leave both read and write on. Crucially, you must then give the integration access to the specific databases it needs, via the ••• menu on each page or database.
💡 Pro Tip: On those approval prompts — if you’ll just click “yes” to every command because you can’t really evaluate it, that’s fake security. You’re far better off investing in clear planning, running on a capable model, and working in an environment where AI can’t break anything vital.
How Do You Test And Improve Your Extension?
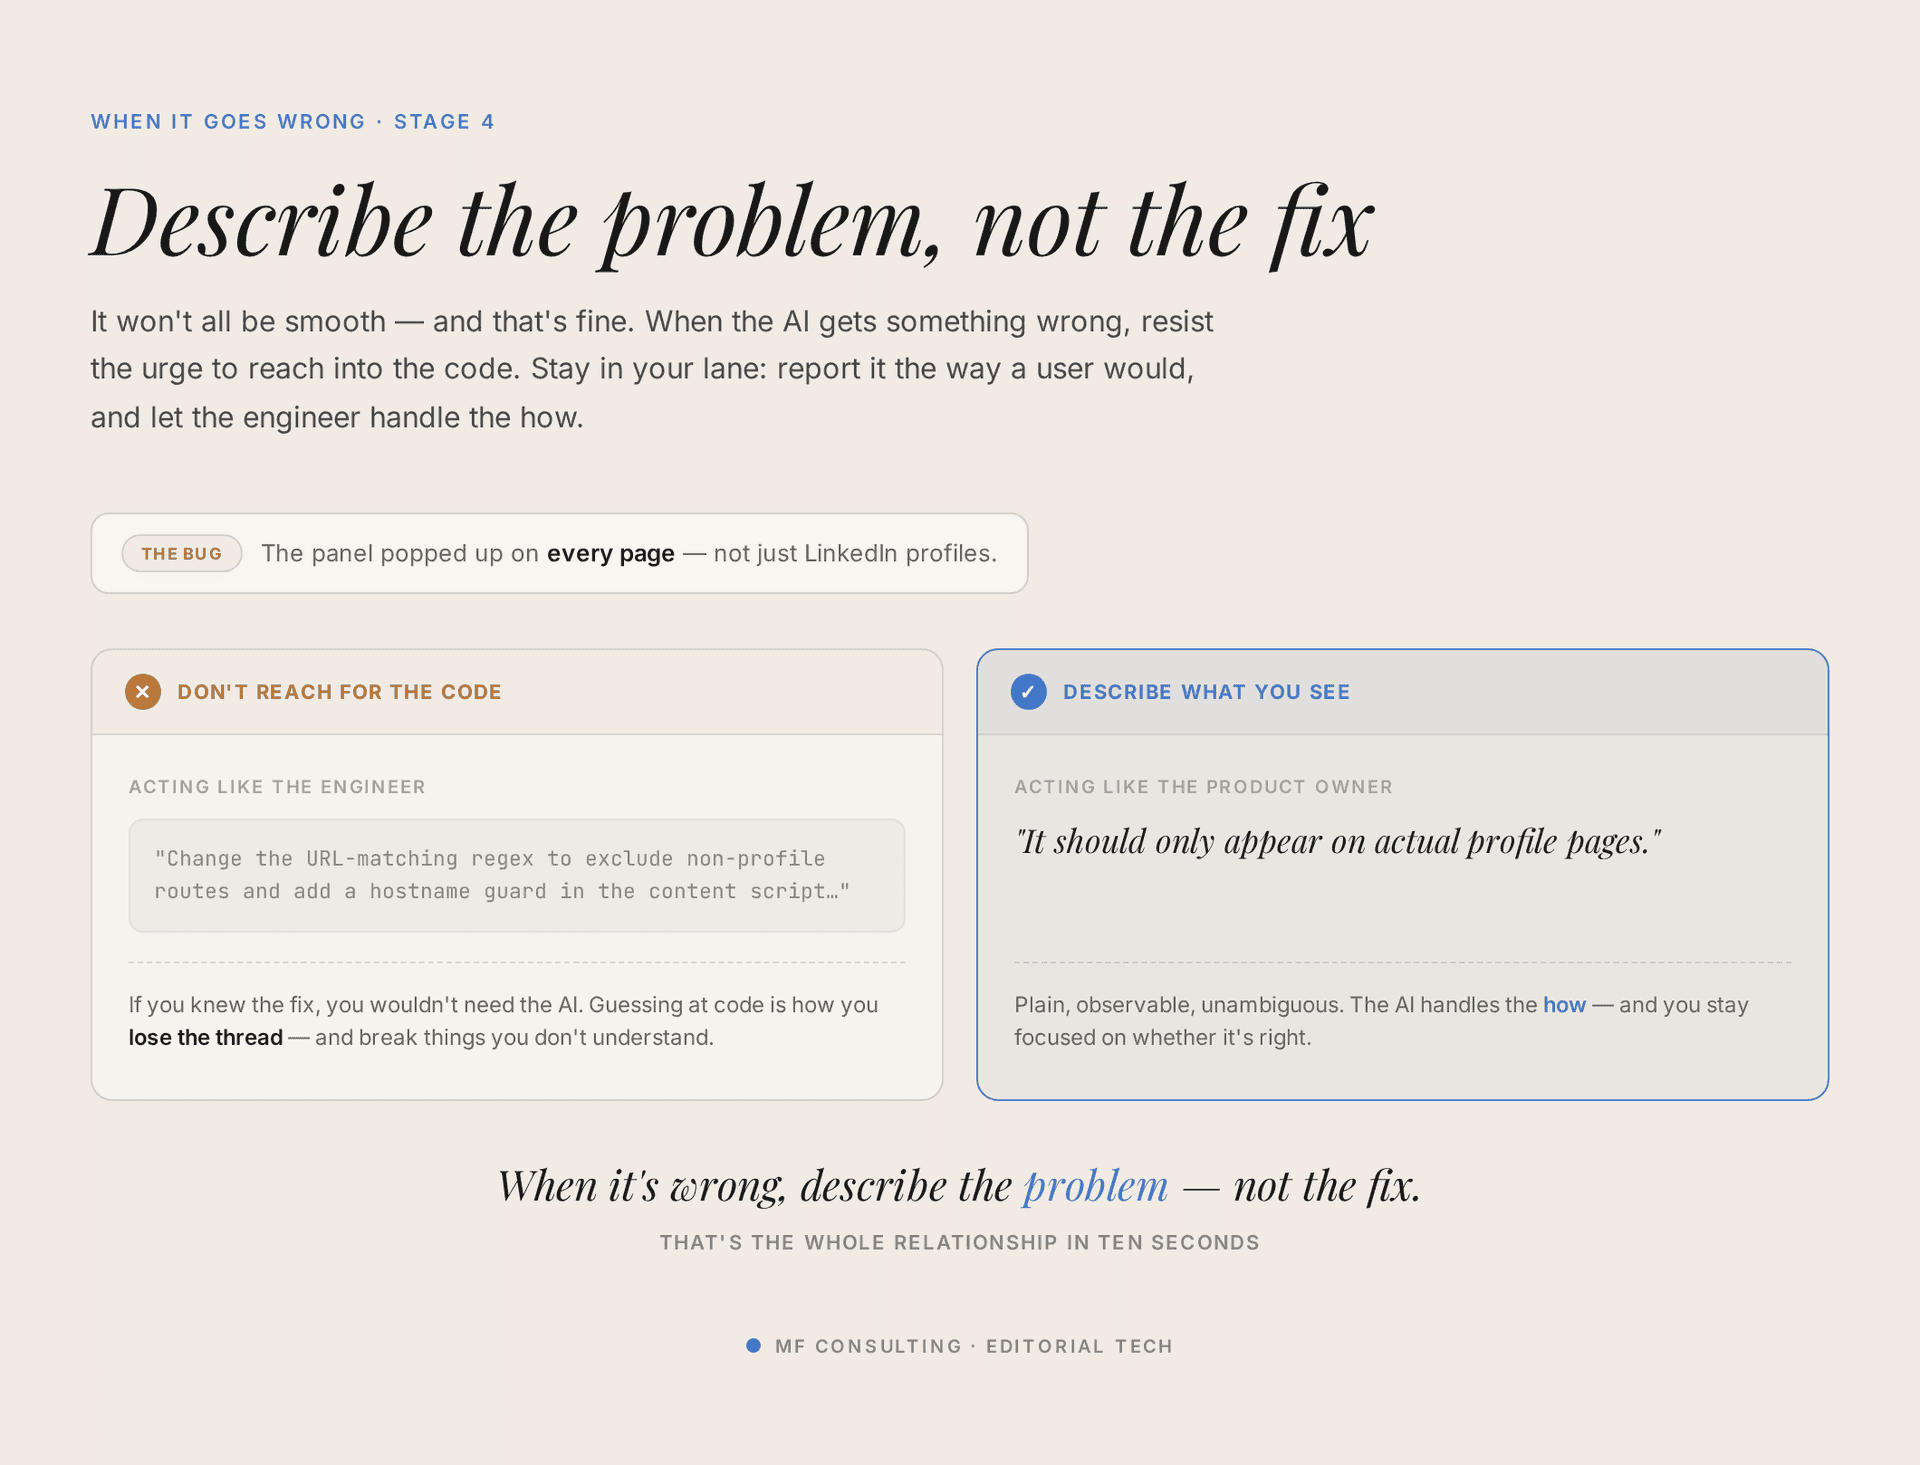
Load the extension into Chrome and test it live, then feed any errors straight back to AI.
In Chrome, open your extensions page, toggle on Developer mode, click Load unpacked, and select the folder AI built. Then head to LinkedIn and see whether it works.
It almost certainly won’t be perfect on the first try — that’s completely normal, even after a thorough grilling session. When something breaks, screenshot it and hand it back to AI with a simple “here’s the error, can you help me troubleshoot?” Asking AI how you can help it help you often unblocks the fix surprisingly fast.
💡 Pro Tip: Ship the simplest useful version first, then extend. It’s the same philosophy we use for client Notion builds — get a basic system into daily use, then improve it from real feedback. It’s genuinely hard to design well in a vacuum.
📬 Want to keep up with what’s new in Notion and AI? Join the newsletter and get 41 free Notion resources.
Frequently Asked Questions
Do I Need To Know How To Code To Build A Notion Chrome Extension?
No. The whole point of this workflow is that AI writes the code. Your job is to act as the product owner — describing what you want clearly, answering the right questions, and reviewing the result. You direct an AI engineering team rather than becoming an engineer yourself.
What Tools Do I Need To Get Started?
You need an AI coding agent (Claude Code or Codex both work well), a code editor like VS Code (handy for creating the .env file and browsing your project folder), and a Notion integration token from the Notion Developer Portal. A dictation app also makes the brainstorming stages far smoother.
Is It Safe To Connect A Chrome Extension To My Notion Workspace?
Yes, as long as you handle it sensibly. Keep the extension internal-only rather than publishing it, store your Notion token in a .env file instead of pasting it into chat, and grant your integration access only to the specific databases it needs. You can also limit the integration to read-only if it never needs to write back.
How Long Does It Take To Build One?
The actual build is fast — often a single afternoon for a simple extension. Most of your time goes into the front-loaded stages: feasibility, the PRD, the grilling session, and planning. That’s by design. Get those right and the build itself can run in as little as 15–20 minutes of AI working time.
What Should I Build First?
Start with the simplest useful version. For a CRM extension, that might just be “tell me if this person is already a contact.” Get it working and into daily use, then extend it with extra features like saving companies or showing deal value — each new feature running back through the same five-stage loop.
💼 Need the support of certified Notion Consultants? My team and I are here to help! → matthiasfrank.de/en/notion-consulting