Notion Security — one of the crucial aspects when you’re running a company with the help of Notion. Imagine your company’s Notion workspace got deleted, or hacked, or you have a whole bunch of corrupted and tampered databases. All because of some mistakes that you could have easily avoided. How would you feel? Pretty bad, right? That’s why, in this blog post, you’re going to learn about 11 of the biggest Notion Mistakes, how you can avoid them and everything you need to know to upgrade your Notion Security.
But before that, let’s answer the most important question:
Is Notion Secure for Business?
For the most part, yes it is. The Notion team is working hard to keep your data secure and at the same time provide you with an optimal user experience. Even so, there are certain things to keep it in mind to enhance the security aspect of Notion. Mistakes are pretty common when you’re working with a large team of different levels of Notion skills. But, if you know what to look out for, they’re easily avoidable.
Now let’s dive into the 11 deadly Notion mistakes that you should definitely avoid if you’re serious about your Notion security:
Notion Mistake 1: Not setting up 2FA in Notion
Many of you use the ‘Sign in with Google’ option to sign in to Notion or use email & passwords. These are good but not fully safe. If the attackers get access to your Notion email, they can also have access to your Notion workspace. To avoid this, you must have Two-Factor Authentication (2FA) turned on.
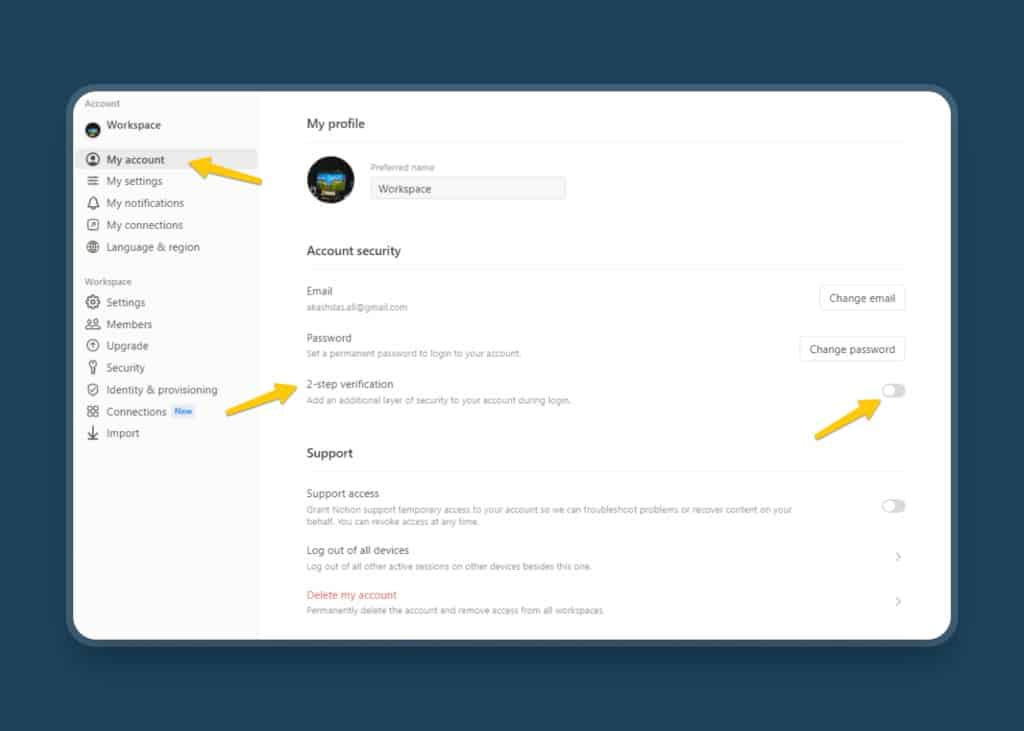
To enable this, head over to ‘Settings & members’ and under ‘Accounts’ click ‘My Account’. There you’ll find the 2-step verification option. Toggle it on and you’ll have two options:
- Code from authenticator
- Text me a code
To keep your Notion security intact, always opt for an Authenticator app like Authy, Microsoft Authenticator, or Google Authenticator. As SIM swapping may happen, it’s always better to use the Authenticator app.
You must set a password to use 2FA in your Notion account.
Notion Mistake 2: Storing Passwords in Notion
You should never store your passwords in Notion. It’s not that Notion is not secure. Just like you shouldn’t put anything confidential in your Google Drive or a file on your desktop, you shouldn’t keep your passwords or banking details in Notion.
Use a dedicated tool like 1Password, Bitwarden, or LastPass. This way, your passwords will be safe and you will be a bit more productive too.
(getting a password manager is my productivity tip nr. 1 for people who are just starting out)
Notion Mistake 3: Clicking on Links isn’t great for Notion Security
Nowadays, Phishing is very common. Criminal actors might pretend to be from a legit company and send you an email that looks fairly official. But if you click on a link inside and provide any confidential data, the hacker gets access and bad things might happen. So, it’s a good idea to avoid clicking on links in emails unless you trust the source. And if clicking the link isn’t necessary, you should avoid it altogether. That’s the case with links in Notion Workspace Invites.
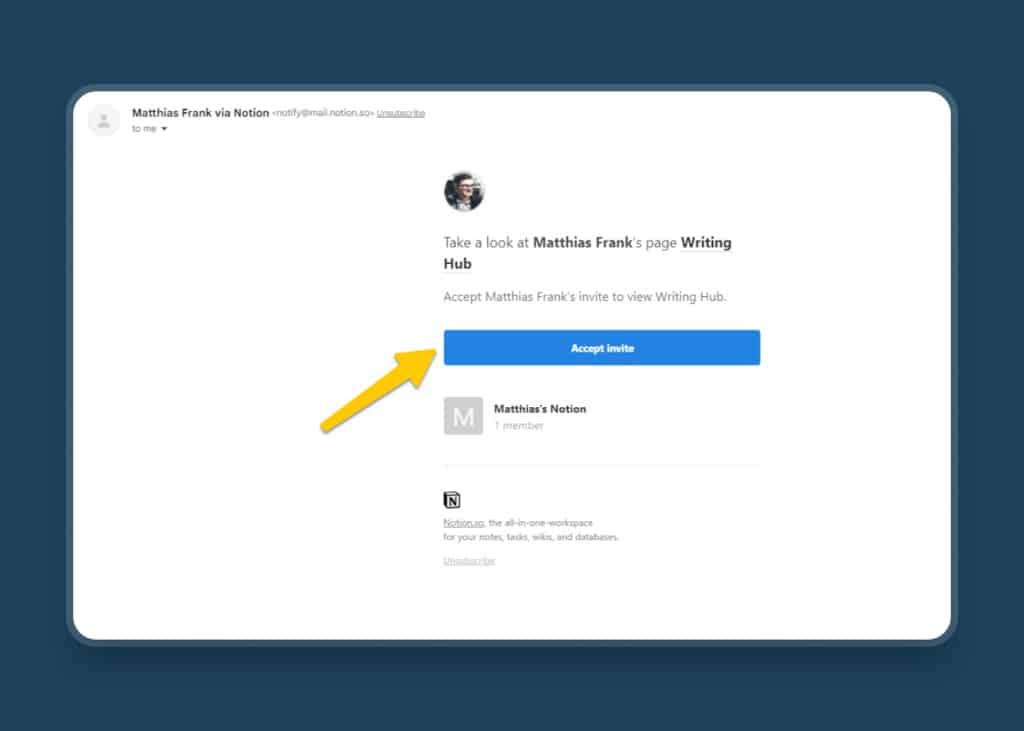
When someone invites you to their Notion workspace, you’ll get an email with a link to accept it. However, it’s not necessary to actually do this. When invited, your new workspace will always show up in your Notion Account drop-down options. From there, you can easily access it.
So, although there aren’t currently any active phishing campaigns with Notion links I’m aware of, it’s a good idea to avoid clicking on such links in the first place.
Notion Mistake 4: Not locking your Notion Pages
You might know this situation: you have designed a beautiful and super functional Notion page for your team. One morning, you log into your account and everything is deleted. Marc from accounting accidentally erased all your hard work.
That certainly isn’t ideal particularly because it’s a Notion mistake that can easily be avoided. To increase your Notion Security, make sure to lock your pages wherever possible
To do this, go to the page you want to lock and click on the three-dot menu on the top-right section. There you’ll see the option ‘Lock Page’. Click on it and you’re good to go.
It’s not to say that one can never delete anything with this option turned on. Anyone with Edit Access can go through the same steps to unlock the page again. But it ensures that no one deletes anything by accident. It’s great, isn’t it?
Notion Mistake 5: Giving Full Access when sharing Notion database
Just like you need to lock your public pages, you should also avoid giving your team Full Access to your Notion databases. Otherwise, you risk that team members accidentally add a bunch of unnecessary properties to your setup. Or worse, delete important properties like relations and rollups.
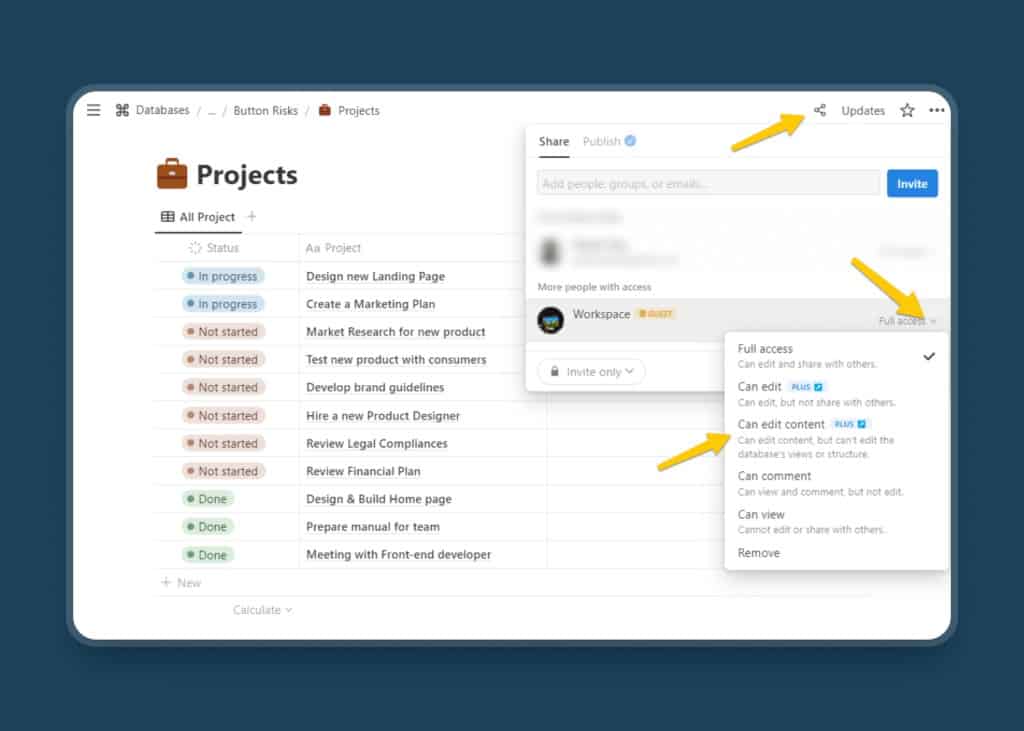
So, next time you’re setting up a Notion database for your team, set the share settings to ‘Can Edit Content’. To do that, head over to the Share & Publish settings in the top-right area. Under Share settings, click on the drop down option and select ‘Can Edit Content’.
Now, any team member can still change the value of each property (i.e. update status, tags, add or remove any text), but can never change the view or the property types themselves. +1 for your Notion Security.
Notion Mistake 6: Giving external apps or extensions access to entire workspace
Automation tools or extensions are great for productivity. They can do awesome things like creating Charts in Notion or building an AI Email Assistant. These are great but there is a catch!
For these tools or extensions to work, you need to give them access to your Notion workspace. But while doing so, you should never give system-wide access. Otherwise, if the app is not working well, it can mess up your Notion data or even be a threat to your Notion security.
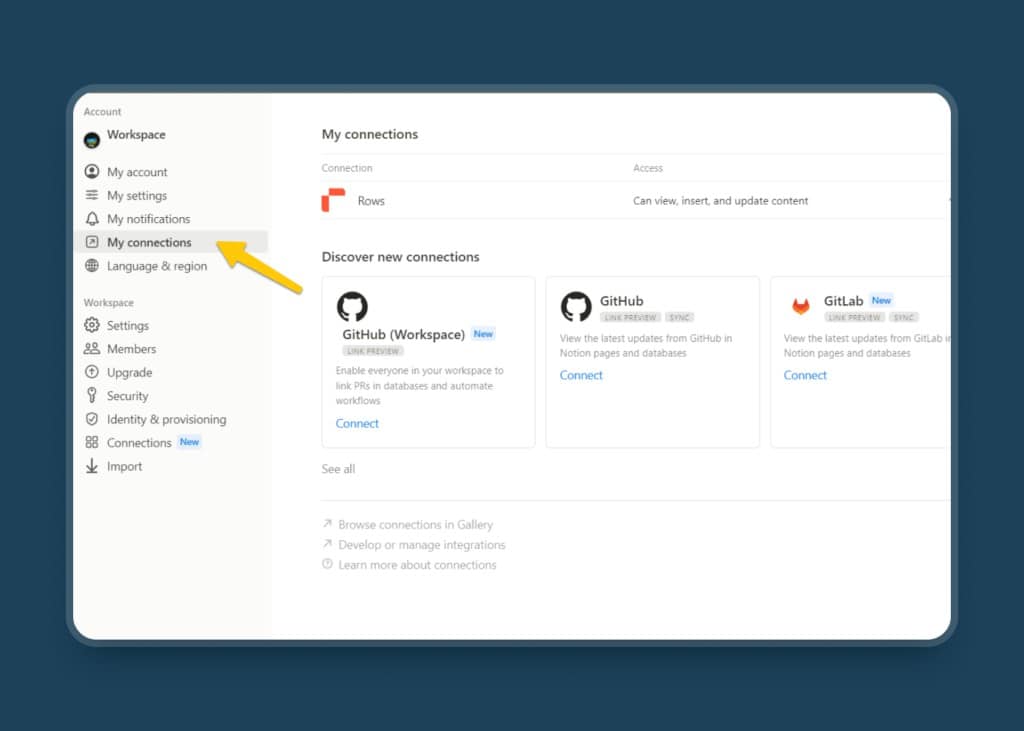
To avoid that, give those tools or extensions only access to the pages or databases they need. Not the entire workspace. Also, if you have an extension already connected to your Notion, be sure to check the ‘Connections’ tab under Settings. Just to make sure you don’t have any unused apps and no apps have full system access.
Notion Mistake 7: Not testing your Notion buttons carefully
One of the best features of Notion are Notion Buttons. They can help you automate your Notion workspace with just the click of, well, a button. You can add new pages to a database, change status, and even create a series of blocks. Amazing, right? But it comes with a price.
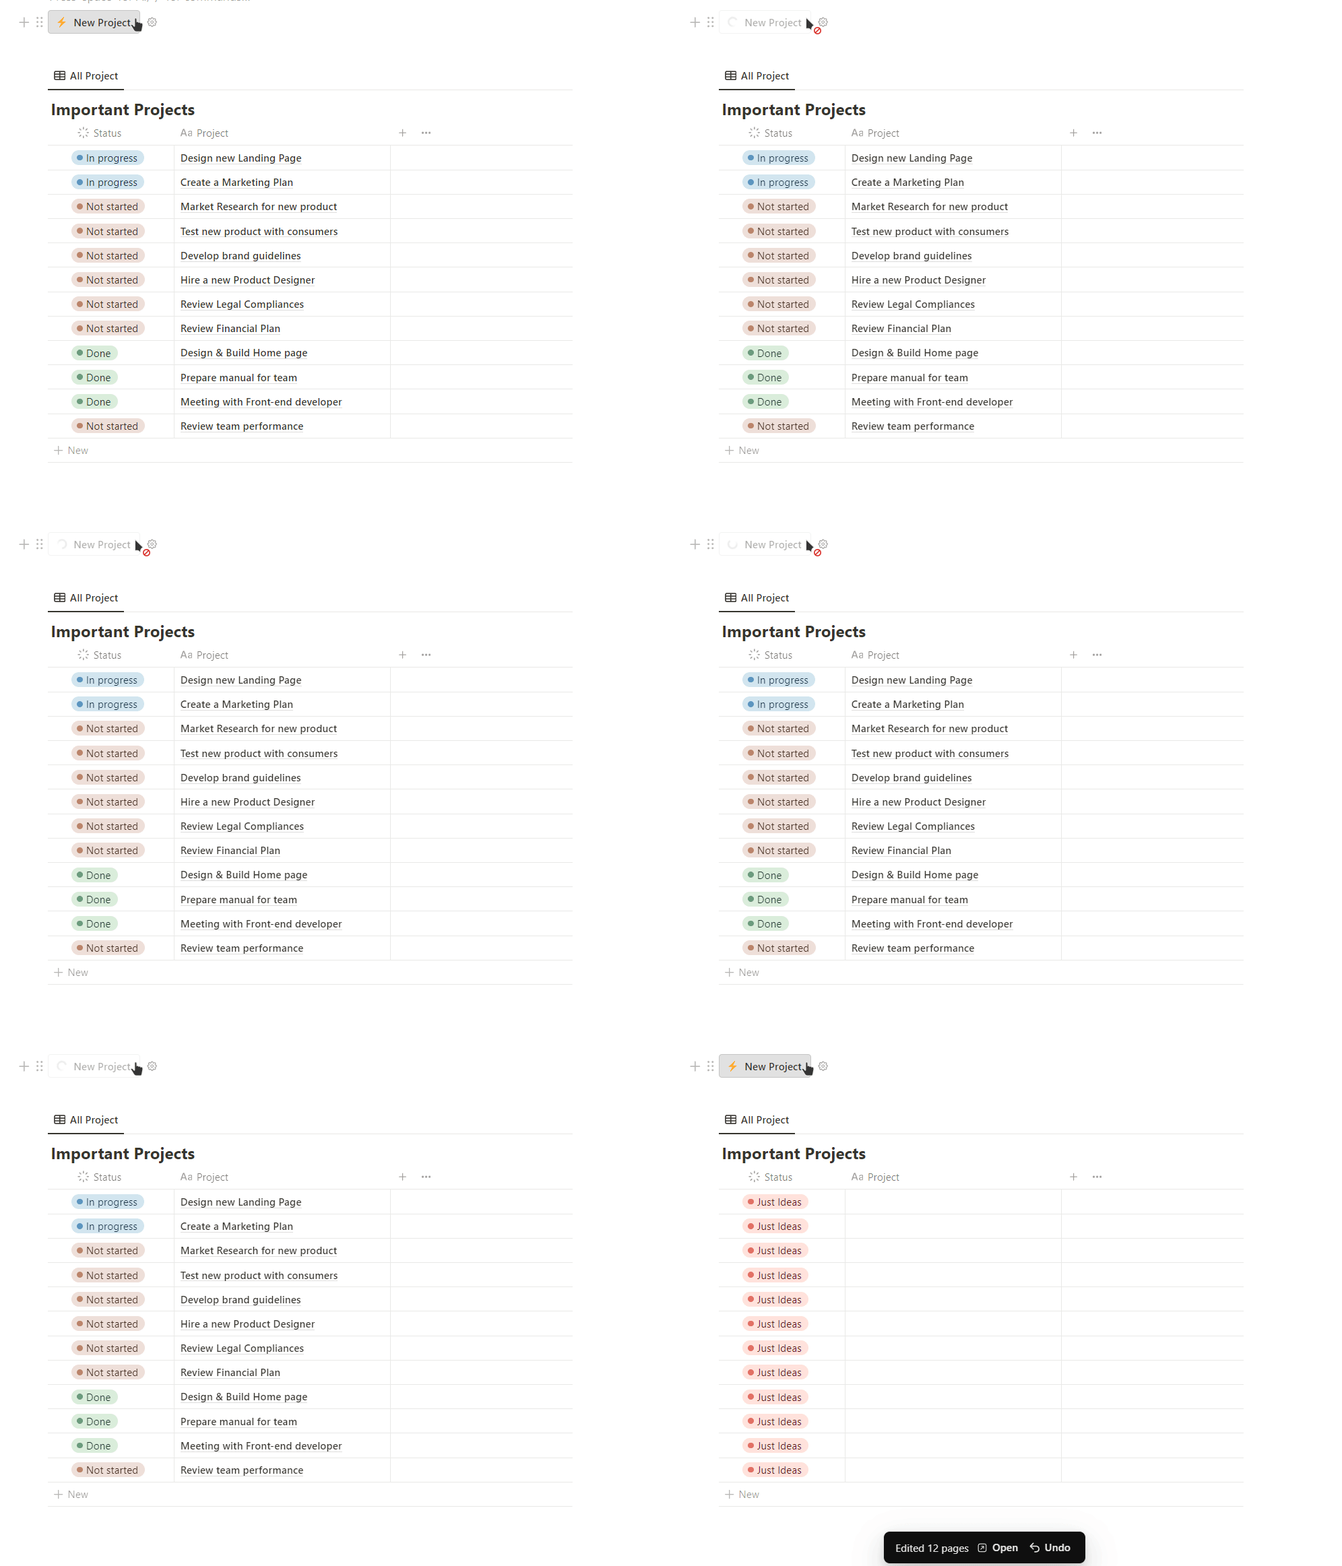
The biggest risk to your Notion Security comes from the Button feature “edit pages in”. This allows you to bulk-edit entries in a database when clicking the button. Which is a good thing, if you specify exactly which pages to edit. But if you don’t, you might accidentally override all your important information.
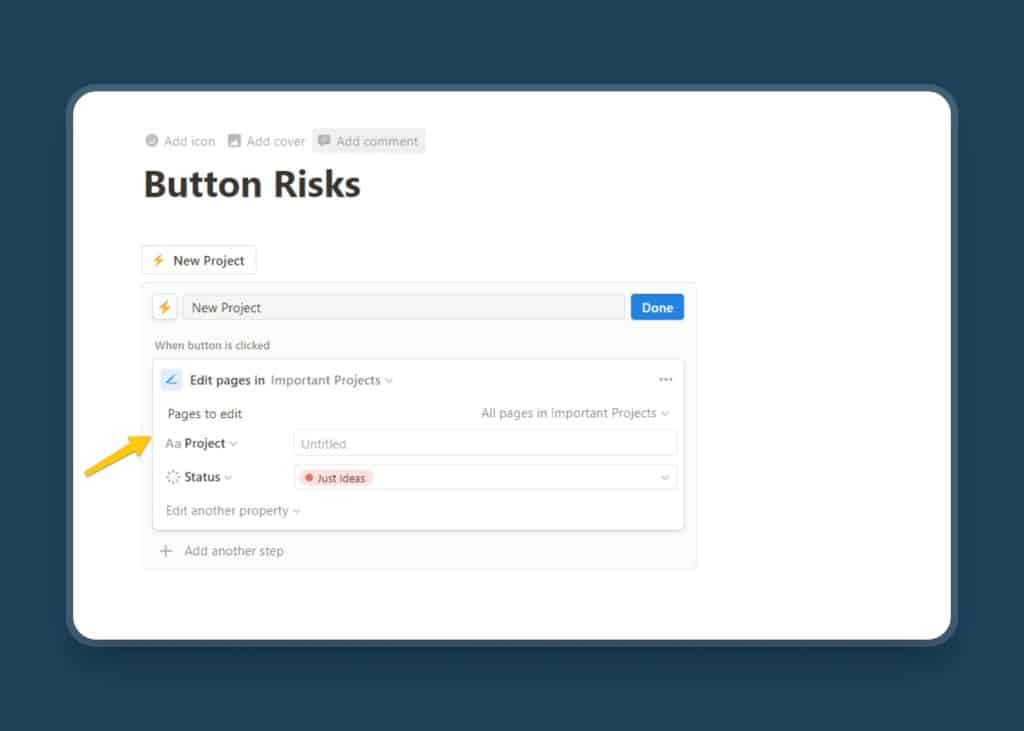
To avoid this, always always set a specific filter for the button action. You can find the filters in light grey on the right side of the button setup, next to Pages to edit. These filters work just like any other database filters and will determine which pages get edited when you click the button.
So, always check the settings of the button properly and recheck whether the actions are applied to the entire database or a particular page. Pro tip, before implementing buttons, create a sample database to test them. You’ll thank me later.
Notion Mistake 8: Not setting up Notion Automations properly
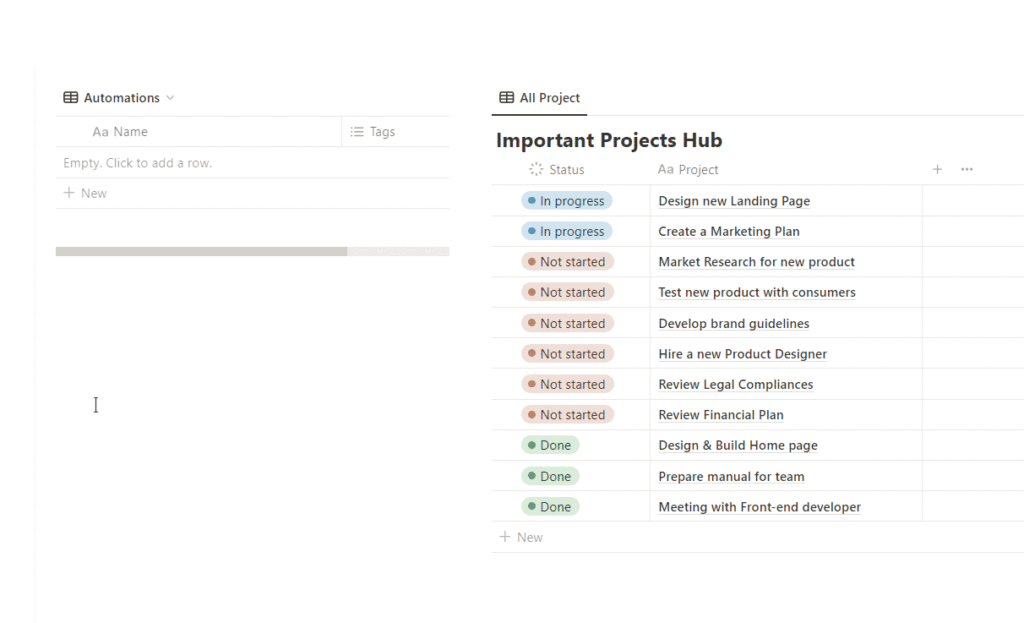
Similar to Notion buttons, Notion Automations also carry the risk of altering your database in an unexpected way. If not set up and tested properly, Notion automations can seriously impact your Notion Security.
Whereas Notion Buttons have the Edit pages in option, Notion Automations have a corresponding feature called Update pages in. It works just the same – upon running the automation, all pages that match the filter will be updated.
So, make sure to always set a granular filter inside the automation options as shown in the image below.
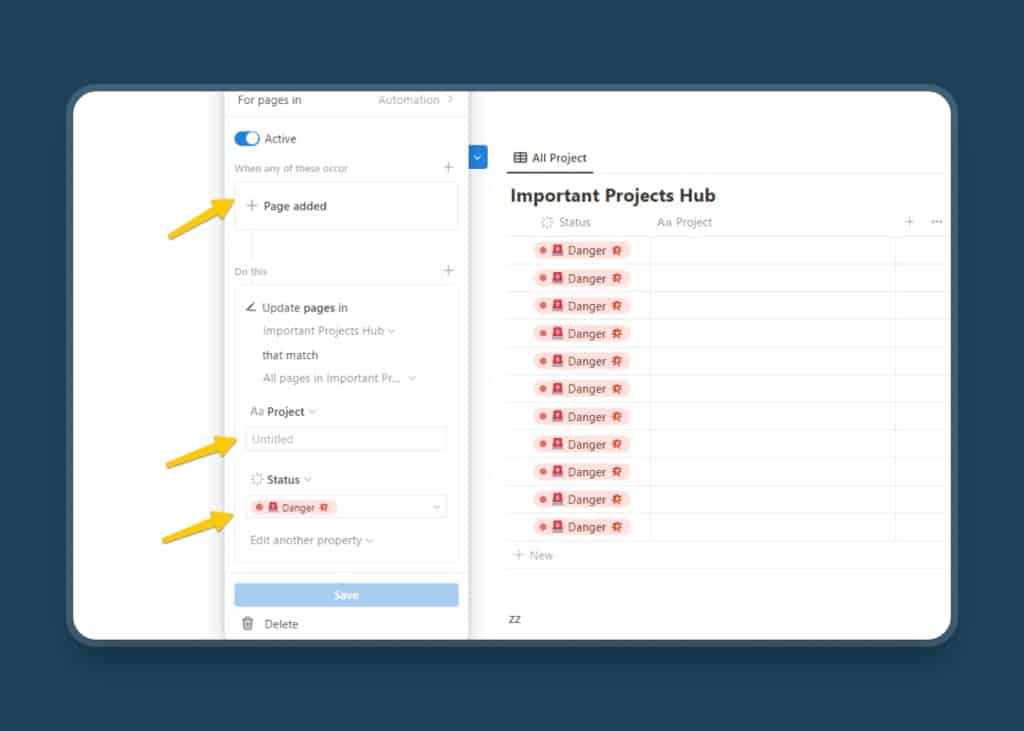
Plus, it’s always a good idea to double-check and test your Notion Automation before implementing it across your workspace. Otherwise, just like a button, you get the risk of a corrupted database and unwanted data loss.
Notion Mistake 9: Not defining User Groups in Notion
If you want to be a Notion power user and use Notion with a team, you need to use this feature. Not only will this increase your Notion Security, it will also help managing your workspace a lot easier.
Put simply, User Groups allow you to create a cluster of users for whom you can easily manage access to pages, databases, or even the entire workspace.
Let’s say you have 10 people working with you. 3 of them are on the marketing team, 4 of them in design, and the rest are Administration. When setting up your workspace, you have two options:
- Individually give all 10 people access to the pages and databases they need
- Manage access rights via User Groups.
By using user groups, you can change access rights much quicker. If a new person joins the marketing team, you only need to add them to the marketing group and they will have instantly access to everything shared with marketing.
Compare that to the other solution, where you would need to add the new person to all pages individually.
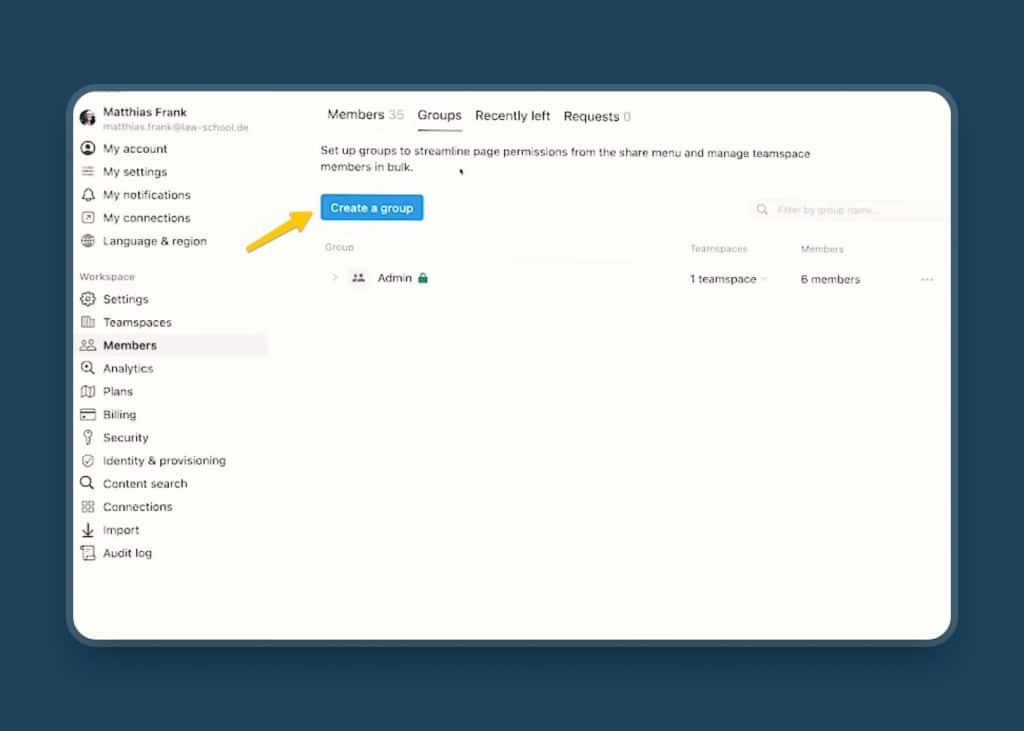
To create user groups, head on over to Settings & Members in your sidebar, click on Members under the Workspace section and then navigate to Groups.
Notion Mistake 10: Not knowing how to restore Notion Pages
So far, you’ve learned about 9 different Notion Mistakes and how to avoid them. But, what if the damage is already done? Can you do anything to save your Notion Security?
Well, thanks to Notion, there is a powerful feature that allows you to undo those mistakes — Page History. Let’s look at how to restore Notion pages or roll back to a previous version of the page.
Head over to the 3 dot menu on the top-right and click on ‘Page History’. Then you can choose which version to move back to and click Restore Version.
Interestingly, you can even copy a part of the page from a previous version and paste that wherever you want. This way, you’ll always have an option to get the previous version of a page, even if you or your team made some mistakes.
Notion Mistake 11: Sharing Databases the wrong way
There are some situations where you need to share only a certain part of the database, not the entire thing. Well, you can’t do that in Notion. At least not for now.
Of course, you can create a linked database (with filters) on a page and share that page with the user. But, the users won’t see the linked database, unless you give them access to the whole original the database.
And, when you do that, users could always navigate to the master database and see more than just the information in the linked view. This isn’t great news for your Notion Security, because you typically don’t want to expose everything at once.
Even if you set some filters on the master database, people can export the database as a whole and access all the data. It’s super annoying and something Notion hopefully fixes soon, but in the meantime, you need to find a better way to securely share your Notion databases.
Fortunately, there is a workaround to it. With the help of Make, you can implement granular database permissions in Notion. Read my guide to know more about it.
Notion Security: Final Thoughts
Notion is an amazing tool to help you get more things done. Whether you use it privately or at work, it can easily become your central hub for productivity.
But, the more you rely on Notion as your daily driver, the more important it becomes that you pay attention to Notion Security Best Practices. You now know about the 11 biggest Notion Mistakes and how to avoid them. So go back to your company’s Notion workspace and start applying these ideas to make it more secure.


