What if Notion could be your personal fitness coach? This Nutrition Tracker in Notion is a real game-changer when it comes to achieving your health goals. Whether you want to build a Weight Loss System in Notion, prepare for your next bulking phase or simply want to live a healthy life, this simple yet effective Notion setup is your perfect sidekick. The best part? It uses ChatGPT to automatically fill out your nutrition information and even reviews your meals to give you personalised recommendations.
Read on for the step-by-step instructions or watch the video tutorial below. If you want to grab the free Notion Template, scroll to the bottom of this page.
How the AI Nutrition Tracker in Notion Works
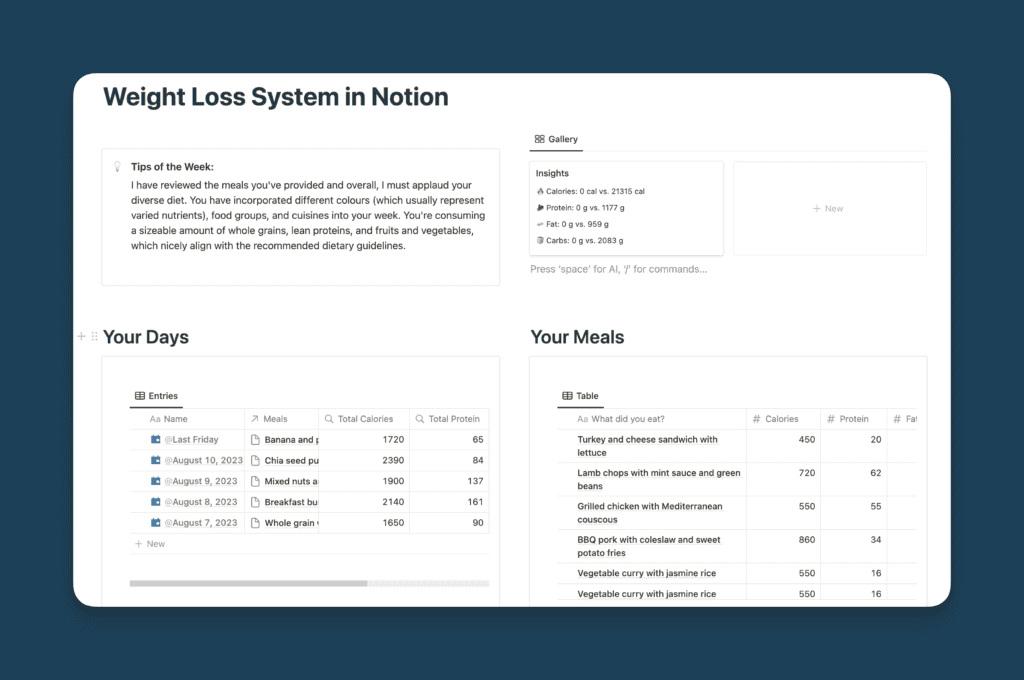
The concept behind this Notion Setup is fairly simple. It consists of four key elements:
- Notion Databases to track your meals
- A ChatGPT Integration that automatically fills out nutritional information
- A Notion Analytics Widget to summarise your results
- A ChatGPT Integration that reviews your meals and provides feedback
Each part of the system can be modified according to your individual fitness goals. Once set up, all you need to do is write down what you ate and you’ll automatically see your nutrition for each meal and across various days. At the end of each week, you get your personalised report from ChatGPT with actionable tips on how to improve your nutrition going forward.
Once you understand the building blocks for the Notion Nutrition Tracker, it’s also easy to integrate it into the rest of your Notion setup.
- Combine the Notion Nutrition Tracker with a Notion Workout Tracker for a holistic approach to fitness
- Integrate it into your Habit Tracker to build healthier habits
- Learn how to add graphs to Notion to easily visualise your nutrition data
Build The Databases For Your Notion Nutrition Tracker
To set up your AI powered Nutrition Tracker in Notion, you’ll need two databases, one for the individual days and one to record the meals you had.
Start by creating the database for individual meals and add the following properties:
- Name – the main property where you’ll write down the description of the food you had
- Type – a select property to organise different types of meals, for example breakfast, lunch and dinner (optional)
- Individual number properties for the various macros that you want to track. The typical combination would be calories, fat, protein and carbs
Then, create a database to store each day. It should have these properties:
- Name – the main property of the database
- Date – a date property to record the time
- Individual roll-up properties for each macro that you’re tracking to calculate the total values for the day
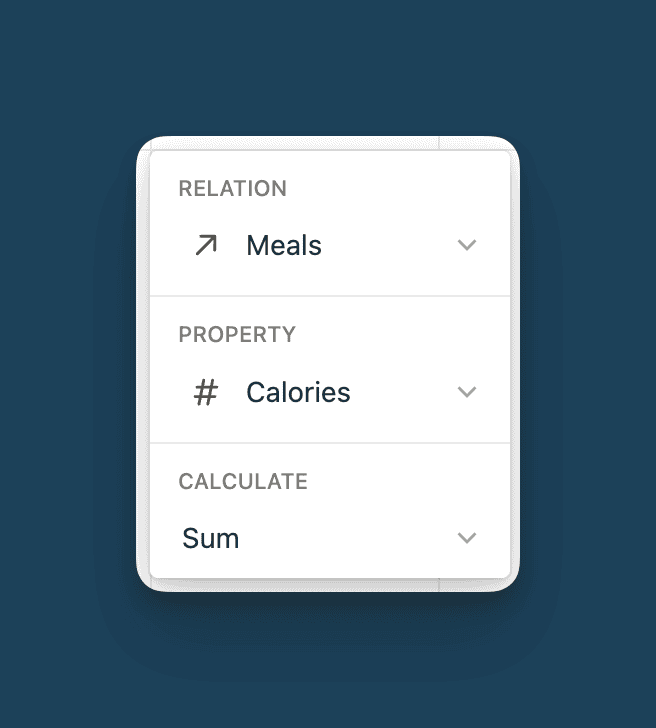
To make data entry easier, I recommend setting up a database template for the second database. Check out the video tutorial above for the step-by-step instructions or download the free Notion template below to see how it’s done.
Set Up Automation To Fill Nutrition Data in Notion with ChatGPT
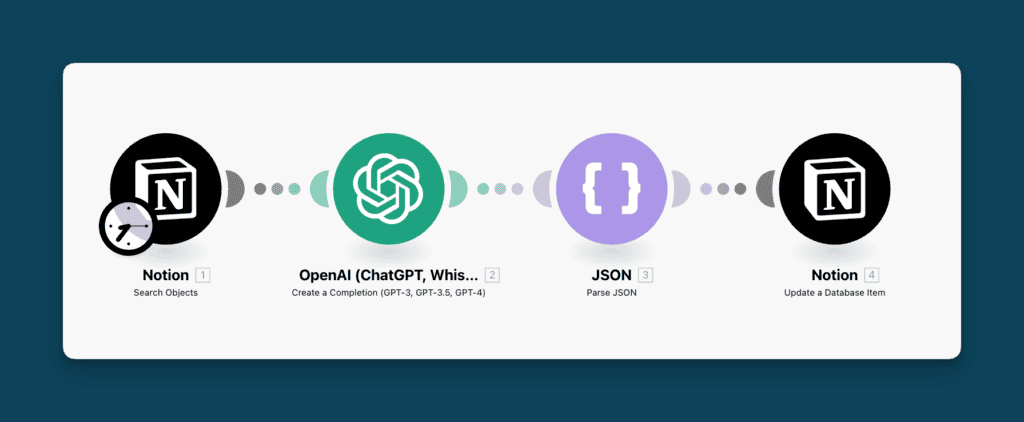
Next, it’s time to connect your individual meals to ChatGPT so that the nutrition data is automatically filled in the database.
If you get stuck anywhere, make sure to check out the video walkthrough or ask for help in the Youtube comments
Before starting this step, make sure that you have some meal entries in your database to work with.
Set up your accounts
To get started, head on over to Make and create a free account.
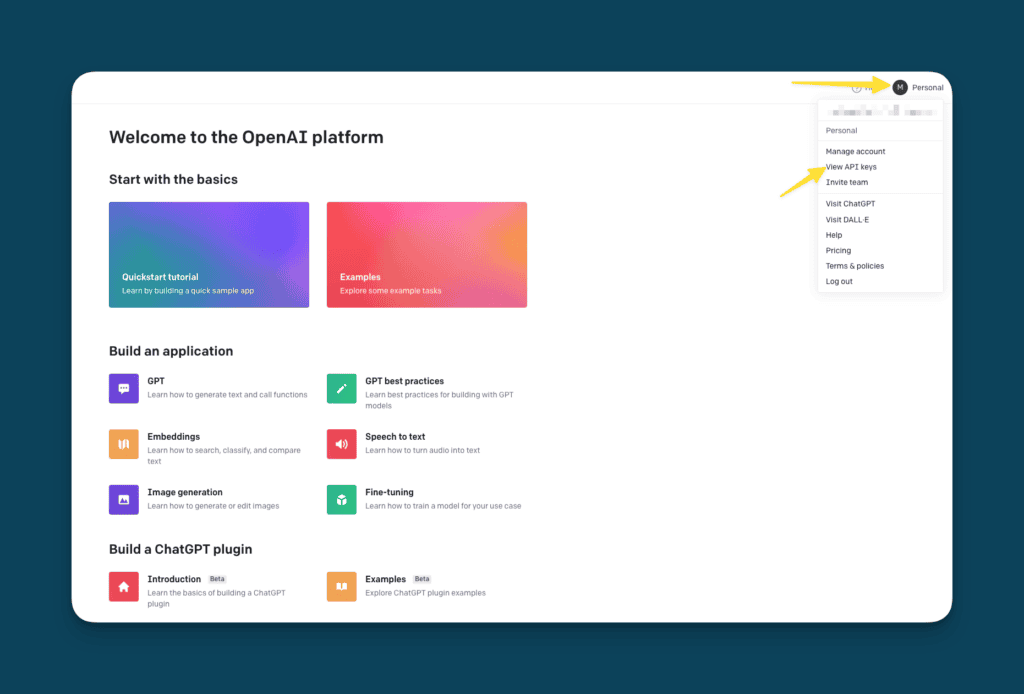
Then, create an OpenAI account and log in. Then, click on Personal in the top right corner and select View API Keys.
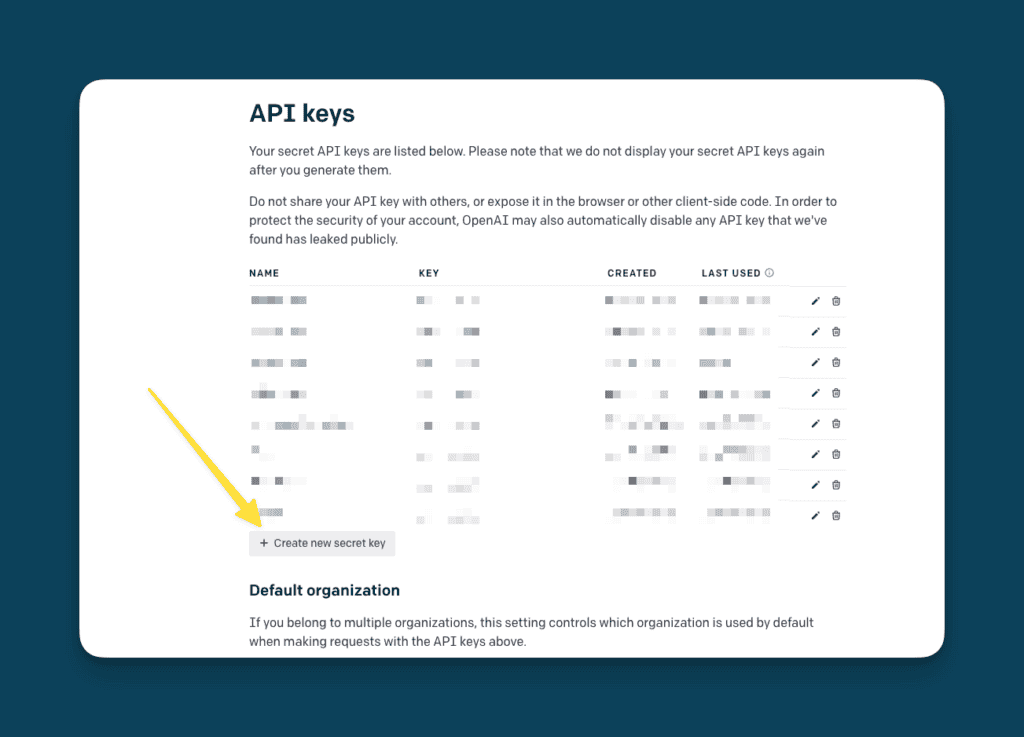
Then, click on Create new secret key and copy the API key to a secure location. You can only see your key once – if you forget to save it, you’ll have to generate a new one.
Start building the automation
First, add a new formula property to your meals database in Notion. Use the formula shown below to check whether there’s data in your Calories property.
empty(prop(“Calories”))
This quick formula will help us with the automation by marking every entry that doesn’t have data yet.
With your key and database ready, head back to Make and click on the Create new scenario button.
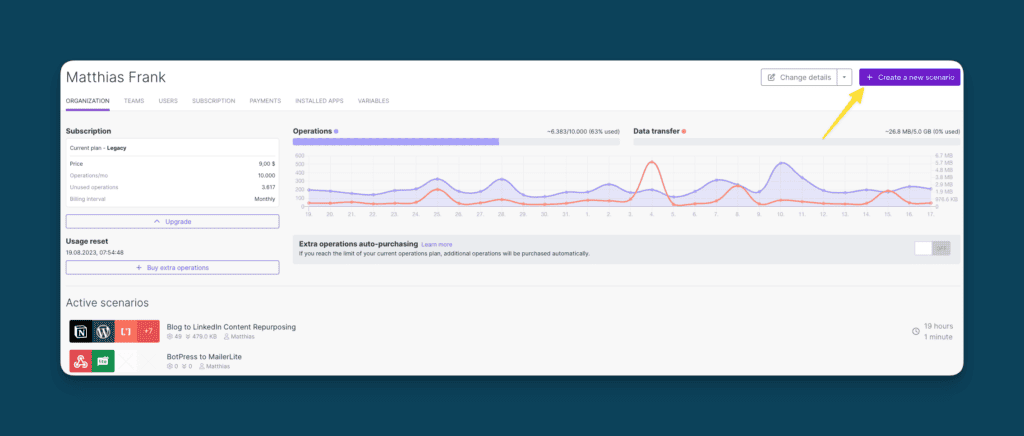
Click on the big purple plus icon, search for Notion and add the Search Objects Module. Then, connect your Notion Workspace and use the search button to look for your meals database.
Add a filter and set it up to only retrieve entries where your newly created formula property equals true (i.e. where the checkbox is checked).
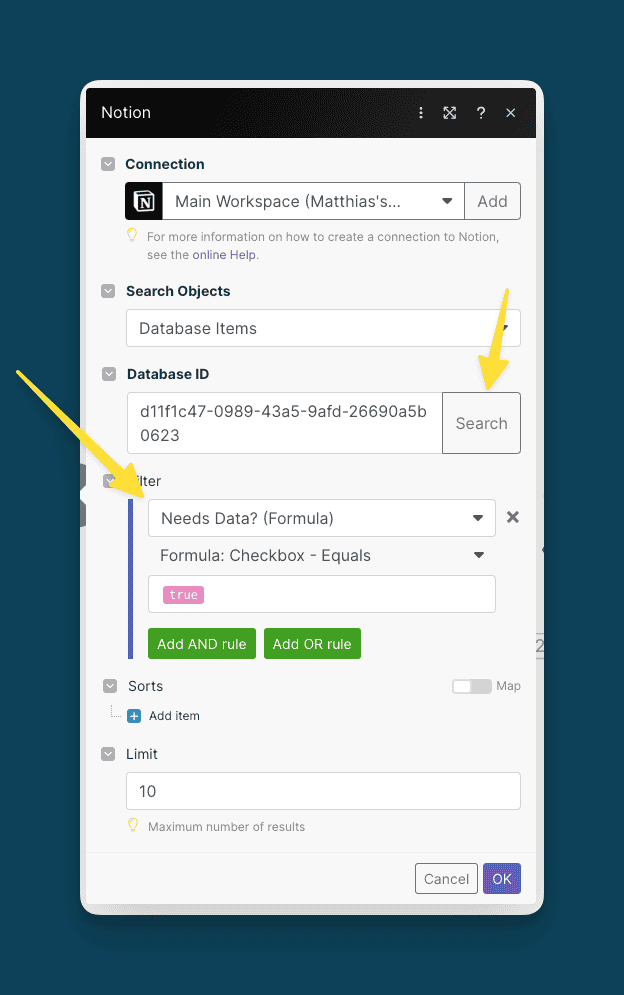
Use OpenAI to fill out your Nutrition Tracker in Notion
Add another module to your automation and search for OpenAI. Opt for the Create a completion module. Connect your OpenAI account by clicking on Add and go through the process (you’ll need your API key here).
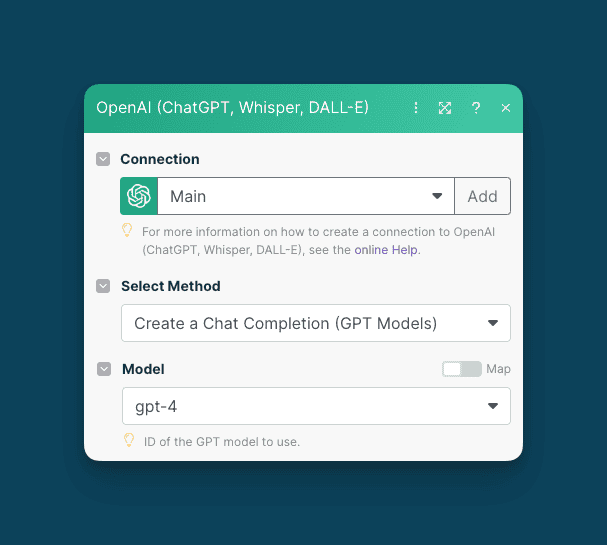
Then, add two messages. For the first message, select the System Role and use a broad prompt to set the stage:
You are a nutrition expert who provides nutrition data for food. You answer only with JSON containing the macro nutrient split.
Then, pick the User Role for the second message and use a more detailed prompt that instructs ChatGPT to assess the nutritional information:
You are my nutrition expert. Your job is to look at the meal I eat and tell me a rough macro nutrient split. When not given any details about the serving sizes, make assumptions based on the typical serving of each.
You will give your answer in JSON. You will only include the macro nutrient split.
Example Answer:
[“Total Calories”:”CALORIES IN KCAL”,”Total Protein”:”TOTAL PROTEIN IN G”,”Total Fat”:”TOTAL FAT IN G”,”Total Carbohydrates”:”TOTAL CARBOHYDRATES IN G”]
Meal:
“{{1.properties_value.Name[].plain_text}}”
Remember to only answer with the Macronutrient split in JSON format. Don’t include any explainers or disclaimers. Don’t include the unit in the JSON response, i.e. if it’s 400 calories only give 400 not 400 cal.
Feel free to adapt the prompt to your unique situation and the factors that matter to you. You could have it report different values or already give you a quick assessment of the food on the spot.
Add another module and look for JSON. Opt for the Parse JSON module and set it up to take the answer from OpenAI (located under Choices – Message – Content).
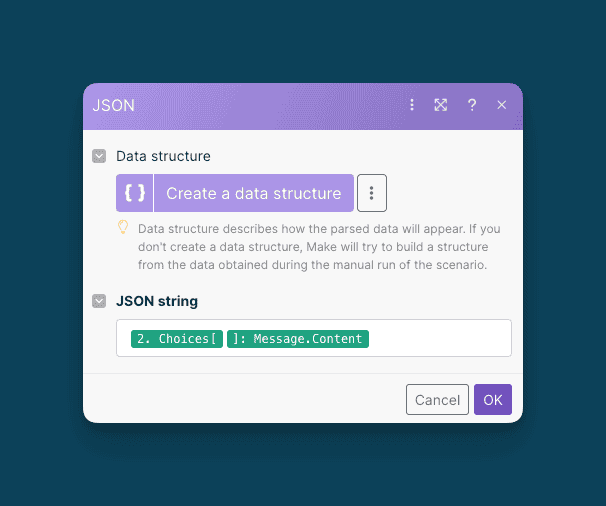
Update your Notion Nutrition Tracker
Last but not least, add another Notion Module to your automation, this time opting for the Update Database Item module.
Set it up to update the initial item and map the values from OpenAI to their individual properties.
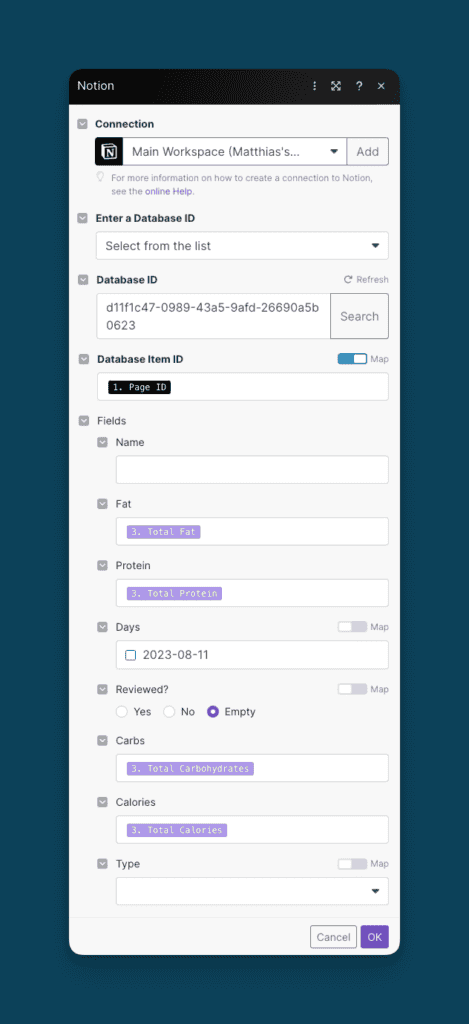
Build Your Notion Nutrition Tracker Analytics Widget
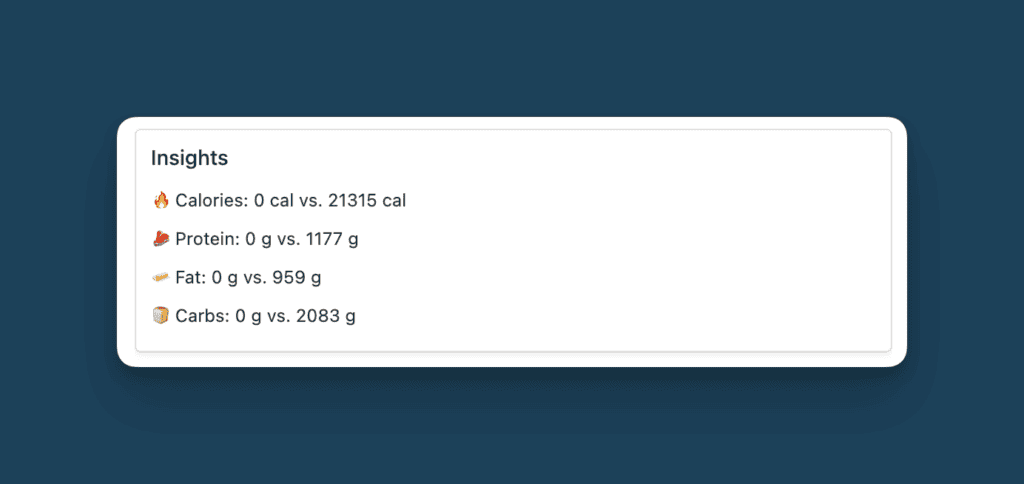
A Notion Analytics Widget is a great way to elevate your setup and get insights from your data much quicker. This widget is built using the Checkbox Method, a universal approach to creating analytics in Notion.
Create Your Analytics Database in Notion
Start by creating a new database called Stats with the following properties:
- Name – the main property of your database
- Days – a relation property to your daily entries
Prepare your daily entries for the Nutrition Analytics
Before you can build out the analytics database further, you first need to modify the database that contains your individual days.
First, add two formula properties that will act as helper formulas for the next step. You could combine them with the actual calculation, but having separate properties will keep things more readable.
The first formula will check whether the entry belongs to the current week.
formatDate(now(), “W”) == formatDate(prop(“Date”), “W”)
The second formula will check whether the entry belongs to the previous week.
toNumber(formatDate(now(), “W”)) – 1 == toNumber(formatDate(prop(“Date”), “W”))
Now it’s time to prepare the data for our analytics. This involves a little bit of setup work, but once done, it will run fully automatic.
Start by adding two more formula properties to your database.
if(prop(“Current Week?”) == true, prop(“Total Calories”), 0)
if(prop(“Last Week?”) == true, prop(“Total Calories”), 0)
As you can see, both formulas are pretty simple. They check whether the daily entry belongs into the current or previously week and based on that, they will either fill the cell with 0 or the corresponding calories.
On their own, they seem quite redundant. But they will allow us to roll up the relevant information into our analytics database to dynamically show the total calories for the current or previous week.
Now, you need to repeat this step for each value that you want to see in your analytics. If you only care about calories, you can move on, but if you also want to see other macros, create the two formula properties for each of them.
Keep this in mind:
- No need to duplicate the helper properties
- If you don’t care about last week, you can only use the formula for the current week
- You can easily adapt this method to incorporate other timelines (like Today vs. Yesterday or a month-over-month view). Check out this article for an in-depth explanation of the Checkbox Method.
Need help with formulas? Check out my free Notion Course
Build the Analytics Widget in Notion
Go back to your analytics database and create a new rollup property. Set it up to show the Sum of your Calories This Week formula property that you just created in the previous step.
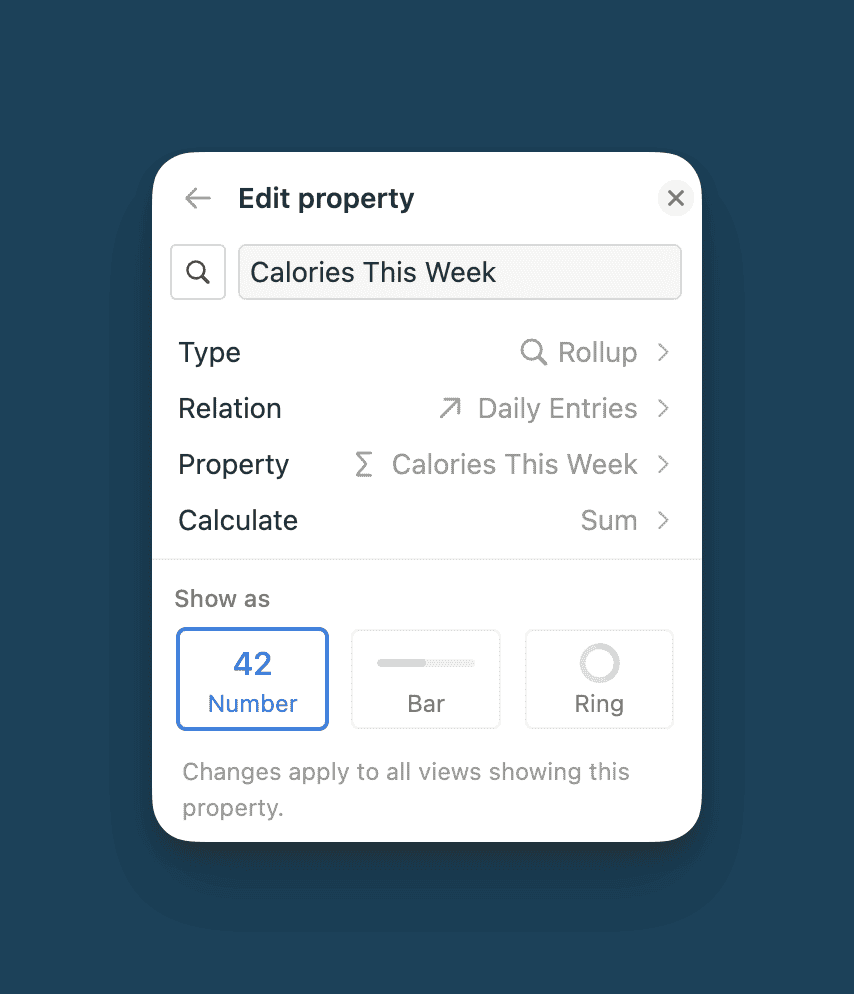
Then, repeat the same process for Calories Last Week. You should now have two rollup properties in your analytics database that each show their respective calories values.
To go from the plain number to a pretty display, add a formula property and use the template shown below (adapt it based on the property names in your setup):
concat(” Calories: ” + format(prop(“Calories This Week”)) + ” cal vs. ” + format(prop(“Calories Last Week “)) + ” cal”)
This will take the rolled up values and combine them into a statement like this:
Calories: 0 cal vs. 3041 cal
Just like before, repeat these two steps (creating rollups and then adding a display formula) for every macro value that you want to see in your analytics.
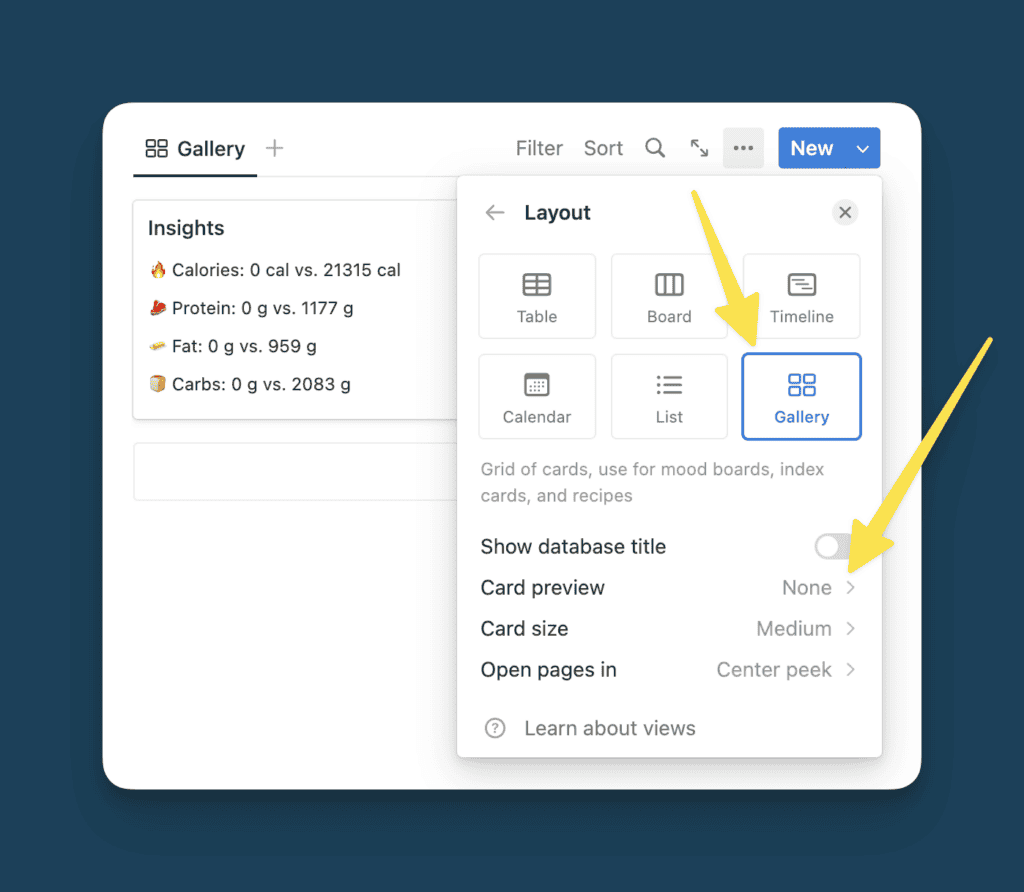
Last but not least, change your database view into a gallery, turn of preview and have it show only the display formulas.
Create A Personalised Nutrition Report using ChatGPT
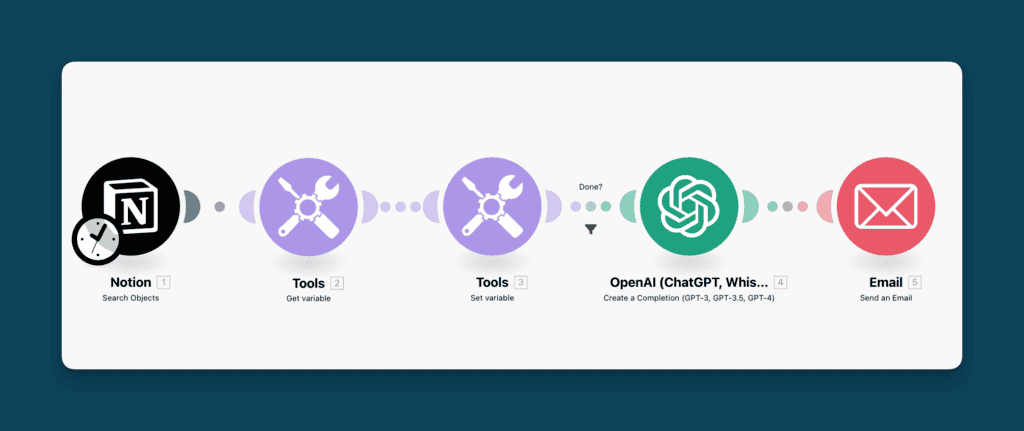
In this last step, you’ll learn how to aggregate all your meals and send them as a list to ChatGPT. ChatGPT will then review your nutrition habits and provide you with feedback and personalised tips on how to improve it.
Prepare your data for the automation
Start by adding a new checkbox property to your meals database in Notion. No need to use a formula here – just add a simple checkbox and label it something like “Reviewed?”.
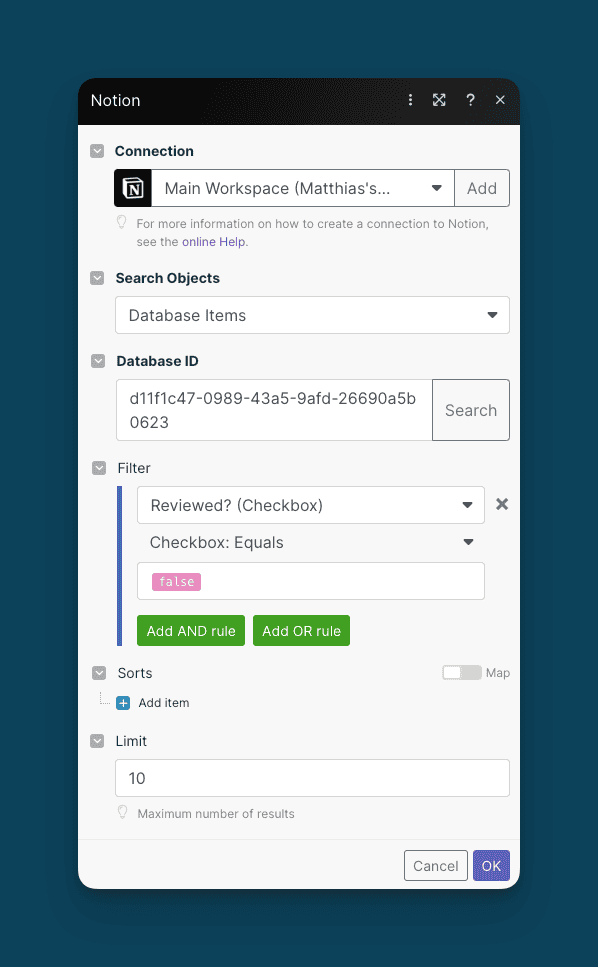
Then, create a new scenario in Make. Add the Search Objects Notion module as the first step and set it up to retrieve all entries from your meals database where the checkbox you just created isn’t checked.
Build a list of your meals for ChatGPT to review
In order to send your meals to ChatGPT, we need to create one long list as opposed to the individual entries you get from Notion.
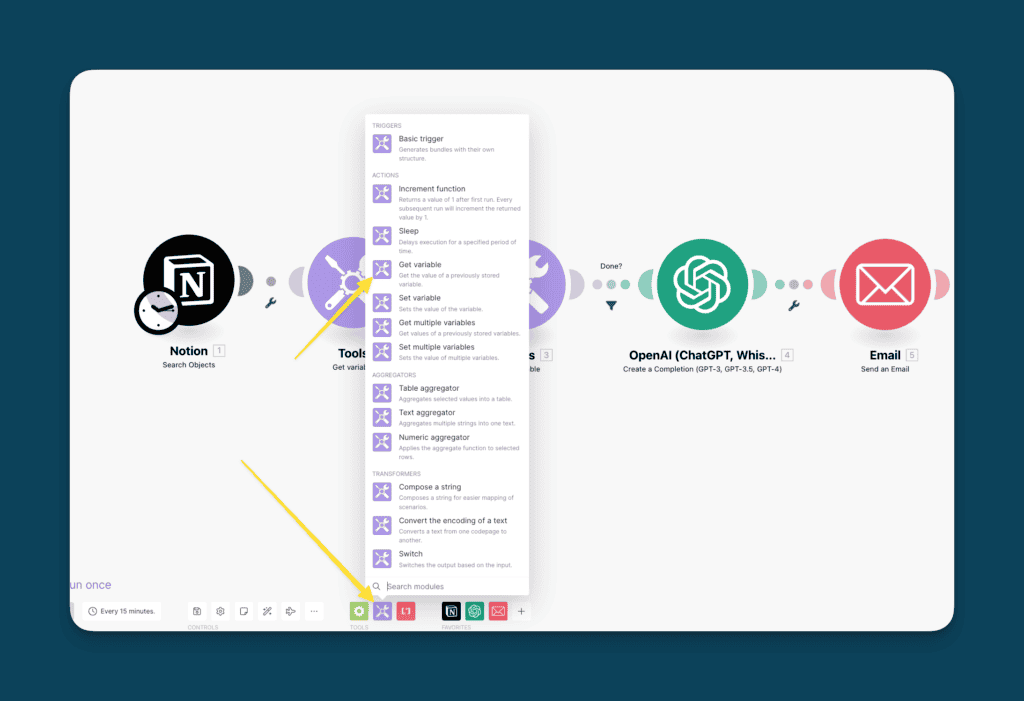
Start by adding a Get Variable module to your automation (which you can find inside the purple tools section in the centre bottom of your screen).
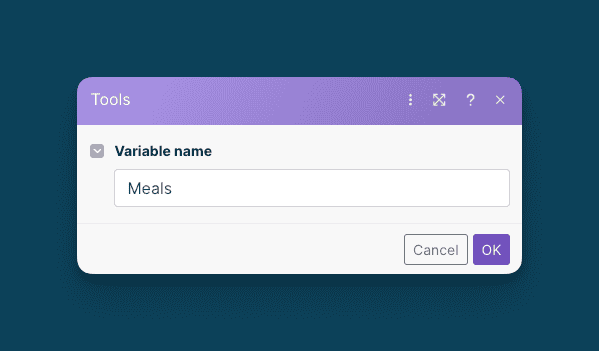
Give your variable a name, for example “Meals”.
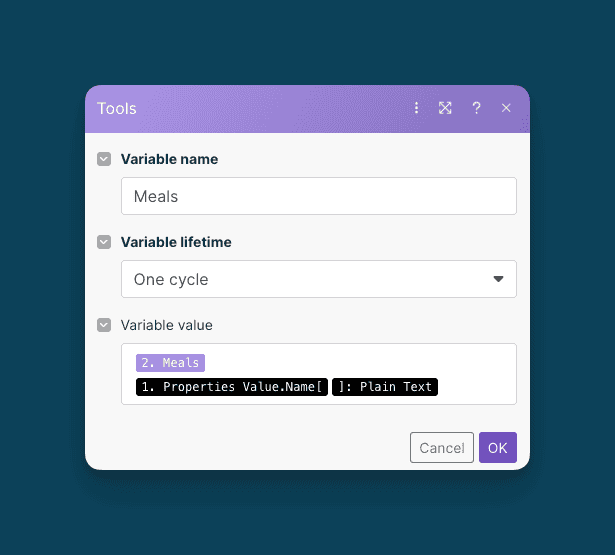
Then, add a second variable module, this time opting for the Set Variable version. In there, add first the value of your meals variable and then in a new line the value of the current meal from Notion.
You now created a simple loop in Make that will
- Grab an entry from Notion
- Check the current value for the variable Meals
- Add the entry from Notion to the current value of Meals
Get personalised nutrition information from ChatGPT
Add a new module to your automation, this time opting for Create a completion by OpenAI.
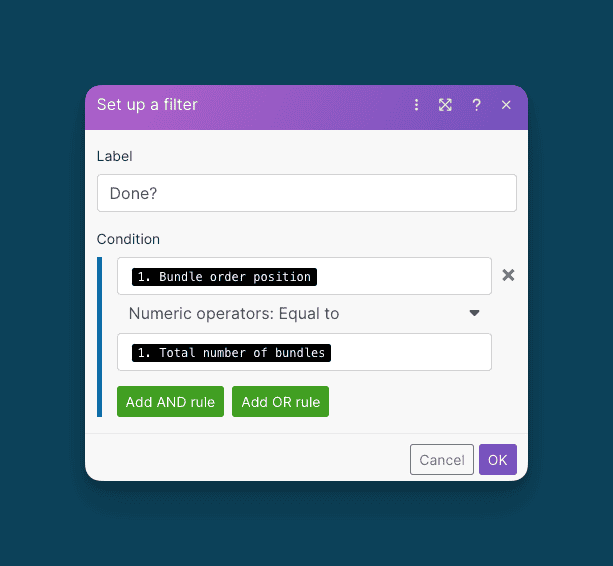
Before moving on to the next step, you need to do one more thing: set up a filter so that the automation only moves on to ChatGPT once the list is complete.
To do so, click on the dotted line between the last variable step and the OpenAI module and set up the filter as shown below.
Then, set up the OpenAI module by adding two messages.
The first message is again your System Message.
You are a nutrition expert who provides personalised nutrition recommendations based on someone’s goals and meals. You only respond in an html email body format.
This sets the stage for the main prompt. Next, set the second message as a User Message and use a prompt similar to this one:
I need your help as a nutrition and health expert. I’ve logged the meals that I ate in the last week. Can you have a look at them and provide me with a general analysis of my nutrition?
Here are my meals:
“{{3.Meals}}”
Please structure your answer as follows:
- Read through my meals and analyse them as a nutrition expert. What stands out? What’s good? What’s bad?
- Based on my meals, give me three actionable tips to improve my nutrition next week.
Format your answer as an html email body.
Just like before, make sure to replace {{3.Meals}} with the actual meals variable to dynamically pull in the data from the previous step.
Feel free to adjust the prompt to your specific situation and needs:
- Add context about yourself. Who are you? What’s your weight? Do you have any health issues? What are your nutritional goals?
- Add details about your situation. Are you single? Do you have kids? How much time do you have to cook and prepare food?
- Specify your eating habits, preferences and limitations. Any allergies? Vegetarian or vegan? Any particular cuisine you enjoy?
- Ask for specific recommendations. General tips as shown in the prompt are great, but get creative and do more! For example, ask ChatGPT to give you three recipe ideas for next week
Send your personalised report via email
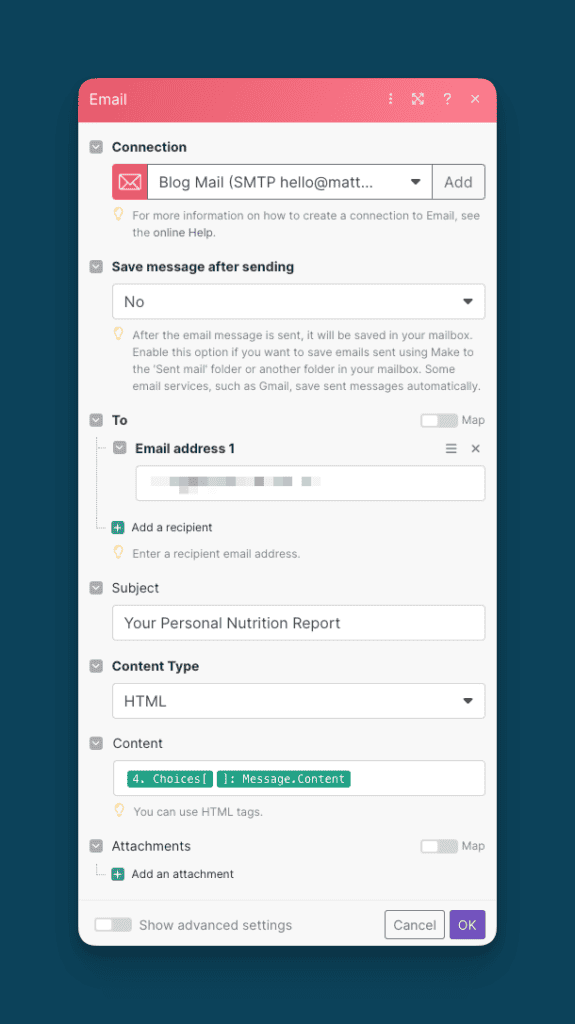
Finish the automation by adding one last module to send the report via email to you. Either opt for the Gmail tool or the standard email tool.
Get The Free Notion Template
You can download this Notion Template plus another 21+ other free templates here:


