Notion Automations are a powerful way to save time and improve your workflows – if you know how to properly use them. This simple yet powerful feature can help eliminate unnecessary manual work which is great news if you want to become a Notion Power User. Want to send a Slack notification when a task is done? You can do that. Or do you manage a team and need to automatically assign a task to your writer after the research phase is done? No problem. In this article, you’ll learn everything you need to know to start implementing Notion Automations and make Notion work for you. Ready? Let’s go!

What are Notion Automations?
Notion automations allow you to automate certain workflows inside your Notion Databases that would otherwise require manual changes from you or another user. And even though this feature is really powerful, using it is fairly straightforward. Think of it as an ‘if this, then that’ condition. If something happens within a database, it will trigger one or multiple actions automatically.
Although this might not sound like much, Notion Automations allow you to automate multiple little steps, which over time will result in a ton of time saved.
What can you use Notion Automations for?
Notion Automations allow you to perform the following types of actions within Notion Databases:
- Create a new page
- Edit properties of a newly created page
- Send Slack Notification with database updates
- Assign date, tags, status, or other properties automatically
- Edit most of the property types of other pages within the same or different databases
How to use Notion Automations
To use Notion Automation, click on the bolt (⚡) icon on the database taskbar. You can also click on the three-dot menu to access it. When you click on New Automation, the first thing you will see:

- Automation name (You can name it anything)
- For Pages in (Set the automation for the current view or all the views of the database)
- Trigger (Changes that will initiate the trigger)
- Actions (Changes done by the automation once it has been triggered)
Triggers
Let’s figure out what a Trigger is. In short, it’s what causes our automation to run. More specifically, a Trigger is one or several things that can happen in a database (for example, a new page could be added to a database or a certain property of an existing page could be modified). Once that’s the case, the automation will start running and it will execute one or several Actions.

Broadly you can set two types of changes in a database as a Trigger:
- New page added
- Database properties edited
For most properties, you can’t specify which change should trigger the automation. The automation will simply react to any change.
Example: Changing even just one letter in a text property or the title property counts as a change. You can’t specify that it should only run if the name of the task was changed to “IMPORTANT TASK”
However, three properties (Selects, Multi-Select, and Status) allow you to specify whether any change should trigger the automation or only changes to a certain option should count.
Example: You could specify that only a change to the status “Done” should trigger the automation. If you change the status to “In Progress”, nothing would happen.
When selecting your trigger, Notion Automations allow you to add multiple triggers at once. When doing so, the automation will run if any of the triggers occur — and you can now also combine conditions so an automation only runs when multiple triggers occur together.
Example: If you set a trigger for Status = Done and another for Select field = Management, the automation will run if either the Status field or the Select field are changed to the respective tag. You can’t enforce that it should only run if both properties have their corresponding values.
When using the New page added trigger, pretty much any way of adding a Notion page to this database will count.
- Adding a page through a linked database,
- Adding a page through a third-party automation platform like Make
- Adding a page through a Notion button)
However, if you have set up a recurring template on your database which automatically adds a new entry, then this won’t trigger the automation. Notion has confirmed that this is the intended behaviour, but it’s unfortunate because it stops us from a few creative use cases.
Actions
Now that you’ve understood what a trigger is, let’s learn about the Actions — the result of the change. When the trigger is initiated, the automation will make some changes to your Notion workspace. These changes are called Actions.

A Notion Automation can have four different types of Actions:
- Add page to
- Edit pages in
- Send Slack Notification to
- Edit database properties
Add page to does exactly what you’d think it does: you can add a new page to the same database or a different database. While doing so, you can also set its properties.
Edit pages in allows you to change the properties of several other pages in this or another database. Be really careful when using this feature, as it’s easy to override important data by accident.
Warning: You should always set a granular filter inside the automation. Otherwise, all the pages inside the database will be updated and there is no way to undo that. So, it’s always a good idea to test your automation before system-wide implementation. It’s one of 11 Notion Mistakes that you should avoid at all cost.
Send Slack notifications to allows you to send information about the change that happened as a trigger (i.e. a new page created or a property updated) to a Slack channel of your choice
Edit property allows you to modify the properties of the page that triggered the automation
Pro Tip: Edit pages in allows you to change other pages whereas edit property changes the page that triggered the automation.
The Latest Update: Notion Workers Can Trigger Automations
Here’s a small but incredibly helpful detail that often makes or breaks a lot of advanced flows — and it comes courtesy of Notion’s newest power feature, Notion Workers.
The headline is simple: Workers can trigger automations. That sounds minor, but it’s actually the glue that makes truly advanced systems natively possible inside Notion.
Here’s why it matters. Simple Notion database automations have one big limitation: one automation can’t trigger another. That’s by design — Notion needs some form of loop prevention to stop automations from infinitely triggering each other.
Workers, however, don’t fall under this limitation. And that’s crucial, because even when you’re building with Workers, you’ll often still want basic automations as the steps in between them — mainly to wire up triggers through webhooks.
So here’s the current state of play for what can trigger an automation:
- ❌ Other Notion automation runs
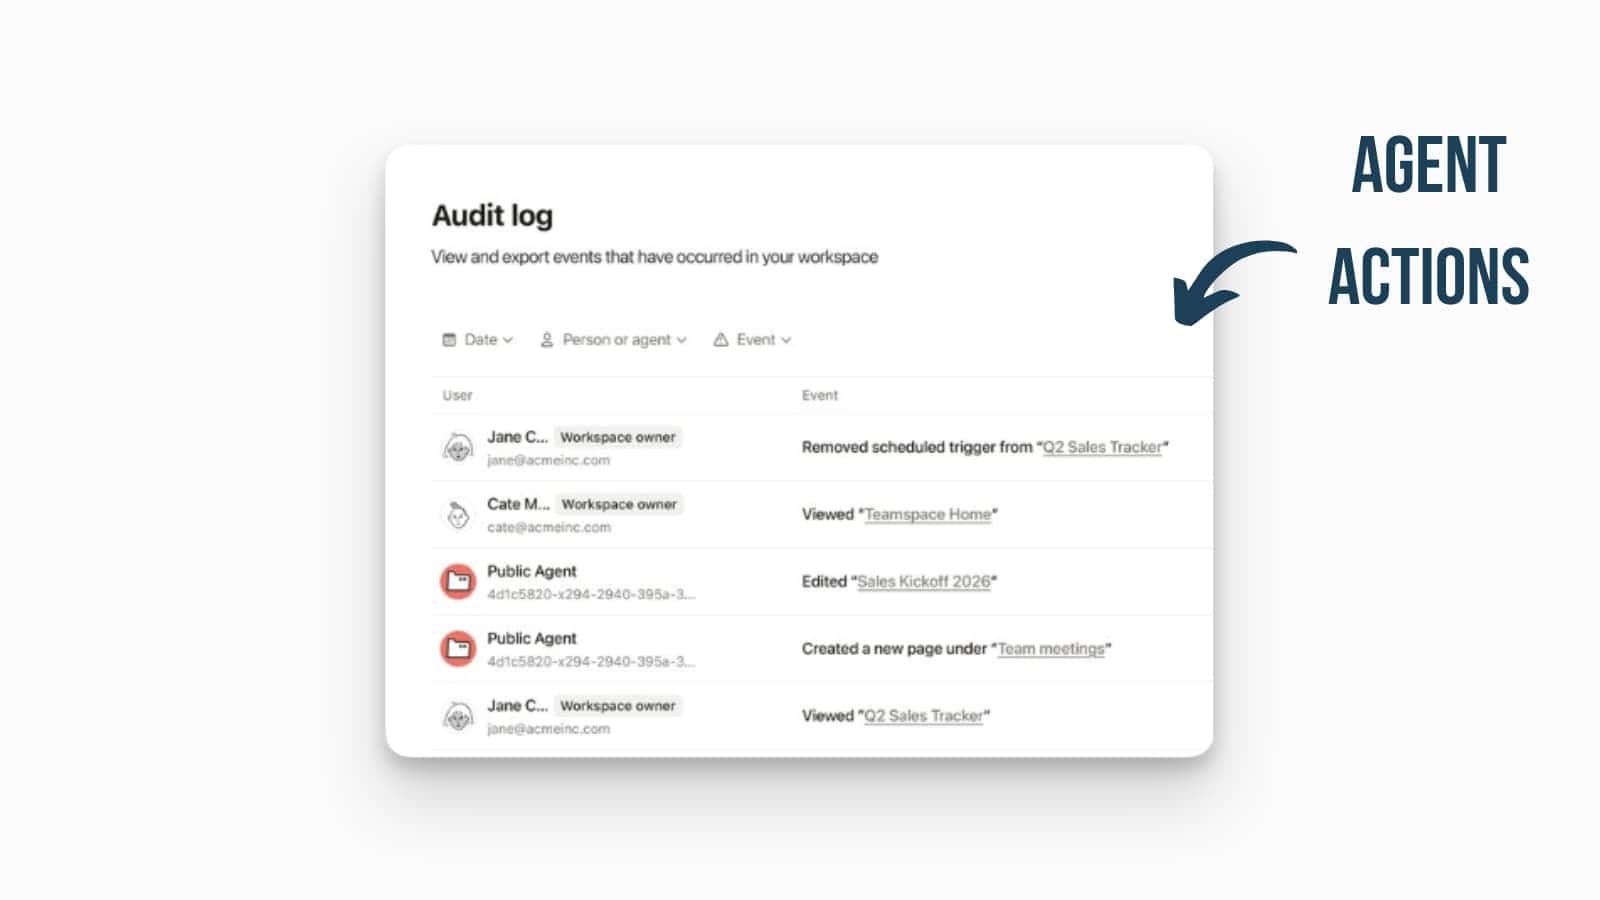
- ✅ Manual user actions in the UI
- ✅ A user clicking a button with an automation (this one can actually trigger another automation)
- ✅ Notion AI & Custom Agents
- ✅ External automation tools
- ✅ Notion Workers
If you want the full breakdown of how Workers fit into the bigger picture, check out my beginner’s guide to Notion Workers.
What are the limitations of Notion Automations?
Notion Automations are an exciting Notion Feature, but they’re still lacking some functionality to turn them from “this is useful” to “WHAT A GAMECHANGER!”.
For a long time, the biggest weakness of Notion Automations was the lack of variables — Notion has since added trigger variables, which removes much of this limitation.
Put simply, when an automation is triggered, you can’t pass a lot of information from the trigger to the automation. For example, you might want to customise the Slack Message based on what task is changed. With trigger variables, this now works — your message can include data from the page that triggered the automation.
Another example where variables would be helpful: you’ve just finished a project and would like to create a record somewhere else to celebrate that victory (and track your completion time). Thanks to trigger variables, you can now pass the name of the completed project into the newly created task.
With these additions, Notion Automations have grown into a genuinely capable tool — and they keep getting better.
But now onto the most exciting part — how to implement the first Notion automation in your system. In this section, you’re going to explore the current 4 best use cases that you should start using immediately to level up your Notion Workspace.
Use Case 1: How to assign people based on status using a Notion Automation
Imagine working in a team or running a business with multiple freelancers. How cool would it be if you could just change the project status and have roles automatically assigned to the right people? You can certainly do that with Notion Automations.

Thanks to this Notion Automation, you don’t have to manually assign roles anymore whenever there is a change in the project status. Instead, the Notion Automation will assign the roles and notify the right people for you.
For this to work perfectly, you’ll need a database with the following:
- Status Property (for the project status)
- People Property (to assign jobs to people)
Now click on the Automation (⚡) icon and then click New Automation. You can rename the Automation if you want. Now, you need to define the Triggers and actions.
Click on Add trigger to set the rules for the trigger. You can choose anything but for this illustration, you can select Status and choose the corresponding value when a specific person should be assigned to the task.

Now for the Actions, click on Add action, select Assigned to, and choose the right person for that status. Then click Create. That’s all you need to do.

This way, whenever you change the status of a database item, the Notion Automation will assign the right person based on your predefined criteria.
Use Case 2: How to send a Slack Notification using Notion Automations
In the world of async communication, Slack is a great tool for team collaboration. Wouldn’t it be amazing if you could get notified whenever there is a change or progress in your Notion workspace?

Well, with the help of a Notion Automation, you can now send notifications directly to your Slack channels based on your predefined rules. You can use any property to set the triggers. So, whenever a task is done, or a project status is changed, or a new item has been added, Notion can send an update to your Slack channel.
Setting it up is super simple. Just like in the previous use case, you can set a Trigger based on when you want a notification to be sent. After creating the Trigger, you need to set the Actions. When you click on Add action, just select the Send Slack notification to option.

If your Slack workspace isn’t already connected, it will ask you to connect. Just click on Connect to connect your Notion workspace to your Slack Workspace. Then, select the Slack channel you want to get notified and click Create. Your automation is ready!

Now, you and your team will get notified about the progress directly on Slack without manually typing anything. Productivity on steroids, right?
However, it’s not perfect yet. You don’t have the option to change the text of the notification or message. The notification will only show the changes made and a link to open the Notion page. Still, it’s better than nothing.
Use Case 3: How to default tasks in Notion using a Notion Automation?
Although every project is different, some still come with the same set of tasks over and over again. Moreover, you’re probably adding all these repeating tasks to Notion manually. Which can be quite annoying at times.
Well, good news! You don’t have to do this manually anymore. You can automate the whole process with the help of a Notion Automation. So, whether you’re a content creator, a project manager, or even a designer, you can have a set of tasks added to your task manager whenever a new project is added.

For this to work, you’ll obviously need two databases. One for Projects and the other one for Tasks. Also, the Tasks database should have a relation property linked to the project so that you know which tasks belong to which project. You can find a more detailed explanation of this setup in my in-depth Notion Tutorial.

To create the automation, click on the Automation (⚡) icon of the Project database and set Page added as the trigger. For the Actions, you need to add all the tasks one by one. Click on Add action and choose Add page to.
Then, you have to select the database where you want to add the new page. In this case, you need to select the Tasks database and add your first default task as the Page name. After that, you need to click on Edit another property and select Project. Then choose This Page as the Project option. This will link the task (new page) to the newly added project.

Now, you have to repeat this process for all default tasks. Just click on the plus icon and start creating the tasks one by one. It’s a bit of a tedious process since automations unfortunately don’t have a Duplicate button yet, but it’s well worth the time saved whenever you create a new project in the future.

Next time a new project is added, all your default tasks will appear like magic. By implementing this Notion Automation alone, you’re going to save a ton of time. Definitely give this a try.
Use Case 4: How to add today’s date using a Notion Automation?
For the final Notion Automation showcase, you will learn how to auto-populate the date property with today’s date or even the exact current time.
Until now, setting the current time on a Notion page wasn’t easy. You had to manually input it every single time or use a fairly complex workaround. But with this simple Notion Automation, the current date will again magically appear after creating a new page.

To set this up, create a new automation. Then set Page Added as the Trigger. For the Action, choose the Date Property under the Edit Property section. Now you have two options. You can either choose Now (the date with the exact time) or Today (only the date). Select the one you prefer and click Create.

With this setup, when you create a new page, the corresponding date or time will auto-populate on the Date property. So, no more manually adding the Date property for a journal entry or a meeting note. Notion Automation will do that for you.
Now you know some of my favourite use cases for Notion Automations, which means it’s time to start experimenting yourself and implement some of them in your Notion Workspaces. If you stumble upon another great way to leverage a Notion Automation, please do let me know!
Notion Automation: Final Thoughts
So, you might be wondering, is Notion Automation worth exploring? Yeah! It’s super useful and you can do so many cool things with it. This single Notion feature alone is going to make your life so much easier and so much more productive. Especially, if you’re working in a team, Notion Automation will supercharge your productivity.
However, it still has some limitations. Options like Better Variables, Recurring Templates as a Trigger, Better Integration with Formulas, and Webhooks will make the Notion Automation feature truly a Game Changer. Nevertheless, you should start using this feature and take your Notion game to the next level. This is just the beginning!