How cool would it be if you could get Notion Notifications straight to your phone? Whether it’s the meeting you have to attend in an hour, the tasks you need to do today or a reminder to wish your mum a happy birthday. It would be amazing, right? Notion does have some built-in notifications, but they’re fairly limited. For starters, you only see them in the app – not on your phone’s home screen, where you actually need them. Luckily, there’s an easy workaround to get actually useful Notion Notifications.
In this blog post, you are going to learn
- My super simple system to send custom Notion notifications directly to your phone
- One big mistake you must avoid that could otherwise ruin your entire workflow
- And a specific trick to turn Notion Notifications from nice-to-have into a real showstopper.
How to get custom Notion Notifications on your phone
Setting up custom Notion Notifications is super simple and you can do it in just five minutes. All you need are:
- A Notion database with some information (of course!)
- A smartphone (both iOS and Android works)
- A free Make account.
Make is a powerful automation tool that will supercharge your workflow and productivity. This tool comes with so many amazing Notion Integrations to speed up your Notion Workflow and boost your productivity. Plus, they have an amazing free plan that’s more than enough to implement this workflow, so you can get Notion Notifications for free.
So, first things first, let’s set up your Notion database.
Step 1: Get your Notion Database ready
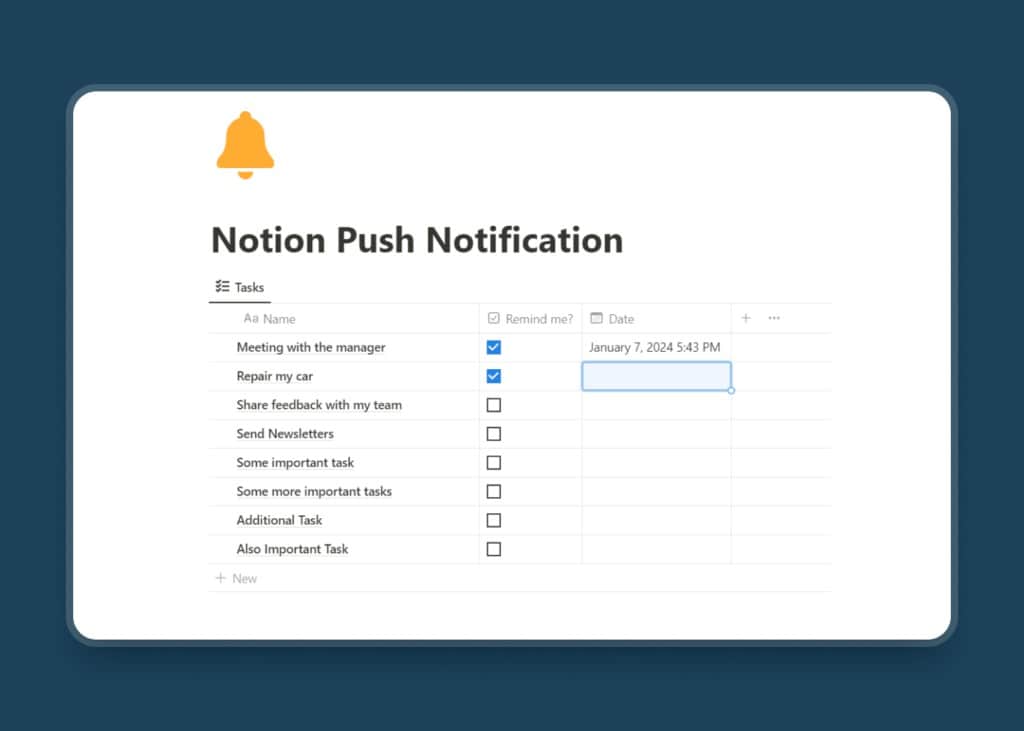
For this workflow, you will need a Notion database with some information in it. The database structure can be simple or complex (it doesn’t matter). Just make sure, it has some Properties that you can change. Like Checkboxes, Selects, Multi-Selects, or any other property.
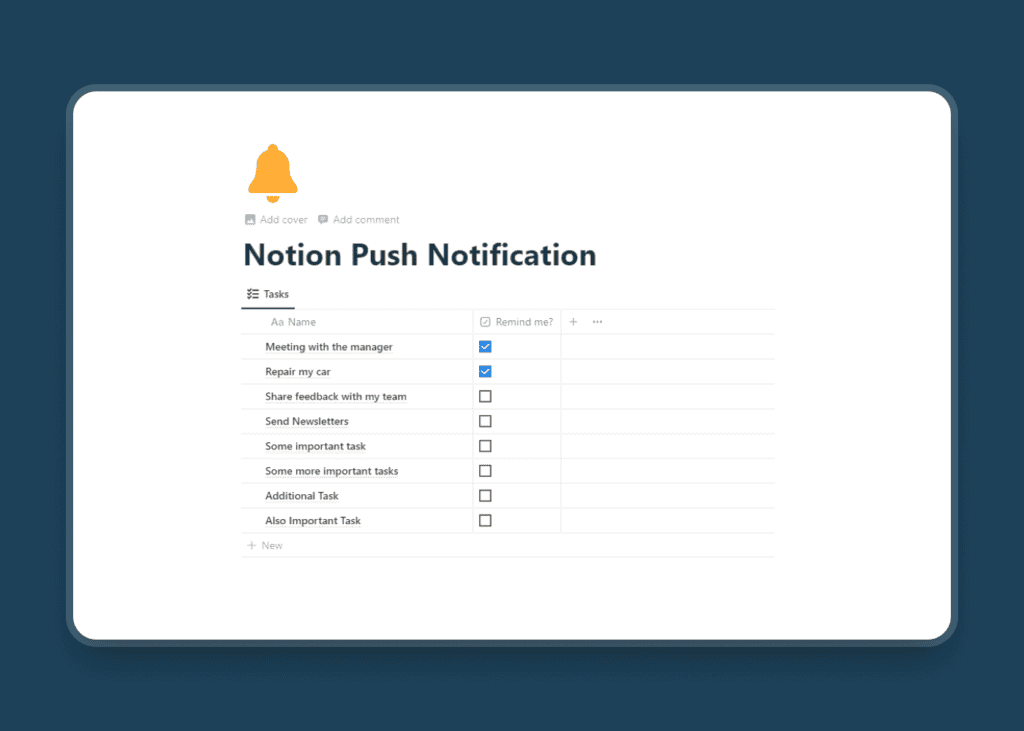
For this example, I am going to use a simple database with one checkbox property.
Step 2: Setup the Make and Notion Connection
Head over to Make.com and create your Make account. It’s free to sign up and you can use it for other Notion integrations too.
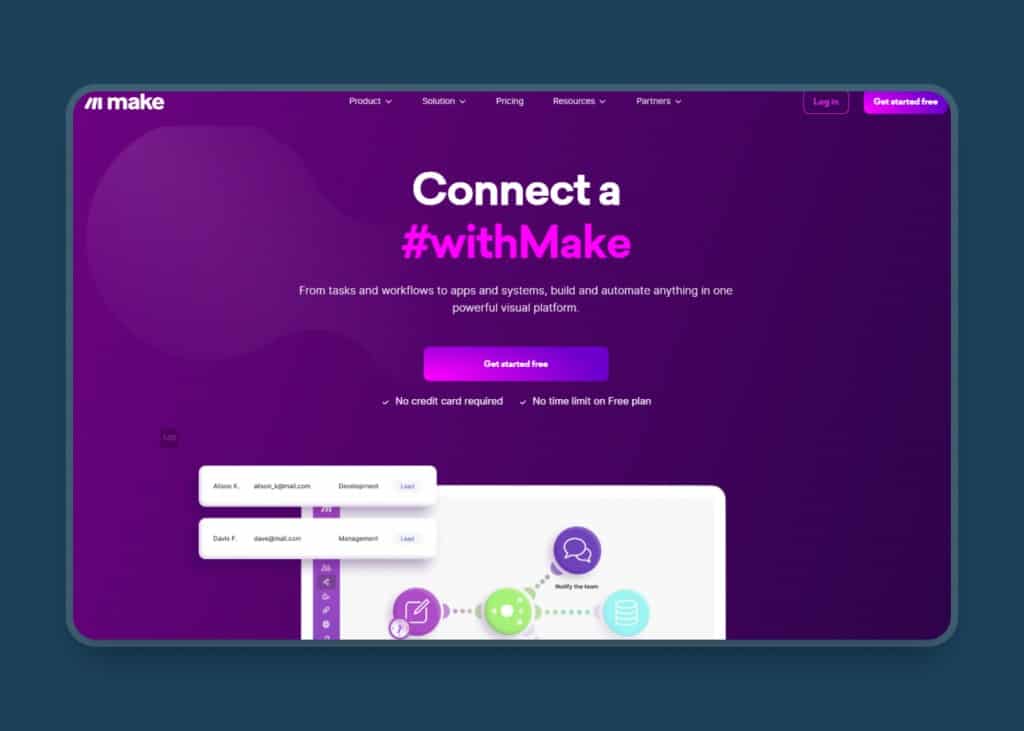
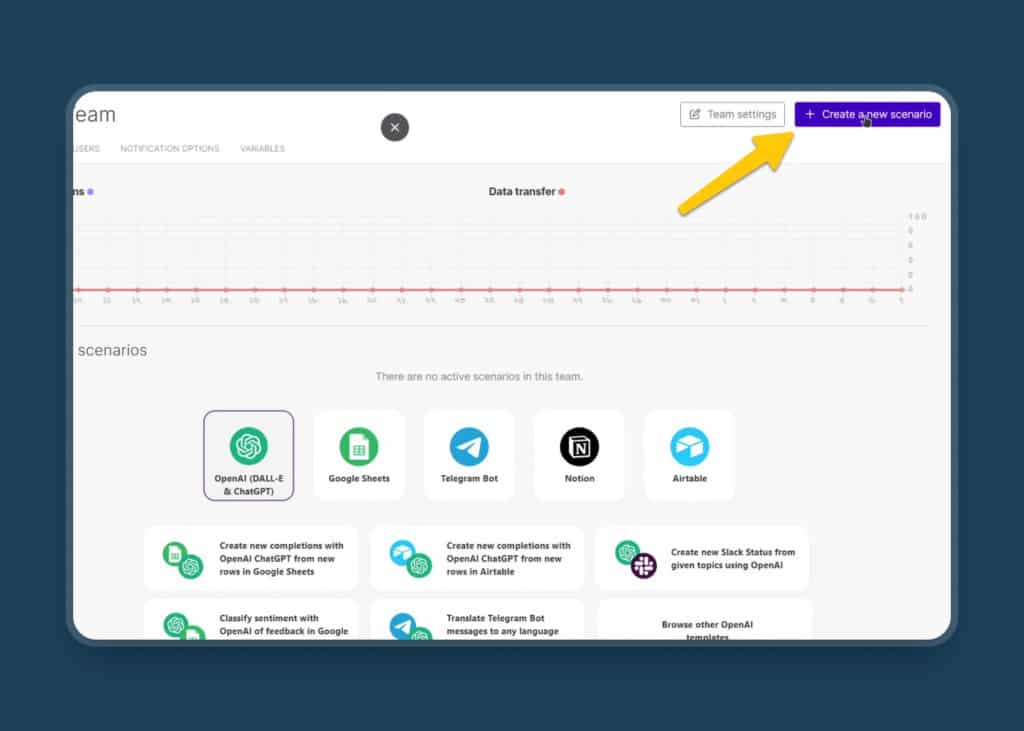
Once your account is created, you will get to see the Make dashboard. To create your first Notion Integration, click on Create a new scenario in the top-right corner. It will open the visual editor.
Now, you can give this Scenario a name in the top left corner and then move on to the most important step — setting up the connection with Notion. This way, you can pull in all the relevant information from your Notion Database into the scenario.
To do that, click on the large Purple Plus button and search for Notion. Now click on Notion and you’ll see a list of Modules. There are a lot of them but don’t get overwhelmed. Here’s exactly what you need to do:
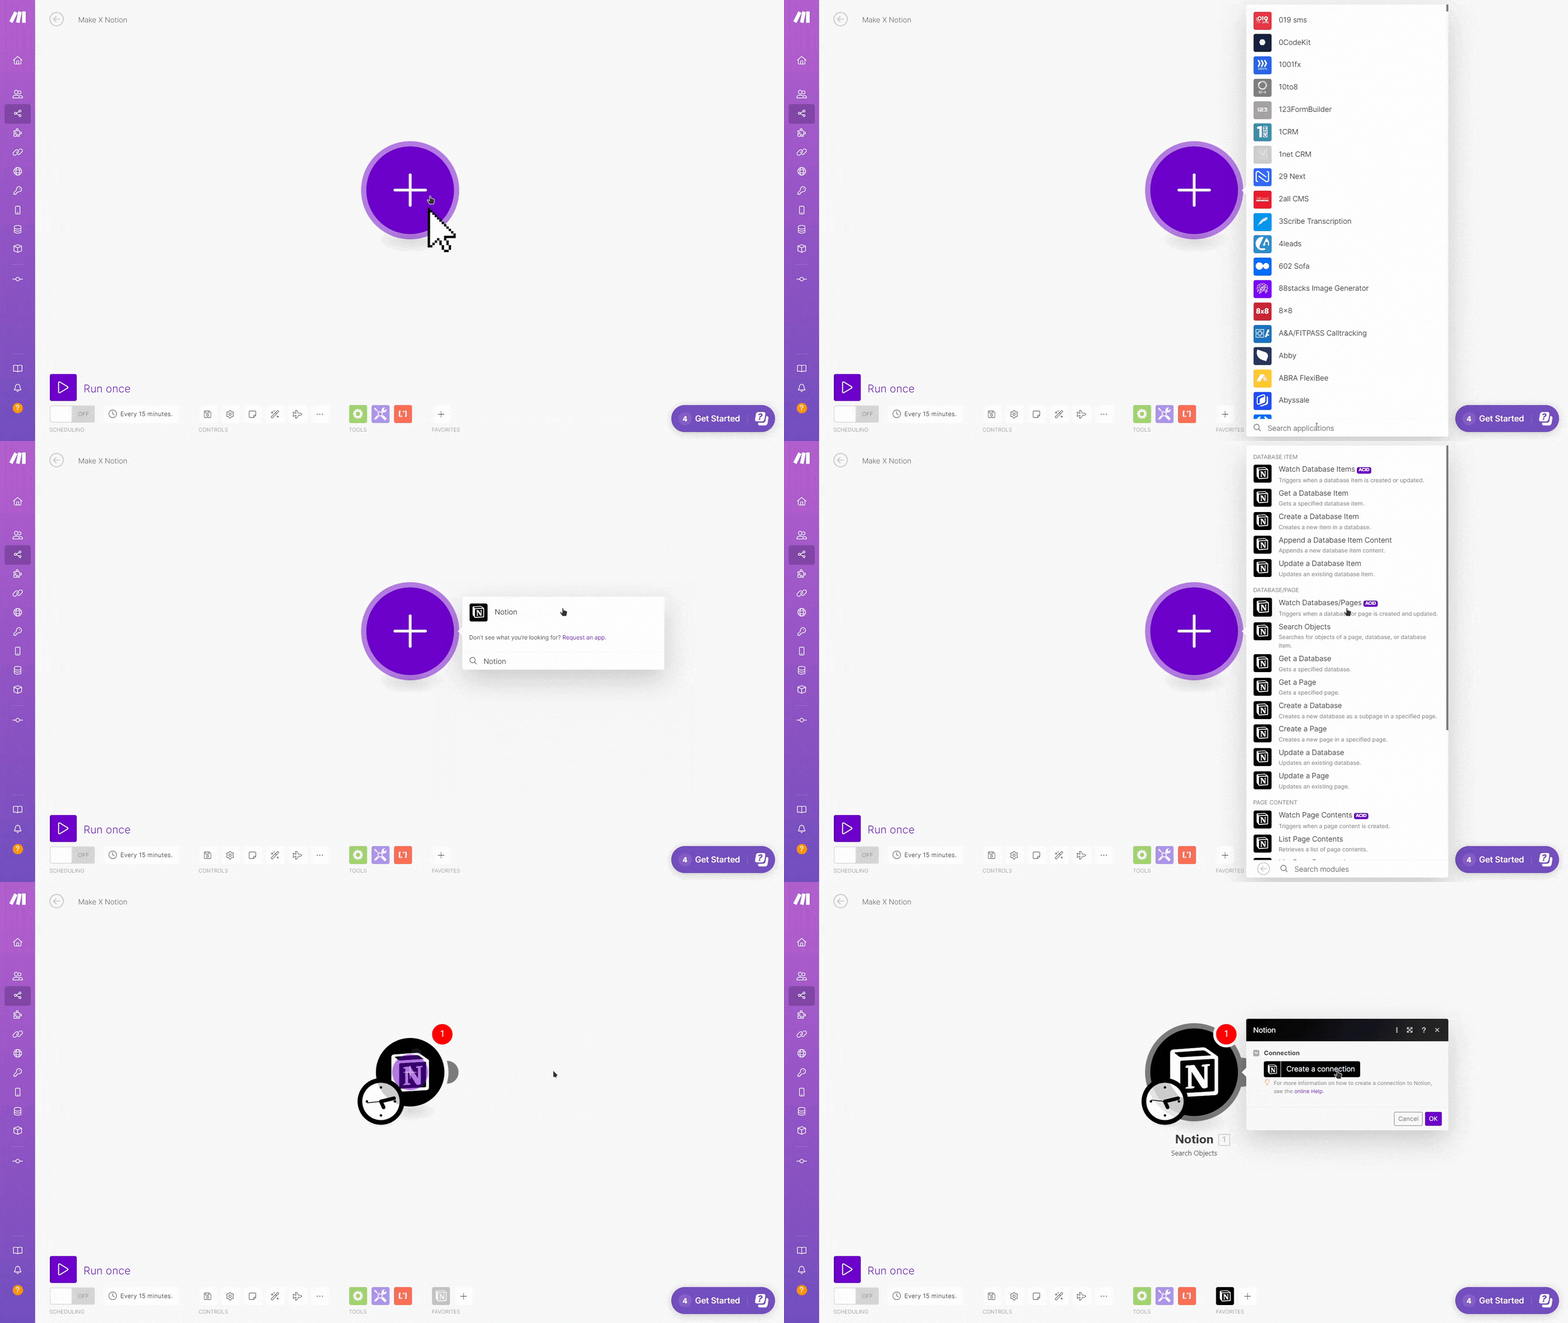
Just look for Search Object and Click on it. A new modal will appear. Now you’ll be asked to connect your Notion workspace with your Make account.
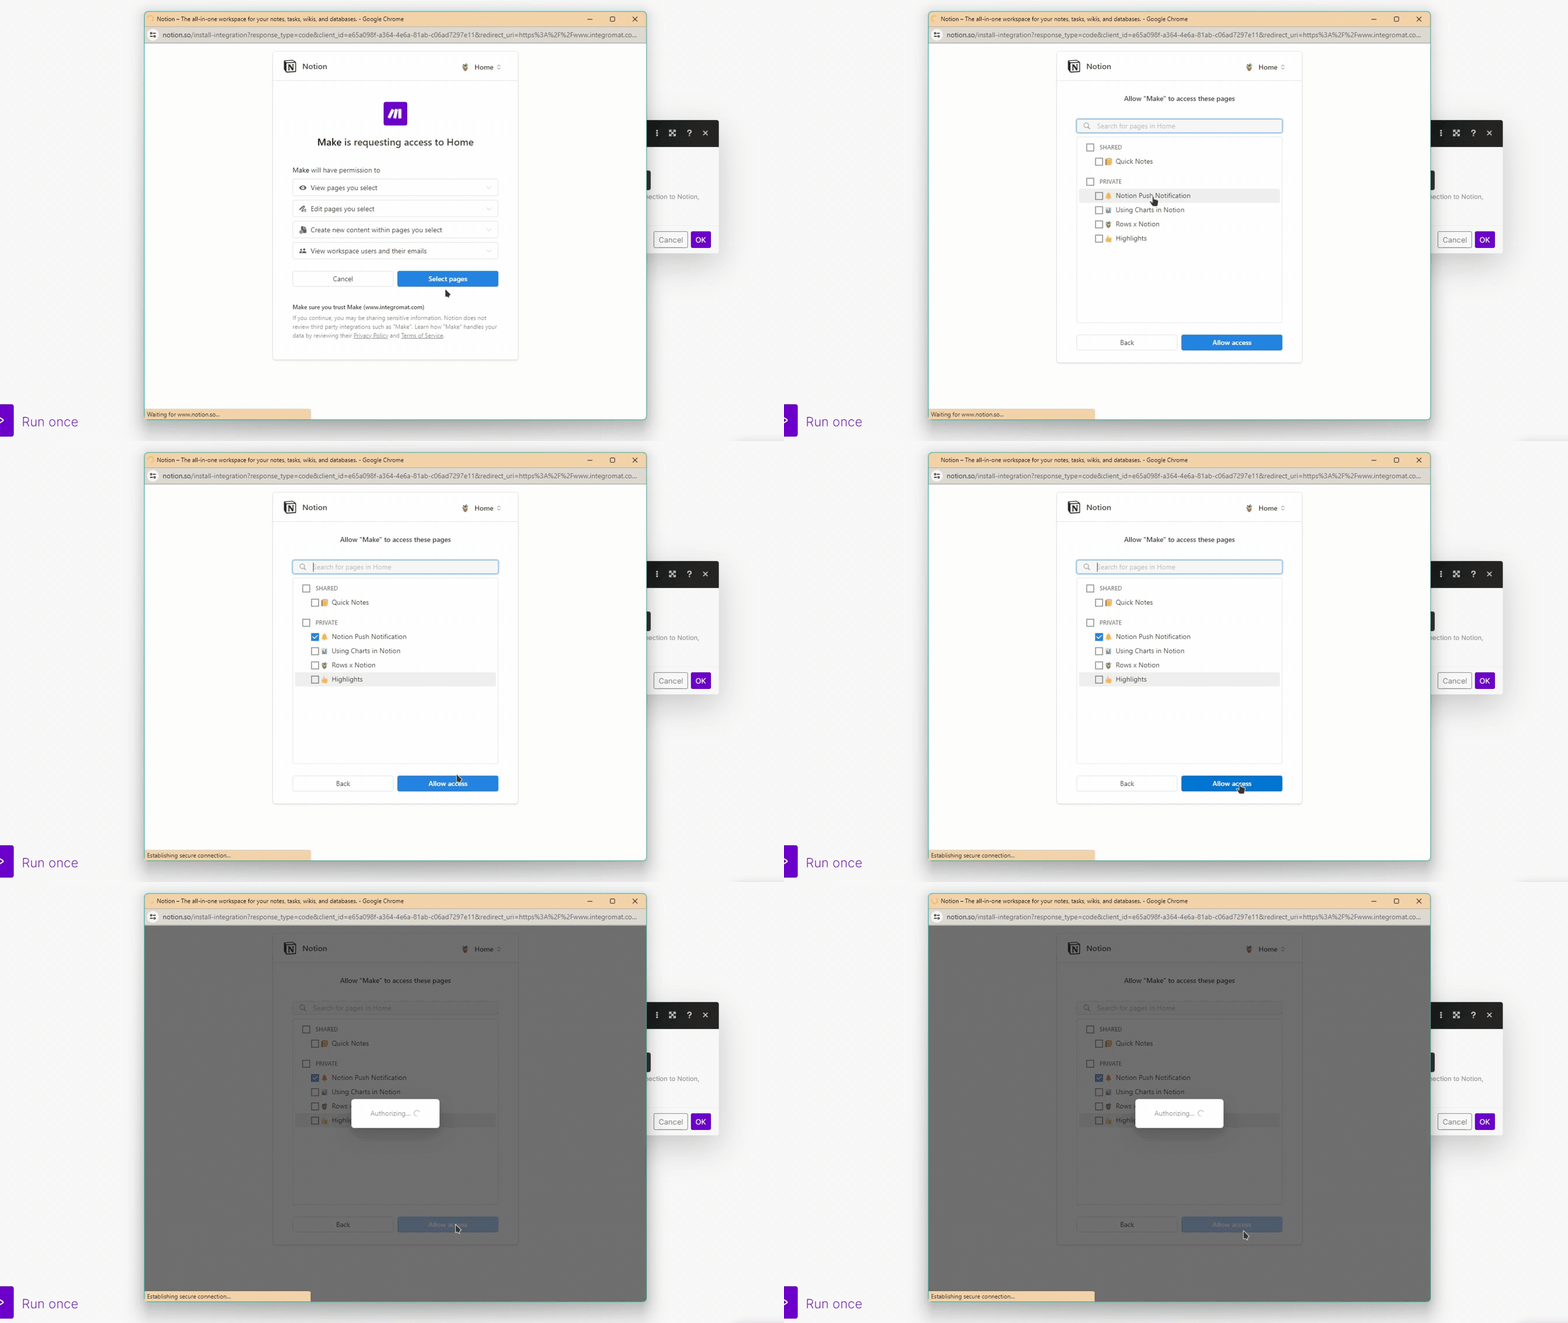
To do that, click on Create a connection and then choose the Connection Type. For this scenario, select Notion Public and a new page will open. From there, select the page(s) you want your Make account to have access to and you’re good to go.
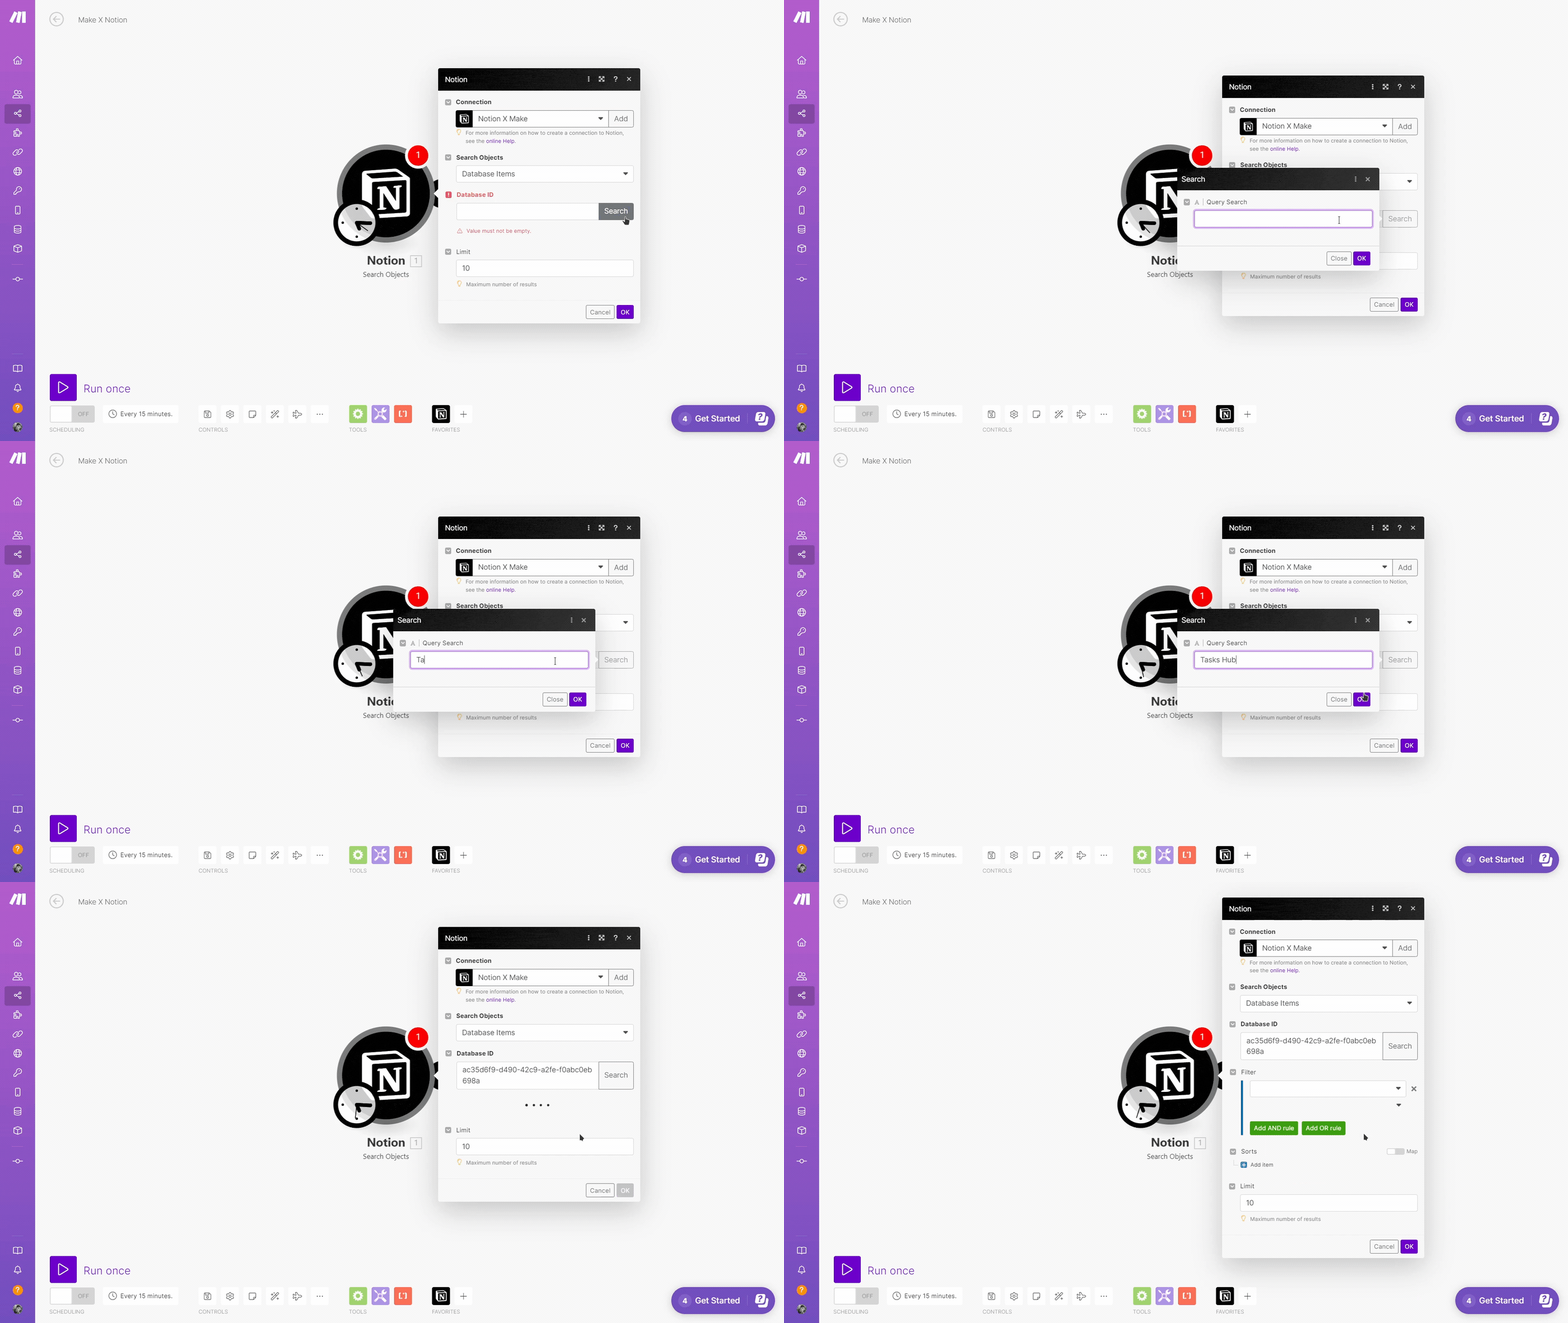
Once set up, you can now further adjust the integration. From the same modal, under Search Objects, select Database Items. Now you need to select your Notion database. Click on Search under Database ID and enter your database title and the Make will automatically select that database.
Now, from the Filter section, set the following rules:
- Filter: Remind me? (Checkbox)
- Rule: Numeric Equals True
This of course assumes that you have a database that contains a checkbox property with this exact name, like in the example I showed you above. If your setup is different, then you have to adjust your filter accordingly.
Just make sure to set a filter that corresponds with what you want to be notified about or else Notion will send you a push notification for every single entry in your database.
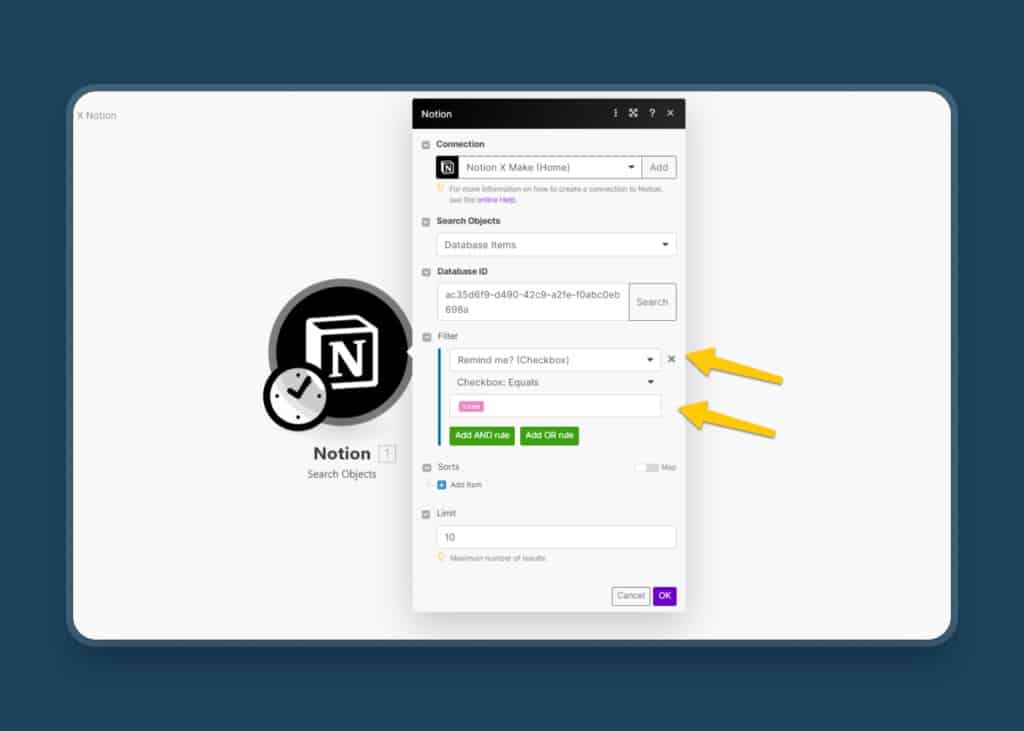
With this setup you can send as many notifications as you want, however, if you would like to limit them, just add the desired number in the Limits property. For testing purposes, I recommend setting it to 1 so you only get one notification every time you run this.
Click OK to save the connections. You can right-click on the Notion Module and click Run this module only to test it. If everything works as intended you should see a tiny bubble with a magnifying glass pop up next to the module. Once that’s the case, head over to your phone to install the Make app there.
Step 3: Install the Make app on your smartphone
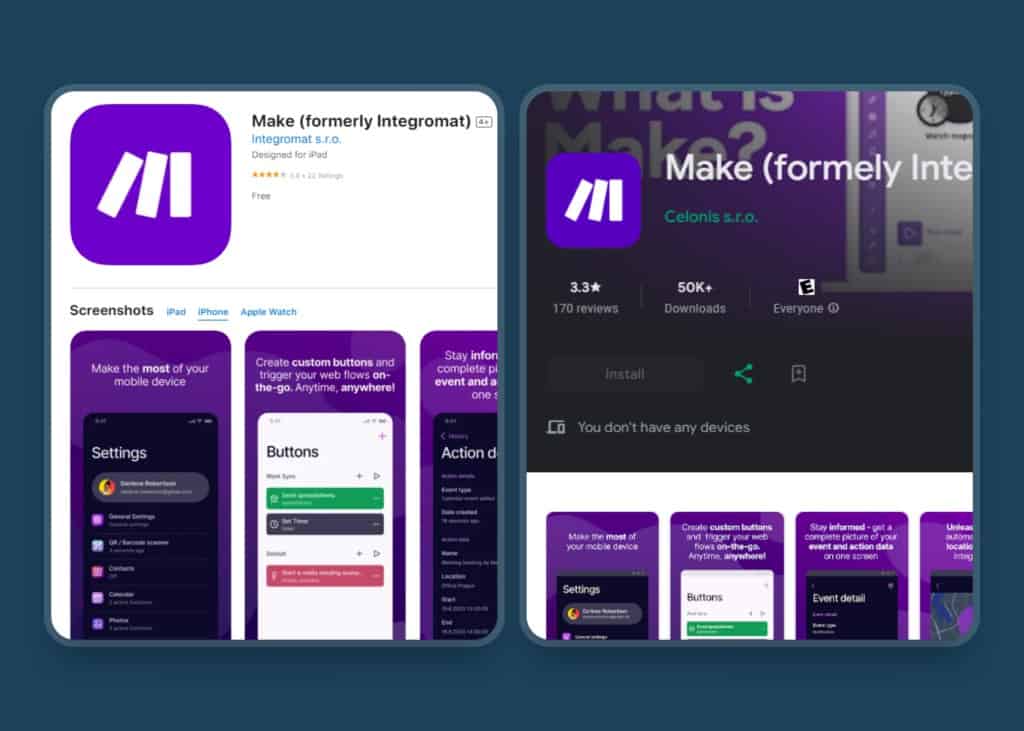
To get custom Notion notifications on your phone, you need to install the Make app on your smartphone. Both iOS and Android versions are available. Once installed, sign in to your Make account.
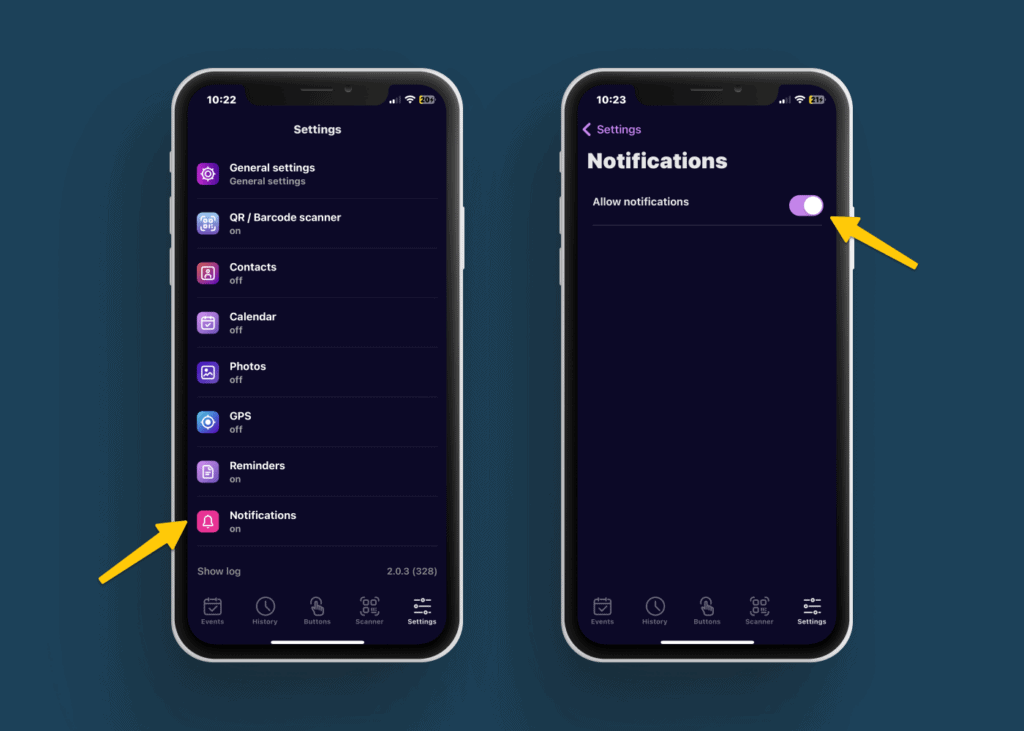
One more thing, inside Make Settings, go to the Notification option and toggle on Allow Notification. Your iPhone will ask for permission. Allow it and you’re set. This is quite easy to overlook when trying to set up this workflow and it took me a few hours to troubleshoot the issue when I first tried it out.
Now that the app is properly set up, head back to your Make scenario on your browser to complete the setup.
Step 4: Set up the push notification module for Notion
Here comes the fun part. Click on Add another module and search for iOS / Android (based on the phone you use). For this case, I will show the iOS setup. For Android, the process is almost identical, so you should be able to figure it out.
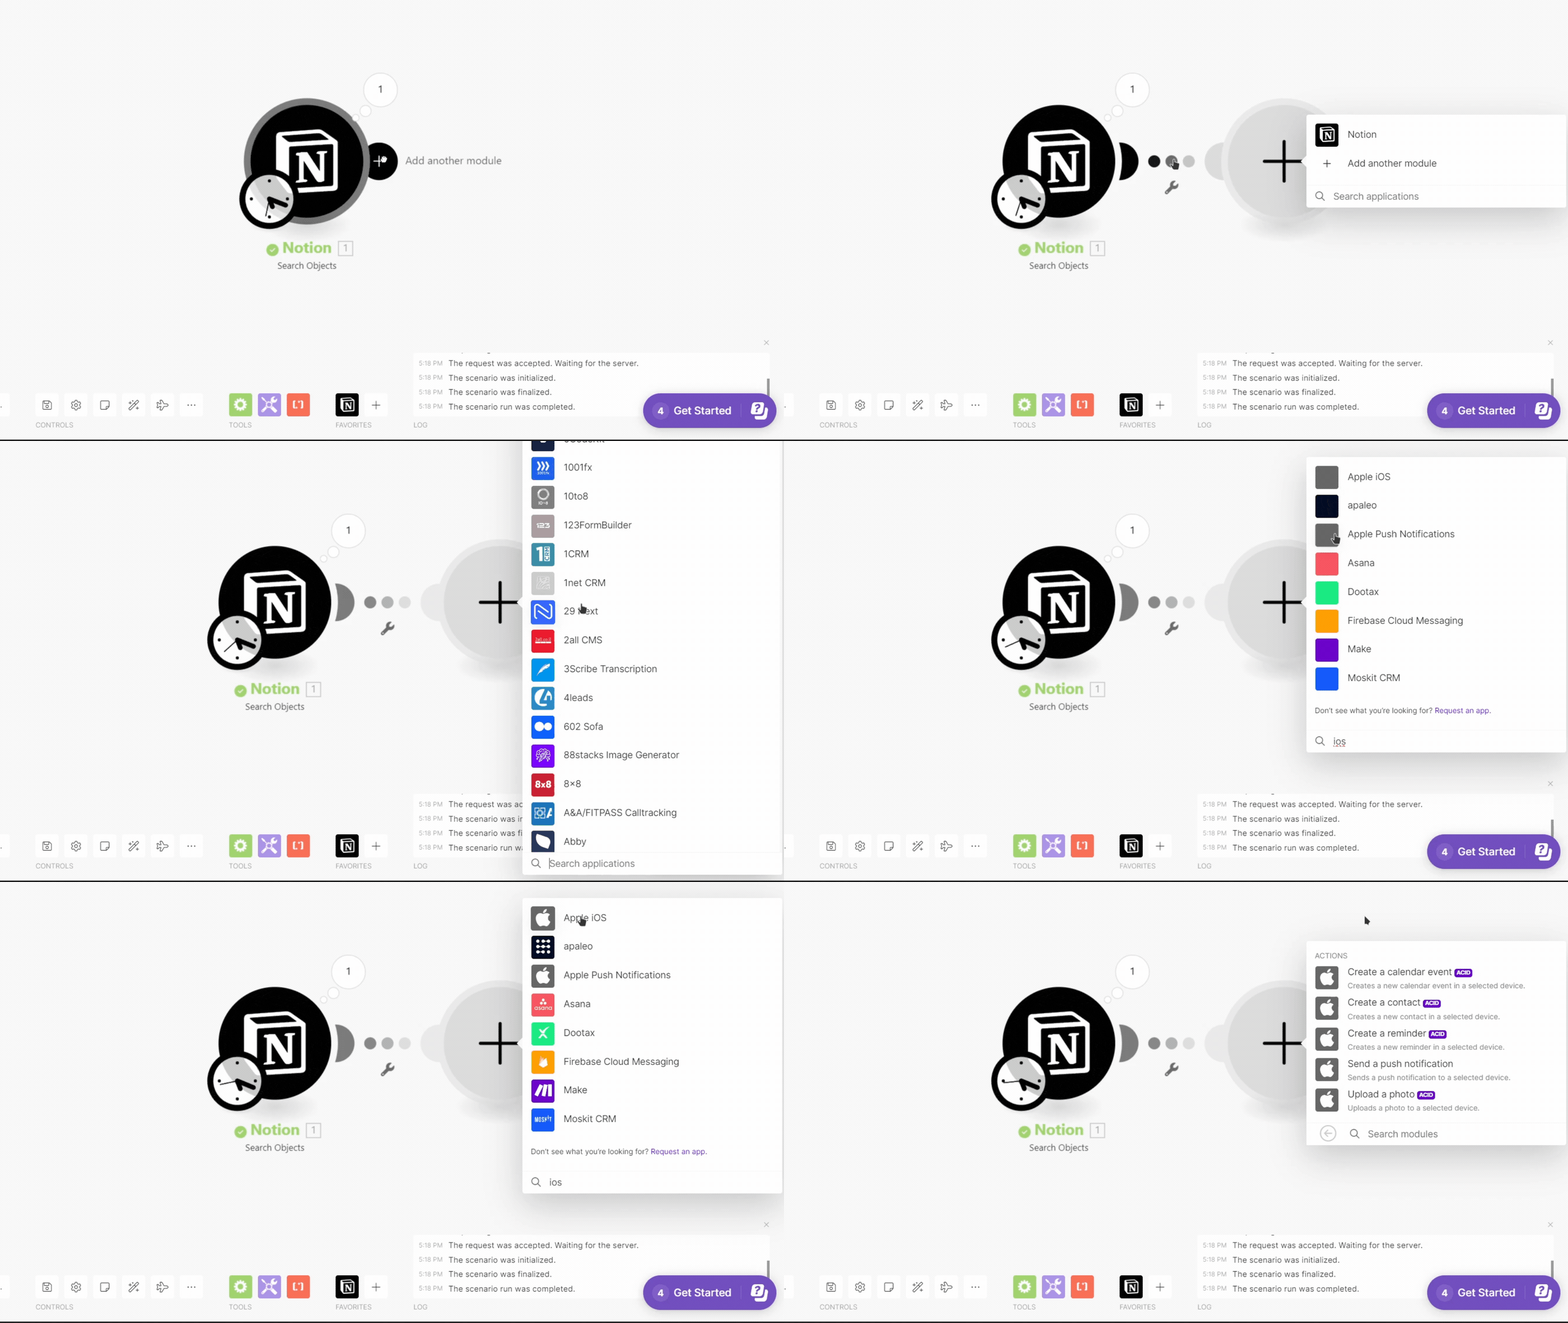
Now, select iOS and click Send Push Notification. It’ll create a new modal window. Under device, select Add to get a QR code. Then, open your Make app on your phone to scan the code and create the connection.
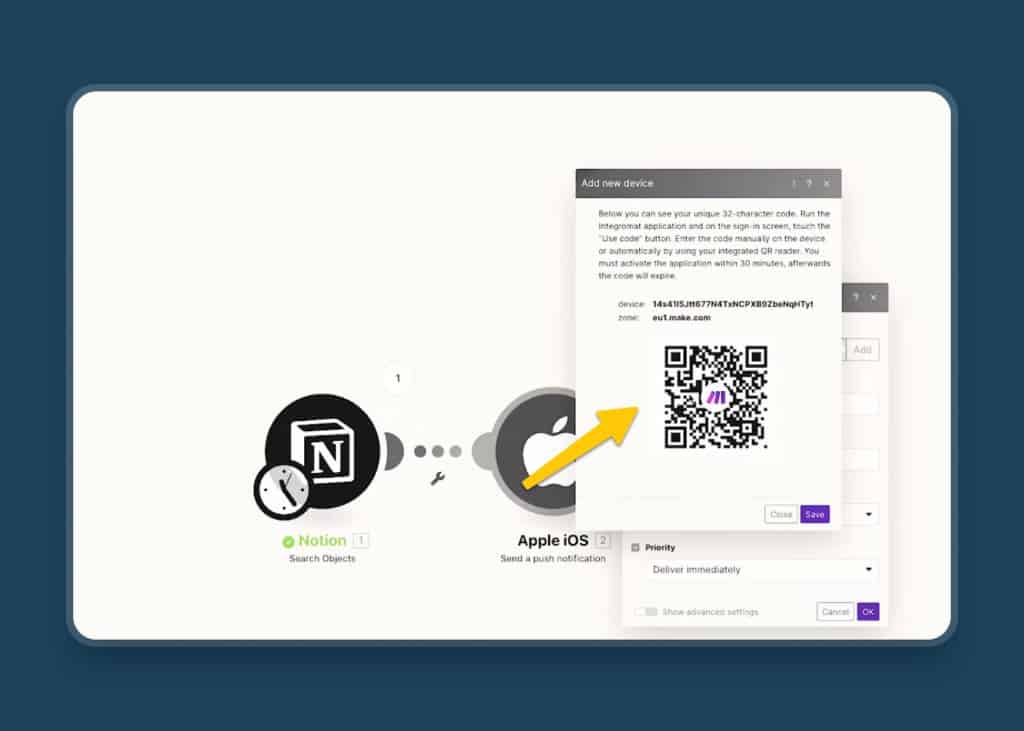
Tip: Setting this connection up for the first time can be a bit tricky – sometimes Make refuses to recognise your QR code. If it doesn’t work after a few attempts, try creating a new connection in the iOS module in Make.
Now select the following options for each field:
- Device: Your Phone
- Title: You can add the title of the Database item or from any other property in your database by clicking into the field and selecting the corresponding value – or hardcode a message by typing in some text
- Body: Again, you can pull in any information from your Notion database that you want. To send the name of the database item, select Properties Value > Name > Plain Text.
- Action: Default or Open Browser. Default simply opens the Make app on your phone whereas Open Browser allows you to set a specific URL to open.
- URL Adress: URL (if you select Open Browser under Action) – you could add here the URL to the Notion database item so that your phone actually opens Notion whenever you click the notification.
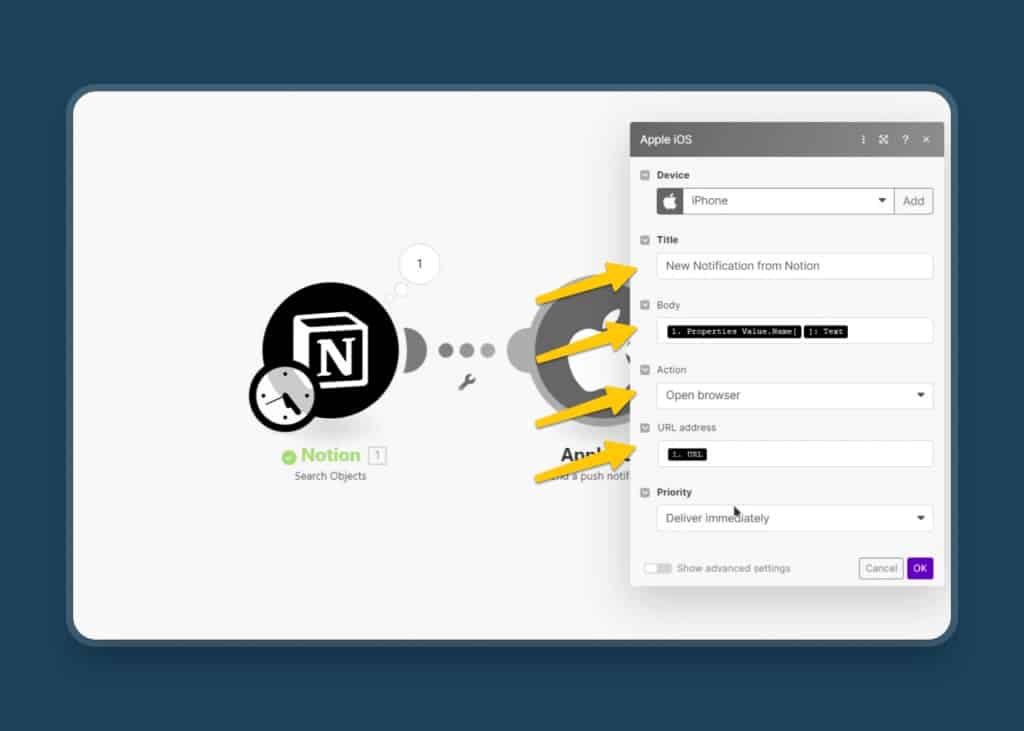
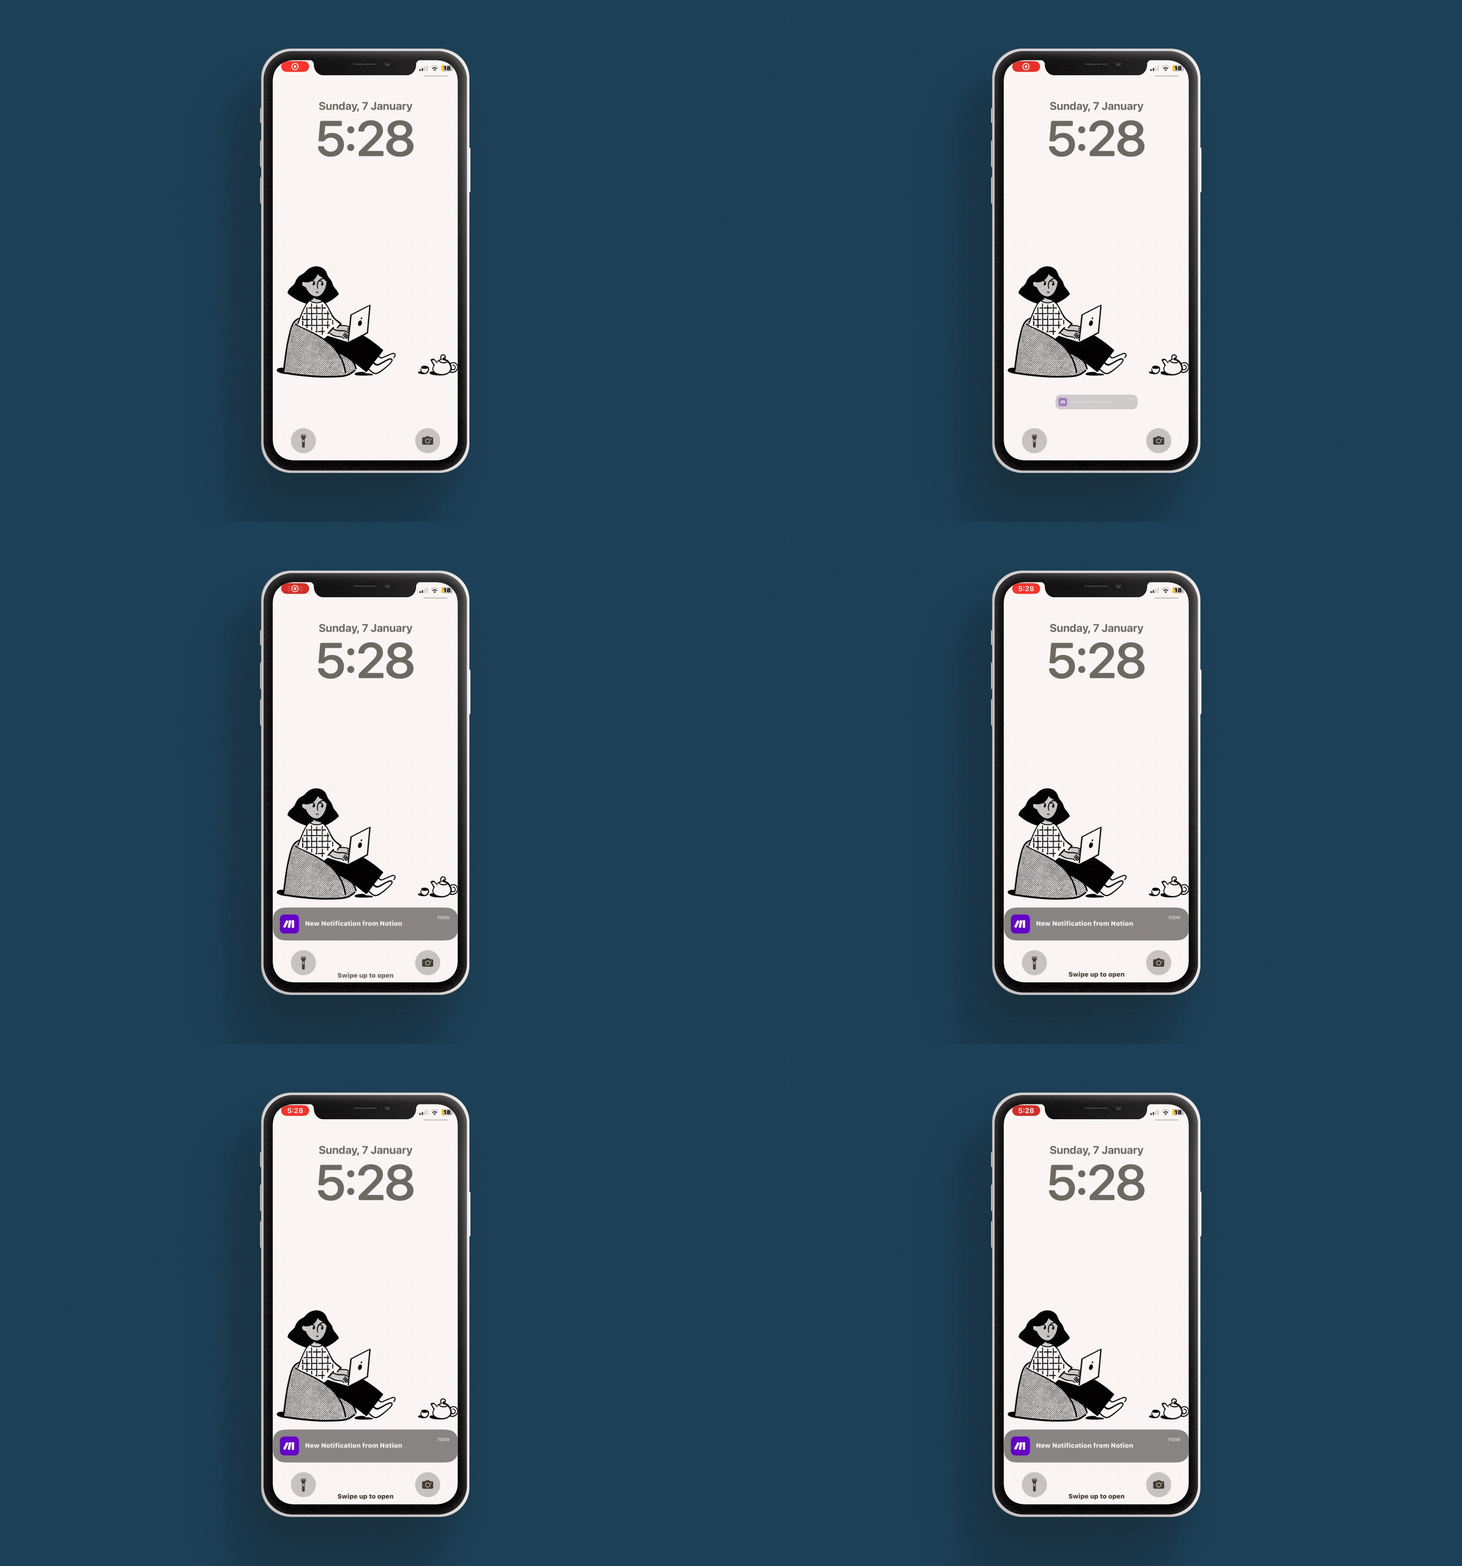
Click OK to save the module. Now, Click on Run Once on the bottom-left corner to run this scenario. If everything works fine, you will get a custom Notification right on your iPhone.
Now, if you want to schedule it on a regular basis, toggle on Scheduling and click on the Clock icon to adjust the following settings based on your preference. Under Run Scenario, you can pick a frequency to run the automation and based on your choice, you’ll see different options to finetune that. In case you select “Every Day” like in the example below, you can then choose the specific time at which to run the automation.
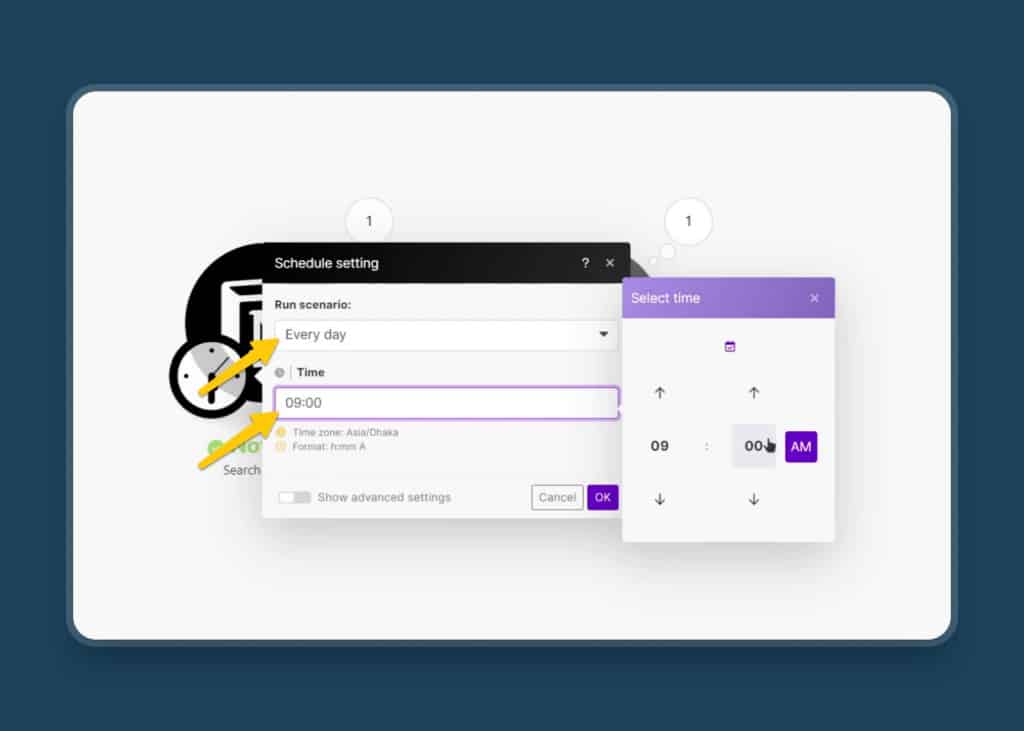
Adjust it to your preferences and click OK to save it. Now, this integration will run automatically at the predefined time.
How to get custom reminders from Notion
With the previous example, you will only get notifications on a certain time of the day. But, what if you have a meeting and you want to get the notification at a specific time that depends on a database property in Notion? You can do that too. For this to happen, you need of course a Date property in your Notion database.
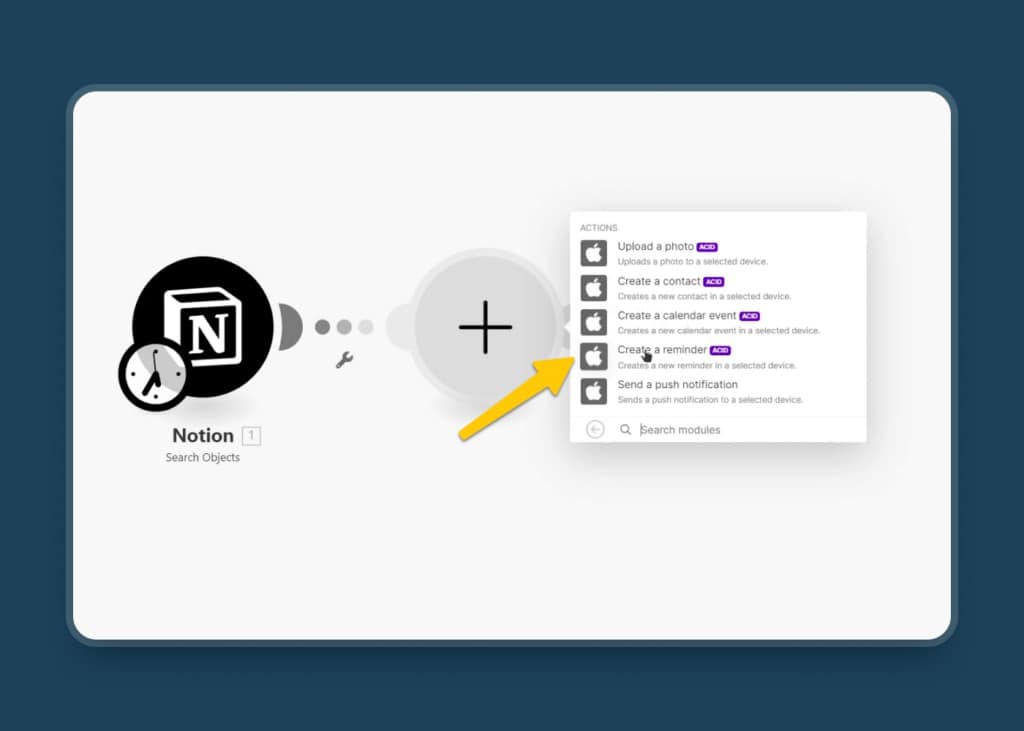
With the Search Object set up like in the previous example, click on the Add another module and select iOS. In order to get a dynamic time for the notification, choose the Create a reminder option.
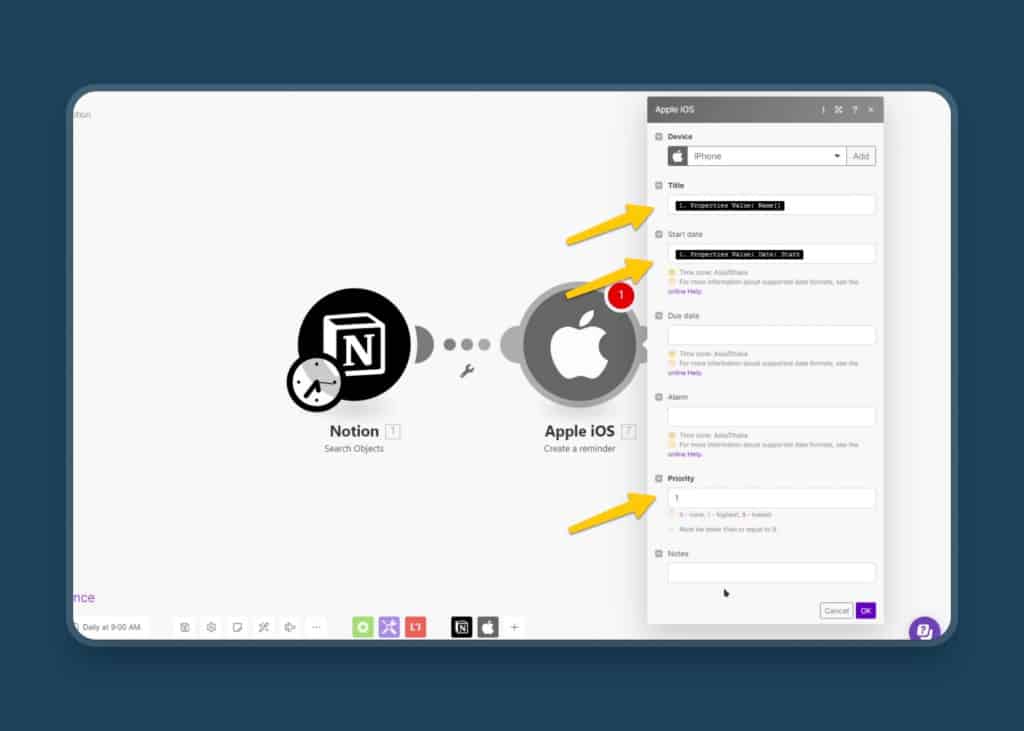
Now, in the Create a reminder module, adjust the following settings as you prefer:
- Title: Select Properties Value > Name > Plain Text to get the name of your database item
- Start Date: Select Properties Value > Date > Start to grab the time that you’ve set in Notion
- Due Date: If you need it, you can add a (separate) due date here from a different date property in Notion or set the same date
- Alarm: Same as for the Due Date, you have the option to add in a separate date value or the same in this property, if you want to trigger an actual alarm
- Priority: 1 for the highest priority
- Notes: You can add notes too (and could of course pull them from a different property in Notion)
Important: if you want the reminder to trigger at a specific time of the day, make sure that your entry in Notion actually has a time set in the date property.
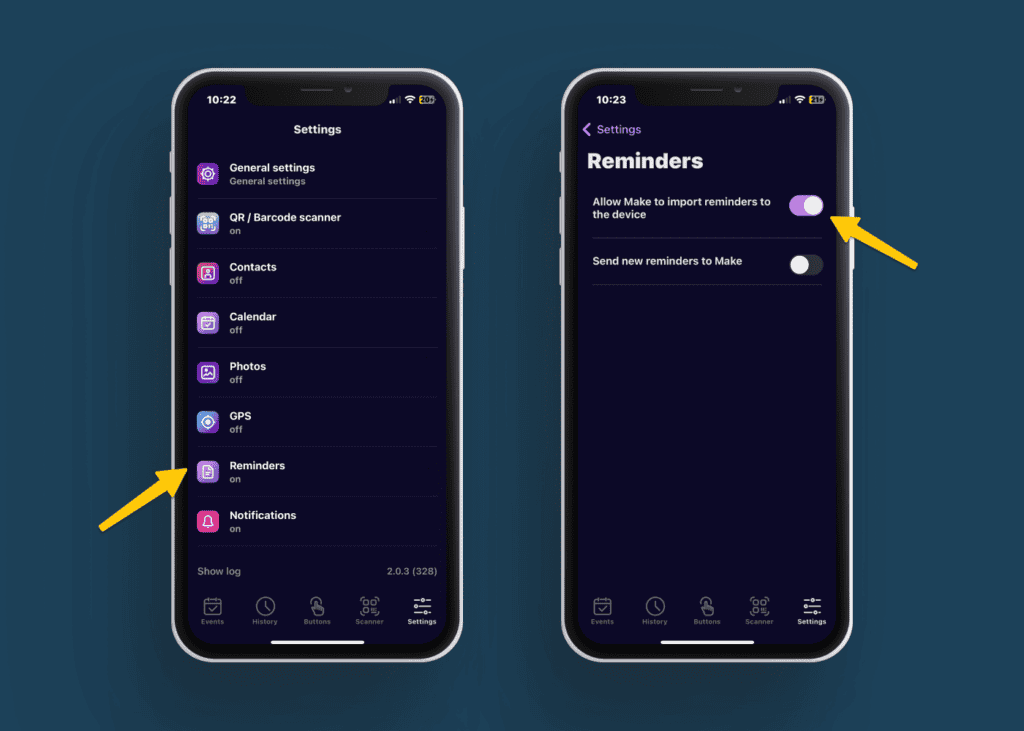
Also, you need to make some changes to your Make app in order to support this new functionality. Head back to your phone and open the Make app. Go to Settings and inside Reminders, you need to toggle on Allow Make to import reminders to the device.
Now, when you click on Run Once, you’ll see the reminder from your Notion workspace right inside your Apple Reminder app – and it should appear on your home screen at the specified time.
How to group multiple Notion Notifications
Notion Notifications are awesome – until you get 50 of them at once. Just imagine yourself in the morning picking up your phone only to see a death spiral of Notion notifications coming at you. Not the best start into the day. However, wouldn’t it be amazing to get all your Notion Notifications grouped together?
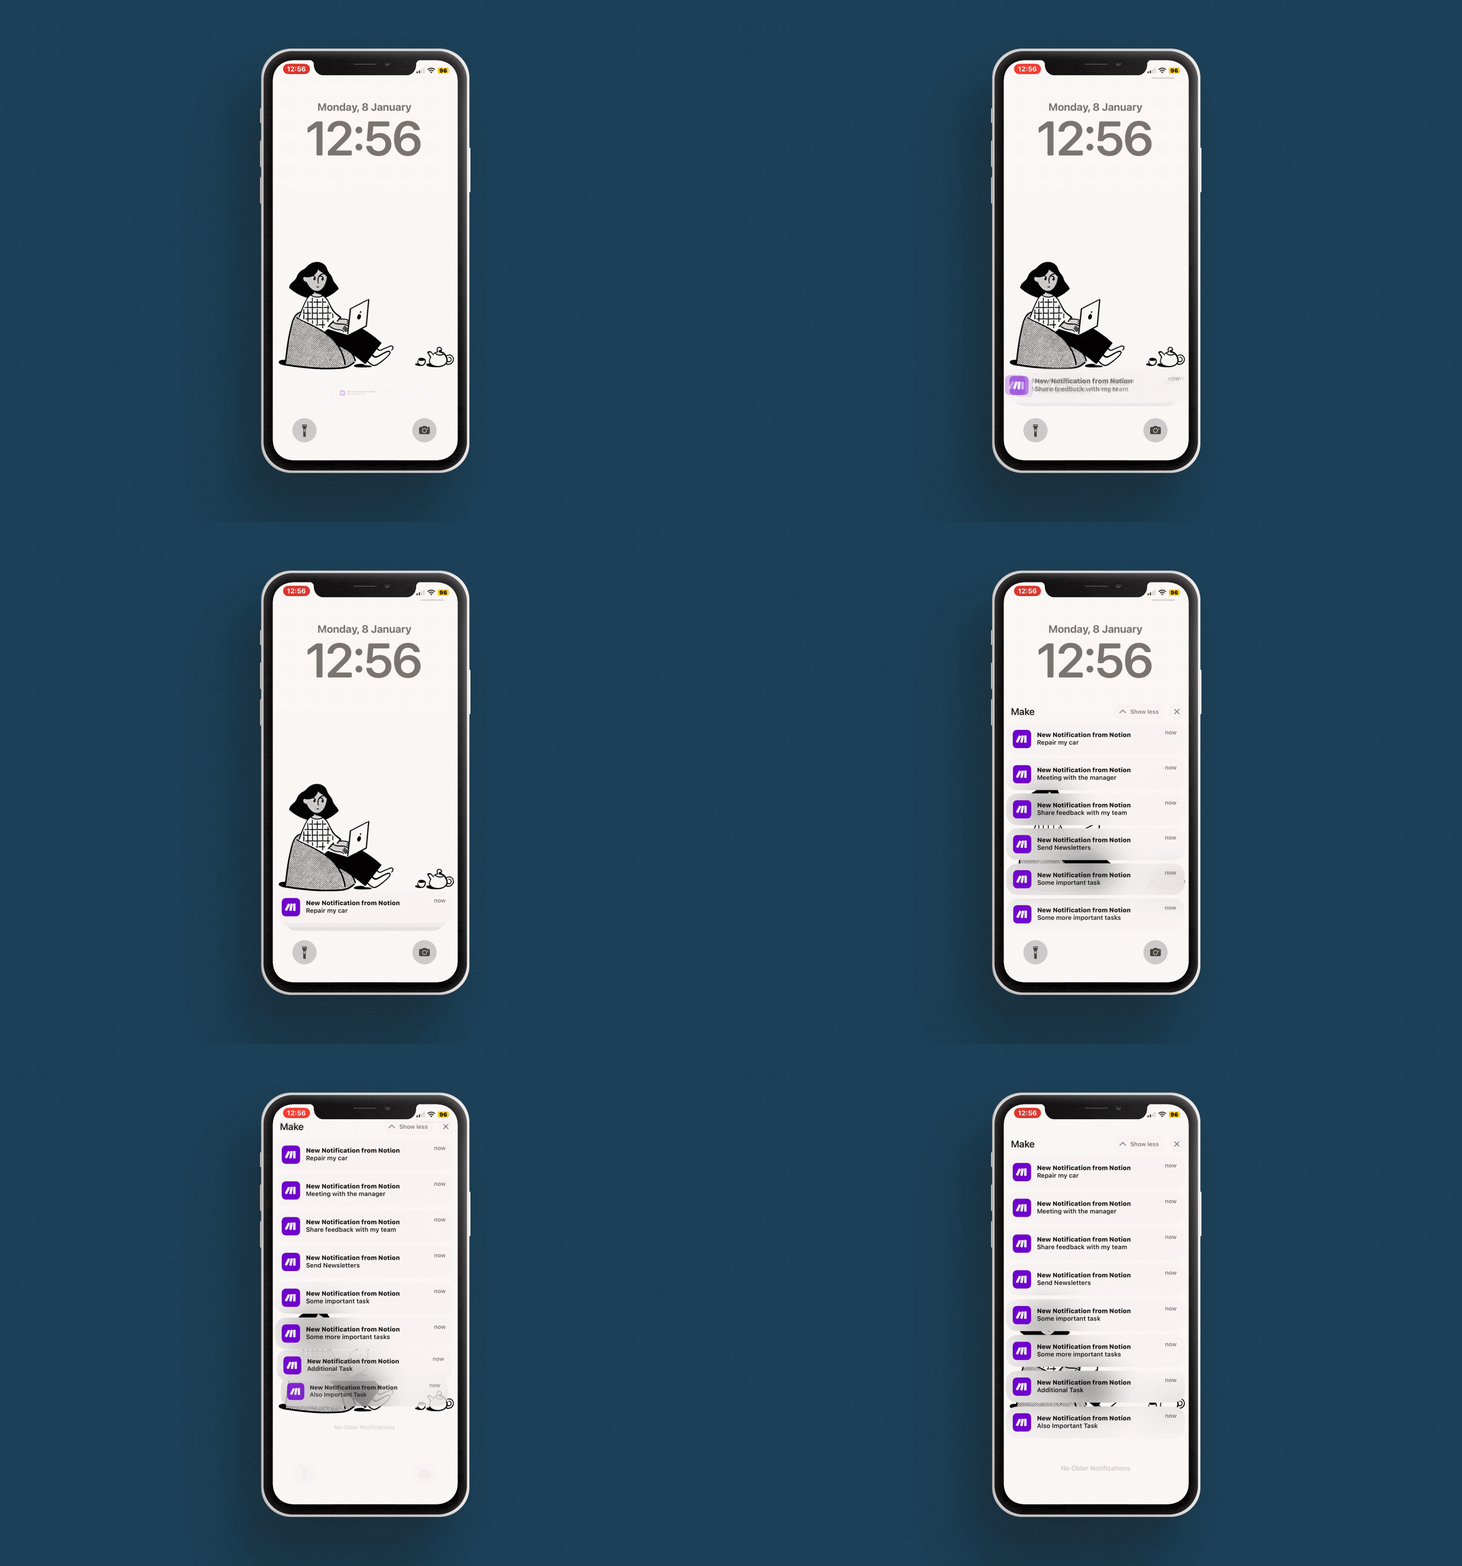
Well, in this part of the Notion Tutorial, you’re going to learn how you can do that too. It’s a bit tricky but I will show you the easiest way.
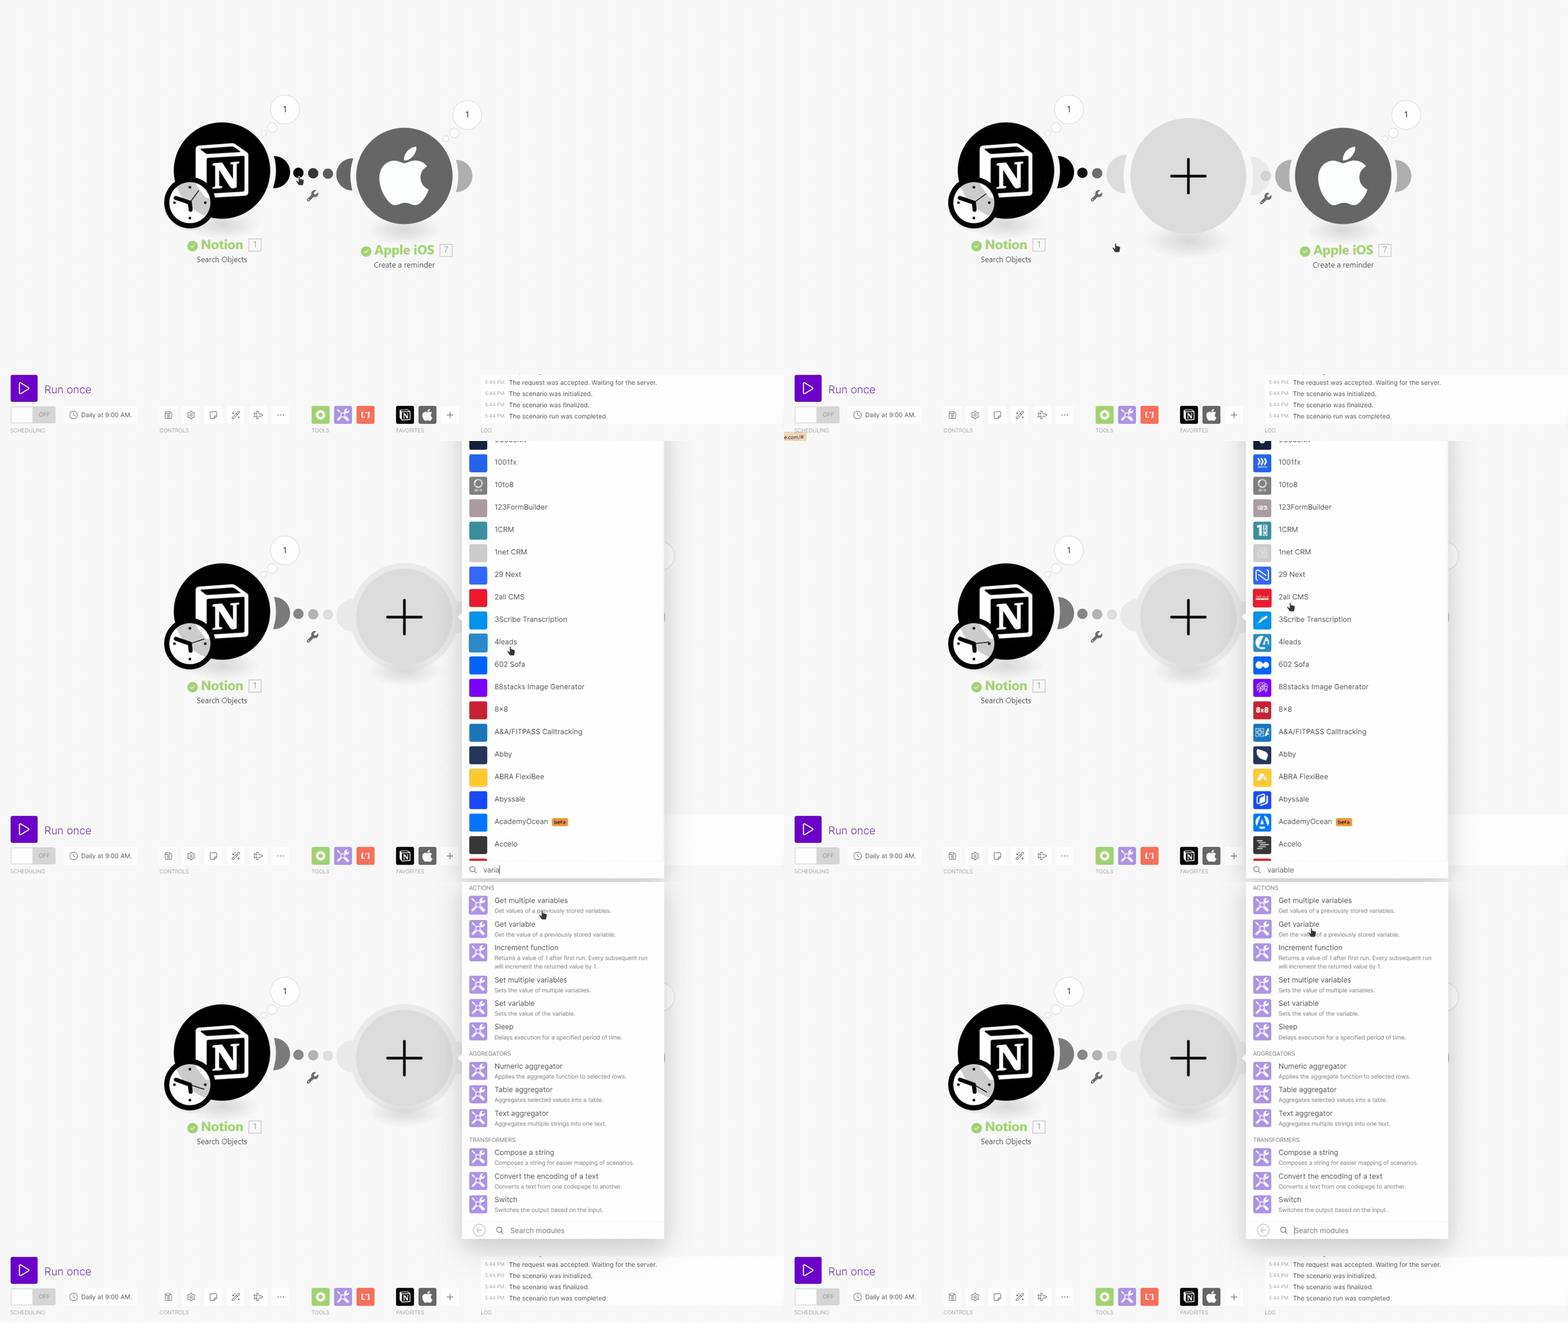
First, set up the Get Object and Send a push notification modules like before. Then, right-click between the two modules, and select Add a module. Now, search for Variables and click on Tools to select Get Variables from the list of actions.
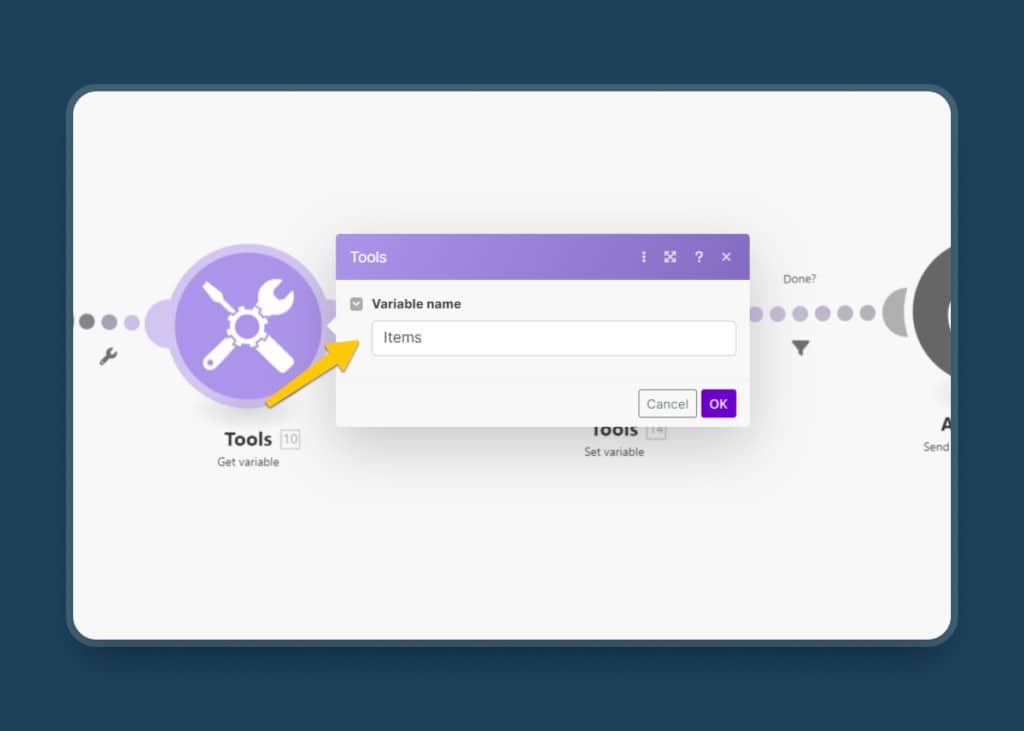
In the variable Name, type anything you want. For now, just type Items.
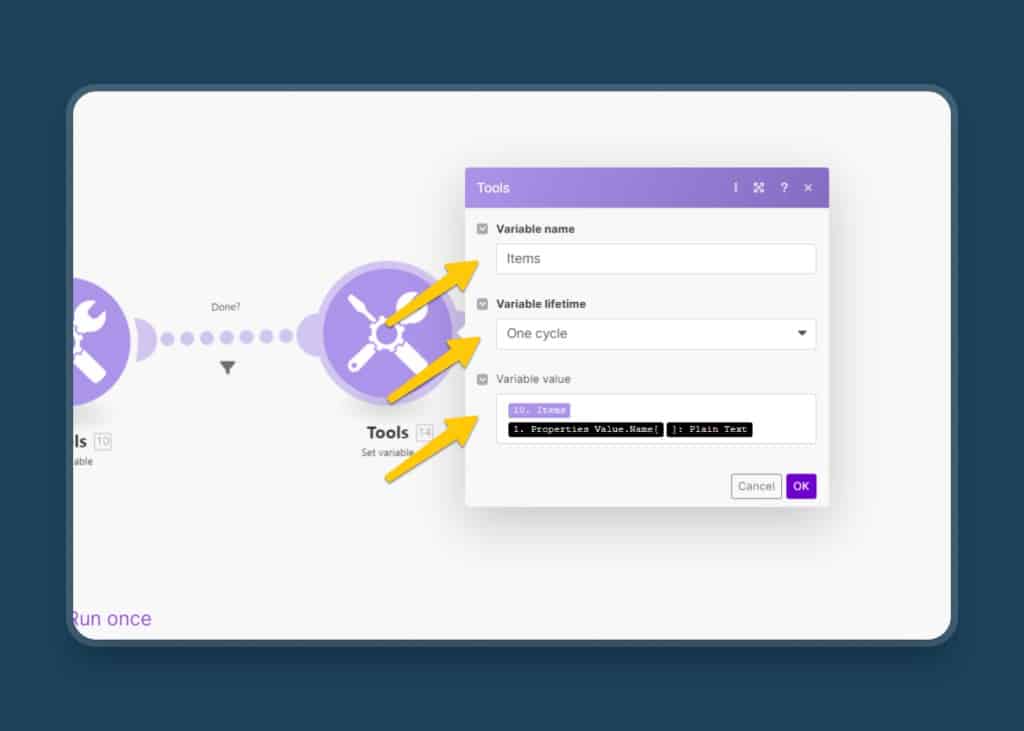
Similarly, add another module between the last two and search for Variables again. But, this time, you will select Set Variables under the list of Actions. Now adjust the following settings:
- Name: Items
- Variable lifetime: One Cycle
- Variable Value: First Select Tools under Get Variables, hit enter and add Properties Value > Name > Plain Text in the next line
Sounds a bit confusing? Let’s break it down.
Your new scenario will now start by pulling in all entries from Notion that fulfil your filter. Then, the scenario will load the current value of the variable Items. On the first run, Items will be empty. Then, we use the third module to set the new value for Items to everything it contained so far plus one more entry from Notion.
By looping over these two variable steps, we slowly add every single entry to the Items variable which we can then later send at once instead of all entries individually.
This way, you won’t get the spiral of notifications. But it’s not quite done yet. You are still missing the loop that ensures the notification only triggers once the variable has been fully built.
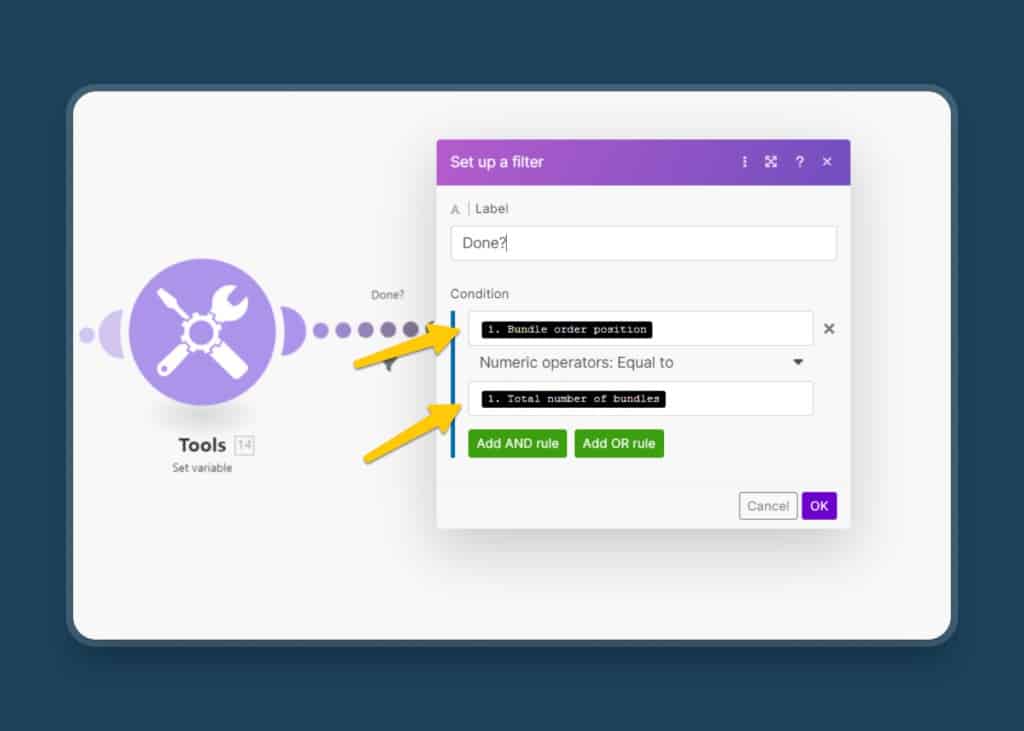
First, create a Filter between the third and fourth module (so between the second Variable Action and the iOS Action). To do so, simply Left-click on the dotted line between the modules. This will open up your filter settings which you should adjust as follows:
- Label: Done? (You can add anything you want – this is just the name of the filter that the UI will display)
- Conditions: Set Bundle order positions with numeric operators equal to the Total number of bundles.
Second, modify the Send a push notification module to use the value of the variable instead of the specific Notion entry under the Body parameter.
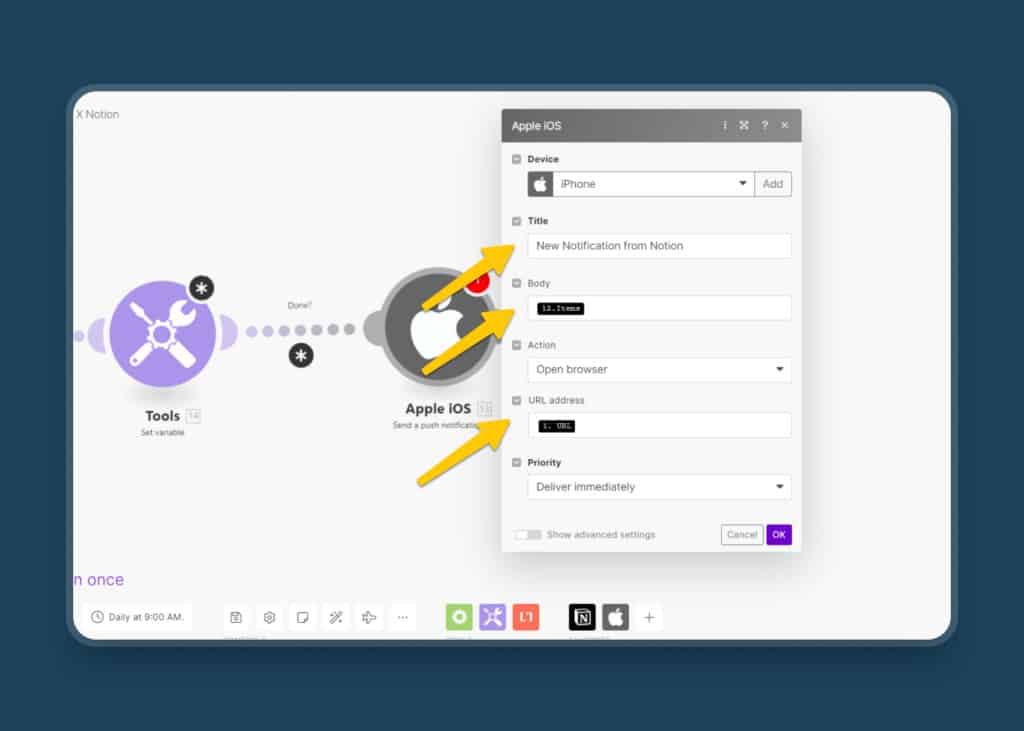
With this setup, you will get one big bundle of all your Custom Notion Notifications from that database. Cool, isn’t it?
Notion Notification: Final Thoughts
Notion is an awesome productivity tool, whether you’re using it for yourself or as a team. And by getting custom Notion Notifications, you can finally integrate all the information from Notion into your day-to-day life without having to open the app every single time.
It’s a great way to be productive when you’re on the go and you can’t access your laptop all the time. So, give this amazing Make & Notion integration a try and start receiving Notion Notification on your smartphone.
Get Your Free Notion Template
You can download this Notion Template plus another 21+ other free templates here:


