Not Much of a Reader? Check Out My Notion Mail Tutorial on YouTube

Key Notion Mail Features
✅ Familiar Notion Layout: Notion Mail looks and feels like Notion (unsurprisingly), so you navigate with a sidebar, central inbox, and properties instead of folders.
🧭 Custom Views For Any Workflow: Build inbox views like “Today”, “Needs Reply”, or “Clients” using filters, groups, and sorts, just like a Notion database.
👀 Flexible Reading Modes: Switch between side peek, centre pane, or full page when reading emails so you can skim quickly or go deep when needed.
🧠 Rules And AI Labels: Combine classic rules with Notion AI labels to sort newsletters, clients, and tasks automatically in the background.
⏰ Built-In Reminders: Snooze emails to a later time so important messages resurface exactly when you are ready to act on them.
✍️ Snippets For Fast Replies: Save your favourite replies as Snippets, then drop them into any email in seconds with variables for names, topics, or links.
🧩 Custom Properties For Emails: Add properties like Project, Priority, Owner, or Status to turn your inbox into a simple CRM or lightweight task manager.
🎨 Rich Notion Block Editor: Write emails with headings, callouts, checkboxes, colours, and quotes so your messages stay clear, structured, and easy to read.
📤 Push Emails to Notion: Send any email directly to a Notion page or database — either manually per email or automatically for entire views.
Important Notion Mail Updates
📢 January 2026 Update: Notion has released two new features — you can now push emails directly to Notion (manually or automatically), and there’s a new account picker for switching between Gmail accounts. This guide has been updated to reflect these changes.
What Is Notion Mail And How Does It Work?
Notion Mail is a rather clever, simple-to-use built-in email client that lets you read, organise, and reply to emails directly inside your workspace2. Instead of bouncing between a traditional inbox and your Notion pages, everything lives quite happily in one place, including your messages, tasks, projects, notes, and the context you need to work without friction.
If you already know how to use Notion’s sidebars, filters, or database views, I am confident that you will pick up Notion Mail instantly. In short, your inbox behaves just like a Notion database: you can filter messages, group them, add properties, apply labels, and create views that match your common sense, and not how a default email app forces you to think.
🌍 Real-world insights: For existing users, it’s all so beautifully familiar, and that’s one of the many things I like about Notion Mail. It feels intuitive, almost as if it were something you would design yourself, if given the chance.
At its core, Notion Mail connects your email account (Gmail for now) so you can:
- Read incoming messages
- Reply from your Notion address
- Organise emails using filters, labels, properties, and rules
- Write messages using the full Notion block editor
- Link emails to projects, tasks, team docs, or clients
🎯 In short: Notion Mail turns email into part of your system, not a separate, third-party tool that distracts you from it.
Notion Mail UI Walkthrough
When you open Notion Mail, the first thing you’ll notice is how natural everything feels. The layout looks just like the rest of Notion, which means that existing users will understand how to use Notion Mail without any bewildered head scratching.
On that note, you may wonder why I created a Notion email tutorial at all, given how remarkably simple it is to use. Well, in my opinion as an all-singing, all-dancing Notion consultant, some of the advantages of the Notion Mail interface might be lost without a few pointers, hence the reason for this guide.
Here’s a quick tour of the interface 👇
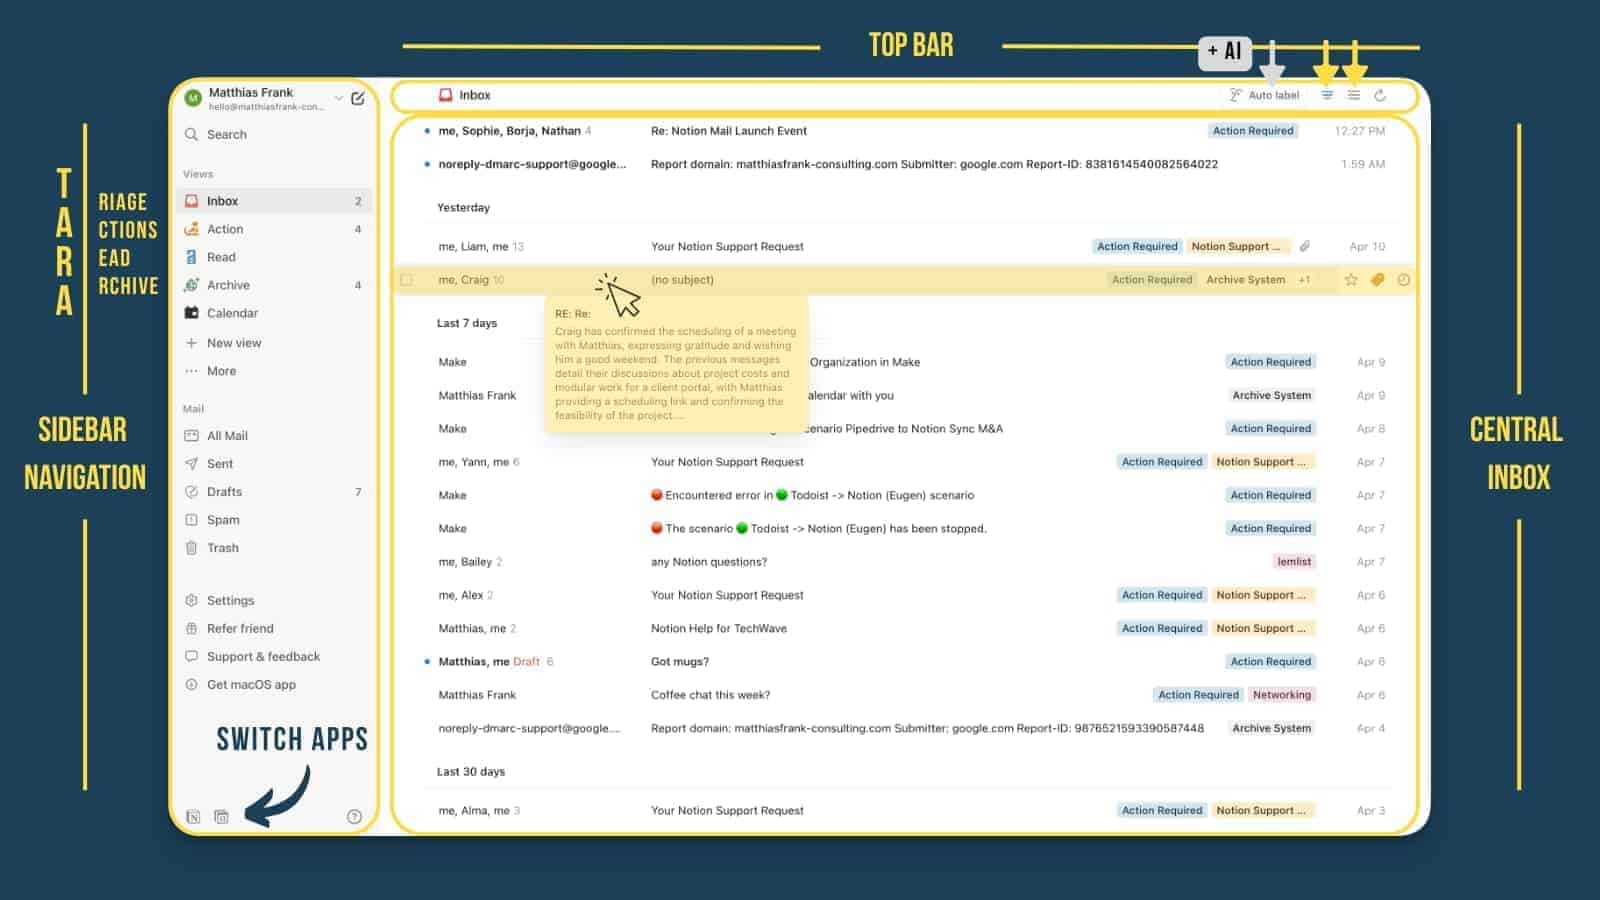
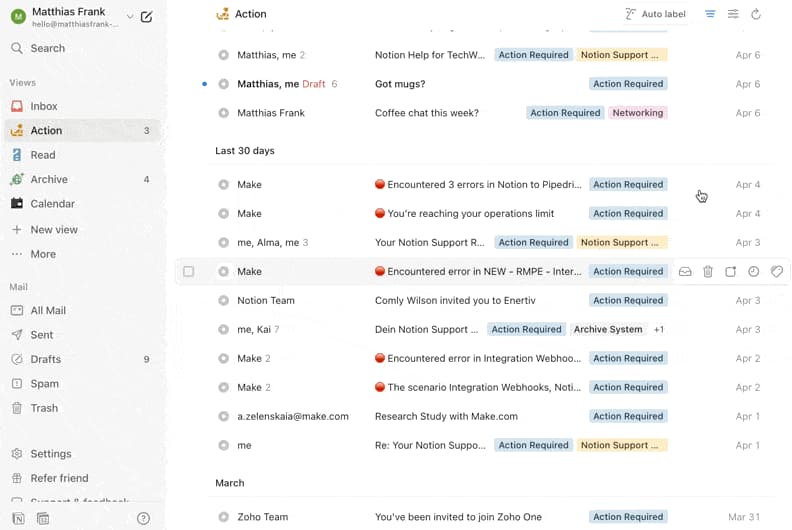
📌 Sidebar Navigation
On the left, you’ll see the main sidebar with your Inbox, Sent, Drafts, labels, templates, and the views you’ll use to stay organised.
This is the best place to start when you’re learning how to use Notion Mail, because all your navigation lives here.
📬 Central Inbox Area
The centre panel is where your emails appear. You’ll see the sender, subject, time, and any properties you add later when you set up your system.
This is the part most people explore first when they try to understand what Notion Mail is and how it behaves – by jumping straight into the main inbox.
🎛️ Top Bar Controls
The top bar holds all your key actions:
- Filters
- Grouping
- Sorting options
- AI auto-labelling tools
These help you control the general flow of your inbox and support how you will likely use Notion Mail on a day-to-day basis.
⚡ Hover Actions
When you hover over an email, you’ll see quick buttons appear, such as:
- Archive
- Label
- Set reminder
This makes it easier to stay on top of your inbox without having to open each message individually.
| 💡 Pro Tip: Your inbox will feel quite empty on first launch, and that’s completely normal. Once you set up your TARA views later in this Notion Mail tutorial, everything will snap neatly into place. |
Notion Mail Pricing
Unlike many comparable offerings, Notion Mail will not cost you the equivalent of a kidney each and every month. This remarkable tool is free to use. All you need is a Notion Account, plus a compatible email (either Google Workspace or Gmail).
The only features in Notion Mail that require a paid plan are the AI-related features, such as the AI Label options and the AI drafting. These features are grouped together with the general AI add-on for your Notion Workspace, so if you’re already paying for Notion AI, you get access immediately.
Since your Notion Account can be a part of several workspaces, it’s enough that you have access to AI in any of these workspaces to unlock it for your Notion Mail Account.
💡 Pro Tip: If you want to find out whether Notion AI is worth it for you, check out our Notion AI Mega Guide
The Notion Mail Advantages Over Other Email Tools
If you already rely on Notion to organise your work, you should find that Notion Mail gives you a huge advantage: again, everything lives in one place. You don’t have to switch between a traditional email inbox and your Notion workspace. Your messages, tasks, notes, projects, and documents all sit together, in perfect digital harmony.
Here are some of the biggest Notion Mail advantages 👇
🔗 Your Emails Live Inside Your System
Most email tools exist in their own stubborn little bubble. Notion Mail is different because it turns emails into part of your workflow. Seriously – if you haven’t used it yet, prepare to be blown away by how utterly seamless it all is.
One of the main features of Notion Mail lies in its effortless connectivity, allowing you to connect an email:
✔️to a project
✔️to a task
✔️to a meeting note
✔️to a client dashboard
….All without copying and pasting! And if you want to share a specific part of your system with someone, Notion makes that pretty much child’s play, too. You can read more here:
👉 How To Share Only Part of a Notion Database
🧠 Custom Properties Instead of Folders
Notion Mail doesn’t rely on fixed folders. Instead, you can add your own properties, like Priority, Status, Owner, Due Date, or Project, and group messages however you want. Just as it should be! This gives you far more control than a traditional email client.
🎛️ Views That Match How You Work
With Notion Mail, you’re not stuck with a boring, default inbox. Instead, you can create views such as:
- Needs Reply
- Waiting On
- Today
- Clients
- Priority
- Meeting Notes
- Unread Only
This helps you stay focused and reduces the surprisingly irritating chaos of an overflowing inbox.
🤖 Automations With Rules + AI Labels
Traditional email filters are helpful, but Notion Mail goes further. Rather cleverly, you can build Rules that organise your emails automatically, and pair them with AI labels for even smarter sorting.
Together, they help keep your inbox clean without constant manual effort because, let’s be honest, who has the time (or the willingness) to constantly spring clean their Inbox?
💡 Pro Tip: You can turn your inbox into a lightweight CRM or client tracker just by combining views + properties – one of the many Notion Mail advantages!
A Step-by-Step Guide to Notion Mail
To get started with Notion Mail, download the Notion app and then go through the onboarding flow as explained below:
Step 1: Log In to Notion Mail
Start by logging into your Gmail account.
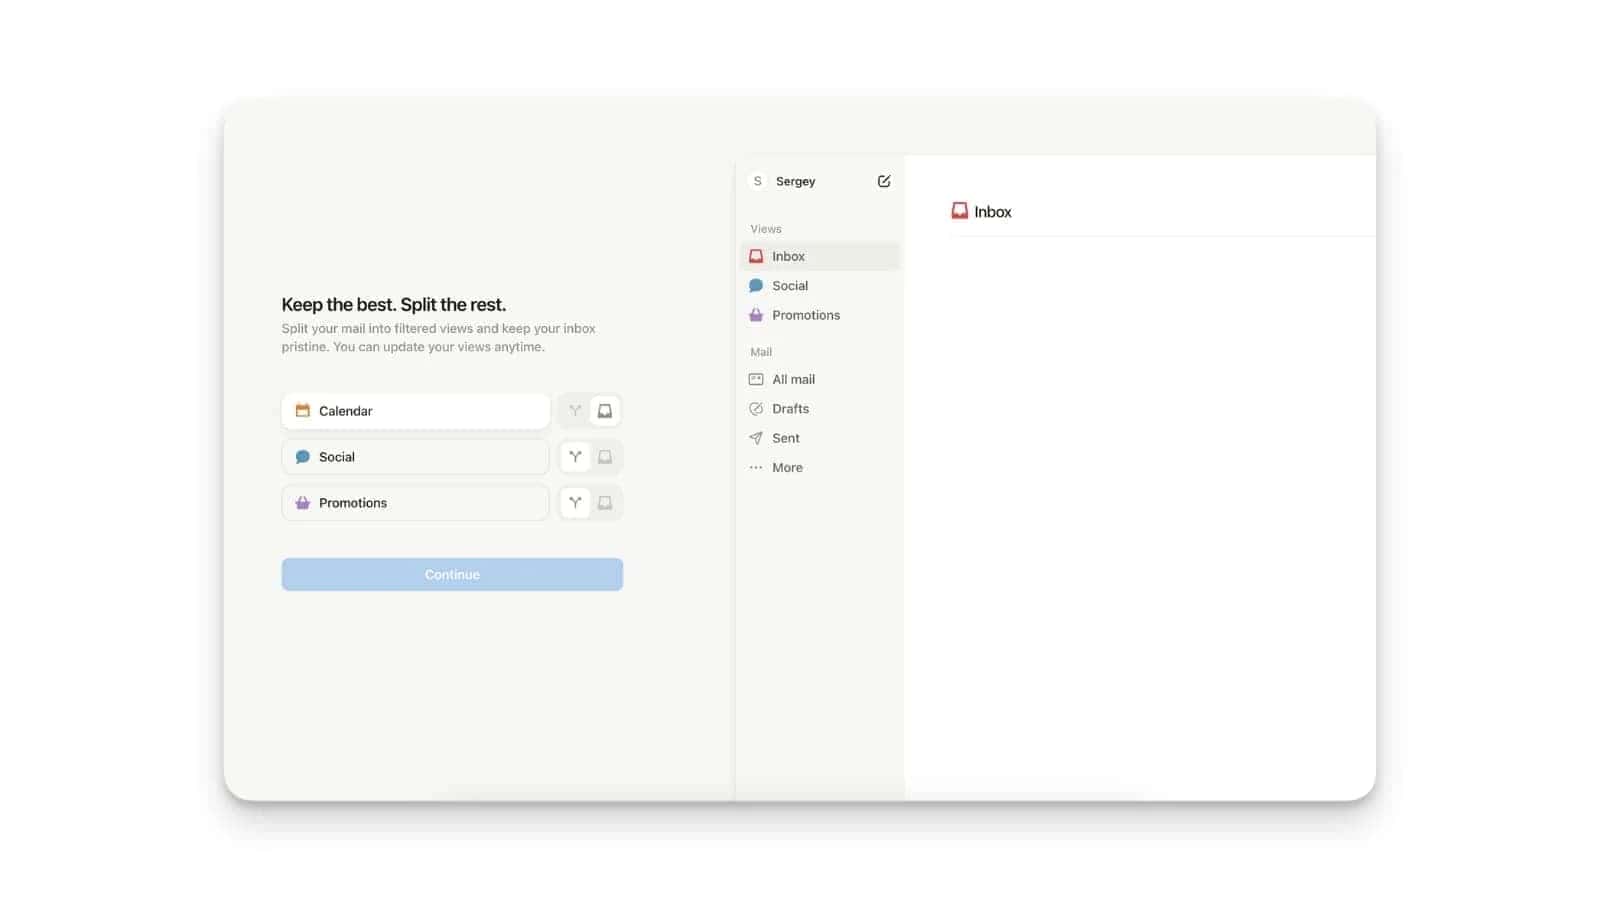
The first time you open Notion Mail, you’ll be greeted by an onboarding workflow that introduces its interface and setup options. It will ask you what kind of look you like for your inbox. At this point, I would recommend going for the default option to avoid starting with any settings that you might have to change later.
Step 2: Essential Settings in Notion Mail
Before diving into customisation, tweak these foundational settings:
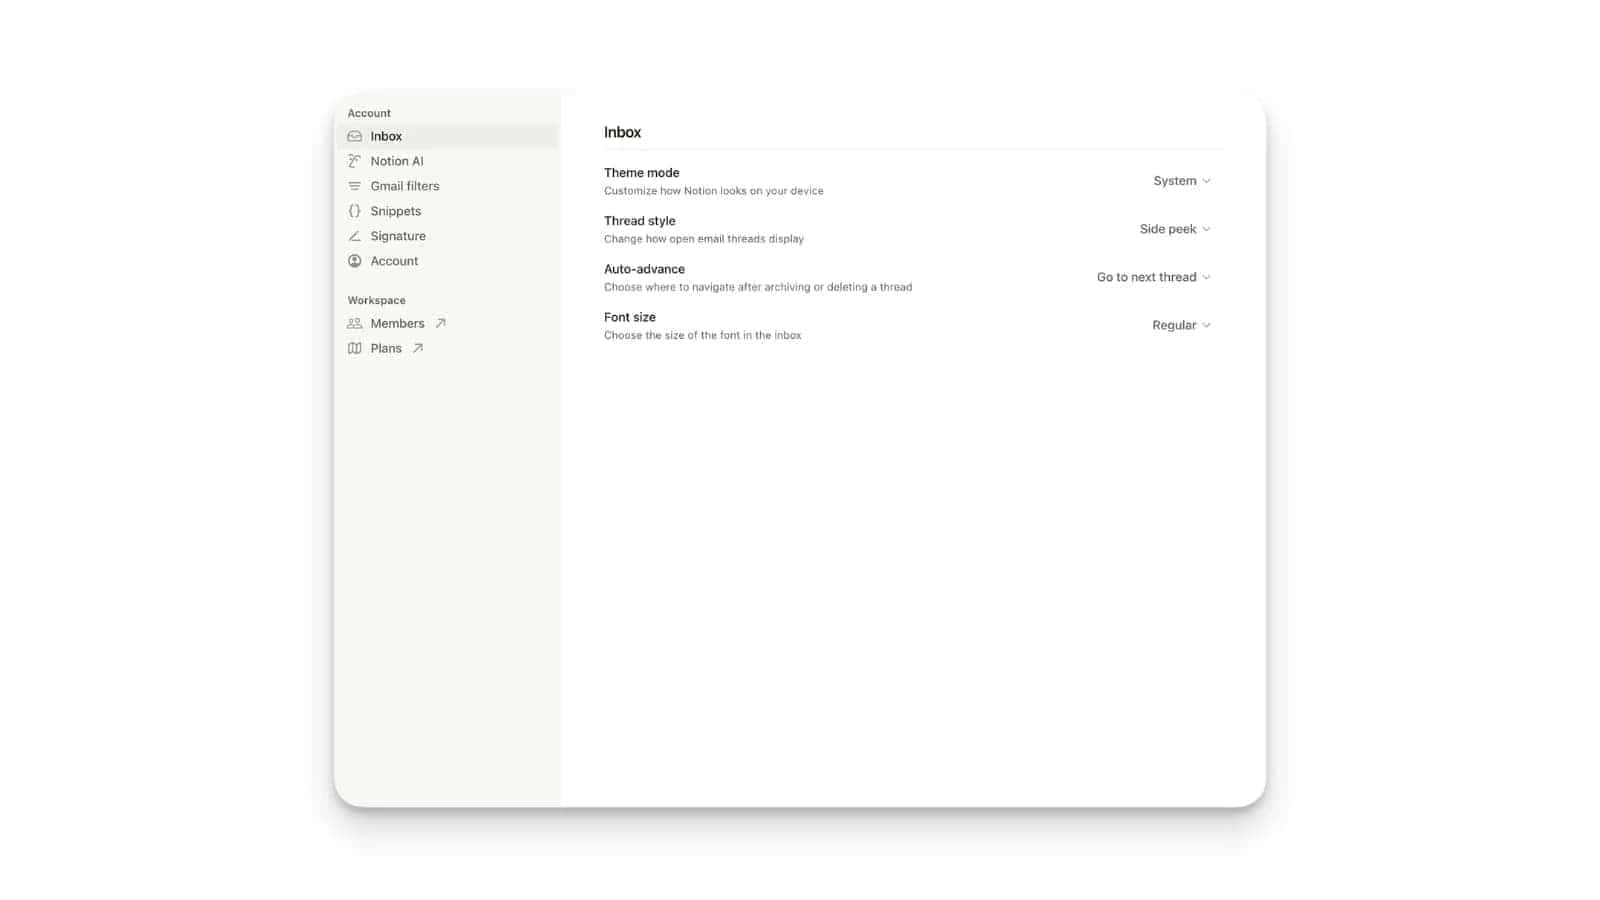
- Theme: Choose between dark mode and light mode. Many users prefer light mode for readability.
- Reading View: Adjust font size for comfortable reading. Experiment with thread styles (side peek vs. full-page view) to find what works best.
- Signature: Notion Mail automatically imports your Gmail signature. Ensure it’s properly configured for replies and forwards.
Step 3: Create Your First View in Notion Mail
Views are one of Notion Mail’s standout features. To create your first view:
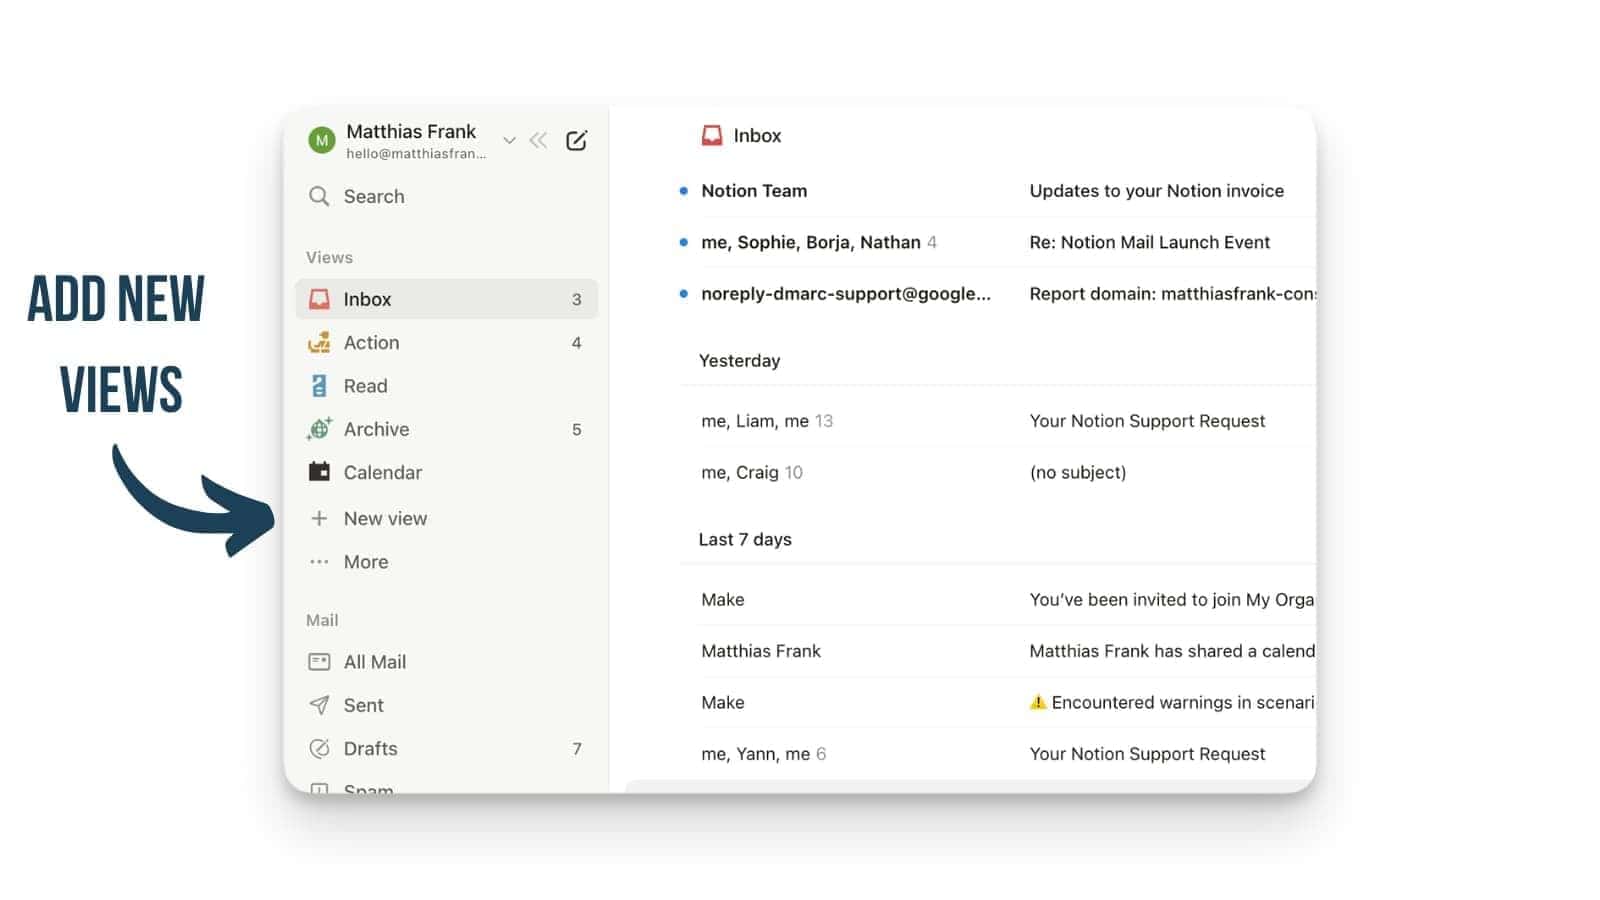
- Click on the “+” icon in the sidebar.
- Rename it (e.g., “Priority Senders”).
- Add filters—such as showing emails from specific senders or those containing attachments—to organise your inbox effectively.
Step 4: Revert Settings if Needed
If you don’t like how your inbox looks after applying filters or creating views
- Navigate to the filter section in your view settings.
- Remove unwanted filters or reset them entirely.
- Restore your default inbox view with just a few clicks.
What’s Missing (for Now) in Notion Mail
In case you missed it, you might describe me as something of a Notion fan. I think it’s a remarkable tool with some truly handy features – and, once armed with a few pointers, it’s a joy to use.
But that doesn’t mean it’s without its faults, specifically in the area of what it lacks. As someone who knows every square inch of Notion right down to its very bones, I have identified a few missing features that might matter depending on how you work. Here’s a quick look at what isn’t available yet, so you can decide whether Notion Mail is the right fit for your workflow today.
Notion Mail Unified Inbox
Notion Mail still doesn’t offer a unified inbox.
However, Notion has now added an account picker — similar to the one in the main Notion app — making it faster to switch between connected Gmail accounts. That said, you’ll still need to switch manually.
There’s no combined view showing emails from all accounts in one place, so if you rely on several inboxes each day, this may feel like an extra step until a proper unified view arrives.
Notion Mail Outlook Integration
At the moment, Notion Mail only supports Gmail. There’s no integration for Microsoft Outlook yet, although the Notion team has confirmed it’s planned for a future release.
At risk of stating the obvious, this is pretty important if your organisation relies heavily on Outlook or Microsoft 365.
Branded Notion Email Domains
This is still on the wishlist. Notion has hinted at offering branded email domains in the future, but for now, Notion Mail behaves as a Gmail-powered client rather than a standalone email provider.
This means:
❌Your email is still sent via Gmail
❌You cannot use @yourcompany.com hosted by Notion
❌Notion Mail acts more like Superhuman or Spark than a full email service
If having a company-branded email domain is essential, you’ll still need to manage that through your hosting provider or Google Workspace. Again, hardly the end of the world, but still worth pointing out for the avoidance of doubt.
Notion Mail App (Notion Mail iOS App & Notion Mail for Android)
Hurrah! The Notion Mail iOS app does exist now… but only for iPhone. There is no Notion Mail for Android yet. If you work across multiple devices or rely heavily on mobile email, this is a crucial consideration.
For now:
- iOS users can access Notion Mail through the Notion mobile app
- Android users must use a desktop or mobile browser to access
💡 Pro Tip: If you’re on Android, pin the Notion webpage to your home screen to create an app-like shortcut for quick access.
Lack of Synced Drafts
At the moment, Gmail drafts do not sync to Notion Mail, which means:
❌Drafts you start in Gmail won’t appear in Notion Mail
❌Drafts you start in Notion Mail won’t appear in Gmail
If you switch between devices or work across platforms, this limitation can feel a bit awkward, so keep your drafting workflow in one place for now.
Lack of Structured Data Sync
You can now push emails directly to Notion pages and databases (more on that below), but the sync doesn’t yet pull over structured data automatically. This means properties like sender email, date, or subject line won’t populate database fields on their own.
For now, you’ll need to either:
❌ Manually add structured data to your database entries
✅ Use Notion AI to extract and populate fields — it can read the content from Notion Mail blocks
If you need fully automated email-to-database pipelines with structured data, attachments, or task extraction, third-party tools are still your best option:
👉 3 Ways To Connect Mails to Notion
Organising Your Inbox With Notion Mail
At its core, Notion Mail is all about helping you take control of your inbox.
With typical features like views, filters, rules, and AI labels, it gives you the flexibility to organise emails in a fully customisable way.
Whether you’re sorting by sender, tagging emails with statuses, or letting AI handle the heavy lifting, Notion Mail makes it easy to create workflows that fit your needs perfectly.
But why even bother?
Well, statistics show that professionals spend (on average) more than two hours daily managing emails (Chui et al., 2012)1. That’s a full workday over the course of a week!
This clearly isn’t the best use of your precious time, so let’s take a look at how Notion Mail can help reduce this.
The Simple Formula for Inbox Organisation in Notion Mail
If you were to sum up inbox organisation for Notion Mail in one line, this would be it:
| Custom Views + Advanced Filters + Rules + AI Labels = Cool Workflows |
Here’s how they break down:
1. Views & Filters: Create custom views using filters like sender domain or unread status. For example:
- A view for “Important Clients” showing only emails from specific domains.
- A view for “Attachments” displaying emails with files attached.
2. Groups: Group emails based on properties. For example:
- Grouped by sender domain for client coordination.
- Grouped by unread/read status for task prioritisation.

3. Rules: Set up rules in Gmail (or Outlook once supported) to automatically apply labels based on criteria like subject lines or sender addresses.
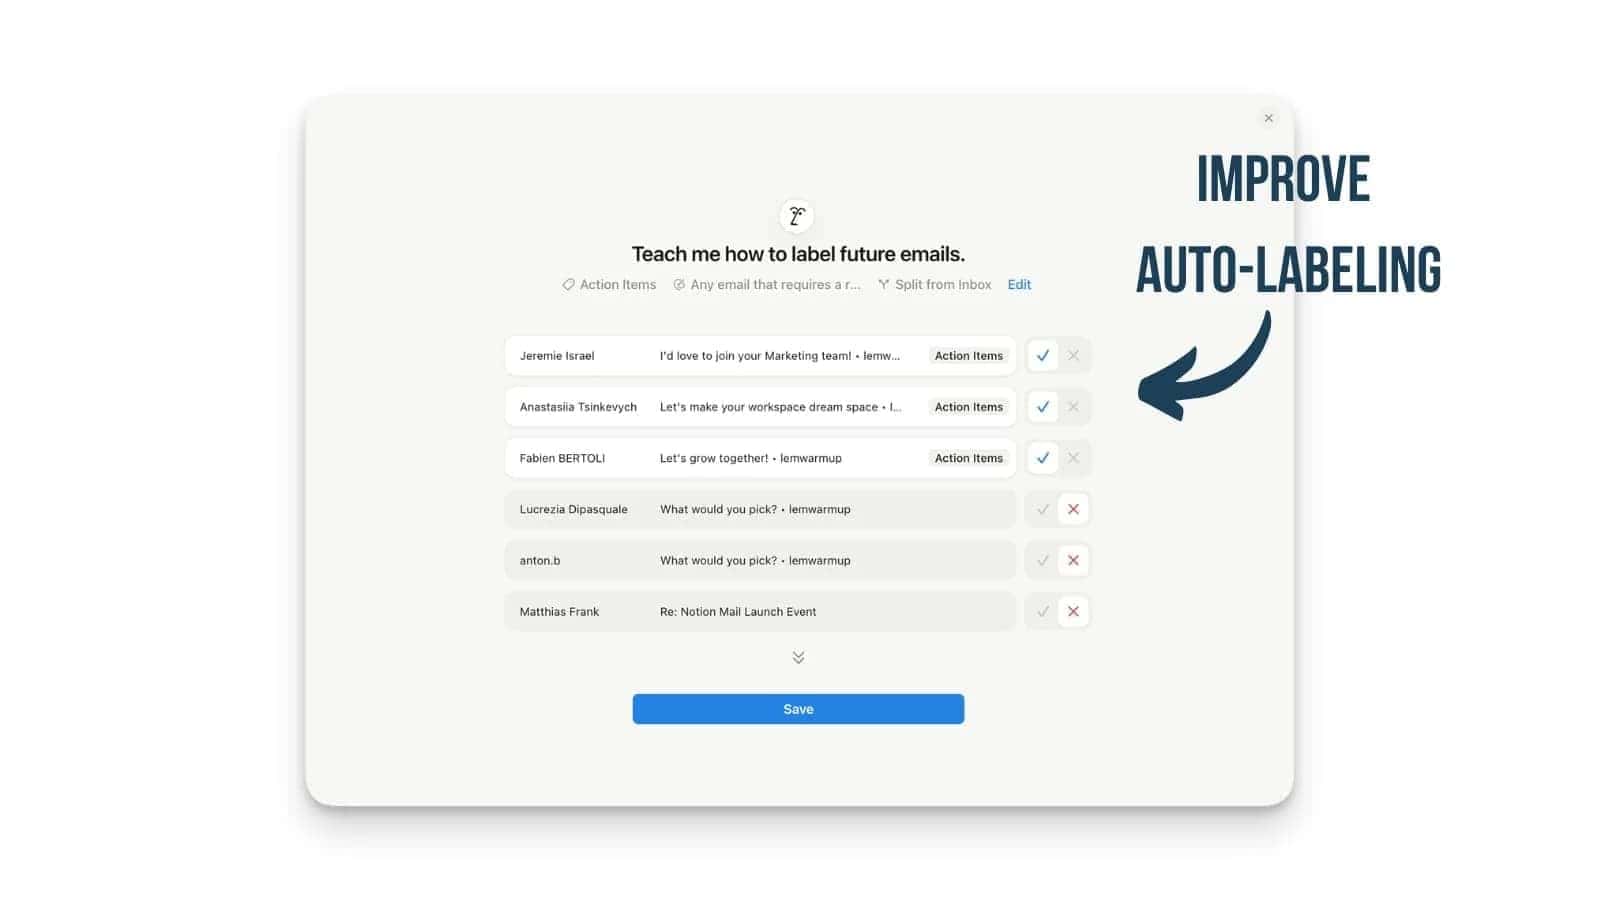
4. AI Labels: Use Notion AI to auto-label emails based on context:
- Emails containing phrases like “Action Required” or “Urgent” can be tagged automatically.
- AI learns from manual corrections over time to improve accuracy.
5. Status: Identify actionable emails (e.g., invoices) and sort them into dedicated views. Add statuses like “To Do,” “In Progress,” or “Completed” to track cycles for outreach campaigns or job applications. Can’t add icons manually, and renaming them causes their disappearance.

Practical Example: Workflow in Action
Looking at all these tools to organise your inbox can feel a bit overwhelming in theory, so here’s a specific example of how to use them to create a workflow in Notion Mail.
Let’s say you’re hiring for a new role and get a lot of job applications.
- Create an AI label to identify job applications reaching your inbox automatically.
- If necessary, add a rule to apply that label to any email with a specific subject line.
- Create a new view labeled “Job Applications.”
- Apply filters to the new view to show only emails that contain your new label.
- Add a status property with cycles such as “Applied,” “Interview Scheduled,” and “Offer Received.”
With just a few steps, you now have a streamlined project management setup directly in your email client.
Next, you can then integrate these individual workflows into the larger context of an operating system for your team.
Notion Mail AI Labels vs Rules: When To Use Which One?
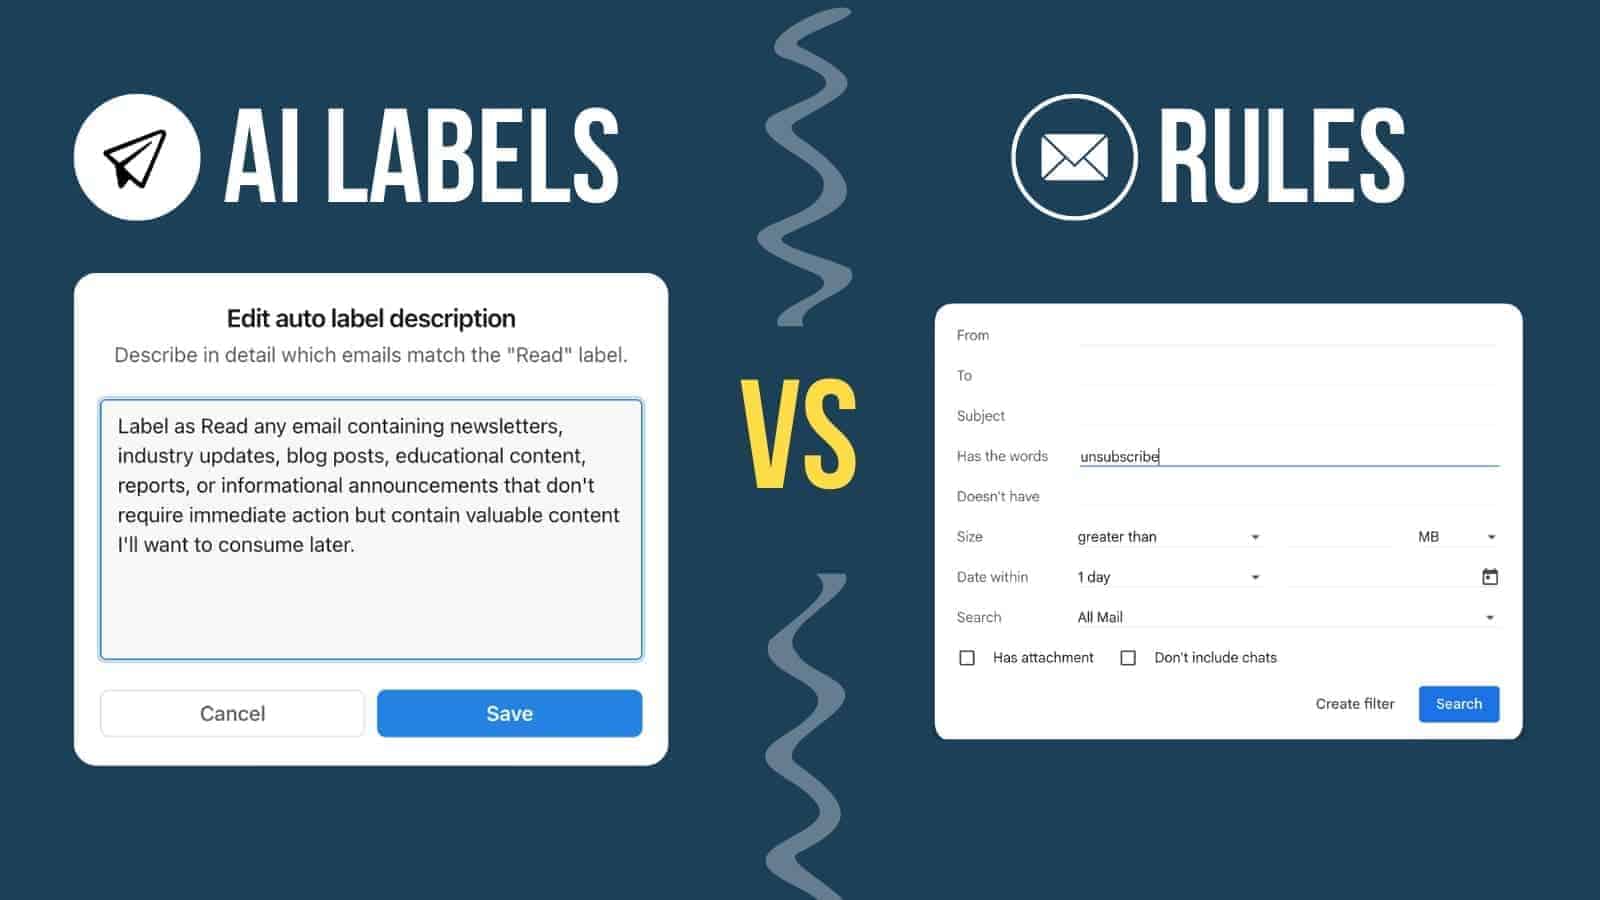
If you want to keep your inbox clean without spending an ungodly number of hours sorting emails manually, you’ll want to understand how Notion Mail AI labels and rules work. Together, they form the backbone of a smart email organisation inside Notion Mail, but they behave very differently3.
Many people report spending roughly one-third of their workweek4 on email-related tasks, which suggests a large share of emails aren’t urgent or action-worthy – and that’s perfect territory for AI labels.
Below is a simple breakdown to help you choose the right tool for the job 👇
Notion Mail Rules (When You Need Precision)
Rules are perfect when something in your inbox always follows a predictable pattern.
A Rule triggers when very specific conditions are met, such as:
- The sender is always the same
- The subject always contains the same phrase
- The message type never changes
- You always want the same action to happen
You might think of Rules as rigid, reliable, no-nonsense instructions.
📌 Example: Daily Report Emails
I receive several DMARC reports every single day for my Notion newsletter. These messages are irrelevant 99 percent of the time.
A simple Notion Mail Rule can:
- Skip the inbox
- Move these emails into a folder/view I can check later
- Keep them out of sight without deleting anything
If you want my advice (that’s why you’re here, after all), these rules perform best when the input is clear, and the desired outcome is always the same.
Notion Mail AI Labels (When Things Are Messier)
AI labels are best when the criteria are soft, subjective, or inconsistent. They’re ideal for patterns that humans can recognise intuitively, but would be an absolute nightmare to write Rules for.
Let me give you a few great examples:
- “travel emails” (flights, hotels, confirmations)
- “receipts”
- “updates from tools I use often”
- “things I want to read later”
Now, you could try writing Rules for these, but you would constantly miss edge cases.
AI labels notice patterns across:
- Tone
- Content
- Phrasing
- Intent
📌 Example: Travel Info
You might want all booking-related emails grouped together. The problem is that airlines, hotels, third-party portals, small B&Bs, and Airbnb all send wildly different email formats.
AI labels catch these automatically and become remarkably accurate over time.
Rules vs AI Labels: A Simple Way To Picture It
📮 Rules = The Strict Postman
They deliver mail only when the label matches exactly what they expect.
🧑💼 AI Labels = The Trained Secretary
They understand your preferences, adapt over time, and can make intelligent guesses about where things belong.
Neither replaces the other; they’re designed to work together.
Combining Notion Mail Rules + AI Labels
Your most powerful workflows emerge from using both tools simultaneously.
💡 Example: Newsletters
For years, I used one simple Rule:
“If the email contains the word unsubscribe, move it to my Notion Newsletter folder.”
It’s simple, and it works. After all, most newsletters include that legally required link.
But, as you might have suspected, there is a catch….
Not all newsletters follow the rules. Some slip through.
That’s where Notion Mail AI labels are just so useful:
- The Rule catches 90 percent automatically
- The AI label catches the rogue 10 percent based on the content itself
Combined, they create a near-perfect filtering system.
💡 Pro Tip: Start with simple Rules first. Then add AI labels to catch everything the Rules weren’t built for.
Your Starting Setup for Notion Mail: The TARA System
Notion Mail is not just another email client—it’s a tool designed to transform how you manage your inbox. But that comes with a challenge. Unlike traditional email clients that have a determined workflow and ask you to simply apply it, Notion Mail puts you in control.
And while that means you can do a lot more with it, it also requires a bit of additional work for the initial setup.
To get you over this initial hump, I’ve developed a simple Beginner Setup for Notion Mail. This setup is inspired by proven productivity frameworks like GTD and PARA and is the perfect starting point to help you understand what Notion Mail can do.
Ladies and Gentlemen, may I introduce to you the magnificent TARA system.
TARA stands for Triage, Actions, Read, Archive, and offers a practical framework to organise your inbox efficiently. What’s more, it’s really quite brilliant.
What Is the TARA System?
The TARA system categorises emails into four distinct groups:
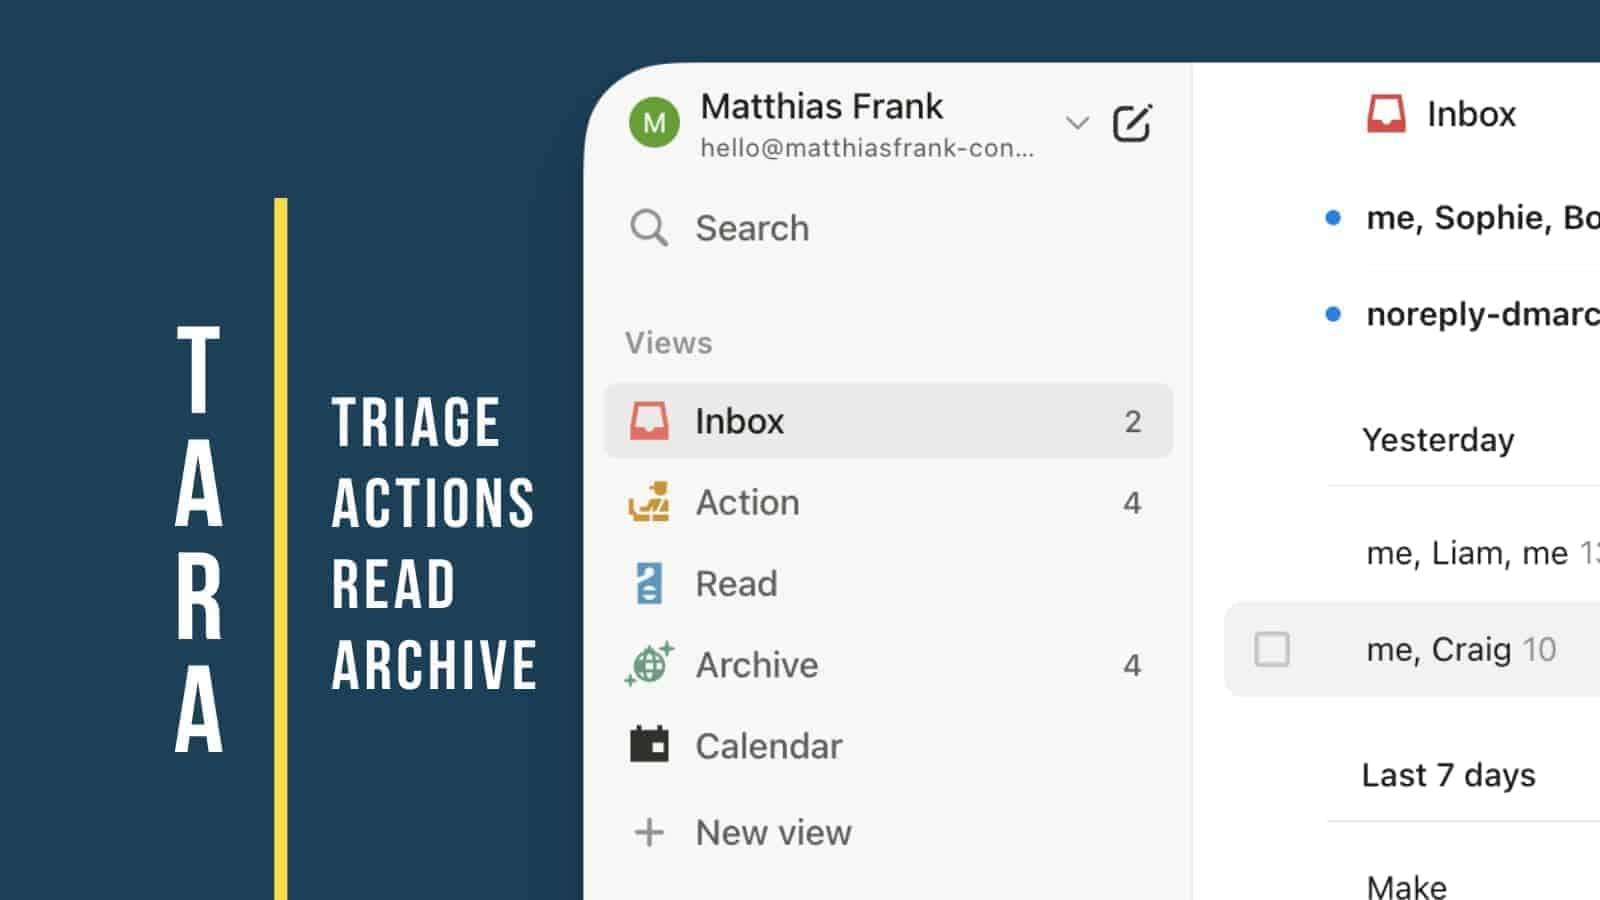
Triage (Inbox)
- What kind of emails do you get? What does your inbox look like?
Take Actions (Action Emails)
- Which emails typically require you to actually do something about them? Whether that’s replying to them or triggering other actions in your workflows?
Read Later (Content Emails)
- Which emails fall into the content category, i.e., you want to read them and get the information similar to a magazine or article on the internet?
Archive (Reference Emails)
- Which emails do you need to keep but should be archived and sorted similarly to a library for later reference?
But TARA isn’t meant to be the endpoint of your system. It’s the start, and once you understand the underlying principles, you can easily turn TARA into TARA+ and expand it with custom workflow views for your needs.
How to Implement the Tara System in Notion Mail
Setting up Notion Mail and the TARA system is simple:
- Set up your driver labels
- Create your views
- Add custom status properties
Set up your driver labels
TARA relies on three labels to categorise your emails and take them out of the triage place (aka your inbox).
I call these labels “driver labels” since their main purpose is to move emails into the specific views. Kind of like tiny chauffeurs who pick up guests and bring them to the right location.
(The idea for this comes from Jason Resnick and his organisational system for Email Marketing in ConvertKit)
The driver labels for TARA are:
- Action
- Read
- Archive System
🌍 Real-world insights: Why do we call it “Archive System” rather than Archive? Since “Archive” is already a system tag used by Google, you need a different variation.
How to apply your driver labels?
In Notion Mail, you have a few ways to apply labels to an email.
The easiest (and manual) way? Hover over any email and click into the label section on the right side of your screen.
Alternatively, you can also press the shortcut “L” to bring up the label selection.
But of course, you want to avoid manual work as much as possible.
To automatically apply labels, you can either use good old Gmail rules or leverage Notion Mail’s AI Label Feature.
👉Here is more context on when to use AI labels vs rules in Notion Mail.
Build your views
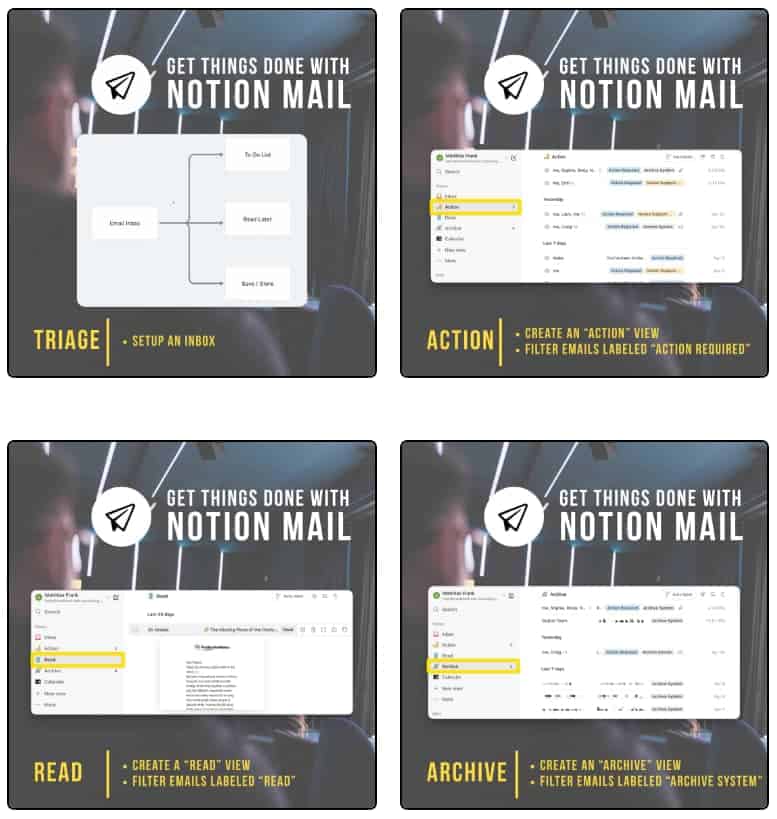
Add Status properties
Some mails can’t be ticked off right away, but expect you to take action. This is when your inbox becomes a task manager.
So far, your mail app probably wasn’t intended to turn emails into tasks and manage your progress. Enter custom status properties.
These statuses can be visualised with colored icons before the task name or used to group your views according to the progress stages.
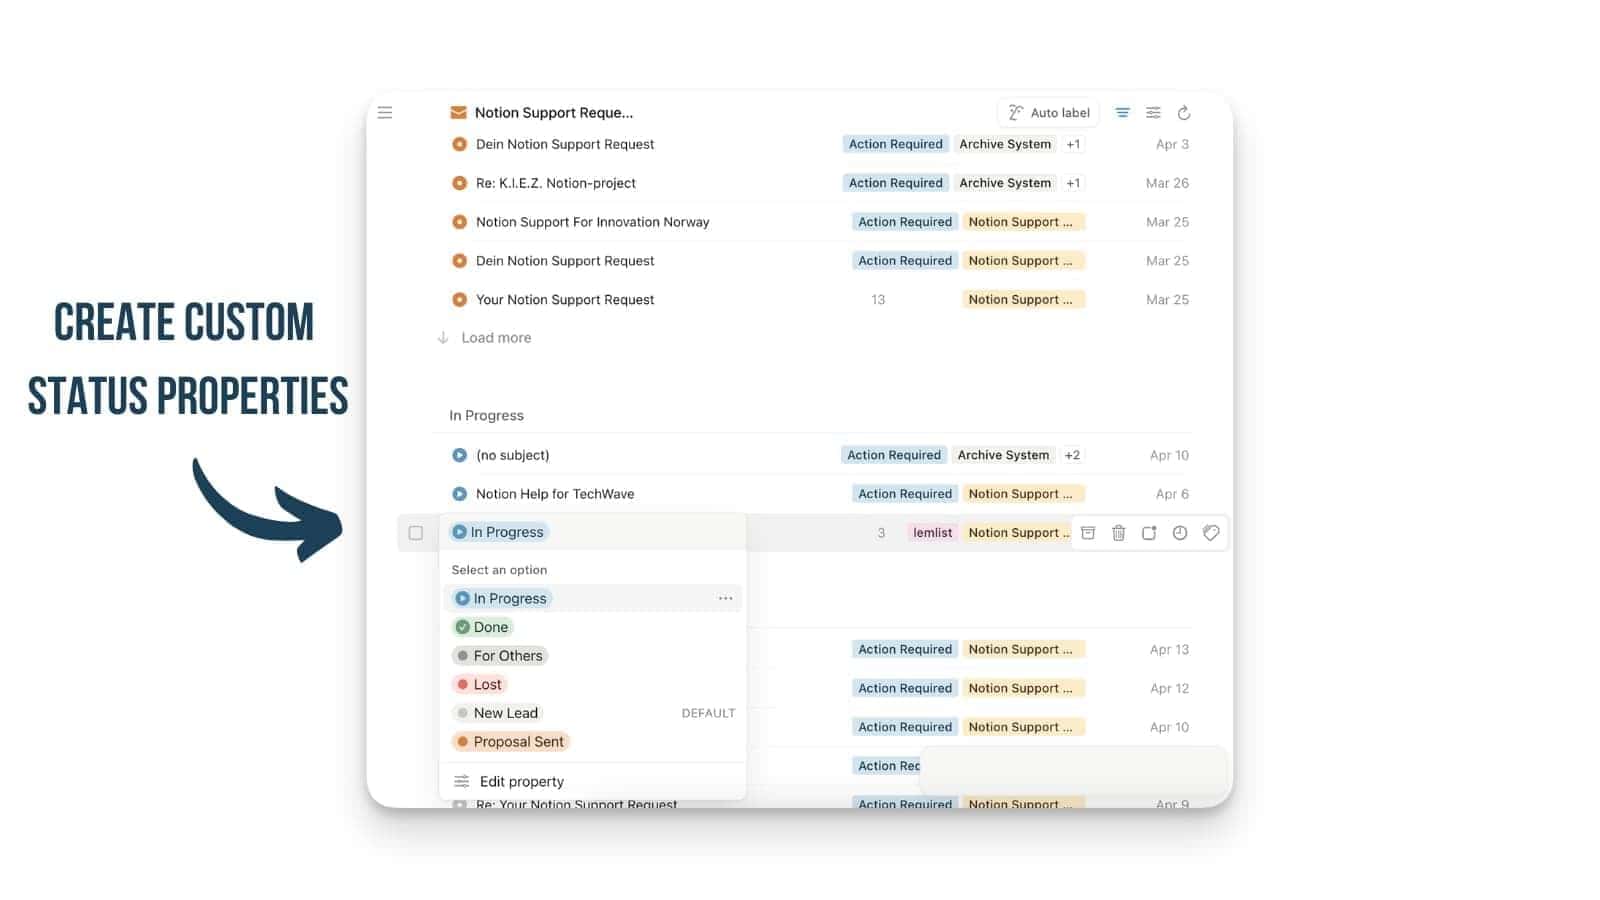
The beauty of Notion Mail is that it doesn’t give you one preset Status property to choose from. Instead, you have the flexibility to create multiple status properties with unique stages. For example:
- Reading Status: “Unread”, “Reading”, “Read”
- Action Status: “Untouched”, “Editing”, “Completed”
- Lead Status: “Proposal Sent”, “In Progress”, “New Lead”, “For others”, “Lost”
Why TARA Works
Unlike traditional email systems that rely on folders or flags, TARA leverages Notion Mail’s database functionality to create dynamic workflows. This makes it easier to prioritise tasks, track cycles (e.g., job applications or outreach), and maintain a clutter-free inbox.
💡 Pro Tip: Start with the basic TARA setup and expand it by adding views for specific workflows like travel planning, invoices, or client coordination.
Writing Emails in Notion Mail
In this section, we’ll cover everything you need to know about writing emails efficiently with Notion Mail, plus all the little tips and tricks to become a Notion Mail power user.
Notion Block Editor
Notion Mail brings the familiar block editor from Notion into your email composition process. This means you can format emails with:
- Headings: Use /h1, /h2, or /h3 for structured content.
- Callouts: Highlight key points with callout blocks.
- Lists: Create bullet points or checklists directly in your email.
Snippets: Streamlining Repetitive Responses
There is a Notion Mail version of templates called “Snippets”. Text snippets allow you to create your own custom slash commands (which we’ll hopefully also see in Notion itself at some point), including custom merge tags, aka variables.
Snippets are reusable text blocks that save time when writing frequent responses. They go beyond basic templates by incorporating dynamic data and placeholders.
Dynamic Data
Snippets can pull information dynamically from your email context or database properties. For example:
Hi {{Name}},

Thank you for reaching out! I'd be happy to assist you with {{Topic}}. Let me know if there's anything else I can help you with.

Best regards,
{{Your Name}}
When you use this snippet, placeholders like {{Name}} and {{Topic}} are automatically filled based on the recipient’s details or your input.
Placeholders
For situations where dynamic data isn’t available, placeholders let you insert custom values while composing an email. For example:
Hi {{RecipientName}},

I'd love to join your podcast titled "{{PodcastName}}." Please let me know next steps!

Best regards,
{{Your Name}}
You can input the PodcastName during composition without manually editing the snippet.
Draft Notion Mails Using AI
Stuck on a reply? Click the AI button and say:
“Write a friendly ‘out of office’ reply that mentions my vacation to Bali.”
It’ll even pull info from your Notion workspace (like your calendar or project docs) to make replies smarter.
You can also ask Notion AI to base the draft on existing content in Notion:
- Chain Context: The AI analyses previous email threads to craft relevant replies automatically.
- Notion Context: You can reference pages from your Notion workspace (e.g., product documentation) while drafting an email.
Simply prompt the AI with instructions like:
“Draft a reply explaining our ordering process based on the attached Notion page.”
This feature is particularly useful for customer support teams or professionals handling repetitive queries.
How Does Notion Mail Integrate With My Notion Workspace?
Notion Mail isn’t just an inbox bolted onto Notion. It uses the same editor, the same shortcuts, and the same workflows you already rely on, which means you can write and organise emails exactly the way you write and organise everything else in your workspace.
If you’re already using Notion to manage projects, tasks, content, or clients, this integration lets you work in one place without constantly switching tools.
👉 You can even pair Notion Mail with your workspace upgrades for workflows
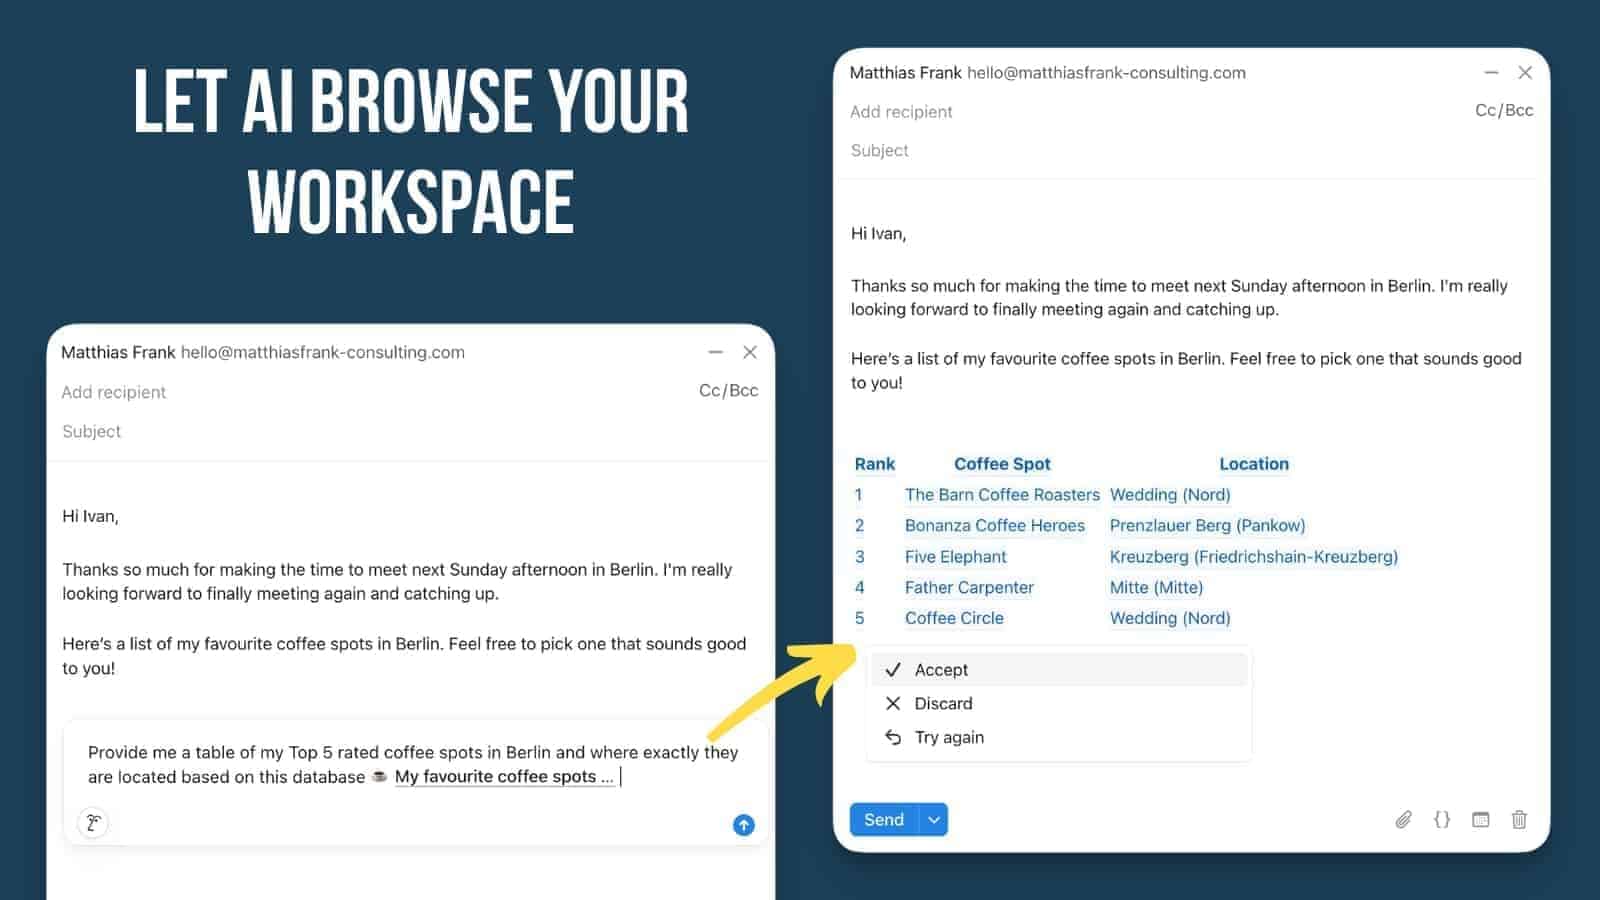
One of the most powerful features is the ability to @tag pages directly inside email drafts.
- Planning a project update? Tag the project page
- Sending a client summary? Pull in the CRM page

And if you have Notion AI enabled on at least one workspace, you can ask it to pull in data from your setup, such as a table of your top coffee spots in Berlin (if that’s the kind of thing you track in Notion ….no judgment).
💡 Pro Tip: Think of your inbox as another workspace surface. The more you link pages, properties, and AI prompts, the more your email becomes part of your system.
Pushing Emails to Notion
One of the most requested features has finally arrived: you can now push emails directly from Notion Mail into your Notion workspace. This creates a much tighter connection between your inbox and your projects, clients, or task management systems.
There are two ways to do this:
Push Individual Emails Manually
Open any email in Notion Mail and click the Notion icon in the top right corner. From there, you can choose to push the email to:
- A specific Notion page (as a subpage)
- A Notion database (as a new entry)
When you push an email, Notion creates a new subpage containing a unique Notion Mail block. This block renders a preview of the email, including the sender, date, and subject line. You can click on the block to jump directly back into that specific email in Notion Mail.
Auto-Push Emails From a View
If you want emails to flow into Notion automatically, you can set this up at the view level:
- Go to any view you’ve created in Notion Mail (e.g., “Clients” or “Invoices”)
- Open the view settings
- Dedicate a specific Notion database
From that point on, all new incoming emails that match that view will be pushed to the database automatically. No manual action required.
What You Should Know
While this feature is a huge step forward, there are a few limitations to keep in mind:
❌ No structured data sync (yet): The push doesn’t automatically populate database properties like sender email, date, or subject. You’ll need to add this information manually — or use Notion AI, which can access the content inside Notion Mail blocks.
❌ Attachments aren’t fully supported: Attachments don’t come over properly and aren’t previewed in Notion. You’ll still need to access them in the original email.
✅ Email chains are tracked: If additional emails arrive in the same thread after the first sync, they get added to the same Notion entry. So you’ll have one database entry (or page) per email chain, not per individual email.
💡 Pro Tip: Combine this with your TARA views. Set up your “Action” view to auto-push to a task database, and emails become trackable tasks without lifting a finger.
Classic Notion Features in Your Inbox
One of the things people love most about Notion is the slash command system — and yes, it’s all here in Notion Mail.
You can format emails using:
- headings (/h1)
- callouts
- quotes
- checklists
- dividers
- toggles
All inside your email editor, without fighting clunky formatting menus like you might in Apple Mail or Gmail.
If you love Notion’s editor, writing emails inside Notion Mail feels instantly natural.
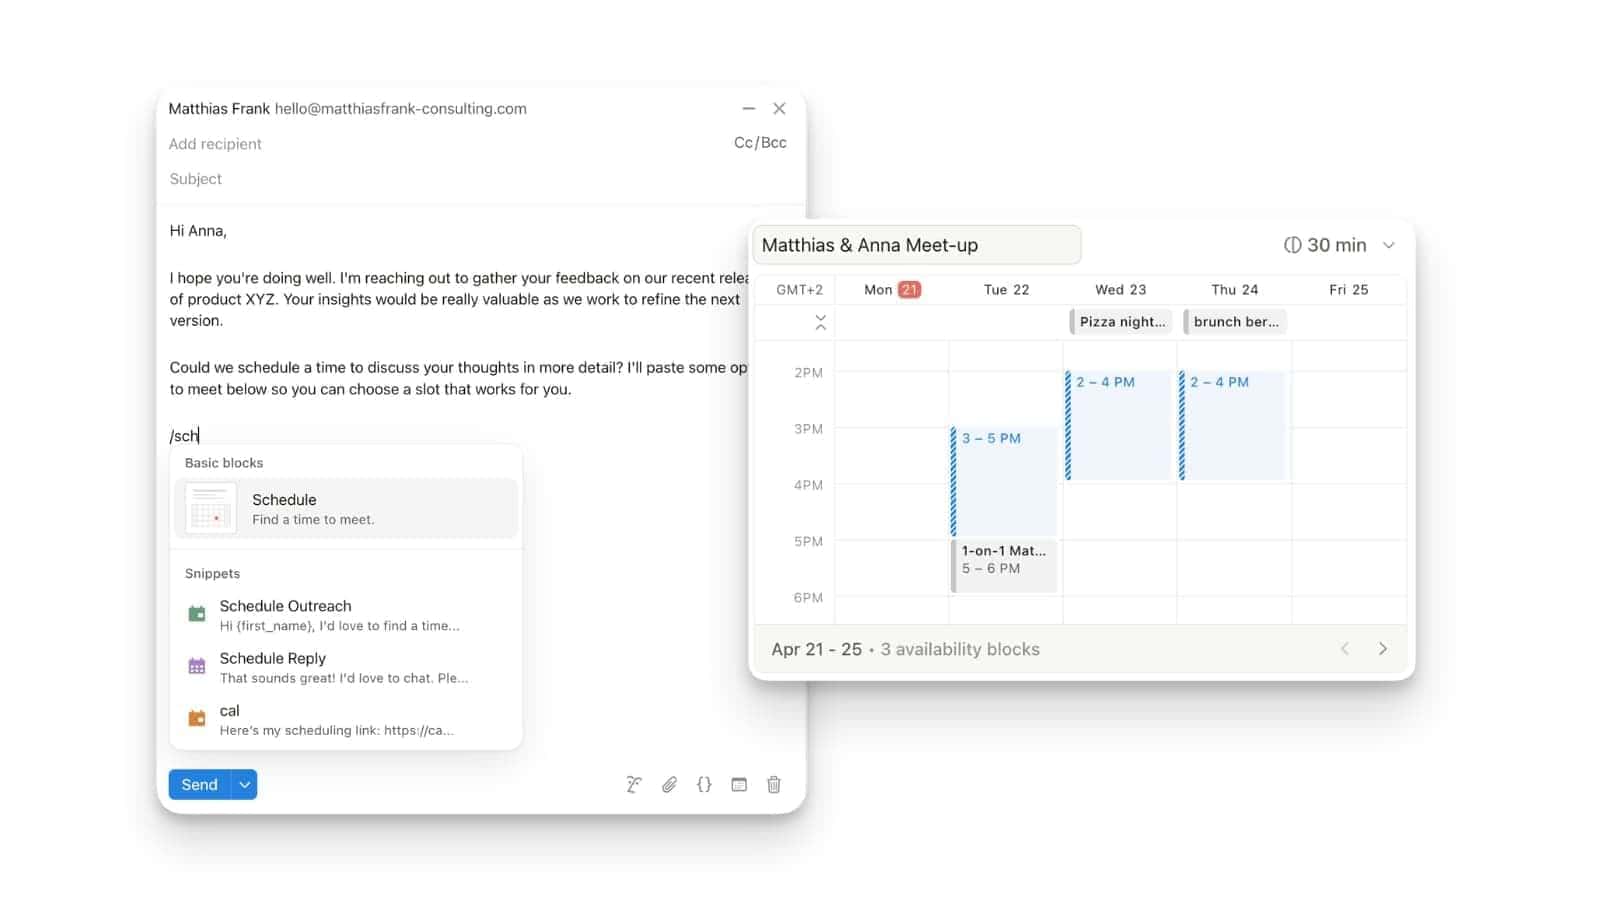
How Does Notion Mail Work Together With Notion Calendar?
Notion Mail already works neatly with Notion Calendar, which means you can schedule meetings without hopping between tools. This is really quite handy if you’d rather keep everything inside one focused workflow than bounce around like a stressed-out browser tab.
👉 If you’re new to Notion Calendar, you can explore it here
Shortcuts for Notion Mail
Here are my top picks for shortcuts in Notion Mail.
Learn These Notion Mail Shortcuts First:
C: Compose a new email
R: Reply to an email
L: Apply labels quickly
U: Mark an email as unread
Cmd/Ctrl + K: Access the command menu for quick actions
Arrows Up / Down: Navigate through emails
💡 Pro Tip: In Notion Mail, you don’t even need to select an email to trigger a shortcut. It’s enough to hover over it or navigate through them with arrows and then press the shortcut key.
Action Shortcuts for Notion Mail
C: Compose a new email
R: Reply to an email
E: Archive an email
U: Mark an email as unread
L: Apply labels quickly
Cmd/Ctrl + P: Open the search bar to find emails or views instantly
Cmd/Ctrl + K: Access the command menu for quick actions
Navigation Shortcuts for Notion Mail
Navigate between sections effortlessly:
Press G + I for Inbox.
Press G + A for All Mail.
Press G + T for Sent Mail.
Press G + D for Drafts.
These shortcuts help you move through your inbox faster without relying on mouse clicks.
Tips & Tricks for Notion Mail
Here are some expert tips to make the most of Notion Mail:
- Customise Hover Actions:
- Tailor quick-action buttons (e.g., archive, label) based on your workflow needs
- Add reminders directly from hover actions to revisit important emails later
- Use AI Labels Wisely:
- Train Notion AI by manually correcting mislabeled emails. Over time, it learns your preferences and improves accuracy
- Combine AI labeling with manual rules for edge cases (e.g., niche newsletters)
- Integrate Snippets into Workflows:
- Use snippets not just for responses but also for internal notes or recurring tasks like follow-ups.
Need A Little Help?
I hope you enjoyed this Notion Mail tutorial – that’s pretty much all of the essential steps and features nailed, leaving you free to use the platform with cheery confidence.
If you want to do even more with Notion, here are a few helpful next steps for your consideration:
- Explore more of my Notion workflows, systems, and tutorials
- Try setting up the TARA system inside your own inbox
- Experiment with Notion Calendar and /schedule to streamline your meetings
- Dive deeper into Notion AI to automate more of your email work
👉You can see how to do those things and more, right here: Learn Notion
FAQs
Which Emails Can I Use With Notion Mail?
Notion Mail currently supports Gmail accounts, including both personal Gmail and Google Workspace. You can connect multiple Gmail accounts if you need to, although each inbox is viewed separately because a unified inbox isn’t available yet.
What Makes Notion Mail Different?
Notion Mail works like an extension of your Notion workspace. You can format emails using the same editor, use slash commands, add callouts and headings, and even @tag pages from your workspace. It also lets you create custom views, filters, and workflows, making your inbox behave more like a Notion database than a traditional mail app.
How Can I Get Access to Notion Mail?
Notion Mail is rolling out gradually. You can check whether it’s available to you by visiting mail.notion.so or opening Notion Calendar. If your account has access, you’ll be prompted to connect your Gmail account and start using Notion Mail.
Can I Use Notion Mail on My Phone or Tablet?
Yes. Notion Mail is now available on iOS devices through the Notion Calendar app, so you can read and send emails directly from your iPhone or iPad. An Android version has not been released yet, so mobile access is currently limited to iOS.
Is Notion Mail Free?
Yes. Notion Mail is free to use and available to all Notion users. You don’t need a paid Notion plan to access it, although features like Notion AI still require an AI add-on.
Does Notion Mail Integrate With Notion?
Yes – and the integration just got a major upgrade.
Beyond using the same editor and @tagging Notion pages in drafts, you can now push emails directly to Notion.
Either manually (per email) or automatically (per view).
This creates a Notion Mail block that previews the email and links back to it. Structured data like sender or subject doesn’t sync to properties yet, but Notion AI can extract it from the block.
Does Notion Mail Integrate With Notion Calendar?
Yes. Notion Mail connects with Notion Calendar, allowing you to insert scheduling links directly from your calendar. Typing /schedule inside an email draft lets you select available times and generate a booking link without leaving your inbox.
What Are The Main Features Of Notion Mail?
Notion Mail gives you a full inbox experience directly inside Notion. You can read, send, and organise emails using the same editor, shortcuts, and workflows you use across your workspace. Core features include connected Gmail support, AI-powered labels, custom views, status properties, scheduling links through Notion Calendar, the ability to push emails directly to Notion pages or databases, and seamless integration with your existing pages and databases.
Sources
- https://www.sciencedirect.com/science/article/abs/pii/S0747563214002039
- https://generativeai.pub/exploring-notion-mail-features-benefits-and-drawbacks-de2c8c99dd1f
- https://techcrunch.com/2025/04/15/notion-releases-its-ai-driven-email-inbox/
- https://www.microsoft.com/en-us/research/blog/email-overload-using-machine-learning-to-manage-messages-commitments/